CentOS 7.X 静默安装Oracle 12C数据库
环境
System : CentOS 7.x
jrxxfwb-zrgldb://> uname -a

Linux jrxxfwb-zrgldb 3.10.0-693.17.1.el7.x86_64 #1 SMP Thu Jan 25 20:13:58 UTC 2018 x86_64 x86_64 x86_64 GNU/Linux
SELINUX: 关闭
FIREWALL:关闭
systemctl stop firewalld.service --关闭防火墙

systemctl disable firewalld.service -- 禁止防火墙开机启动

systemctl status firewalld.service  -- 查看防火墙状态
操作步骤
A、环境准备
B、用户组创建
C、修改系统内核参数
D、修改用户配置
E、数据库应用安装
F、数据库初始化
A、环境准备
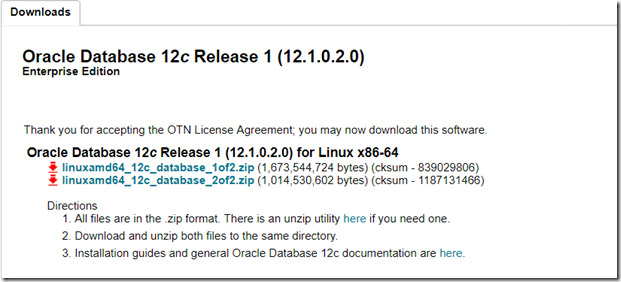
1、选择Oracle安装包,直接去官网选择自己需要的版本(需要注册oracle账号),如果下载不了的话也可以联系我度盘共享。
地址:https://www.oracle.com/technetwork/cn/database/enterprise-edition/downloads/index.html
2、使用root用户登录,进行系统基础环境准备。
执行以下命令:
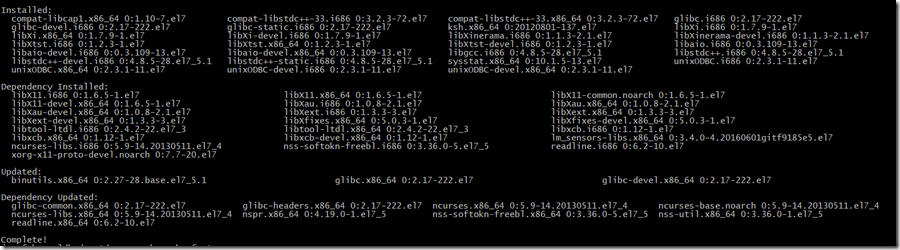
yum -y install binutils compat-libcap1 compat-libstdc++-33 compat-libstdc++-33*i686 compat-libstdc++-33*.devel compat-libstdc++-33 compat-libstdc++-33*.devel gcc gcc-c++ glibc glibc*.i686 glibc-devel glibc-devel*.i686 ksh libaio libaio*.i686 libaio-devel libaio-devel*.devel libgcc libgcc*.i686 libstdc++ libstdc++*.i686 libstdc++-devel libstdc++-devel*.devel libXi libXi*.i686 libXtst libXtst*.i686 make sysstat unixODBC unixODBC*.i686 unixODBC-devel unixODBC-devel*.i686静待系统进行软件更新安装,成功后如下:
执行检查命令:
rpm -q binutils compat-libcap1 compat-libstdc++-33 gcc gcc-c++ glibc glibc-devel ksh libaio libaio-devel libgcc libstdc++ libstdc++-devel libXi libXtst make sysstat unixODBC unixODBC-devel
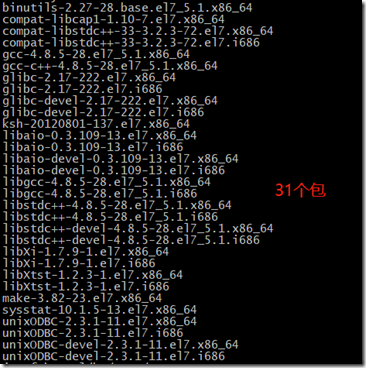
5
B、用户组创建
1、创建 oinstall 和 dba 组
zrgldb:/root/> groupadd oinstall

zrgldb:/root/> groupadd dba
2、创建 oracle 用户,设置密码
jrxxfwb-zrgldb:/root/> useradd -g oinstall -G dba oracle

jrxxfwb-zrgldb:/root/> passwd oracle

Changing password for user oracle.

New password:

BAD PASSWORD: it is based on a dictionary word

BAD PASSWORD: is too simple

Retype new password:

BAD PASSWORD: The password is shorter than 8 characters

Retype new password:

passwd: all authentication tokens updated successfully.
3、查看用户 id oracle
zrgldb:/root/> id oracle

uid=1004(oracle) gid=1004(oinstall) groups=1004(oinstall),1005(dba)
C、修改系统内核参数
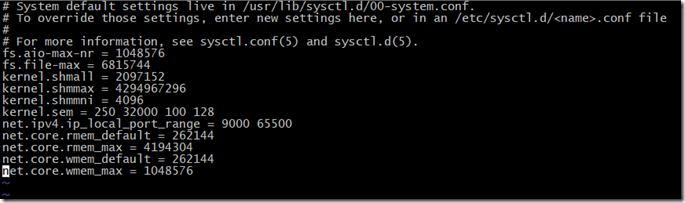
1、修改系统配置: vi /etc/sysctl.conf ,增加如下内容:
fs.aio-max-nr = 1048576

fs.file-max = 6815744

# shmall 是全部允许使用的共享内存大小,shmmax 是单个段允许使用的大小。这两个可以设置为内存的 90%。例如 16G 内存,16*1024*1024*1024*90% = 15461882265,shmall 的大小为 15461882265/4k(getconf PAGESIZE可得到) = 3774873# 因为本机是32G内存,所以shmmax 是 32*1024*1024*1024*90% = 30,923,764,531,shmall 是 30,923,764,531/4096 = 7,549,747kernel.shmmax = 30923764531kernel.shmall = 7549747

kernel.shmmni = 4096

kernel.sem = 250 32000 100 128

net.ipv4.ip_local_port_range = 9000 65500

net.core.rmem_default = 262144

net.core.rmem_max = 4194304

net.core.wmem_default = 262144

net.core.wmem_max = 1048576
结果如下:
2、使配置生效: sysctl -p

D、修改用户配置
1、修改用户限制。
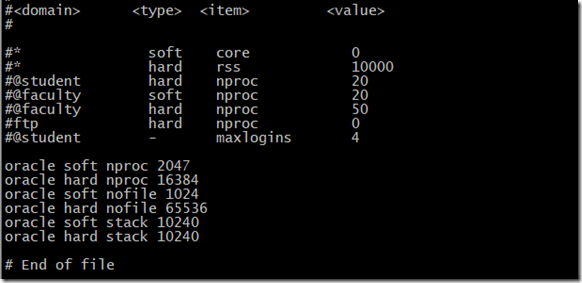
打开文件: vi /etc/security/limits.conf
在文件末尾添加如下6行内容:
oracle soft nproc 2047

oracle hard nproc 16384

oracle soft nofile 1024

oracle hard nofile 65536

oracle soft stack 10240

oracle hard stack 10240
最终结果如图:
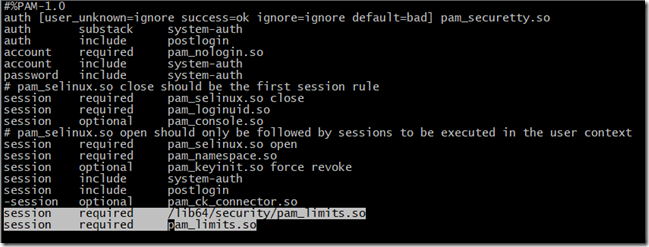
2、修改用户登录库文件引用
打开系统文件: vi /etc/pam.d/login
在文件末尾添加如下2行内容:
session    required     /lib64/security/pam_limits.so

session    required     pam_limits.so
最终结果如图:
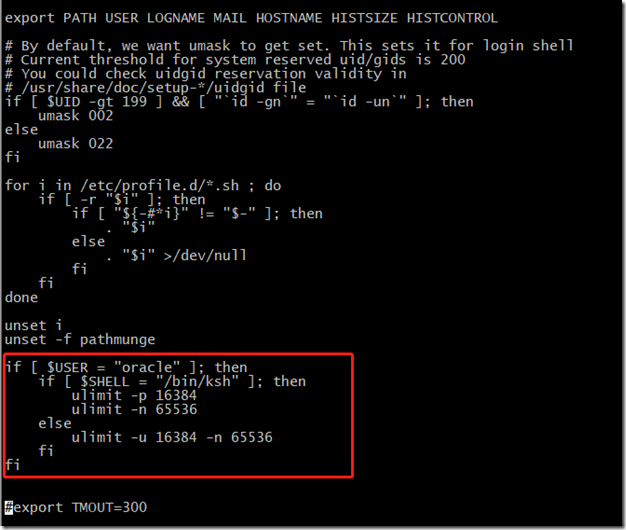
3、修改用户登录环境变量
打开系统文件: vi /etc/profile
在文件末尾添加如下内容:
if [ $USER = "oracle" ]; then

    if [ $SHELL = "/bin/ksh" ]; then

        ulimit -p 16384

        ulimit -n 65536

    else

        ulimit -u 16384 -n 65536

    fi

fi
最终结果如图:
退出编辑状态,使修改的文件生效:
source /etc/profile4、创建安装目录,配置安装目录权限。
mkdir -p /usr/app/
chown -R oracle:oinstall /usr/app/
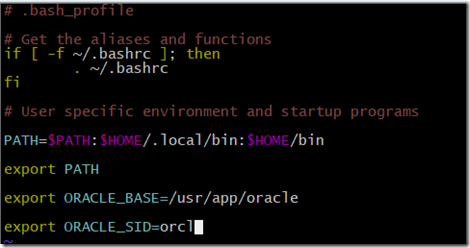
chmod -R 775 /usr/app/5、配置 Oracle 用户环境变量
切换用户: su – oracle
编辑环境变量: vi .bash_profile
新增配置如下:
export ORACLE_BASE=/usr/app/oracle

export ORACLE_SID=orcl

export PS1=`uname -n`':$PWD/> '
生效配置文件: source .bash_profile
E、数据库应用安装
1、使用 oracle 用户,创建数据库安装配置文件夹 etc 。
zrgldb://> su - oraclezrgldb:/home/oracle/> mkdir etc2、上传安装文件到 oracle 用户目录下,并解压文件。
执行命令:
zrgldb:/home/oracle/> unzip linuxamd64_12102_database_1of2.zipzrgldb:/home/oracle/> unzip linuxamd64_12102_database_2of2.zip解压完成会在用户目录下出现一个 database 文件夹,如下:
3、复制 Oracle配置文件到 etc 目录下,并修改配置文件权限
zrgldb:/home/oracle/> cp ./database/response/* ./etc/zrgldb:/home/oracle/> chmod 700 ./etc/*.rsp复制后的etc目录文件如下:
4、修改静默安装配置文件 db_install.rsp
vi ./etc/db_install.rsp
 # 修改文件配置
#-------------------------------------------------------------------------------
# Specify the installation option.
# It can be one of the following:
# - INSTALL_DB_SWONLY
# - INSTALL_DB_AND_CONFIG
# - UPGRADE_DB
#-------------------------------------------------------------------------------
oracle.install.option=INSTALL_DB_SWONLY #-------------------------------------------------------------------------------
# Specify the Unix group to be set for the inventory directory.
#-------------------------------------------------------------------------------
UNIX_GROUP_NAME=oinstall #-------------------------------------------------------------------------------
# Specify the location which holds the inventory files.
# This is an optional parameter if installing on
# Windows based Operating System.
#-------------------------------------------------------------------------------
INVENTORY_LOCATION=/usr/app/oracle/oraInventory # Specify value as the following to select all the languages.
# Example : SELECTED_LANGUAGES=all_langs
#-------------------------------------------------------------------------------
SELECTED_LANGUAGES=en,zh_CN #-------------------------------------------------------------------------------
# Specify the complete path of the Oracle Home.
#-------------------------------------------------------------------------------
ORACLE_HOME=/usr/app/oracle/product/12/db_1 #-------------------------------------------------------------------------------
# Specify the complete path of the Oracle Base.
#-------------------------------------------------------------------------------
ORACLE_BASE=/usr/app/oracle #-------------------------------------------------------------------------------
# Specify the installation edition of the component.
#
# The value should contain only one of these choices.
# - EE : Enterprise Edition #-------------------------------------------------------------------------------
oracle.install.db.InstallEdition=EE #------------------------------------------------------------------------------
# The DBA_GROUP is the OS group which is to be granted OSDBA privileges.
#-------------------------------------------------------------------------------
oracle.install.db.DBA_GROUP=dba #------------------------------------------------------------------------------
# The OPER_GROUP is the OS group which is to be granted OSOPER privileges.
# The value to be specified for OSOPER group is optional.
#------------------------------------------------------------------------------
oracle.install.db.OPER_GROUP=oinstall #------------------------------------------------------------------------------
# The BACKUPDBA_GROUP is the OS group which is to be granted OSBACKUPDBA privileges.
#------------------------------------------------------------------------------
oracle.install.db.BACKUPDBA_GROUP=oinstall #------------------------------------------------------------------------------
# The DGDBA_GROUP is the OS group which is to be granted OSDGDBA privileges.
#------------------------------------------------------------------------------
oracle.install.db.DGDBA_GROUP=oinstall #------------------------------------------------------------------------------
# The KMDBA_GROUP is the OS group which is to be granted OSKMDBA privileges.
#------------------------------------------------------------------------------
oracle.install.db.KMDBA_GROUP=oinstall #-------------------------------------------------------------------------------
# Specify the type of database to create.
# It can be one of the following:
# - GENERAL_PURPOSE
# - DATA_WAREHOUSE
# GENERAL_PURPOSE: A starter database designed for general purpose use or transaction-heavy applications.
# DATA_WAREHOUSE : A starter database optimized for data warehousing applications.
#-------------------------------------------------------------------------------
oracle.install.db.config.starterdb.type=GENERAL_PURPOSE #-------------------------------------------------------------------------------
# Specify the Starter Database Global Database Name.
#-------------------------------------------------------------------------------
oracle.install.db.config.starterdb.globalDBName=orcl #-------------------------------------------------------------------------------
# Specify the Starter Database SID.
#-------------------------------------------------------------------------------
oracle.install.db.config.starterdb.SID=orcl #-------------------------------------------------------------------------------
# Specify the Starter Database character set.
#
# One of the following
# AL32UTF8, WE8ISO8859P15, WE8MSWIN1252, EE8ISO8859P2,
# EE8MSWIN1250, NE8ISO8859P10, NEE8ISO8859P4, BLT8MSWIN1257,
# BLT8ISO8859P13, CL8ISO8859P5, CL8MSWIN1251, AR8ISO8859P6,
# AR8MSWIN1256, EL8ISO8859P7, EL8MSWIN1253, IW8ISO8859P8,
# IW8MSWIN1255, JA16EUC, JA16EUCTILDE, JA16SJIS, JA16SJISTILDE,
# KO16MSWIN949, ZHS16GBK, TH8TISASCII, ZHT32EUC, ZHT16MSWIN950,
# ZHT16HKSCS, WE8ISO8859P9, TR8MSWIN1254, VN8MSWIN1258
#-------------------------------------------------------------------------------
oracle.install.db.config.starterdb.characterSet=AL32UTF8 #------------------------------------------------------------------------------
# This variable should be set to true if Automatic Memory Management
# in Database is desired.
# If Automatic Memory Management is not desired, and memory allocation
# is to be done manually, then set it to false.
#------------------------------------------------------------------------------
oracle.install.db.config.starterdb.memoryOption=true #------------------------------------------------------------------------------
# This variable holds the password that is to be used for all schemas in the
# starter database.
#-------------------------------------------------------------------------------
oracle.install.db.config.starterdb.password.ALL=oracle #------------------------------------------------------------------------------
# Specify whether to enable the user to set the password for
# My Oracle Support credentials. The value can be either true or false.
# If left blank it will be assumed to be false.
#
# Example : SECURITY_UPDATES_VIA_MYORACLESUPPORT=true
#------------------------------------------------------------------------------
SECURITY_UPDATES_VIA_MYORACLESUPPORT=true #------------------------------------------------------------------------------
# Specify whether user doesn't want to configure Security Updates.
# The value for this variable should be true if you don't want to configure
# Security Updates, false otherwise.
#
# The value can be either true or false. If left blank it will be assumed
# to be false.
#
# Example : DECLINE_SECURITY_UPDATES=false
#------------------------------------------------------------------------------
DECLINE_SECURITY_UPDATES=trueLook这里
5、开始安装,执行 db_install.rsp
zrgldb:/home/oracle/> ./database/runInstaller -silent -responseFile /home/oracle/etc/db_install.rsp

Starting Oracle Universal Installer...

Checking Temp space: must be greater than 500 MB.   Actual 44203 MB    Passed

Checking swap space: 0 MB available, 150 MB required.    Failed <<<<

Some requirement checks failed. You must fulfill these requirements before

continuing with the installation,

Continue? (y/n) [n]
报错了。我直接输入 n退出了,当然输入 y 也可能安装成功,避免失败,我还是把问题解决一下。如果没报错直接进行安装操作,跳过以下步骤。
一、是没有swap空间
① 检查一下系统的 swap 文件
zrgldb:/home/oracle/>  swapon –s

swapon: stat failed –s: No such file or directory
说明系统不存在swap
② 切换 root 用户,创建swap文件
zrgldb:/root/> dd if=/dev/zero of=/swapfile bs=1024 count=512k

524288+0 records in

524288+0 records out

536870912 bytes (537 MB) copied, 1.49301 s, 360 MB/s
③ 格式化并激活 Swap 文件
zrgldb:/root/> mkswap /swapfile

Setting up swapspace version 1, size = 524284 KiB

no label, UUID=ea40b04c-238c-41b1-8f83-7d36b8b7fd66zrgldb:/root/> swapon /swapfile

swapon: /swapfile: insecure permissions 0644, 0600 suggested.
④ 再次检查系统的 Swap 文件
zrgldb:/root/> swapon -s

Filename                                Type            Size    Used    Priority

/swapfile                               file    524284  0       -1
⑤ 配置机器重启自动挂载Swap,修改 fstab 配置:vi /etc/fstab
添加一行
/swapfile swap swap defaults 0 0⑥ 赋予 Swap 文件权限
zrgldb://> chmod 600 /swapfile

zrgldb://> chown root:root /swapfile
切换到 oracle 用户 ,再次执行本部操作的数据库安装命令:
zrgldb:/home/oracle/> ./database/runInstaller -silent -responseFile /home/oracle/etc/db_install.rsp

Starting Oracle Universal Installer...

Checking Temp space: must be greater than 500 MB.   Actual 43690 MB    Passed

Checking swap space: must be greater than 150 MB.   Actual 511 MB    Passed

Preparing to launch Oracle Universal Installer from /tmp/OraInstall2019-08-01_03-16-16PM. Please wait ...……You can find the log of this install session at:  /usr/app/oracle/oraInventory/logs/installActions2019-08-01_03-20-39PM.log

The installation of Oracle Database 12c was successful.

Please check '/usr/app/oracle/oraInventory/logs/silentInstall2019-08-01_03-20-39PM.log' for more details.

As a root user, execute the following script(s):         1. /usr/app/oracle/oraInventory/orainstRoot.sh         2. /usr/app/oracle/product/12/db_1/root.sh

Successfully Setup Software.
等待结果,这样安装就成功完成了。
6、切换 root 用户,修改数据库配置
zrgldb://> /usr/app/oracle/oraInventory/orainstRoot.sh

Changing permissions of /usr/app/oracle/oraInventory.

Adding read,write permissions for group.

Removing read,write,execute permissions for world.

Changing groupname of /usr/app/oracle/oraInventory to oinstall.

The execution of the script is complete.

jrxxfwb-zrgldb://> /usr/app/oracle/product/12/db_1/root.sh

Check /usr/app/oracle/product/12/db_1/install/root_jrxxfwb-zrgldb_2019-08-01_15-29-54.log for the output of root script


F、数据库初始化
1、使用 oracle 用户登录,修改用户环境变量
export ORACLE_BASE=/usr/app/oracle

export ORACLE_SID=orcl

export LD_LIBRARY_PATH=$ORACLE_HOME/lib:/usr/lib

export ORACLE_HOME=/usr/app/oracle/product/12/db_1

export PATH=$PATH:$ORACLE_HOME/bin

export LANG="zh_CN.UTF-8"

export NLS_LANG="SIMPLIFIED CHINESE_CHINA.AL32UTF8"

export NLS_DATE_FORMAT='yyyy-mm-dd hh24:mi:ss'
使环境变量生效,执行命令:source .bash_profile
2、配置监听程序
zrgldb:/home/oracle/> netca /silent /responsefile /home/oracle/etc/netca.rsp3、启动监听
zrgldb:/home/oracle/> lsnrctl start

LSNRCTL for Linux: Version 12.1.0.2.0 - Production on 01-8月 -2019 15:47:15

Copyright (c) 1991, 2014, Oracle.  All rights reserved.
4、静默建库文件修改,打开 dbca.rsp 文件。
vi ./etc/dbca.rsp
#-----------------------------------------------------------------------------

# Name          : SID

# Datatype      : String

# Description   : System identifier (SID) of the database

# Valid values  : Check Oracle12c Administrator's Guide

# Default value : <db_name> specified in GDBNAME

# Mandatory     : No

#-----------------------------------------------------------------------------

SID = "orcl"

#-----------------------------------------------------------------------------

# Name          : CHARACTERSET

# Datatype      : String

# Description   : Character set of the database

# Valid values  : Check Oracle12c National Language Support Guide

# Default value : "US7ASCII"

# Mandatory     : NO

#-----------------------------------------------------------------------------

CHARACTERSET = "AL32UTF8"

#-----------------------------------------------------------------------------

# Name          : LISTENERS

# Datatype      : String

# Description   : Specifies list of listeners to register the database with.

#                 By default the database is configured for all the listeners specified in the

#                 $ORACLE_HOME/network/admin/listener.ora

# Valid values  : The list should be comma separated like "listener1,listener2".

# Mandatory     : NO

#-----------------------------------------------------------------------------

LISTENERS = "LISTENERS"
5、执行静默建库
zrgldb:/home/oracle/> dbca -silent -createDatabase -responseFile /home/oracle/etc/dbca.rsp
输入 SYS 用户口令:
输入 SYSTEM 用户口令:
复制数据库文件
1% 已完成
3% 已完成
11% 已完成
18% 已完成
26% 已完成
37% 已完成
正在创建并启动 Oracle 实例
40% 已完成
45% 已完成
50% 已完成
55% 已完成
56% 已完成
60% 已完成
62% 已完成
正在进行数据库创建
66% 已完成
70% 已完成
73% 已完成
85% 已完成
96% 已完成
100% 已完成
有关详细信息, 请参阅日志文件 "/usr/app/oracle/cfgtoollogs/dbca/orcl/orcl.log"。建库完成了。
6、创建数据库应用用户并授权。
zrgldb:/home/oracle/> sqlplus / as sysdba

SQL*Plus: Release 12.1.0.2.0 Production on 星期四 8月 1 16:45:33 2019

Copyright (c) 1982, 2014, Oracle.  All rights reserved.

连接到:

Oracle Database 12c Enterprise Edition Release 12.1.0.2.0 - 64bit Production

With the Partitioning, OLAP, Advanced Analytics and Real Application Testing options

SQL> create user starring identified by starring;

用户已创建。

SQL> grant connect,resource,dba to starring;

授权成功。
CentOS 7.X 静默安装Oracle 12C数据库的更多相关文章
- 最小安装centos 7 无GUI静默安装 oracle 12c,打造轻量linux化服务器
CentOS 7 下载地址:http://mirrors.opencas.cn/centos/7/isos/x86_64/CentOS-7-x86_64-Everything-1511.iso 一.安 ...
- Oracle 静默安装 oracle 12c
[oracle@local12cdg app]$ id oracleuid=501(oracle) gid=501(oinstall) groups=501(oinstall),502(dba)[or ...
- CentOS7静默安装Oracle 18g数据库(无图形化界面)
说明: 因为是静默安装,所以我们不需要安装图形界面 准备:下载Oracle软件 官方网站:http://www.oracle.com/technetwork/database/enterprise-e ...
- CentOS 7.5静默安装oracle 11g
1.安装前环境准备 1.1.配置本地yum源 #因公司内网环境,没有互联网,所以需要配置本地yum源,安装所需依赖包等. #挂载ios镜像centos7.5-1804 [root@oracle ~]# ...
- CentOS7.9安装Oracle 12C数据库实战
准备工作(先安装好以下软件): 1.服务器操作系统 CentOS7.9 2.Shell工具:Xshell 7免费版 3.Xmanager 7软件 =========================== ...
- CentOS 7静默安装Oracle 11g R2数据库软件
之前安装Oracle 11g R2数据库软件都是建立在图形界面上的,不过现在大部分服务器上都没有安装图形界面.图形界面安装较为方便,安装选项清晰,步骤明确,但Oracle还支持另一种安装方式,就是通过 ...
- 【实战】静默安装-oracle 11.2.0.3 on centos 5.10
发现网上静默安装的文章非常多,乱七八糟,五花八门!来个扫盲的! centos 5.10 下安装oracle 11g_r2 ************************************* ...
- CentOS 7.1静默安装11.2.0.3 64位单机数据库软件
第1章 CentOS 7.1静默安装11.2.0.3 64位单机数据库软件 1.1 安装前的准备工作 1.1.1 软件准备 1.1.2 检查硬件 注意这里的内存应该满足要求,不然 ...
- CentOS静默安装Oracle 11gR2(x64)
环境 OS: CentOS 7.4; hosts: L134; IP: 192.168.1.134 DB: linux.x64_11gR2_database 安装依赖包 yum install -y ...
随机推荐
- linux的常见目录
常见的目录和作用 目录名 目录名的作用 /bin/ 存放系统命令的目录,普通用户和root都使用,不过放在bin/命令下的单用户模式也可执行 /sbin/ 保存于系统环境相关的命令,只有root可以使 ...
- Qt 中 Oracle 数据库 QOCI 驱动问题及解决
Qt 中 Oracle 数据库 QOCI 驱动问题及解决是本文要讲述的问题,用Qt开发Oracle程序时,常会遇到QOCI驱动问题,主要表现为程序运行时出现下面的错误. QOCI driver not ...
- python 日期计算
from datetime import timedelta,datetime import time tdy = datetime.today() tdy = tdy.strftime(" ...
- toast提示信息获取和Monkey笔记
获取toast toast提示信息出现场景:用户输入用户名和密码后,提示的'登录成功', 用之前的定位方法获取不了,需要Uiautomator2来获取 安装node.js (使用 npm 或 node ...
- Kubernetes简介二
Kubernetes是什么?Kubernetes是容器集群管理系统,是一个开源的平台,可以实现容器集群的自动化部署.自动扩缩容.维护等功能.通过Kubernetes你可以: 快速部署应用 快速扩展应用 ...
- java中快速读写图片到BufferedImage对象
java7读取文件到BufferedImage对象 BufferedImage bufferedImage = ImageIO.read(Files.newInputStream(Paths.get( ...
- web前端学习路程
学习路程: 1.HTML和CSS基础 2.JavaScript语言 3.jQuery and ajax 4.综合网站实践 5.优化及调试
- iOS-Foundation各种NS
1.1 NSRange NSRange range = NSMakeRange(2, 4);//location=2,len=4 NSString *str = @"i love oc ...
- 浅出讲解:php的socket通信
原文地址:https://www.cnblogs.com/aipiaoborensheng/p/6708963.html 对TCP/IP.UDP.Socket编程这些词你不会很陌生吧?随着网络技术的发 ...
- go os.State类用法
参考文章: https://blog.csdn.net/weixin_43851310/article/details/87988648