设计模式-命令模式(Command)
关注公众号 JavaStorm 获取更多成长。
大约需要6分钟读完。建议收藏后阅读。
命令模式把一个请求或者操作封装到一个对象中。命令模式允许系统使用不同的请求把客户端参数化,对请求排队或者记录请求日志,可以提供命令的撤销和恢复功能。
GitHub地址: https://github.com/UniqueDong/zero-design-stu 中的 headfirst 包下代码。
概述
命令模式是对命令的封装。命令模式把发出命令的责任和执行命令的责任分割开,委派给不同的对象。
每一个命令都是一个操作:请求的一方发出请求要求执行一个操作;接收的一方收到请求,并执行操作。命令模式允许请求的一方和接收的一方独立开来,使得请求的一方不必知道接收请求的一方的接口,更不必知道请求是怎么被接收,以及操作是否被执行、何时被执行,以及是怎么被执行的。
命令允许请求的一方和接收请求的一方能够独立演化,从而具有以下的优点:
(1)命令模式使新的命令很容易地被加入到系统里。
(2)允许接收请求的一方决定是否要否决请求。
(3)能较容易地设计一个命令队列。
(4)可以容易地实现对请求的撤销和恢复。
(5)在需要的情况下,可以较容易地将命令记入日志。
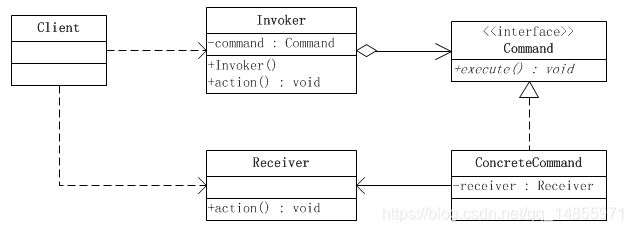
角色
- 客户端(Client)角色: 创建一个 ConcreteCommand,并设置其接受者。
- 命令(Command)角色: 为所有的命令申明一个接口。调用命令对象的 execute 方法就可以让接受者执行相关的动作,同事接口还具备一个 undo() 撤回方法。
- 具体命令(ConcreteCommand)角色: 定义一个接收者和行为之间的弱耦合;实现execute()方法,负责调用接收者的相应操作。execute()方法通常叫做执行方法。调用者只需要调用 execute 方法就可以发出请求,然后由 ConcreteCommand 调用接受者的一个或者多个动作。
- 调用者(Invoker)角色: 调用者持有一个命令对象,提供一个触发方法调用命令对象的 execute 方法,将命令执行。
- 接收者(Receiver)角色: 负责具体实施和执行一个请求。任何一个类都可以成为接收者,实施和执行请求的方法叫做行动方法。
执行流程
- 客户端创建一个命令对象。
- 客户端在调用者对象上调用 setCommand 方法。
- 在未来合适的时间点,调用者调用命令对象的 execute 方法。
- 命令通过调用者委托到对应的接受者执行。完成任务。
场景模拟
一个全能遥控器 6个可编程插槽(每个可以指定一个不同的家电装置),用来控制家电(电视、空调、冰箱、音响)。每个插槽有对应的 [开] 和 [关] 按钮。同时还具备一个整体一键撤回按钮。撤回需求是这样的,比如电灯是关的,然后按下开启按钮电灯就开了。现在假如按下撤销按钮,那么上一个动作将会翻转。在这里,电灯将会关闭。
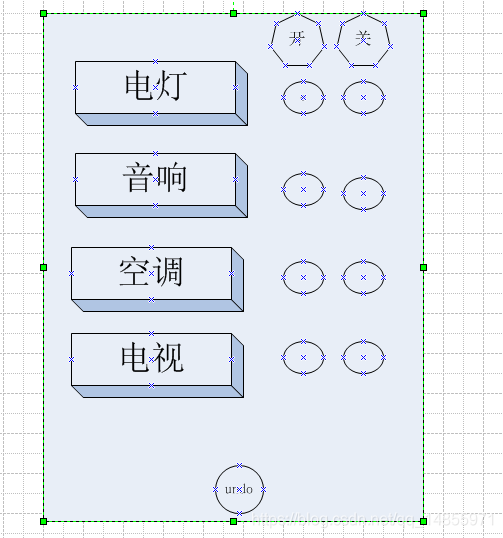
插槽连接对应的家电,开关是对应的指令。每个家电对应两个指令,分别是 【开】和【关】按键。
许多家电都有 on() 和 off() 方法,除此之外还有一些 setVolumn()、setTV()、setTemperature() 方法。
我们总不能 写 if slot1 == Light then light.on()。
代码实现
命令接受者角色
首先我们拥有很多家电。他们其实就是不同命令的接受者执行。
- 灯
package com.zero.headfirst.command.receiver;

public class Light {

    public void on() {

        System.out.println("打开电灯。");

    }

    public void off() {

        System.out.println("关灯。");

    }

}
- 音响
package com.zero.headfirst.command.receiver;

public class Stereo {

    public void on() {

        System.out.println("打开音响");

    }

    public void off() {

        System.out.println("关闭音响");

    }

    public void setCD() {

        System.out.println("放入CD");

    }

    public void setVolume() {

        System.out.println("音响音量设置为20");

    }

}
命令角色
首先让所有的命令对象实现该接口,分别有命令执行与撤回
package com.zero.headfirst.command;

/**

 * 命令(Command)角色

 */

public interface Command {

    /**

     * 命令执行

     */

    void execute();

    /**

     * 命令撤销

     */

    void undo();

}
具体命令角色
- 定义开灯命令,实现 execute 。持有 命令接受者 灯的引用,从而当调用者调用 execute 将委托给对应的 灯执行开灯操作。
package com.zero.headfirst.command.impl;

import com.zero.headfirst.command.Command;

import com.zero.headfirst.command.receiver.Light;

public class LightOnCommand implements Command {

    /**

     * 持有接受者实例,以便当命令execute执行的时候由接受者执行开灯

     */

    private Light light;

    @Override

    public void execute() {

        light.on();

    }

    @Override

    public void undo() {

        light.off();

    }

    /**

     * 设置命令的接受者

     * @param light

     */

    public void setLight(Light light) {

        this.light = light;

    }

}
- 定义关灯命令
package com.zero.headfirst.command.impl;

import com.zero.headfirst.command.Command;

import com.zero.headfirst.command.receiver.Light;

public class LightOffCommand implements Command {

    /**

     * 持有接受者实例,以便当命令execute执行的时候由接受者执行

     */

    private Light light;

    @Override

    public void execute() {

        light.off();

    }

    @Override

    public void undo() {

        light.on();

    }

    public void setLight(Light light) {

        this.light = light;

    }

}
- 定义打开音响命令
package com.zero.headfirst.command.impl;

import com.zero.headfirst.command.Command;

import com.zero.headfirst.command.receiver.Stereo;

/**

 * 音响开指令

 */

public class StereoOnCommand implements Command {

    private Stereo stereo;

    @Override

    public void execute() {

        stereo.on();

        stereo.setCD();

        stereo.setVolume();

    }

    @Override

    public void undo() {

        stereo.off();

    }

    public void setStereo(Stereo stereo) {

        this.stereo = stereo;

    }

}
- 定义关闭音响命令
package com.zero.headfirst.command.impl;

import com.zero.headfirst.command.Command;

import com.zero.headfirst.command.receiver.Stereo;

public class StereoOffCommand implements Command {

    private Stereo stereo;

    public void setStereo(Stereo stereo) {

        this.stereo = stereo;

    }

    @Override

    public void execute() {

        stereo.off();

    }

    @Override

    public void undo() {

        stereo.on();

        stereo.setCD();

        stereo.setVolume();

    }

}
剩下的打开电视机、关闭电视机、打开空调、关闭空调的就不一一写了。都是一样的模板套路。具体代码可以查阅 GitHub地址: https://github.com/UniqueDong/zero-design-stu 中的 headfirst 包下代码。
调用者角色
其实就是我们的遥控器。
package com.zero.headfirst.command;

import com.zero.headfirst.command.impl.NoCommand;

import java.util.Arrays;

/**

 * 调用者:遥控器

 */

public class RemoteControl {

    /**

     * 一共4个家电插槽,每个插槽有 开与关命令。

     */

    private Command[] onCommands;

    private Command[] offCommands;

    //用来保存前一个命令,用来实现撤销功能

    private Command undoCommand;

    /**

     * 通过构造器初始化开关数组

     */

    public RemoteControl() {

        onCommands = new Command[4];

        offCommands = new Command[4];

        //初始化所有插槽为空指令

        Command noCommand = new NoCommand();

        for (int i = 0; i < 4; i++) {

            onCommands[i] = noCommand;

            offCommands[i] = noCommand;

        }

        //一开始没有所谓的前一个命令,所以默认无指令

        undoCommand = noCommand;

    }

    /**

     * 设置指定插槽对应的按钮指令

     * @param slot 插槽位置

     * @param onCommand 开指令

     * @param offCaommand 关指令

     */

    public void setCommand(int slot,Command onCommand, Command offCaommand) {

        onCommands[slot] = onCommand;

        offCommands[slot] = offCaommand;

    }

    /**

     * 模拟按下指定插槽对应的【开】按键

     */

    public void pressOnButton(int slot) {

        onCommands[slot].execute();

        //将当前指令记录下来,用于在撤销的时候能执行命令对应的 undo 方法从而实现撤销功能

        undoCommand = onCommands[slot];

    }

    /**

     * 模拟按下指定插槽对应的【关】按键

     */

    public void pressOffButton(int slot) {

        offCommands[slot].execute();

        undoCommand = offCommands[slot];

    }

    /**

     * 撤销功能

     */

    public void pressUndoButton() {

        undoCommand.undo();

    }

    @Override

    public String toString() {

        return "RemoteControl{" +

                "onCommands=" + Arrays.toString(onCommands) +

                ", offCommands=" + Arrays.toString(offCommands) +

                '}';

    }

}
客户端角色
获取遥控器,并且拿到灯、空调等命令接受者。分别创建对应的 【开】,【关】指令。
链接到对应的插槽。当按下按钮的时候触发指定的指令。
package com.zero.headfirst.command;

import com.zero.headfirst.command.impl.*;

import com.zero.headfirst.command.receiver.AirConditioning;

import com.zero.headfirst.command.receiver.Light;

import com.zero.headfirst.command.receiver.Stereo;

import com.zero.headfirst.command.receiver.TV;

/**

 * 客户端角色

 */

public class CommandClient {

    public static void main(String[] args) {

        //创建一个遥控器-调用者角色

        RemoteControl remoteControl = new RemoteControl();

        //1. 创建电灯-接受者角色

        Light light = new Light();

        //创建开灯、关灯命令-命令具体角色

        LightOnCommand lightOnCommand = new LightOnCommand();

        lightOnCommand.setLight(light);

        LightOffCommand lightOffCommand = new LightOffCommand();

        lightOffCommand.setLight(light);

        //调用者设置电灯插槽以及对应的开关按键指令-调用者角色

        remoteControl.setCommand(0, lightOnCommand, lightOffCommand);

        // 2. 设置音响插槽与对应按键指令

        Stereo stereo = new Stereo();

        StereoOnCommand stereoOnCommand = new StereoOnCommand();

        stereoOnCommand.setStereo(stereo);

        StereoOffCommand stereoOffCommand = new StereoOffCommand();

        stereoOffCommand.setStereo(stereo);

        remoteControl.setCommand(1, stereoOnCommand, stereoOffCommand);

        //3. 空调

        AirConditioning airConditioning = new AirConditioning();

        AirConditioningOnCommand airConditioningOnCommand = new AirConditioningOnCommand();

        airConditioningOnCommand.setAirConditioning(airConditioning);

        AirConditioningOffCommand airConditioningOffCommand = new AirConditioningOffCommand();

        airConditioningOffCommand.setAirConditioning(airConditioning);

        remoteControl.setCommand(2, airConditioningOnCommand, airConditioningOffCommand);

        //4. 电视

        TV tv = new TV();

        TVOnCommand tvOnCommand = new TVOnCommand();

        tvOnCommand.setTv(tv);

        TVOffCommand tvOffCommand = new TVOffCommand();

        tvOffCommand.setTv(tv);

        remoteControl.setCommand(3, tvOnCommand, tvOffCommand);

        //模拟按键

        System.out.println("-------码农回家了,使用遥控开启电灯、音响、空调、电视----");

        remoteControl.pressOnButton(0);

        remoteControl.pressOnButton(1);

        remoteControl.pressOnButton(2);

        remoteControl.pressOnButton(3);

        System.out.println("------码农睡觉了,使用遥控关闭电灯、音响、电视。不关空调--------");

        remoteControl.pressOffButton(0);

        remoteControl.pressOffButton(1);

        remoteControl.pressOffButton(3);

        System.out.println("----撤销测试,先打开电灯。再关闭电灯。然后按撤销----");

        remoteControl.pressOnButton(0);

        remoteControl.pressOffButton(0);

        //一键撤销

        remoteControl.pressUndoButton();

    }

}
测试结果
-------码农回家了,使用遥控开启电灯、音响、空调、电视----

打开电灯。

打开音响

放入CD

音响音量设置为20

打开空调

空调温度设置28°

打开电视

设置频道为宇宙电视台

电视音量设置为20

------码农睡觉了,使用遥控关闭电灯、音响、电视。不关空调--------

关灯。

关闭音响

关闭电视

----撤销测试,先打开电灯。再关闭电灯。然后按撤销----

打开电灯。

关灯。

打开电灯。
总结
使用场景:
- 工作队列:在某一端添加指令,只要是实现命令模式的对象都可以放到队列里。另外一端是线程。线程进项下面的工作:从队列取出一个命令,然后调用execute 方法,调用完后将该命令丢弃,再继续取下一个命令。
- 线程池。
关注公众号 JavaStorm 获取更多模式

设计模式-命令模式(Command)的更多相关文章
- 设计模式 - 命令模式(command pattern) 多命令 具体解释
命令模式(command pattern) 多命令 具体解释 本文地址: http://blog.csdn.net/caroline_wendy 參考命令模式: http://blog.csdn.ne ...
- 设计模式 - 命令模式(command pattern) 具体解释
命令模式(command pattern) 详细解释 本文地址: http://blog.csdn.net/caroline_wendy 命令模式(command pattern) : 将请求封装成对 ...
- 设计模式 - 命令模式(command pattern) 宏命令(macro command) 具体解释
命令模式(command pattern) 宏命令(macro command) 具体解释 本文地址: http://blog.csdn.net/caroline_wendy 參考: 命名模式(撤销) ...
- 设计模式 - 命令模式(command pattern) 撤销(undo) 具体解释
命令模式(command pattern) 撤销(undo) 详细解释 本文地址: http://blog.csdn.net/caroline_wendy 參考命令模式: http://blog.cs ...
- 设计模式--命令模式Command(对象行为型)
一.命令模式 将一个请求封装为一个对象,从而让你使用不同的请求把客户端参数化,对请求排队或者记录请求日志,可以提供命令的撤销和恢复功能. (1)Command类:是一个抽象类,类中对需要执行的命令进行 ...
- C#设计模式——命令模式(Command Pattern)
一.概述通常来说,“行为请求者”与“行为实现者”是紧耦合的.但在某些场合,比如要对行为进行“记录.撤销/重做.事务”等处理,这种无法抵御变化的紧耦合是不合适的.在这些情况下,将“行为请求者”与“行为实 ...
- 大话设计模式--命令模式 Command -- C++实现实例
1. 命令模式: 将请求封装为一个对象,从而使你可以用不同的请求对客户进行参数化,对请求排队或记录请求日志,以及支持可撤销的操作. 命令模式有点: a. 较容易的设计一个命令队列 b. 在需要的的情况 ...
- 深入浅出设计模式——命令模式(Command Pattern)
模式动机 在软件设计中,我们经常需要向某些对象发送请求,但是并不知道请求的接收者是谁,也不知道被请求的操作是哪个,我们只需在程序运行时指定具体的请求接收者即可,此时,可以使用命令模式来进行设计,使得请 ...
- 设计模式 ( 十三 ) 命令模式Command(对象行为型)
设计模式 ( 十三 ) 命令模式Command(对象行为型) 1.概述 在软件设计中,我们经常需要向某些对象发送请求,但是并不知道请求的接收者是谁,也不知道被请求的操作是哪个,我们只需 ...
随机推荐
- LeetCode:寻找旋转排序数组中的最小值【153】
LeetCode:寻找旋转排序数组中的最小值[153] 题目描述 假设按照升序排序的数组在预先未知的某个点上进行了旋转. ( 例如,数组 [0,1,2,4,5,6,7] 可能变为 [4,5,6,7,0 ...
- MVC+Ext.net零基础学习记录(一)
由于最近开发一个项目,决定使用MVC+EXT.NET,决定将学习的这个过程记录下来 本人和很多菜鸟一样,之前既没有使用过MVC开发,也没有接触过EXT.NET,所以这将是一个大家共同学习的过程,文章中 ...
- echarts如何显示在页面上
echarts如何显示在页面上 1.引入echarts的相关.js文件 <script src="js/echarts.min.js"></script> ...
- 文章预告的自我挖坑系列——D3.js 系列之星光闪烁
D3.js 是个神奇的工具,下面收集了一些与星星相关的可视化的例子,静待慢慢的把坑填上 雷达图http://bl.ocks.org/kevinschaul/8213691 星空 二维(一)h ...
- HihoCoder1673 : 01间隔矩阵([Offer收割]编程练习赛41)(单调队列)
描述 给定一个N × M的01矩阵,小Hi希望从中找到一个01间隔的子矩阵,并且子矩阵的面积越大越好. 例如对于 0101010 1000101 0101010 1010101 0101010 在右侧 ...
- python爬虫知识点总结(一)库的安装
环境要求: 1.编程语言版本python3: 2.系统:win10; 3.浏览器:Chrome68.0.3440.75:(如果不是最新版有可能影响到程序执行) 4.chromedriver2.41 注 ...
- bzoj 4275 Badania naukowe —— DP
题目:https://www.lydsy.com/JudgeOnline/problem.php?id=4275 枚举 \( C \) 在 \( A \) 和 \( B \) 中的位置,然后取它前后的 ...
- Python 中的 classmethod 和 staticmethod 有什么具体用途?
作者:李保银链接:https://www.zhihu.com/question/20021164/answer/18224953来源:知乎著作权归作者所有.商业转载请联系作者获得授权,非商业转载请注明 ...
- POJ3660(foyld闭包问题)
Cow Contest Time Limit: 1000MS Memory Limit: 65536K Total Submissions: 8794 Accepted: 4948 Descr ...
- Scala学习——类,继承,接口(中)
基本类的使用:(初) package com.dtspark.scala.basics /** * trait是一个接口 * 接口的第一次继承用extends,多继承时用with * 多继承时,如果这 ...