iOS-跨界面传值和跨应用传值
跨界面传值
从一个界面将一个结果值传到另一个界面,这个是我们在开发过程中非常常见的一个问题。传值本身并不是一个太复杂的问题,在此主要简述一下常用的传值方法。
我们传值常用的方法主要有四种:
- 1.属性传值
- 2.代理传值
- 3.block传值
- 4.通知传值
- 5.KVO
- 对象传值
属性传值:
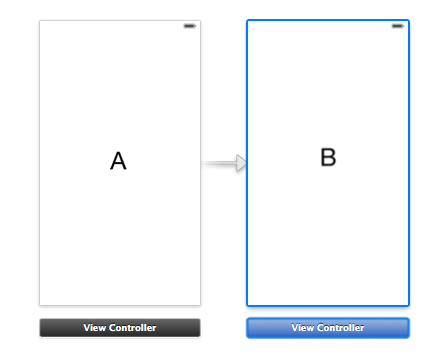
属性传值应该来说是比较简单的一种传值方式,但是这种传值方式有其局限性,常用的一种场合是我们从界面A跳转到界面B,如何我们想讲界面A的值传到界面B,属性传值是比较方便的一种方式。如下图所示,如果我们点击A界面上的一个按钮,跳转到B界面,并且把A界面的一个值传送到B界面。
先说明一下大致的原理,首先要创建两个控制器A和B,在A中导入B的头文件,在A的按钮点击事件中,添加A跳转到B的代码段。现在的问题是如何在跳转的过程中把A界面上的值传到B界面呢?
我们可以给B添加一个属性,在点击按钮从A跳转到B的时候,将A界面要传送的值赋给B的属性,这样在B界面可以使用(self.属性)直接获取从A界面传过来的值。
代码段如下:(下面的代码段是一个最简单的演示)
 #import <UIKit/UIKit.h>

 @interface ViewController : UIViewController

 {

     NSString *send;//我们在界面跳转的时候,将send的值传到下一个界面

 }

 - (IBAction)changeScreenButtonClick:(UIButton *)sender;

 @end
A.h
 #import "ViewController.h"

 #import "BViewController.h"

 @interface ViewController ()

 @end

 @implementation ViewController

 - (void)viewDidLoad

 {

     [super viewDidLoad];

     // Do any additional setup after loading the view, typically from a nib.

     send = @"传值操作";

 }

 - (void)didReceiveMemoryWarning

 {

     [super didReceiveMemoryWarning];

     // Dispose of any resources that can be recreated.

 }

 - (IBAction)changeScreenButtonClick:(UIButton *)sender

 {

     BViewController *b = [[BViewController alloc]init];

     b.receiveValue = send;

     UIWindow *window = [UIApplication sharedApplication].delegate.window;

     window.rootViewController = b;

 }

 @end
A.m
 #import <UIKit/UIKit.h>

 @interface BViewController : UIViewController

 @property(nonatomic,copy) NSString *receiveValue;//接收A界面传过来的值

 @end
B.h
 #import "BViewController.h"

 @interface BViewController ()

 @end

 @implementation BViewController

 - (id)initWithNibName:(NSString *)nibNameOrNil bundle:(NSBundle *)nibBundleOrNil

 {

     self = [super initWithNibName:nibNameOrNil bundle:nibBundleOrNil];

     if (self) {

         // Custom initialization

     }

     return self;

 }

 - (void)viewDidLoad

 {

     [super viewDidLoad];

     // Do any additional setup after loading the view from its nib.

     NSLog(@"从A界面传过来的值为:%@",self.receiveValue);

 }

 - (void)didReceiveMemoryWarning

 {

     [super didReceiveMemoryWarning];

     // Dispose of any resources that can be recreated.

 }

 @end
B.m
代理传值:
代理传值对应初学者来说有一点难度,但是多使用几次就好了,像在系统中我们代理这种设计使用的非常广泛,在此主要说明使用代理传值的方法。我们在页面跳转的过程中,将借助于导航,使用push从A界面跳转到B界面,使用pop从B界面返回到A界面。
现在我们假设一种场景,我们需要从界面A传值到界面B,同时也要从界面B传值到界面A,如何使用代理来实现呢?
首先使用代理传值,我们需要知道怎么自定义代理,首先先普及一下代理的相关知识。
假如我们需要在A界面传值到B界面,我们需要在A界面中定义一些协议方法,只需要声明方法即可,不需要实现,如果其他类想要访问这些协议方法,只需要遵守这些协议即可。在A中定义的协议方法,相当于一个接口,你想使用A的接口,就要遵守A的协议方法,例如在B中,想要访问A的协议方法,B就要遵守A的协议。传值的话,B从A的协议方法中就能获取到A界面中的值。
如何自己写一个协议,下面是基本的格式:
@protocol 协议名称 <NSObject> //协议方法 @end
假设我们现在要在A界面中写一个协议,具体代码如下(传值是从界面A传到界面B):
 #import <UIKit/UIKit.h>

 //协议

 @protocol aScreenDelegate <NSObject>

 -(void)sendValueFromScreenaTOScreenb:(NSString *)value;

 @end

 @interface ViewController : UIViewController

 @property(nonatomic,assign)id<aScreenDelegate>delegate;

 - (IBAction)changeScreenButtonClick:(UIButton *)sender;

 @end
A.h
 #import "ViewController.h"

 #import "BViewController.h"

 @interface ViewController ()

 @end

 @implementation ViewController

 - (void)viewDidLoad

 {

     [super viewDidLoad];

     // Do any additional setup after loading the view, typically from a nib.

 }

 - (void)didReceiveMemoryWarning

 {

     [super didReceiveMemoryWarning];

     // Dispose of any resources that can be recreated.

 }

 - (IBAction)changeScreenButtonClick:(UIButton *)sender

 {

     BViewController *b = [[BViewController alloc]init];

     NSString *send = @"wyg";

     self.delegate = b;

     [_delegate sendValueFromScreenaTOScreenb:send];

     [self.navigationController pushViewController:b animated:YES];

 }

 @end
A.m
 #import <UIKit/UIKit.h>

 #import "ViewController.h"

 @interface BViewController : UIViewController<aScreenDelegate>

 @end
B.h
 @implementation BViewController

 - (id)initWithNibName:(NSString *)nibNameOrNil bundle:(NSBundle *)nibBundleOrNil

 {

     self = [super initWithNibName:nibNameOrNil bundle:nibBundleOrNil];

     if (self) {

         // Custom initialization

     }

     return self;

 }

 -(void)sendValueFromScreenaTOScreenb:(NSString *)value

 {

     NSLog(@"从A界面传过来的值:%@",value);

 }

 - (void)viewDidLoad

 {

     [super viewDidLoad];

     // Do any additional setup after loading the view from its nib.

 }
B.m
假如你向从界面B,pop到界面A,并把界面B的值传到界面A,这种使用属性传值不太方便,使用代理可以解决,从B界面往A传值,协议方法应该在B中写明,在A中遵守协议,下面是具体代码:
 #import <UIKit/UIKit.h>

 #import "BViewController.h"

 @interface ViewController : UIViewController<bScreenDelegate>

 - (IBAction)changeScreenButtonClick:(UIButton *)sender;

 @end
A.h
 #import "ViewController.h"

 @interface ViewController ()

 @end

 @implementation ViewController

 - (void)viewDidLoad

 {

     [super viewDidLoad];

     // Do any additional setup after loading the view, typically from a nib.

 }

 //代理方法

 -(void)sendValueFromBtoA:(NSString *)str

 {

     NSLog(@"从B界面传过来的值为:%@",str);

 }

 - (IBAction)changeScreenButtonClick:(UIButton *)sender

 {

     BViewController *b = [[BViewController alloc]init];

     b.delegate = self;

     [self.navigationController pushViewController:b animated:YES];

 }

 @end
A.m
 #import <UIKit/UIKit.h>

 @protocol bScreenDelegate <NSObject>

 -(void)sendValueFromBtoA:(NSString *)str;

 @end

 @interface BViewController : UIViewController

 @property(nonatomic,assign) id<bScreenDelegate>delegate;

 - (IBAction)popButtonClick:(UIButton *)sender;

 @end
B.h
 #import "BViewController.h"

 @interface BViewController ()

 @end

 @implementation BViewController

 - (id)initWithNibName:(NSString *)nibNameOrNil bundle:(NSBundle *)nibBundleOrNil

 {

     self = [super initWithNibName:nibNameOrNil bundle:nibBundleOrNil];

     if (self) {

         // Custom initialization

     }

     return self;

 }

 - (void)viewDidLoad

 {

     [super viewDidLoad];

     // Do any additional setup after loading the view from its nib.

 }

 - (IBAction)popButtonClick:(UIButton *)sender

 {

     NSString *str = @"wxy";

     [_delegate sendValueFromBtoA:str];

     [self.navigationController popViewControllerAnimated:YES];

 }

 @end
B.m
block传值
使用block传值,我们需要自定义代理,这种写法相对来说是比较麻烦的,使用block传值的话,会使得代码量大大缩减,现在我们假设我们要把界面A上的值传到界面B,使用block来实现。
现在假设我们想在界面A上直接获取界面B上的信息,如何获取,代码如下:
 #import <UIKit/UIKit.h>

 #import "BViewController.h"

 @interface ViewController : UIViewController

 @end
A.h
 #import "ViewController.h"

 #import "BViewController.h"

 @interface ViewController ()

 @end

 @implementation ViewController

 - (void)viewDidLoad

 {

     [super viewDidLoad];

     // Do any additional setup after loading the view, typically from a nib.

     BViewController *b = [[BViewController alloc]init];

     [b converyValueToA:^(NSString *str) {

         NSLog(@"B界面上的值为:%@",str);

     }];

 }

 @end
A.m
 #import <UIKit/UIKit.h>

 @interface BViewController : UIViewController

 -(void)converyValueToA:(void(^)(NSString *))block;

 @end
B.h
 #import "BViewController.h"

 @interface BViewController ()

 @end

 @implementation BViewController

 - (id)initWithNibName:(NSString *)nibNameOrNil bundle:(NSBundle *)nibBundleOrNil

 {

     self = [super initWithNibName:nibNameOrNil bundle:nibBundleOrNil];

     if (self) {

         // Custom initialization

     }

     return self;

 }

 -(void)converyValueToA:(void (^)(NSString *))block

 {

     NSString *name = @"wxy";

     block(name);

 }

 - (void)viewDidLoad

 {

     [super viewDidLoad];

     // Do any additional setup after loading the view from its nib.

 }

 @end
B.m
通知传值
通知传值有点类似于广播,有发送者,有监听者,比如A想接受B的值,B要发送一个通知,A只要监听这个通知,就能接收到值,通知传值就不细述。
例如发送一个通知:
NSNotificationCenter *center = [NSNotificationCenter defaultCenter];
[center postNotificationName:通知名字 object:self userInfo:传递参数];
接收一个通知:
NSNotificationCenter *center = [NSNotificationCenter defaultCenter];
[center addObserver:self selector:@selector(receiveNofitication:) name:通知名字 object:nil];
-(void)receiveNofitication:(NSNotification *)notification
{//接收到通知,执行相关代码}
跨应用传值
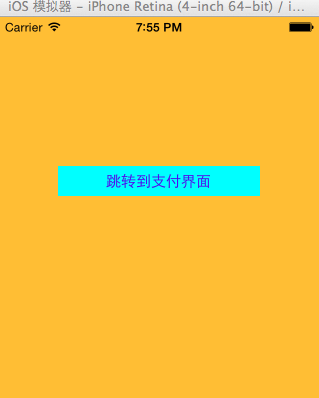
 - (IBAction)toPayApp:(id)sender

 {

     //设置跳转到应用程序的链接

     //双斜杠之后是传递的参数,多个参数使用&连接

     NSURL *url = [NSURL URLWithString:@"payApp://name=iPhone6&price=5288"];

     //跳转前先判断,是否可以打开链接

     if ([[UIApplication sharedApplication] canOpenURL:url] == YES)

     {

         [[UIApplication sharedApplication] openURL:url];

     }

     else

     {

         NSLog(@"连接不能打开,应用程序未安装");

     }

 }
应用跳转
现在我们已经进入到PayApp,如何在这个应用中接受传过来的参数呢?
我们可以在AppDelegate这个.m文件中添加下面的方法:
- (BOOL)application:(UIApplication *)application openURL:(NSURL *)url sourceApplication:(NSString *)sourceApplication annotation:(id)annotation
iOS-跨界面传值和跨应用传值的更多相关文章
- atitit. js 跨界面 页面 web cs 传值方法总结
atitit. js 跨界面 页面 web cs 传值方法总结 #--需求 js #---两个方法: 直接传跟跟间接传递... 1.直接传跟new form(param) web使用url方 ...
- 扩展BindingList,防止增加、删除项时自动更新界面而不出现“跨线程操作界面控件 corss thread operation”异常
在做界面程序时,常常需要一些数据类,界面元素通过绑定等方式显示出数据,然而由于UI线程不是线程安全的,一般都需要通过Invoke等方式来调用界面控件.但对于数据绑定bindingList而言,没法响应 ...
- 属性传值,协议传值,block传值,单例传值四种界面传值方式
一.属性传值 对于属性传值而言,相对于其它的三种 方法来说,是最基础,最简单的一种 方法,但,属性传值 有很大的局限性,因为是适用于第一个界面向第二个界面传 值,第二个向第三个界面传值等等.N界面向N ...
- SeGue 多控制器跨界面传递数据原理
多控制器跨界面传递数据原理
- 解析观察者模式在安卓程序中的应用——如何实现跨界面Handler通讯
这里特使用了github中的一个项目作为例子进行解析,地址为:https://github.com/LiqiNew/HandlerFrame/tree/master/handlerFrame/src/ ...
- iOS 页面跳转传值,属性传值,代理传值,代码块传值,单例传值,通知传值
有时候我们在页面跳转的时候回传递相应的参数,如,你想把在第一个页面的文本框里的内容显示在第二个文本框中,或者你又想把第二个文本框中的内容改变之后到第一个页面的文本框中,所有,这个时候我们就要用到页面跳 ...
- JS跨域(ajax跨域、iframe跨域)解决方法及原理详解(jsonp)
这里说的js跨域是指通过js在不同的域之间进行数据传输或通信,比如用ajax向一个不同的域请求数据,或者通过js获取页面中不同域的框架中(iframe)的数据.只要协议.域名.端口有任何一个不同,都被 ...
- 如何让iOS 保持界面流畅?这些技巧你知道吗
如何让iOS 保持界面流畅?这些技巧你知道吗 作者:ibireme这篇文章会非常详细的分析 iOS 界面构建中的各种性能问题以及对应的解决思路,同时给出一个开源的微博列表实现,通过实际的代码展示如 ...
- fir.im Weekly - iOS 保持界面流畅的技巧
生命不息,coding 不止.本期 fir.im Weekly 收集了微博上的热转资源,包含 Android.iOS 开发工具.源码分享,产品 UI 设计的好文章,还有一些程序员成长的 Tips,希望 ...
随机推荐
- 2018.5.14 PHP基础学习
1.使用PHP输出HTML 使用PHP输出一个表格,并且通过style标签改变字体 <!--思考与练习--> <style type="text/css"> ...
- kubernetes-jenkins CI/CD平台
软件环境:Jenkins + Kubernetes + Git + Maven + Harbor 发布流程设计 工作流程:手动/自动构建-> Jenkins 调度K8S API->动态生成 ...
- Unity调用Windows窗口句柄,选择文件和目录
T:2019-6-25 10:06:59 C:Scatt Kang using System; using System.Collections; using System.Collections.G ...
- 《毛毛虫团队》第七次作业:团队项目设计完善&编码
一:实验名称:团队项目设计完善&编码 二:实验目的与要求 掌握软件编码实现的工程要求. 三:实验步骤 任务一:团队软件项目设计完善: 任务二:团队软件项目编码实现: 任务三:在团队博客发布博文 ...
- s///|s()()i|/i|/g|\U|\u|\L|\l|\U\l|split|join|匹配到hash|匹配到变量|`date`|$^I
#!/usr/bin/perl -w use strict; use warnings; $_='She is a good girl and likes helping others '; s/sh ...
- PayPal为什么从Java迁移到Node.js 性能提高一倍 文件代码减少44%
大家都知道PayPal是另一家迁移到Node.js平台的大型公司,Jeff Harrell的这篇博文 Node.js at PayPal 解释了为什么从Java迁移出来的原因: 开发效率提高一倍(2 ...
- C#语言命名的9种规范
下面介绍C#语言命名的9种规范: a) 类 [规则1-1]使用Pascal规则命名类名,即首字母要大写. [规则1-2]使用能够反映类功能的名词或名词短语命名类. [规则1-3]不要使用“I”.“C” ...
- HTML5<footer>元素
HTML5中<footer>元素是用来描述文档中的底部信息,比如:版本,版权,作者,链接声明,联系信息,时间等等. 实例: <footer> <p>这是一个底部的信 ...
- 函数的扩展——箭头函数this的使用
箭头函数中的this指向的是定义时的this,而不是执行时的的this . 举例: 案例中,我们的obj对象中有一个属性x和一个属性show( )方法,show( )通过this打印出x的值,结果是u ...
- Mac配置gdb的一些问题
1.Unable to find Mach task port for process-id 1527: (os/kern) failure (0x5). (please check gdb is ...