Netruon 理解(11):使用 NAT 将 Linux network namespace 连接外网
学习 Neutron 系列文章:
(2)Neutron OpenvSwitch + VLAN 虚拟网络
(3)Neutron OpenvSwitch + GRE/VxLAN 虚拟网络
(4)Neutron OVS OpenFlow 流表 和 L2 Population
(9)Neutron FWaas 和 Nova Security Group
(10)Neutron VPNaas
(11)Neutron DVR
(12)Neutron VRRP
(14)使用 NAT 将 Linux network namespace 连接外网
(15)使用 Linux bridge 将 Linux network namespace 连接外网
Linux network namespace 连接外网从大类上来讲主要有两种方法:网络地址转换(NAT) 和 桥接(bridging),而桥接根据使用的网桥又可以分为使用 linux bridge 和 Open vSwitch 网络等。本文将说明 NAT 具体配置过程以及原理。
1. 环境及配置
我们可以把一个 linux network namespace 看作另一个计算机,这样看起来会更加直观:
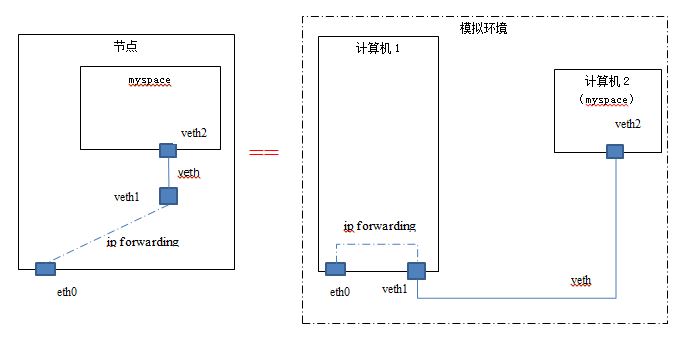
节点 host1 的 IP 地址为 192.168.1.32. 实验使用的另一个机器 host2 的 IP 为 192.168.1.15.
为了能从在 host1 上的 netns myspace 上能 ping 通 host2 ,你需要做的配置及说明:
| 步骤# | 命令 | 说明 |
| 1 | ip netns add myspace | 创建名称为 ‘myspace’ 的 linux network namespace |
| 2 | ip link add veth1 type veth peer name veth2 | 创建一个 veth 设备,一头为 veth1,另一头为 veth2 |
| 3 | ip link set veth2 netns myspace | 将 veth2 加入 myspace 作为其一个 network interface |
| 4 | ifconfig veth1 192.168.45.2 netmask 255.255.255.0 up | 配置 veth1 的 IP 地址 |
| 5 | ip netns exec myspace ifconfig veth2 192.168.45.3 netmask 255.255.255.0 up | 配置 veth2 的 IP 地址,它和 veth1 需要在同一个网段上 |
| 6 | ip netns exec myspace route add default gw 192.168.45.2 | 将 myspace 的默认路由设为 veth1 的 IP 地址 |
| 7 | echo 1 > /proc/sys/net/ipv4/ip_forward | 开启 linux kernel ip forwarding |
| 8 | iptables -t nat -A POSTROUTING -s 192.168.45.0/24 -o eth0 -j MASQUERADE | 配置 SNAT,将从 myspace 发出的网络包的 soruce IP address 替换为 eth0 的 IP 地址 |
| 9 |
iptables -t filter -A FORWARD -i eth0 -o veth1 -j ACCEPT iptables -t filter -A FORWARD -o eth0 -i veth1 -j ACCEPT |
在默认 FORWARD 规则为 DROP 时显式地允许 veth1 和 eth0 之间的 forwarding |
这些配置之后,host 上的 route 表中自动添加了一条路由规则:
root@compute2:/home/s1# route -n

Kernel IP routing table

Destination     Gateway         Genmask         Flags Metric Ref    Use Iface

0.0.0.0         192.168.1.1     0.0.0.0         UG                   eth0

192.168.1.0     0.0.0.0         255.255.255.0   U                    eth0

192.168.45.0    0.0.0.0         255.255.255.0   U     0      0        0 veth1
myspace 的路由表:
root@compute2:/home/s1# ip netns exec myspace route -n

Kernel IP routing table

Destination     Gateway         Genmask         Flags Metric Ref    Use Iface

0.0.0.0         192.168.45.2    0.0.0.0         UG                   veth2

192.168.45.0    0.0.0.0         255.255.255.0   U                    veth2
其中第一条是显式地被创建的,第二条是自动被创建的。
现在你就可以从 myspace 中 ping 外网的地址了。
2 原理
2.1 关于第八条 SNAT
如果没有设置第八条 SNAT,那么 ICMP Request 能够到达对方计算机,但是 echo reply 消息回不来,因为其目的地址为一个内部地址。
root@compute1:/home/s1# tcpdump -eni bridge1 -p icmp -v

tcpdump: listening on bridge1, link-type EN10MB (Ethernet), capture size  bytes

::03.827852 :::4f:: > :::c7:cf:ca, ethertype IPv4 (0x0800), length : (tos 0x0, ttl , id , offset , flags [DF], proto ICMP (), length )

    192.168.45.3 > 192.168.1.15: ICMP echo request, id , seq , length

::04.829779 :::4f:: > :::c7:cf:ca, ethertype IPv4 (0x0800), length : (tos 0x0, ttl , id , offset , flags [DF], proto ICMP (), length )
加上第八条之后,ping 能成功,也就是 ICMP echo request 能发出,echo reply 能返回。
在 host2 的网卡 eth0 上,能看到 ICMP echo request 网络包的源 IP 为 host1 的 IP:
::19.360519 :::c7:cf:ca > :::4f::, ethertype IPv4 (0x0800), length : (tos 0x0, ttl , id , offset , flags [none], proto ICMP (), length )

    192.168.1.15 > 192.168.1.32: ICMP echo reply, id , seq , length

::20.358360 :::4f:: > :::c7:cf:ca, ethertype IPv4 (0x0800), length : (tos 0x0, ttl , id , offset , flags [DF], proto ICMP (), length )

    192.168.1.32 > 192.168.1.15: ICMP echo request, id , seq , length
在 host1 的网卡 eth0 上,能看到来回网络包使用的是 host1 和 host2 的 IP 地址:
root@compute2:/home/s1# tcpdump -envi eth0 -p icmp -v

tcpdump: listening on eth0, link-type EN10MB (Ethernet), capture size  bytes

::27.285150 :::4f:: > :::c7:cf:ca, ethertype IPv4 (0x0800), length : (tos 0x0, ttl , id , offset , flags [DF], proto ICMP (), length )

    192.168.1.32 > 192.168.1.15: ICMP echo request, id , seq , length

::27.285777 :::c7:cf:ca > :::4f::, ethertype IPv4 (0x0800), length : (tos 0x0, ttl , id , offset , flags [none], proto ICMP (), length )

    192.168.1.15 > 192.168.1.32: ICMP echo reply, id , seq , length
在 host1 的 veth1 上,能看到发出的网络包的源 IP 和收到的网络包的目的 IP 皆为内部网段的 IP 地址:
root@compute2:/home/s1# tcpdump -envi veth1 -p icmp -v

tcpdump: listening on veth1, link-type EN10MB (Ethernet), capture size  bytes

::13.355956 b2::7e:b6:e9:4e > ee::ae:dd:6f:7f, ethertype IPv4 (0x0800), length : (tos 0x0, ttl , id , offset , flags [DF], proto ICMP (), length )

    192.168.45.3 > 192.168.1.15: ICMP echo request, id , seq , length

::13.356391 ee::ae:dd:6f:7f > b2::7e:b6:e9:4e, ethertype IPv4 (0x0800), length : (tos 0x0, ttl , id , offset , flags [none], proto ICMP (), length )

    192.168.1.15 > 192.168.45.3: ICMP echo reply, id , seq , length
那为什么在 forwarding 发生之前,在 iptables nat 表中并没有显式做 DNAT 的情况下 veth1 和 eth0 之间有了 DNAT 呢?
原因是 ICMP 使用了 Query ID,而 NAT 会自动根据 ICMP Query ID 对 ICMP echo reply 做 DNAT。根据 https://tools.ietf.org/html/rfc5508 的 3.1. ICMP Query Mapping 章节,当内部的 host1 发一个 ICMP Query 给外部 host2 时,linux 内核的 NAT 模块会针对 NAT 的外部地址分配一个匹配的 query ID(上面例子中的 id 29610);然后当收到 ICMP echo reply 时,NAT模块会根据 ICMP Query ID 以及 ICMP header checksum 将外部 IP 转化为内部 IP,然后再做 forwarding。也可以看出,ICMP Query ID 类似于 TCP 和 UDP 使用的端口号(port number),两者的区别在于 NAT 为 ICMP 自动做了 DNAT,而 TCP 和 UDP 则需要显式添加 DNAT 规则。
2.2 关于 IP forwarding
 (图片来源)
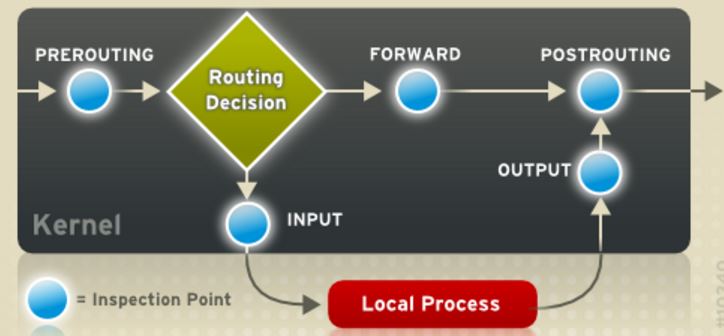
Linux 内核在从 veth1 上收到 myspace 发过来的 ICMP 包以后,
- 执行 PREROTING 规则,本例不需要此配置此规则。
- 执行 Routing decision。它会检查网络包的目的IP地址,发现它不在本机上,说明需要进行 routing (FORWARD)。因为 Linux 上默认的 IP forwarding 是关闭的,因此需要执行第七条命令来开启它;然后再检查 iptable 规则中的这种 forwarding (ICMP 包从veth1 出再进入 eth0)。通常为了安全起见,管理员会将 FORWARD 的默认规则设置为 DROP,此时则需要执行第九条命令显式地允许(ACCEPT)所需要的 forwarding。
- 执行 ip forwarding。查找 host1 上的路由表,网络包会被路由到 eth0。
- 执行 POSTROUTING 规则。因为此时的网络包的源 IP 地址仍然为内部地址,为了避免 ICMP 网络包有去无回,需要通过 SNAT 将内部地址转换为外部地址。这就是第八条的作用。
- 从 eth0 发出
(3)关于 myspace 的默认路由
因为 myspace 只有一根网线(veth)连接到 veth1,因此,必须将默认的路由器地址设置为 veth1 的 IP 地址。
2.3 DNAT
上面的配置只是为了能从 myspace 中访问外网。要使得外面网络能访问 myspace 中的应用的话,则需要在 host1 上添加 DNAT 规则,比如将 8080 端口受到的 TCP 转到内部 IP 上的 80 端口;同时还需要配置 forward 规则,允许从 eth0 出到 veth1 进。基本过程为:
对方计算机使用 host1 的 IP 地址和特定端口访问 mysapce 中的 TCP 应用 (192.168.1.32:8080),
- Linux 内核在从 eth0 上收到发过来的TCP包(IP 为 192.168.1.32,端口为 8080)
- 执行 PREROTING 规则,将目的 IP 及端口修改为 192.168.45.3 和 80
- 执行 Routing decision。它会检查网络包的目的IP地址,发现它不在本机上,说明需要进行 routing (FORWARD)。检查 Linux 的 IP forwarding 是否打开;然后再检查 iptable 规则中的这种 forwarding (TCP 包从 eth0 出再进入 veth1)。通常为了安全起见,管理员会将 FORWARD 的默认规则设置为 DROP,此时则需要执行类似第九条命令显式地允许(ACCEPT)所需要的 forwarding。
- 执行 ip forwarding。查找 host1 上的路由表,网络包会被路由到 veth1。
- 执行 POSTROUTING 规则。尽管有第八条规则,但是它要求源地址在内部网段,因此不会执行。
- 从 veth1 发出的包通过 veth 设备进入 myspace 的 veth0 网卡。
- 被 80 端口上的应用接收到。
Netruon 理解(11):使用 NAT 将 Linux network namespace 连接外网的更多相关文章
- Netruon 理解(12):使用 Linux bridge 将 Linux network namespace 连接外网
学习 Neutron 系列文章: (1)Neutron 所实现的虚拟化网络 (2)Neutron OpenvSwitch + VLAN 虚拟网络 (3)Neutron OpenvSwitch + GR ...
- 【转】理解Docker容器网络之Linux Network Namespace
原文:理解Docker容器网络之Linux Network Namespace 由于2016年年中调换工作的原因,对容器网络的研究中断过一段时间.随着当前项目对Kubernetes应用的深入,我感觉之 ...
- centos中NAT模式下静态IP连接外网
使用linux虚拟机时,通常会用到yum命令来安装软件,然而这个命令需要连外网下载软件,用maven下载jar包也需要外网.虚拟机在内网可以互相ping通,然而ping不了外网,于是通过试验,终于找到 ...
- vmware 中Linux系统怎么连接外网?
VMware虚拟机有三种网络模式,分别是Bridged(桥接模式).NAT(网络地址转换模式).Host-only(主机模式). VMware workstation安装好之后会多出两个网络连接,分别 ...
- linux: centos设置ip以及连接外网
注明:我使用的的使centos 7,所有文件名是ifcfg-enp0s3, 一. 设置虚拟机中linux的ip,使本地能连通虚拟机的linux系统 1>.进入本地windows的cmd,输入ip ...
- 虚拟机NAT模式连接外网
虚拟机三种联网方式: 一.NAT(推荐使用) 功能:①可以和外部网络连通 ②可以隔离外部网络 二.桥接模式 功能:直接 ...
- NAT模式下VMware中CentOS7无法连接外网的解决方法
故障现象 ----------------------------------------------------------------------------------------------- ...
- 虚拟机中的centos在nat模式下连不上外网
这两天需要配置ftp服务器,可是虚拟机在nat模式下死活连不上外网,主机能够通过该ssh与虚拟机进行连接,虚拟机也能ping同一网段主机的IP地址,但就是ping不通外网, 开始我是这样配置的: 主机 ...
- windows,linux,cmd查看公网/外网IP
1.linux(centos)查看公网/外网ip: curl ifconfig.me #inconfig.me是一个网站来的#或者,如果上面的无法访问curl icanhazip.com 2.Wi ...
随机推荐
- 【Win10开发】关于AutoSuggestBox
其实看名字我们就知道,这个控件可以提供一些建议文本.我们在做搜索框时可以做一些文本来让用户选择. 这个控件有两个关键的事件QuerySubmitted和SuggestionChosen事件,当下拉列表 ...
- sqlserver附加 mdf、ldf的方法(手记)
exec sp_attach_db 'bookstore','E:\homework\bookstore_Data.MDF','E:\homework\bookstore_Log.LDF' EXEC ...
- Java02
一.IDE的概念.eclipse的介绍.安装.使用 (用eclipse写HelloWorld例子) 1.什么是IDE(Integrated Development Environment)? ...
- java web学习总结(八) -------------------HttpServletResponse对象(二)
一.HttpServletResponse常见应用--生成验证码 1.1.生成随机图片用作验证码 生成图片主要用到了一个BufferedImage类,
- WaterfallFlowLayout瀑布流用重写UICollectionViewFlowLayout类实现
最近调研瀑布流,在gitHub上下了个Demo发现它的所有视图都是用Main.storyboard拖的, 自己研究半天没研究明白; 然后就又找了一个Demo, 它的视图全是手打的, 但是实现的方法不太 ...
- xCode5 在ios7模拟器中出现__cxa_throw _pthread_exit错误
xCode5 在ios7模拟器中出现__cxa_throw _pthread_exit错误 2013年10月28日 ⁄ 综合 ⁄ 共 233字 ⁄ 字号 小 中 大 ⁄ 评论关闭 在项目中用模拟器 ...
- Feathers UI 性能优化
Feathers UI作者写的 http://joshblog.net/2013/feathers-performance-tips/
- Session 失效原因
转载http://blog.csdn.net/LLorJJ999/article/details/4107464 昨天去GTSC面试,有面试官问我关于Session丢失之后怎么查的问题,说老实话,开发 ...
- 使用xhprof分析php代码性能
推荐在Linux平台使用xhprof,win下xhprof目前稳定版本在php5.5 安装xhprof 下载地址 http://pecl.php.net/get/xhprof-0.9.4.tgz 与p ...
- [Java编程思想-学习笔记]第2章 一切都是对象
2.1 创建新的数据类型:类 通过第一章掌握了面向对象的理论后,我们知道每个对象必定属于一个类型,那么Java如何创建新的数据类型?如下程序所示: class Circle { // 属性 // 方 ...