fish_redux使用详解---看完就会用!
说句心里话,这篇文章,来来回回修改了很多次,如果认真看完这篇文章,还不会写fish_redux,请在评论里喷我。
前言
来学学难搞的fish_redux框架吧,这个框架,官方的文档真是一言难尽,比flutter_bloc官网的文档真是逊色太多了,但是一旦知道怎么写,页面堆起来也是非常爽呀,结构分明,逻辑也会错落有致。
其实在当时搞懂这个框架的时候,就一直想写一篇文章记录下,但是因为忙(lan),导致一直没写,现在觉得还是必须把使用的过程记录下,毕竟刚上手这个框架是个蛋痛的过程,必须要把这个过程做个记录。
这不仅仅是记录的文章,文中所给出的示例,也是我重新构思去写的,过程也是力求阐述清楚且详细。

几个问题点
- 页面切换的转场动画
- 页面怎么更新数据
- fish_redux各个模块之间,怎么传递数据
- 页面跳转传值,及其接受下个页面回传的值
- 怎么配合ListView使用
- ListView怎么使用adapter,数据怎么和item绑定
- 怎么将Page当做widget使用(BottomNavigationBar,NavigationRail等等导航栏控件会使用到)
- 这个直接使用:XxxPage.buildPage(null) 即可
如果你在使用fish_redux的过程中遇到过上述的问题,那就来看看这篇文章吧!这里,会解答上面所有的问题点!
准备
引入
fish_redux相关地址
我用的是0.3.X的版本,算是第三版,相对于前几版,改动较大
- 引入fish_redux插件,想用最新版插件,可进入pub地址里面查看
fish_redux: ^0.3.4

#演示列表需要用到的库

dio: ^3.0.9    #网络请求框架

json_annotation: ^2.4.0 #json序列化和反序列化用的
开发插件
此处我们需要安装代码生成插件,可以帮我们生成大量文件和模板代码
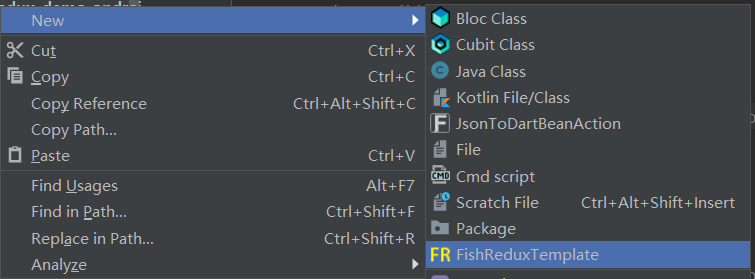
在Android Studio里面搜索”fish“就能搜出插件了,插件名叫:FishReduxTemplate

BakerJQ编写:Android Studio的Fish Redux模板。
huangjianke编写:VSCode的Fish Redux模板
创建
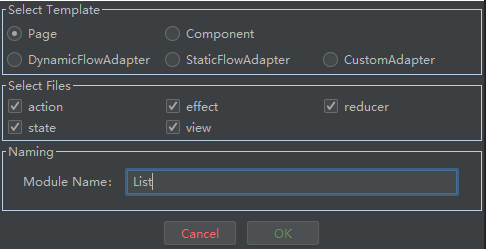
- 这里我在新建的count文件夹上,选择新建文件,选择:New ---> FishReduxTemplate
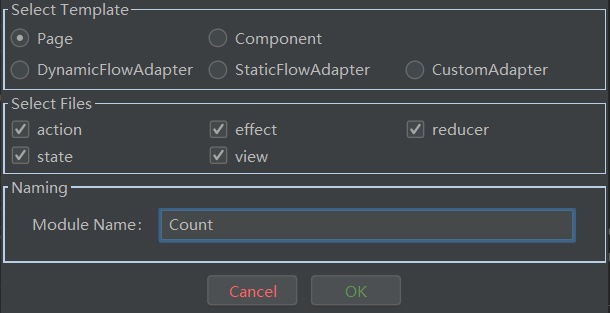
- 此处选择:Page,底下的“Select Fils”全部选择,这是标准的redux文件结构;这边命名建议使用大驼峰:Count
- Component:这个一般是可复用的相关的组件;列表的item,也可以选择这个
- Adapter:这里有三个Adapter,都可以不用了;fish_redux第三版推出了功能更强大的adapter,更加灵活的绑定方式
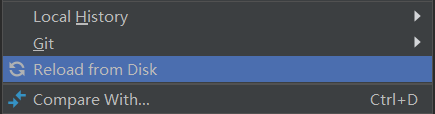
- 创建成功后,记得在创建的文件夹上右击,选择:Reload From Disk;把创建的文件刷新出来
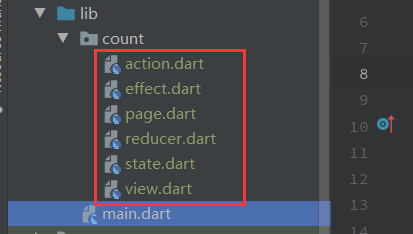
- 创建成功的文件结构
- page:总页面,注册effect,reducer,component,adapter的功能,相关的配置都在此页面操作
- state:这地方就是我们存放子模块变量的地方;初始化变量和接受上个页面参数,也在此处,是个很重要的模块
- view:主要是我们写页面的模块
- action:这是一个非常重要的模块,所有的事件都在此处定义和中转
- effect:相关的业务逻辑,网络请求等等的“副作用”操作,都可以写在该模块
- reducer:该模块主要是用来更新数据的,也可以写一些简单的逻辑或者和数据有关的逻辑操作
- OK,至此就把所有的准备工作搞定了,下面可以开搞代码了

开发流程
redux流程
- 下图是阮一峰老师博客上放的redux流程图
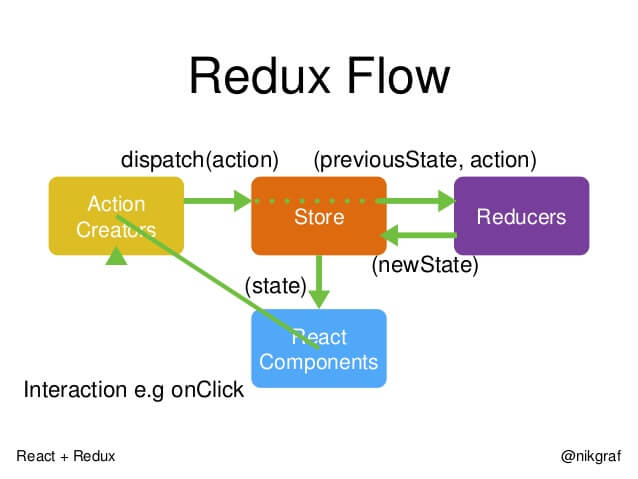
fish_redux流程
在写代码前,先看写下流程图,这图是凭着自己的理解画的
- 可以发现,事件的传递,都是通过dispatch这个方法,而且action这层很明显是非常关键的一层,事件的传递,都是在该层定义和中转的
- 这图在语雀上调了半天,就在上面加了个自己的github水印地址

通过俩个流程图对比,其中还是有一些差别的
- redux里面的store是全局的。fish_redux里面也有这个全局store的概念,放在子模块里面理解store,react;对应fish_redux里的就是:state,view
- fish_redux里面多了effect层:这层主要是处理逻辑,和相关网络请求之类
- reducer里面,理论上也是可以处理一些和数据相关,简单的逻辑;但是复杂的,会产生相应较大的“副作用”的业务逻辑,还是需要在effect中写
范例说明
这边写几个示例,来演示fish_redux的使用
- 计数器
- fish_redux正常情况下的流转过程
- fish_redux各模块怎么传递数据
- 页面跳转
- A ---> B(A跳转到B,并传值给B页面)
- B ---> A(B返回到A,并返回值给A页面)
- 列表文章
- 列表展示-网络请求
- 列表修改-单item刷新
- 多样式列表
- 列表存在的问题+解决方案
- 全局模块
- 全局切换主题
- 全局模式优化
- 大幅度提升开发体验
- Component使用
- page中使用component
- 广播
- 开发小技巧
- 弱化reducer
- widget组合式开发
计数器
效果图
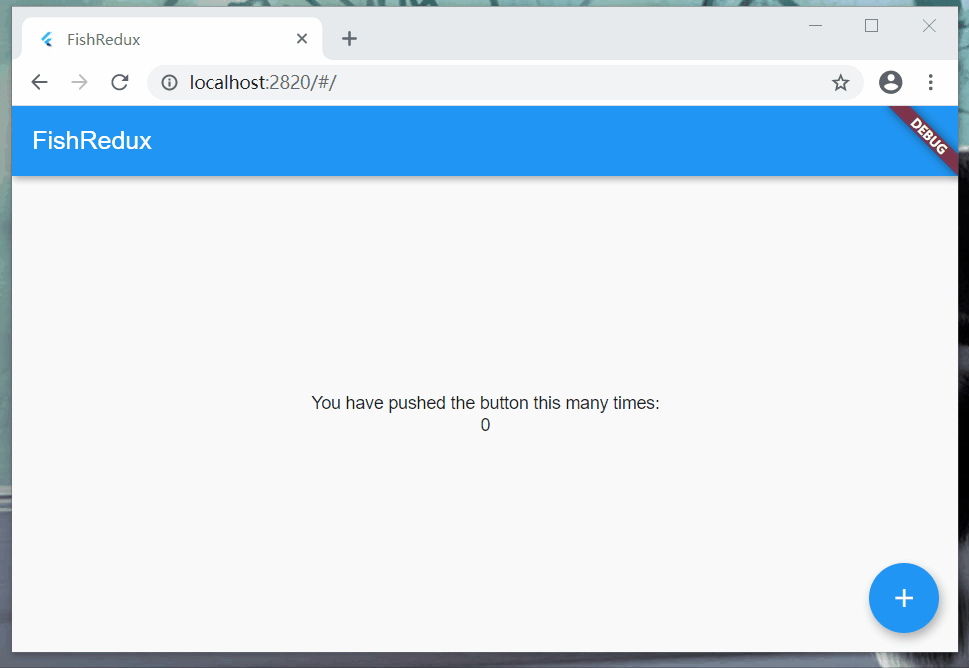
- 这个例子演示,view中点击此操作,然后更新页面数据;下述的流程,在effect中把数据处理好,通过action中转传递给reducer更新数据
- view ---> action ---> effect ---> reducer(更新数据)
- 注意:该流程将展示,怎么将数据在各流程中互相传递
标准模式
- main
- 这地方需要注意,cupertino,material这类系统包和fish_redux里包含的“Page”类名重复了,需要在这类系统包上使用hide,隐藏系统包里的Page类
- 关于页面的切换风格,可以在MaterialApp中的onGenerateRoute方法中,使用相应页面切换风格,这边使用ios的页面切换风格:cupertino
///需要使用hide隐藏Page

import 'package:flutter/cupertino.dart'hide Page;

import 'package:flutter/material.dart' hide Page;

void main() {

  runApp(MyApp());

}

Widget createApp() {

  ///定义路由

  final AbstractRoutes routes = PageRoutes(

    pages: <String, Page<Object, dynamic>>{

      "CountPage": CountPage(),

    },

  );

  return MaterialApp(

    title: 'FishDemo',

    home: routes.buildPage("CountPage", null), //作为默认页面

    onGenerateRoute: (RouteSettings settings) {

      //ios页面切换风格

      return CupertinoPageRoute(builder: (BuildContext context) {

        return routes.buildPage(settings.name, settings.arguments);

      })

//      Material页面切换风格

//      return MaterialPageRoute<Object>(builder: (BuildContext context) {

//        return routes.buildPage(settings.name, settings.arguments);

//      });

    },

  );

}
- state
- 定义我们在页面展示的一些变量,initState中可以初始化变量;clone方法的赋值写法是必须的
class CountState implements Cloneable<CountState> {

  int count;

  @override

  CountState clone() {

    return CountState()..count = count;

  }

}

CountState initState(Map<String, dynamic> args) {

  return CountState()..count = 0;

}
- view:这里面就是写界面的模块,buildView里面有三个参数
- state:这个就是我们的数据层,页面需要的变量都写在state层
- dispatch:类似调度器,调用action层中的方法,从而去回调effect,reducer层的方法
- viewService:这个参数,我们可以使用其中的方法:buildComponent("组件名"),调用我们封装的相关组件
Widget buildView(CountState state, Dispatch dispatch, ViewService viewService) {

  return _bodyWidget(state, dispatch);

}

Widget _bodyWidget(CountState state, Dispatch dispatch) {

  return Scaffold(

    appBar: AppBar(

      title: Text("FishRedux"),

    ),

    body: Center(

      child: Column(

        mainAxisAlignment: MainAxisAlignment.center,

        children: <Widget>[

          Text('You have pushed the button this many times:'),

          ///使用state中的变量,控住数据的变换

          Text(state.count.toString()),

        ],

      ),

    ),

    floatingActionButton: FloatingActionButton(

      onPressed: () {

        ///点击事件,调用action 计数自增方法

        dispatch(CountActionCreator.countIncrease());

      },

      child: Icon(Icons.add),

    ),

  );

}
- action
- 该层是非常重要的模块,页面所有的行为都可以在本层直观的看到
- XxxxAction中的枚举字段是必须的,一个事件对应有一个枚举字段,枚举字段是:effect,reducer层标识的入口
- XxxxActionCreator类中的方法是中转方法,方法中可以传参数,参数类型可任意;方法中的参数放在Action类中的payload字段中,然后在effect,reducer中的action参数中拿到payload值去处理就行了
- 这地方需要注意下,默认生成的模板代码,return的Action类加了const修饰,如果使用Action的payload字段赋值并携带数据,是会报错的;所以这里如果需要携带参数,请去掉const修饰关键字
enum CountAction { increase, updateCount }

class CountActionCreator {

  ///去effect层去处理自增数据

  static Action countIncrease() {

    return Action(CountAction.increase);

  }

  ///去reducer层更新数据,传参可以放在Action类中的payload字段中,payload是dynamic类型,可传任何类型

  static Action updateCount(int count) {

    return Action(CountAction.updateCount, payload: count);

  }

}
- effect
- 如果在调用action里面的XxxxActionCreator类中的方法,相应的枚举字段,会在combineEffects中被调用,在这里,我们就能写相应的方法处理逻辑,方法中带俩个参数:action,ctx
- action:该对象中,我们可以拿到payload字段里面,在action里面保存的值
- ctx:该对象中,可以拿到state的参数,还可以通过ctx调用dispatch方法,调用action中的方法,在这里调用dispatch方法,一般是把处理好的数据,通过action中转到reducer层中更新数据
- 如果在调用action里面的XxxxActionCreator类中的方法,相应的枚举字段,会在combineEffects中被调用,在这里,我们就能写相应的方法处理逻辑,方法中带俩个参数:action,ctx
Effect<CountState> buildEffect() {

  return combineEffects(<Object, Effect<CountState>>{

    CountAction.increase: _onIncrease,

  });

}

///自增数

void _onIncrease(Action action, Context<CountState> ctx) {

  ///处理自增数逻辑

  int count = ctx.state.count + 1;

  ctx.dispatch(CountActionCreator.updateCount(count));

}
- reducer
- 该层是更新数据的,action中调用的XxxxActionCreator类中的方法,相应的枚举字段,会在asReducer方法中回调,这里就可以写个方法,克隆state数据进行一些处理,这里面有俩个参数:state,action
- state参数经常使用的是clone方法,clone一个新的state对象;action参数基本就是拿到其中的payload字段,将其中的值,赋值给state
Reducer<CountState> buildReducer() {

  return asReducer(

    <Object, Reducer<CountState>>{

      CountAction.updateCount: _updateCount,

    },

  );

}

///通知View层更新界面

CountState _updateCount(CountState state, Action action) {

  final CountState newState = state.clone();

  newState..count = action.payload;

  return newState;

}
- page模块不需要改动,这边就不贴代码了
优化
从上面的例子看到,如此简单数据变换,仅仅是个state中一个参数自增的过程,effect层就显得有些多余;所以,把流程简化成下面
- view ---> action ---> reducer
注意:这边把effect层删掉,该层可以舍弃了;然后对view,action,reducer层代码进行一些小改动
搞起来
- view
- 这边仅仅把点击事件的方法,微微改了下:CountActionCreator.countIncrease()改成CountActionCreator.updateCount()
Widget buildView(CountState state, Dispatch dispatch, ViewService viewService) {

  return _bodyWidget(state, dispatch);

}

Widget _bodyWidget(CountState state, Dispatch dispatch) {

  return Scaffold(

    appBar: AppBar(

      title: Text("FishRedux"),

    ),

    body: Center(

      child: Column(

        mainAxisAlignment: MainAxisAlignment.center,

        children: <Widget>[

          Text('You have pushed the button this many times:'),

          Text(state.count.toString()),

        ],

      ),

    ),

    floatingActionButton: FloatingActionButton(

      onPressed: () {

        ///点击事件,调用action 计数自增方法

        dispatch(CountActionCreator.updateCount());

      },

      child: Icon(Icons.add),

    ),

  );

}
- action
- 这里只使用一个枚举字段,和一个方法就行了,也不用传啥参数了
enum CountAction { updateCount }

class CountActionCreator {

  ///去reducer层更新数据,传参可以放在Action类中的payload字段中,payload是dynamic类型,可传任何类型

  static Action updateCount() {

    return Action(CountAction.updateCount);

  }

}
- reducer
- 这里直接在:_updateCount方法中处理下简单的自增逻辑
Reducer<CountState> buildReducer() {

  return asReducer(

    <Object, Reducer<CountState>>{

      CountAction.updateCount: _updateCount,

    },

  );

}

///通知View层更新界面

CountState _updateCount(CountState state, Action action) {

  final CountState newState = state.clone();

  newState..count = state.count + 1;

  return newState;

}
搞定
- 可以看见优化了后,代码量减少了很多,对待不同的业务场景,可以灵活的变动,使用框架,但不要拘泥框架;但是如果有网络请求,很复杂的业务逻辑,就万万不能写在reducer里面了,一定要写在effect中,这样才能保证一个清晰的解耦结构,保证处理数据和更新数据过程分离

页面跳转
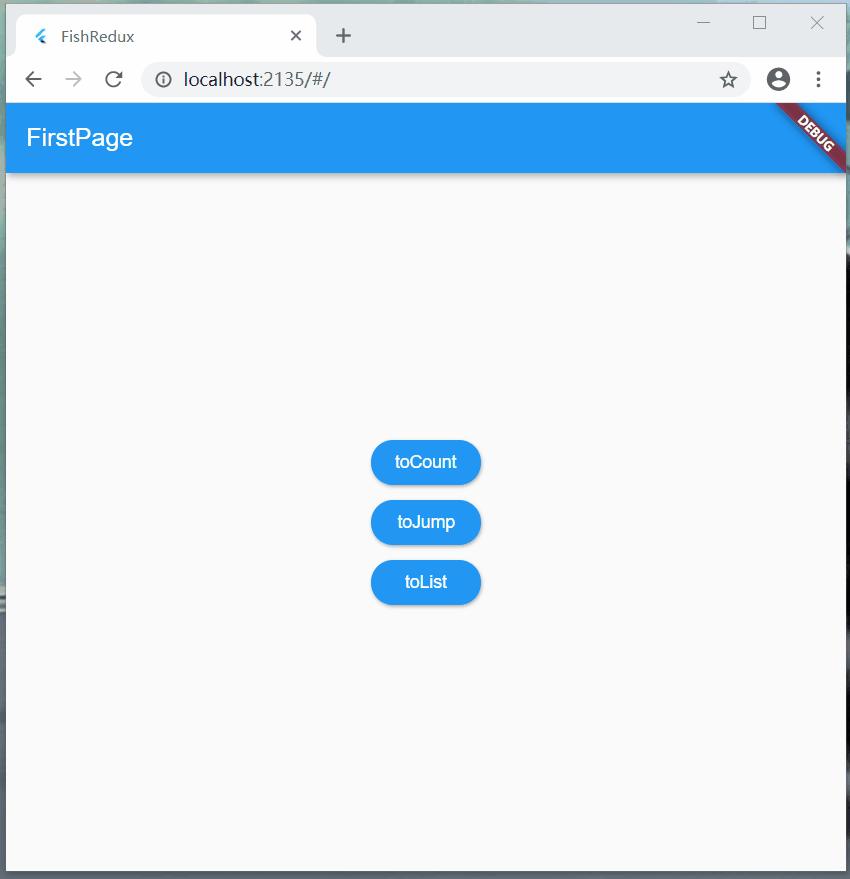
效果图

- 从效果图,很容易看到,俩个页面相互传值
- FirstPage ---> SecondPage(FirstPage跳转到SecondPage,并传值给SecondPage页面)
- SecondPage ---> FirstPage(SecondPage返回到FirstPage,并返回值给FirstPage页面)
实现
- 从上面效果图上看,很明显,这边需要实现俩个页面,先看看main页面的改动
- main
- 这里只增加了俩个页面:FirstPage和SecondPage;并将主页面入口换成了:FirstPage
Widget createApp() {

  ///定义路由

  final AbstractRoutes routes = PageRoutes(

    pages: <String, Page<Object, dynamic>>{

      ///计数器模块演示

      "CountPage": CountPage(),

      ///页面传值跳转模块演示

      "FirstPage": FirstPage(),

      "SecondPage": SecondPage(),

    },

  );

  return MaterialApp(

    title: 'FishRedux',

    home: routes.buildPage("FirstPage", null), //作为默认页面

    onGenerateRoute: (RouteSettings settings) {

      //ios页面切换风格

      return CupertinoPageRoute(builder: (BuildContext context) {

        return routes.buildPage(settings.name, settings.arguments);

      });

    },

  );

}
FirstPage
先来看看该页面的一个流程
- view ---> action ---> effect(跳转到SecondPage页面)
- effect(拿到SecondPage返回的数据) ---> action ---> reducer(更新页面数据)
state
- 先写state文件,这边需要定义俩个变量来
- fixedMsg:这个是传给下个页面的值
- msg:在页面上展示传值得变量
- initState方法是初始化变量和接受页面传值的,这边我们给他赋个初始值
- 先写state文件,这边需要定义俩个变量来
class FirstState implements Cloneable<FirstState> {

  ///传递给下个页面的值

  static const String fixedMsg = "\n我是FirstPage页面传递过来的数据:FirstValue";

  ///展示传递过来的值

  String msg;

  @override

  FirstState clone() {

    return FirstState()..msg = msg;

  }

}

FirstState initState(Map<String, dynamic> args) {

  return FirstState()..msg = "\n暂无";

}
- view
- 该页面逻辑相当简单,主要的仅仅是在onPressed方法中处理逻辑
Widget buildView(FirstState state, Dispatch dispatch, ViewService viewService) {

  return _bodyWidget(state, dispatch);

}

Widget _bodyWidget(FirstState state, Dispatch dispatch) {

  return Scaffold(

    appBar: AppBar(

      title: Text("FirstPage"),

    ),

    body: Center(

      child: Column(

        mainAxisAlignment: MainAxisAlignment.center,

        children: <Widget>[

          Text('下方数据是SecondPage页面传递过来的:'),

          Text(state.msg),

        ],

      ),

    ),

    floatingActionButton: FloatingActionButton(

      onPressed: () {

        ///跳转到Second页面

        dispatch(FirstActionCreator.toSecond());

      },

      child: Icon(Icons.arrow_forward),

    ),

  );

}
- action:这里需要定义俩个枚举事件
- toSecond:跳转到SecondPage页面
- updateMsg:拿到SecondPage页面返回的数据,然后更新页面数据
enum FirstAction { toSecond , updateMsg}

class FirstActionCreator {

  ///跳转到第二个页面

  static Action toSecond() {

    return const Action(FirstAction.toSecond);

  }

  ///拿到第二个页面返回的数据,执行更新数据操作

  static Action updateMsg(String msg) {

    return Action(FirstAction.updateMsg, payload: msg);

  }

}
- effect
- 此处需要注意:fish_redux 框架中的Action类和系统包中的重名了,需要把系统包中Action类隐藏掉
- 传值直接用pushNamed方法即可,携带的参数可以写在arguments字段中;pushNamed返回值是Future类型,如果想获取他的返回值,跳转方法就需要写成异步的,等待从SecondPage页面获取返回的值,
/// 使用hide方法,隐藏系统包里面的Action类

import 'package:flutter/cupertino.dart' hide Action;

Effect<FirstState> buildEffect() {

  return combineEffects(<Object, Effect<FirstState>>{

    FirstAction.toSecond: _toSecond,

  });

}

void _toSecond(Action action, Context<FirstState> ctx) async{

  ///页面之间传值;这地方必须写个异步方法,等待上个页面回传过来的值;as关键字是类型转换

  var result = await Navigator.of(ctx.context).pushNamed("SecondPage", arguments: {"firstValue": FirstState.fixedMsg});

  ///获取到数据,更新页面上的数据

  ctx.dispatch(FirstActionCreator.updateMsg( (result as Map)["secondValue"]) );

}
- reducer
- 这里就是从action里面获取传递的值,赋值给克隆对象中msg字段即可
Reducer<FirstState> buildReducer() {

  return asReducer(

    <Object, Reducer<FirstState>>{

      FirstAction.updateMsg: _updateMsg,

    },

  );

}

FirstState _updateMsg(FirstState state, Action action) {

  return state.clone()..msg = action.payload;

}
SecondPage
- 这个页面比较简单,后续不涉及到页面数据更新,所以reducer模块可以不写,看看该页面的流程
- view ---> action ---> effect(pop当前页面,并携带值返回)
- state
- 该模块的变量和FirstPage类型,就不阐述了
- initState里面通过args变量获取上个页面传递的值,上个页面传值需要传递Map类型,这边通过key获取相应的value
class SecondState implements Cloneable<SecondState> {

  ///传递给下个页面的值

  static const String fixedMsg = "\n我是SecondPage页面传递过来的数据:SecondValue";

  ///展示传递过来的值

  String msg;

  @override

  SecondState clone() {

    return SecondState()..msg = msg;

  }

}

SecondState initState(Map<String, dynamic> args) {

  ///获取上个页面传递过来的数据

  return SecondState()..msg = args["firstValue"];

}
- view
- 这边需要注意的就是:WillPopScope控件接管AppBar的返回事件
Widget buildView(SecondState state, Dispatch dispatch, ViewService viewService) {

  return WillPopScope(

    child: _bodyWidget(state),

    onWillPop: () {

      dispatch(SecondActionCreator.backFirst());

      ///true:表示执行页面返回    false:表示不执行返回页面操作,这里因为要传值,所以接管返回操作

      return Future.value(false);

    },

  );

}

Widget _bodyWidget(SecondState state) {

  return Scaffold(

    appBar: AppBar(

      title: Text("SecondPage"),

    ),

    body: Center(

      child: Column(

        mainAxisAlignment: MainAxisAlignment.center,

        children: <Widget>[

          Text('下方数据是FirstPage页面传递过来的:'),

          Text(state.msg),

        ],

      ),

    ),

  );

}
- action
enum SecondAction { backFirst }

class SecondActionCreator {

  ///返回到第一个页面,然后从栈中移除自身,同时传回去一些数据

  static Action backFirst() {

    return Action(SecondAction.backFirst);

  }

}
- effect
- 此处同样需要隐藏系统包中的Action类
- 这边直接在pop方法的第二个参数,写入返回数据
///隐藏系统包中的Action类

import 'package:flutter/cupertino.dart' hide Action;

Effect<SecondState> buildEffect() {

  return combineEffects(<Object, Effect<SecondState>>{

    SecondAction.backFirst: _backFirst,

  });

}

void _backFirst(Action action, Context<SecondState> ctx) {

  ///pop当前页面,并且返回相应的数据

  Navigator.pop(ctx.context, {"secondValue": SecondState.fixedMsg});

}
搞定
- 因为page模块不需要改动,所以就没必要将page模块代码附上了哈
- OK,到这里,咱们也已经把俩个页面相互传值的方式get到了!

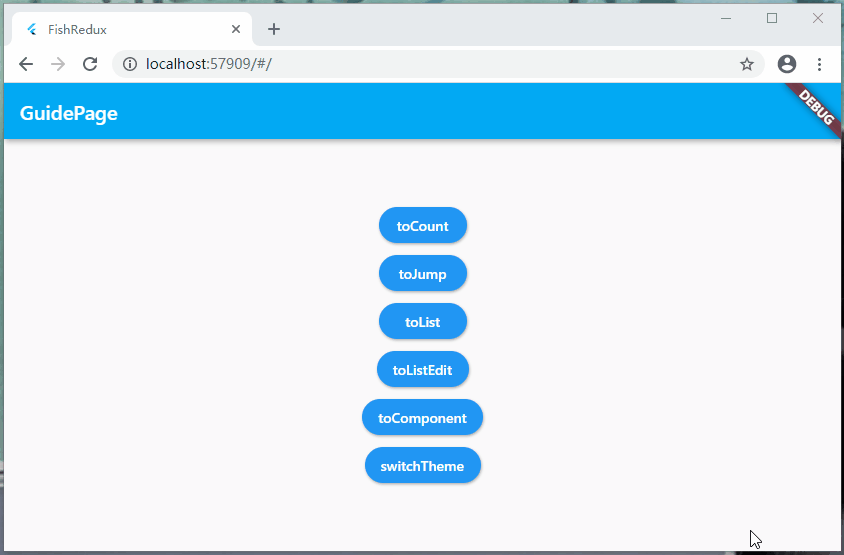
列表文章
理解了上面俩个案例,相信你可以使用fish_redux实现一部分页面了;但是,我们堆页面的过程中,能体会列表模块是非常重要的一部分,现在就来学学,在fish_redux中怎么使用ListView吧!
- 废话少说,上号!

列表展示-网络请求
效果图
- 效果图对于列表的滚动,做了俩个操作:一个是拖拽列表;另一个是滚动鼠标的滚轮。flutter对鼠标触发的相关事件也支持的越来越好了!
- 这边我们使用的是玩Android的api,这个api有个坑的地方,没设置开启跨域,所以运行在web上,这个api使用会报错,我在玩Android的github上提了issue,哎,也不知道作者啥时候解决,,,
- 这地方只能曲线救国,关闭浏览器跨域限制,设置看这里:https://www.jianshu.com/p/56b1e01e6b6a
- 如果运行在虚拟机上,就完全不会出现这个问题!
准备
- 先看下文件结构
- main
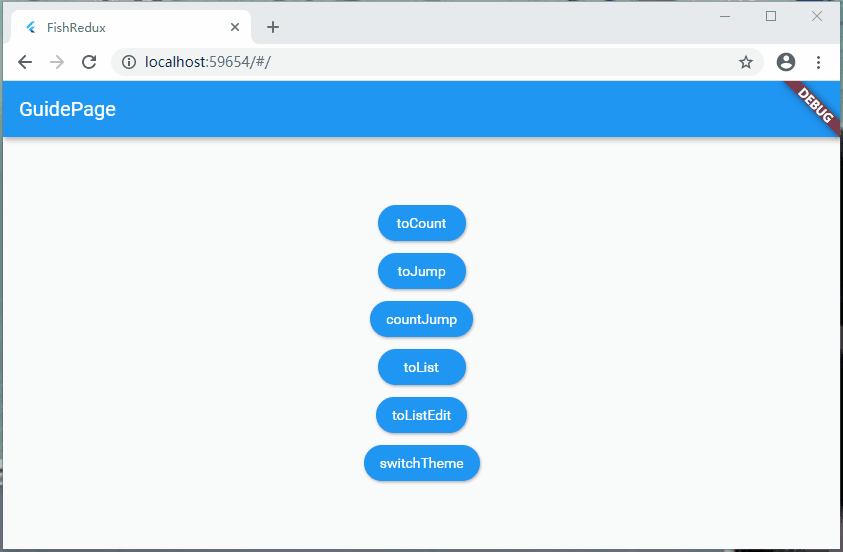
- 这边改动非常小,只在路由里,新增了:GuidePage,ListPage;同时将home字段中的默认页面,改成了:GuidePage页面;导航页面代码就不贴在文章里了,下面贴下该页面链接
- ListPage才是重点,下文会详细说明
void main() {

  runApp(createApp());

}

Widget createApp() {

  ///定义路由

  final AbstractRoutes routes = PageRoutes(

    pages: <String, Page<Object, dynamic>>{

      ///导航页面

      "GuidePage": GuidePage(),

      ///计数器模块演示

      "CountPage": CountPage(),

      ///页面传值跳转模块演示

      "FirstPage": FirstPage(),

      "SecondPage": SecondPage(),

      ///列表模块演示

      "ListPage": ListPage(),

    },

  );

  return MaterialApp(

    title: 'FishRedux',

    home: routes.buildPage("GuidePage", null), //作为默认页面

    onGenerateRoute: (RouteSettings settings) {

      //ios页面切换风格

      return CupertinoPageRoute(builder: (BuildContext context) {

        return routes.buildPage(settings.name, settings.arguments);

      });

    },

  );

}
流程
- Adapter实现的流程
- 创建item(Component) ---> 创建adapter文件 ---> state集成相应的Source ---> page里面绑定adapter
- 通过以上四步,就能在fish_redux使用相应列表里面的adapter了,过程有点麻烦,但是熟能生巧,多用用就能很快搭建一个复杂的列表了
- 总流程:初始化列表模块 ---> item模块 ---> 列表模块逻辑完善
- 初始化列表模块
- 这个就是正常的创建fish_redux模板代码和文件
- item模块
- 根据接口返回json,创建相应的bean ---> 创建item模块 ---> 编写state ---> 编写view界面
- 列表模块逻辑完善:俩地方分俩步(adapter创建及其绑定,正常page页面编辑)
- 创建adapter文件 ---> state调整 ---> page中绑定adapter
- view模块编写 ---> action添加更新数据事件 ---> effect初始化时获取数据并处理 ---> reducer更新数据
- 初始化列表模块
- 整体流程确实有些多,但是咱们按照整体三步流程流程走,保证思路清晰就行了
初始化列表模块
- 此处新建个文件夹,在文件夹上新建fis_redux文件就行了;这地方,我们选择page,整体的五个文件:action,effect,reducer,state,view;全部都要用到,所以默认全选,填入Module的名字,点击OK
item模块
按照流程走
- 根据接口返回json,创建相应的bean ---> 创建item模块 ---> 编写state ---> 编写view界面
准备工作
创建bean实体
- 根据api返回的json数据,生成相应的实体
- json转实体
- 网站:https://javiercbk.github.io/json_to_dart/
- 插件:AS中可以搜索:FlutterJsonBeanFactory
- 这地方生成了:ItemDetailBean;代码俩百多行就不贴了,具体的内容,点击下面链接
创建item模块
- 这边我们实现一个简单的列表,item仅仅做展示功能;不做点击,更新ui等操作,所以这边我们就不需要创建:effect,reducer,action文件;只选择:state和view就行了
- 创建item,这里选择component

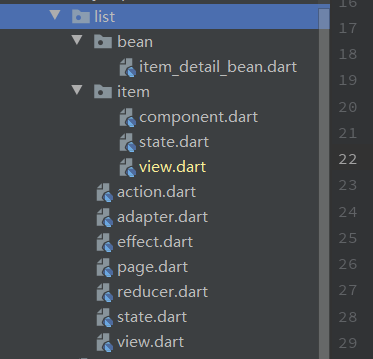
文件结构
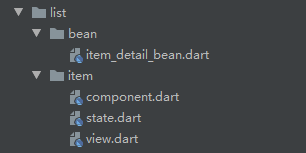
OK,bean文件搞定了,再来看看,item文件中的文件,这里component文件不需要改动,所以这地方,我们只需要看:state.dart,view.dart
- state
- 这地方还是常规的写法,因为json生成的bean里面,能用到的所有数据,都在Datas类里面,所以,这地方建一个Datas类的变量即可
- 因为,没用到reducer,实际上clone实现方法都能删掉,防止后面可能需要clone对象,暂且留着
import 'package:fish_redux/fish_redux.dart';

import 'package:fish_redux_demo/list/bean/item_detail_bean.dart';

class ItemState implements Cloneable<ItemState> {

  Datas itemDetail;

  ItemState({this.itemDetail});

  @override

  ItemState clone() {

    return ItemState()

        ..itemDetail = itemDetail;

  }

}

ItemState initState(Map<String, dynamic> args) {

  return ItemState();

}
- view
- 这里item布局稍稍有点麻烦,整体上采用的是:水平布局(Row),分左右俩大块
- 左边:单纯的图片展示
- 右边:采用了纵向布局(Column),结合Expanded形成比例布局,分别展示三块东西:标题,内容,作者和时间
- OK,这边view只是简单用到了state提供的数据形成的布局,没有什么要特别注意的地方
- 这里item布局稍稍有点麻烦,整体上采用的是:水平布局(Row),分左右俩大块
Widget buildView(ItemState state, Dispatch dispatch, ViewService viewService) {

  return _bodyWidget(state);

}

Widget _bodyWidget(ItemState state) {

  return Card(

    shape: RoundedRectangleBorder(borderRadius: BorderRadius.circular(20)),

    elevation: 5,

    margin: EdgeInsets.only(left: 20, right: 20, top: 20),

    child: Row(

      children: <Widget>[

        //左边图片

        Container(

          margin: EdgeInsets.all(10),

          width: 180,

          height: 100,

          child: Image.network(

            state.itemDetail.envelopePic,

            fit: BoxFit.fill,

          ),

        ),

        //右边的纵向布局

        _rightContent(state),

      ],

    ),

  );

}

///item中右边的纵向布局,比例布局

Widget _rightContent(ItemState state) {

  return Expanded(

      child: Container(

    margin: EdgeInsets.all(10),

    height: 120,

    child: Column(

      mainAxisAlignment: MainAxisAlignment.start,

      children: <Widget>[

        //标题

        Expanded(

          flex: 2,

          child: Container(

            alignment: Alignment.centerLeft,

            child: Text(

              state.itemDetail.title,

              style: TextStyle(fontSize: 16),

              maxLines: 1,

              overflow: TextOverflow.ellipsis,

            ),

          ),

        ),

        //内容

        Expanded(

            flex: 4,

            child: Container(

              alignment: Alignment.centerLeft,

              child: Text(

                state.itemDetail.desc,

                style: TextStyle(fontSize: 12),

                maxLines: 3,

                overflow: TextOverflow.ellipsis,

              ),

            )),

        Expanded(

          flex: 3,

          child: Column(

            mainAxisAlignment: MainAxisAlignment.end,

            children: <Widget>[

              //作者

              Row(

                children: <Widget>[

                  Text("作者:", style: TextStyle(fontSize: 12)),

                  Expanded(

                    child: Text(state.itemDetail.author,

                        style: TextStyle(color: Colors.blue, fontSize: 12),

                        overflow: TextOverflow.ellipsis),

                  )

                ],

              ),

              //时间

              Row(children: <Widget>[

                Text("时间:", style: TextStyle(fontSize: 12)),

                Expanded(

                  child: Text(state.itemDetail.niceDate,

                      style: TextStyle(color: Colors.blue, fontSize: 12),

                      overflow: TextOverflow.ellipsis),

                )

              ])

            ],

          ),

        ),

      ],

    ),

  ));

}
item模块,就这样写完了,不需要改动什么了,接下来看看List模块
列表模块逻辑完善
首先最重要的,我们需要将adapter建立起来,并和page绑定
- 创建adapter文件 ---> state调整 ---> page中绑定adapter
adapter创建及其绑定
- 创建adapter
- 首先需要创建adapter文件,然后写入下面代码:这地方需要继承SourceFlowAdapter适配器,里面的泛型需要填入ListState,ListState这地方会报错,因为我们的ListState没有继承MutableSource,下面state的调整就是对这个的处理
- ListItemAdapter的构造函数就是通用的写法了,在super里面写入我们上面写好item样式,这是个pool应该可以理解为样式池,这个key最好都提出来,因为在state模块还需要用到,可以定义多个不同的item,很容易做成多样式item的列表;目前,我们这边只需要用一个,填入:ItemComponent()
class ListItemAdapter extends SourceFlowAdapter<ListState> {

  static const String item_style = "project_tab_item";

  ListItemAdapter()

      : super(

          pool: <String, Component<Object>>{

            ///定义item的样式

            item_style: ItemComponent(),

          },

        );

}
- state调整
- state文件中的代码需要做一些调整,需要继承相应的类,和adapter建立起关联
- ListState需要继承MutableSource;还必须定义一个泛型是item的ItemState类型的List,这俩个是必须的;然后实现相应的抽象方法就行了
- 这里只要向items里写入ItemState的数据,列表就会更新了
class ListState extends MutableSource implements Cloneable<ListState> {

  ///这地方一定要注意,List里面的泛型,需要定义为ItemState

  ///怎么更新列表数据,只需要更新这个items里面的数据,列表数据就会相应更新

  ///使用多样式,请写出  List<Object> items;

  List<ItemState> items;

  @override

  ListState clone() {

    return ListState()..items = items;

  }

  ///使用上面定义的List,继承MutableSource,就把列表和item绑定起来了

  @override

  Object getItemData(int index) => items[index];

  @override

  String getItemType(int index) => ListItemAdapter.item_style;

  @override

  int get itemCount => items.length;

  @override

  void setItemData(int index, Object data) {

    items[index] = data;

  }

}

ListState initState(Map<String, dynamic> args) {

  return ListState();

}
- page中绑定adapter
- 这里就是将我们的ListSate和ListItemAdapter适配器建立起连接
class ListPage extends Page<ListState, Map<String, dynamic>> {

  ListPage()

      : super(

          initState: initState,

          effect: buildEffect(),

          reducer: buildReducer(),

          view: buildView,

          dependencies: Dependencies<ListState>(

              ///绑定Adapter

              adapter: NoneConn<ListState>() + ListItemAdapter(),

              slots: <String, Dependent<ListState>>{}),

          middleware: <Middleware<ListState>>[],

        );

}
正常page页面编辑
整体流程
view模块编写 ---> action添加更新数据事件 ---> effect初始化时获取数据并处理 ---> reducer更新数据
view
- 这里面的列表使用就相当简单了,填入itemBuilder和itemCount参数就行了,这里就需要用viewService参数了哈
Widget buildView(ListState state, Dispatch dispatch, ViewService viewService) {

  return Scaffold(

    appBar: AppBar(

      title: Text("ListPage"),

    ),

    body: _itemWidget(state, viewService),

  );

}

Widget _itemWidget(ListState state, ViewService viewService) {

  if (state.items != null) {

    ///使用列表

    return ListView.builder(

      itemBuilder: viewService.buildAdapter().itemBuilder,

      itemCount: viewService.buildAdapter().itemCount,

    );

  } else {

    return Center(

      child: CircularProgressIndicator(),

    );

  }

}
- action
- 只需要写个更新items的事件就ok了
enum ListAction { updateItem }

class ListActionCreator {

  static Action updateItem(var list) {

    return Action(ListAction.updateItem, payload: list);

  }

}
- effect
- Lifecycle.initState是进入页面初始化的回调,这边可以直接用这个状态回调,来请求接口获取相应的数据,然后去更新列表
- 这地方有个坑,dio必须结合json序列号和反序列的库一起用,不然Dio无法将数据源解析成Response类型
Effect<ListState> buildEffect() {

  return combineEffects(<Object, Effect<ListState>>{

    ///进入页面就执行的初始化操作

    Lifecycle.initState: _init,

  });

}

void _init(Action action, Context<ListState> ctx) async {

  String apiUrl = "https://www.wanandroid.com/project/list/1/json";

  Response response = await Dio().get(apiUrl);

  ItemDetailBean itemDetailBean =

      ItemDetailBean.fromJson(json.decode(response.toString()));

  List<Datas> itemDetails = itemDetailBean.data.datas;

  ///构建符合要求的列表数据源

  List<ItemState> items = List.generate(itemDetails.length, (index) {

    return ItemState(itemDetail: itemDetails[index]);

  });

  ///通知更新列表数据源

  ctx.dispatch(ListActionCreator.updateItem(items));

}
- reducer
- 最后就是更新操作了哈,这里就是常规写法了
Reducer<ListState> buildReducer() {

  return asReducer(

    <Object, Reducer<ListState>>{

      ListAction.updateItem: _updateItem,

    },

  );

}

ListState _updateItem(ListState state, Action action) {

  return state.clone()..items = action.payload;

}
列表修改-单item刷新
效果图
- 这次来演示列表的单item更新,没有网络请求的操作,所以代码逻辑就相当简单了
结构
- 来看看代码结构
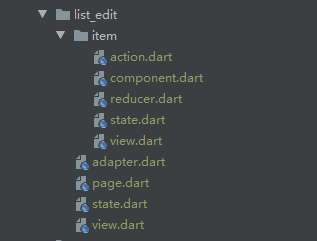
- 这地方很明显得发现,list_edit主体文件很少,因为这边直接在state里初始化了数据源,就没有后期更新数据的操作,所以就不需要:action,effect,reducer这三个文件!item模块则直接在reducer里更新数据,不涉及相关复杂的逻辑,所以不需要:effect文件。
列表模块
这次列表模块是非常的简单,基本不涉及什么流程,就是最基本初始化的一个过程,将state里初始化的数据在view中展示
- state ---> view
state
- 老规矩,先来看看state中的代码
- 这里一些新建了变量,泛型是ItemState(item的State),items变量初始化了一组数据;然后,同样继承了MutableSource,实现其相关方法
class ListEditState extends MutableSource implements Cloneable<ListEditState> {

  List<ItemState> items;

  @override

  ListEditState clone() {

    return ListEditState()..items = items;

  }

  @override

  Object getItemData(int index) => items[index];

  @override

  String getItemType(int index) => ListItemAdapter.itemName;

  @override

  int get itemCount => items.length;

  @override

  void setItemData(int index, Object data) {

    items[index] = data;

  }

}

ListEditState initState(Map<String, dynamic> args) {

  return ListEditState()

    ..items = [

      ItemState(id: 1, title: "列表Item-1", itemStatus: false),

      ItemState(id: 2, title: "列表Item-2", itemStatus: false),

      ItemState(id: 3, title: "列表Item-3", itemStatus: false),

      ItemState(id: 4, title: "列表Item-4", itemStatus: false),

      ItemState(id: 5, title: "列表Item-5", itemStatus: false),

      ItemState(id: 6, title: "列表Item-6", itemStatus: false),

    ];

}
- view
- view的代码主体仅仅是个ListView.builder,没有什么额外Widget
Widget buildView(ListEditState state, Dispatch dispatch, ViewService viewService) {

  return Scaffold(

    appBar: AppBar(

      title: Text("ListEditPage"),

    ),

    body: ListView.builder(

      itemBuilder: viewService.buildAdapter().itemBuilder,

      itemCount: viewService.buildAdapter().itemCount,

    ),

  );

}
- adapter
- 和上面类型,adapter继承SourceFlowAdapter适配器
class ListItemAdapter extends SourceFlowAdapter<ListEditState> {

  static const String itemName = "item";

  ListItemAdapter()

      : super(

          pool: <String, Component<Object>>{itemName: ItemComponent()},

        );

}
- page
- 在page里面绑定adapter
class ListEditPage extends Page<ListEditState, Map<String, dynamic>> {

  ListEditPage()

      : super(

    initState: initState,

    view: buildView,

    dependencies: Dependencies<ListEditState>(

        ///绑定适配器

        adapter: NoneConn<ListEditState>() + ListItemAdapter(),

        slots: <String, Dependent<ListEditState>>{}),

    middleware: <Middleware<ListEditState>>[],

  );

}
item模块
- 接下就是比较重要的item模块了,item模块的流程,也是非常的清晰
- view ---> action ---> reducer
- state
- 老规矩,先来看看state里面的代码;此处就是写常规变量的定义,这些在view中都能用得着
class ItemState implements Cloneable<ItemState> {

  int id;

  String title;

  bool itemStatus;

  ItemState({this.id, this.title, this.itemStatus});

  @override

  ItemState clone() {

    return ItemState()

      ..title = title

      ..itemStatus = itemStatus

      ..id = id;

  }

}

ItemState initState(Map<String, dynamic> args) {

  return ItemState();

}
- view
- 可以看到Checkbox的内部点击操作,我们传递了一个id参数,注意这个id参数是必须的,在更新item的时候来做区分用的
Widget buildView(ItemState state, Dispatch dispatch, ViewService viewService) {

  return Container(

    child: InkWell(

      onTap: () {},

      child: ListTile(

        title: Text(state.title),

        trailing: Checkbox(

          value: state.itemStatus,

          ///Checkbox的点击操作:状态变更

          onChanged: (value) => dispatch(ItemActionCreator.onChange(state.id)),

        ),

      ),

    ),

  );

}
- action
- 一个状态改变的事件
enum ItemAction { onChange }

class ItemActionCreator {

  //状态改变

  static Action onChange(int id) {

    return Action(ItemAction.onChange, payload: id);

  }

}
- reducer
- _onChange会回调所有ItemState,所以这地方必须用id或其它唯一标识去界定,我们所操作的item具体是哪一个
- _onChange方法,未操作的item返回的时候要注意,需要返回:state原对象,标明该state对象未变动,其item不需要刷新;不能返回state.clone(),这样返回的就是个全新的state对象,每个item都会刷新,还会造成一个很奇怪的bug,会造成后续点击item操作失灵
Reducer<ItemState> buildReducer() {

  return asReducer(

    <Object, Reducer<ItemState>>{

      ItemAction.onChange: _onChange,

    },

  );

}

ItemState _onChange(ItemState state, Action action) {

  if (state.id == action.payload) {

    return state.clone()..itemStatus = !state.itemStatus;

  }

  ///这地方一定要注意,要返回:state;不能返回:state.clone(),否则会造成后续更新失灵

  return state;

}
多样式列表
注意:如果使用多样式,items的列表泛型不要写成ItemState,写成Object就行了;在下面代码,我们可以看到,实现的getItemData()方法返回的类型是Object,所以Items的列表泛型写成Object,是完全可以的。
- 我们定义数据源的时候把泛型写成Object是完全可以的,但是初始化数据的时候一定要注意,写成对应adapter类型里面的state
- 假设一种情况,在index是奇数时展示:OneComponent;在index是奇数时展示:TwoComponent;
- getItemType:这个重写方法里面,在index为奇偶数时分别返回:OneComponent和TwoComponent的标识
- 数据赋值时也一定要在index为奇偶数时赋值泛型分别为:OneState和TwoState
- 也可以这样优化去做,在getItemType里面判断当前泛型是什么数据类型,然后再返回对应的XxxxComponent的标识
- 数据源的数据类型必须和getItemType返回的XxxxComponent的标识相对应,如果数据源搞成Object类型,映射到对应位置的item数据时,会报类型不适配的错误
下述代码可做思路参考
class ListState extends MutableSource implements Cloneable<PackageCardState> {

    List<Object> items;

    @override

    ListState clone() {

        return PackageCardState()..items = items;

    }

    @override

    Object getItemData(int index) => items[index];

    @override

    String getItemType(int index) {

        if(items[index] is OneState) {

            return PackageCardAdapter.itemStyleOne;

        }else{

            return PackageCardAdapter.itemStyleTwo;

        }

    }

    @override

    int get itemCount => items.length;

    @override

    void setItemData(int index, Object data) => items[index] = data;

}
列表存在的问题+解决方案
列表多item刷新问题
这里搞定了单item刷新场景,还存在一种多item刷新的场景
- 说明下,列表item是没办法一次刷新多个item的,只能一次刷新一个item(一个clone对应着一次刷新),一个事件对应着刷新一个item;这边是打印多个日志分析出来了
- 解决:解决办法是,多个事件去处理刷新操作
举例:假设一种场景,对于上面的item只能单选,一个item项被选中,其它item状态被重置到未选状态,具体效果看下方效果图
- 效果图
这种效果的实现非常简单,但是如果思路不对,会掉进坑里出不来
还原被选的状态,不能在同一个事件里写,需要新写一个清除事件
下述代码为整体流程
- view
Widget buildView(ItemState state, Dispatch dispatch, ViewService viewService) {

  return InkWell(

    onTap: () {},

    child: ListTile(

      title: Text(state.title),

      trailing: Checkbox(

        value: state.itemStatus,

        ///CheckBox的点击操作:状态变更

        onChanged: (value) {

          //单选模式,清除选中的item,以便做单选

          dispatch(ItemActionCreator.clear());

          //刷新选中item

          dispatch(ItemActionCreator.onChange(state.id));

        }

      ),

    ),

  );

}
- action
enum ItemAction {

  onChange,

  clear,

}

class ItemActionCreator {

  //状态改变

  static Action onChange(int id) {

    return Action(ItemAction.onChange, payload: id);

  }

  //清除改变的状态

  static Action clear() {

    return Action(ItemAction.clear);

  }

}
- reducer
Reducer<ItemState> buildReducer() {

  return asReducer(

    <Object, Reducer<ItemState>>{

      ItemAction.onChange: _onChange,

      ItemAction.clear: _clear,

    },

  );

}

ItemState _onChange(ItemState state, Action action) {

  if (state.id == action.payload) {

    return state.clone()..itemStatus = !state.itemStatus;

  }

  ///这地方一定要注意,要返回:state;不能返回:state.clone(),否则会造成后续更新失灵

  return state;

}

///单选模式

ItemState _clear(ItemState state, Action action) {

  if (state.itemStatus) {

    return state.clone()..itemStatus = false;

  }

  ///这地方一定要注意,要返回:state;不能返回:state.clone(),否则会造成后续更新失灵

  return state;

}
这个问题实际上解决起来很简单,但是如果一直在 _onChange 方法重置状态,你会发现和你预期的结果一直对不上;完整且详细的效果,可以去看demo里面代码
搞定
呼,终于将列表这块写完,说实话,这个列表的使用确实有点麻烦;实际上,如果大家用心看了的话,麻烦的地方,其实就是在这块:adapter创建及其绑定;只能多写写了,熟能生巧!
列表模块大功告成,以后就能愉快的写列表了!

全局模式
效果图
- 理解了上面的是三个例子,相信大部分页面,对于你来说都不在话下了;现在我们再来看个例子,官方提供的全局主题功能,当然,这不仅仅是全局主题,全局字体样式,字体大小等等,都是可以全局管理,当然了,写app之前要做好规划
开搞
store模块
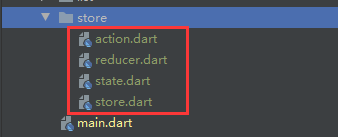
- 文件结构
- 这地方需要新建一个文件夹,新建四个文件:action,reducer,state,store
- state
- 老规矩,先来看看state,我们这里只在抽象类里面定义了一个主题色,这个抽象类是很重要的,需要做全局模式所有子模块的state,都必须实现这个抽象类
abstract class GlobalBaseState{

  Color themeColor;

}

class GlobalState implements GlobalBaseState, Cloneable<GlobalState>{

  @override

  Color themeColor;

  @override

  GlobalState clone() {

    return GlobalState();

  }

}
- action
- 因为只做切换主题色,这地方只需要定义一个事件即可
enum GlobalAction { changeThemeColor }

class GlobalActionCreator{

  static Action onChangeThemeColor(){

    return const Action(GlobalAction.changeThemeColor);

  }

}
- reducer
- 这里就是处理变色的一些操作,这是咸鱼官方demo里面代码;这说明简单的逻辑,是可以放在reducer里面写的
import 'package:flutter/material.dart' hide Action;

Reducer<GlobalState> buildReducer(){

  return asReducer(

    <Object, Reducer<GlobalState>>{

      GlobalAction.changeThemeColor: _onChangeThemeColor,

    },

  );

}

List<Color> _colors = <Color>[

  Colors.green,

  Colors.red,

  Colors.black,

  Colors.blue

];

GlobalState _onChangeThemeColor(GlobalState state, Action action) {

  final Color next =

  _colors[((_colors.indexOf(state.themeColor) + 1) % _colors.length)];

  return state.clone()..themeColor = next;

}
- store
- 切换全局状态的时候,就需要调用这个类了
/// 建立一个AppStore

/// 目前它的功能只有切换主题

class GlobalStore{

  static Store<GlobalState> _globalStore;

  static Store<GlobalState> get store => _globalStore ??= createStore<GlobalState>(GlobalState(), buildReducer());

}
main改动
- 这里面将PageRoutes里面的visitor字段使用起来,状态更新操作代码有点多,就单独提出来了;所以main文件里面,增加了:
- visitor字段使用
- 增加_updateState方法
void main() {

  runApp(createApp());

}

Widget createApp() {

  ///全局状态更新

  _updateState() {

    return (Object pageState, GlobalState appState) {

      final GlobalBaseState p = pageState;

      if (pageState is Cloneable) {

        final Object copy = pageState.clone();

        final GlobalBaseState newState = copy;

        if (p.themeColor != appState.themeColor) {

          newState.themeColor = appState.themeColor;

        }

        /// 返回新的 state 并将数据设置到 ui

        return newState;

      }

      return pageState;

    };

  }

  final AbstractRoutes routes = PageRoutes(

    ///全局状态管理:只有特定的范围的Page(State继承了全局状态),才需要建立和 AppStore 的连接关系

    visitor: (String path, Page<Object, dynamic> page) {

      if (page.isTypeof<GlobalBaseState>()) {

        ///建立AppStore驱动PageStore的单向数据连接: 参数1 AppStore  参数2 当AppStore.state变化时,PageStore.state该如何变化

        page.connectExtraStore<GlobalState>(GlobalStore.store, _updateState());

      }

    },

    ///定义路由

    pages: <String, Page<Object, dynamic>>{

      ///导航页面

      "GuidePage": GuidePage(),

      ///计数器模块演示

      "CountPage": CountPage(),

      ///页面传值跳转模块演示

      "FirstPage": FirstPage(),

      "SecondPage": SecondPage(),

      ///列表模块演示

      "ListPage": ListPage(),

    },

  );

  return MaterialApp(

    title: 'FishRedux',

    home: routes.buildPage("GuidePage", null), //作为默认页面

    onGenerateRoute: (RouteSettings settings) {

      //ios页面切换风格

      return CupertinoPageRoute(builder: (BuildContext context) {

        return routes.buildPage(settings.name, settings.arguments);

      });

    },

  );

}
子模块使用
- 这里就用计数器模块的来举例,因为仅仅只需要改动少量代码,且只涉及state和view,所以其它模块代码也不重复贴出了
- state
- 这地方,仅仅让CountState多实现了GlobalBaseState类,很小的改动
class CountState implements Cloneable<CountState>,GlobalBaseState {

  int count;

  @override

  CountState clone() {

    return CountState()..count = count;

  }

  @override

  Color themeColor;

}

CountState initState(Map<String, dynamic> args) {

  return CountState()..count = 0;

}
- view
- 这里面仅仅改动了一行,在AppBar里面加了backgroundColor,然后使用state里面的全局主题色
Widget buildView(CountState state, Dispatch dispatch, ViewService viewService) {

  return _bodyWidget(state, dispatch);

}

Widget _bodyWidget(CountState state, Dispatch dispatch) {

  return Scaffold(

    appBar: AppBar(

      title: Text("FishRedux"),

      ///全局主题,仅仅在此处改动了一行

      backgroundColor: state.themeColor,

    ),

    body: Center(

      child: Column(

        mainAxisAlignment: MainAxisAlignment.center,

        children: <Widget>[

          Text('You have pushed the button this many times:'),

          Text(state.count.toString()),

        ],

      ),

    ),

    floatingActionButton: FloatingActionButton(

      onPressed: () {

        ///点击事件,调用action 计数自增方法

        dispatch(CountActionCreator.updateCount());

      },

      child: Icon(Icons.add),

    ),

  );

}
- 如果其他模块也需要做主题色,也按照此处逻辑改动即可
调用
- 调用状态更新就非常简单了,和正常模块更新View一样,这里我们调用全局的就行了,一行代码搞定,在需要的地方调用就OK了
GlobalStore.store.dispatch(GlobalActionCreator.onChangeThemeColor());
搞定
- 经过上面的的三步,我们就可以使用全局状态了;从上面子模块的使用,可以很明显的感受到,全局状态,必须前期做好字段的规划,确定之后,最好不要再增加字段,不然继承抽象类的多个模块都会爆红,提示去实现xxx变量
全局模块优化
反思
在上面的全局模式里说了,使用全局模块,前期需要规划好字段,不然项目进行到中期的时候,想添加字段,多个模块的State会出现大范围爆红,提示去实现你添加的字段;项目开始规划好所有的字段,显然这需要全面的考虑好大部分场景,但是人的灵感总是无限的,不改代码是不可能,这辈子都不可能。只能想办法看能不能添加一次字段后,后期添加字段,并不会引起其他模块爆红,试了多次,成功的使用中间实体,来解决该问题
这里优化俩个方面
- 使用通用的全局实体
- 这样后期添加字段,就不会影响其他模块,这样我们就能一个个模块的去整改,不会出现整个项目不能运行的情况
- 将路由模块和全局模块封装
- 路由模块后期页面多了,代码会很多,放在主入口,真的不好管理;全局模块同理
因为使用中间实体,有一些地方会出现空指针问题,我都在流程里面写清楚了,大家可以把优化流程完整看一遍哈,都配置好,后面拓展使用就不会报空指针了
优化
入口模块
- main:大改
- 从下面代码可以看到,这里将路由模块和全局模块单独提出来了,这地方为了方便观看,就写在一个文件里;说明下,RouteConfig和StoreConfig这俩个类,可以放在俩个不同的文件里,这样管理路由和全局字段更新就会很方便了!
- RouteConfig:这里将页面标识和页面映射分开写,这样我们跳转页面的时候,就可以直接引用RouteConfig里面的页面标识
- StoreConfig:全局模块里最重要的就是状态的判断,注释写的很清楚了,可以看看注释哈
void main() {

  runApp(createApp());

}

Widget createApp() {

  return MaterialApp(

    title: 'FishRedux',

    home: RouteConfig.routes.buildPage(RouteConfig.guidePage, null), //作为默认页面

    onGenerateRoute: (RouteSettings settings) {

      //ios页面切换风格

      return CupertinoPageRoute(builder: (BuildContext context) {

        return RouteConfig.routes.buildPage(settings.name, settings.arguments);

      });

    },

  );

}

///路由管理

class RouteConfig {

  ///定义你的路由名称比如   static final String routeHome = 'page/home';

  ///导航页面

  static const String guidePage = 'page/guide';

  ///计数器页面

  static const String countPage = 'page/count';

  ///页面传值跳转模块演示

  static const String firstPage = 'page/first';

  static const String secondPage = 'page/second';

  ///列表模块演示

  static const String listPage = 'page/list';

  static const String listEditPage = 'page/listEdit';

  static final AbstractRoutes routes = PageRoutes(

    pages: <String, Page<Object, dynamic>>{

      ///将你的路由名称和页面映射在一起,比如:RouteConfig.homePage : HomePage(),

      RouteConfig.guidePage: GuidePage(),

      RouteConfig.countPage: CountPage(),

      RouteConfig.firstPage: FirstPage(),

      RouteConfig.secondPage: SecondPage(),

      RouteConfig.listPage: ListPage(),

      RouteConfig.listEditPage: ListEditPage(),

    },

    visitor: StoreConfig.visitor,

  );

}

///全局模式

class StoreConfig {

  ///全局状态管理

  static _updateState() {

    return (Object pageState, GlobalState appState) {

      final GlobalBaseState p = pageState;

      if (pageState is Cloneable) {

        final Object copy = pageState.clone();

        final GlobalBaseState newState = copy;

        if (p.store == null) {

          ///这地方的判断是必须的,判断第一次store对象是否为空

          newState.store = appState.store;

        } else {

          /// 这地方增加字段判断,是否需要更新

          if ((p.store.themeColor != appState.store.themeColor)) {

            newState.store.themeColor = appState.store.themeColor;

          }

          /// 如果增加字段,同理上面的判断然后赋值...

        }

        /// 返回新的 state 并将数据设置到 ui

        return newState;

      }

      return pageState;

    };

  }

  static visitor(String path, Page<Object, dynamic> page) {

    if (page.isTypeof<GlobalBaseState>()) {

      ///建立AppStore驱动PageStore的单向数据连接

      ///参数1 AppStore  参数2 当AppStore.state变化时,PageStore.state该如何变化

      page.connectExtraStore<GlobalState>(GlobalStore.store, _updateState());

    }

  }

}
Store模块
下面俩个模块是需要改动代码的模块
- state
- 这里使用了StoreModel中间实体,注意,这地方实体字段store,初始化是必须的,不然在子模块引用该实体下的字段会报空指针
abstract class GlobalBaseState{

  StoreModel store;

}

class GlobalState implements GlobalBaseState, Cloneable<GlobalState>{

  @override

  GlobalState clone() {

    return GlobalState();

  }

  @override

  StoreModel store = StoreModel(

    /// store这个变量,在这必须示例化,不然引用该变量中的字段,会报空指针

    /// 下面的字段,赋初值,就是初始时展示的全局状态

    /// 这地方初值,理应从缓存或数据库中取,表明用户选择的全局状态

    themeColor: Colors.lightBlue

  );

}

///中间全局实体

///需要增加字段就在这个实体里面添加就行了

class StoreModel {

  Color themeColor;

  StoreModel({this.themeColor});

}
- reducer
- 这地方改动非常小,将state.themeColor改成state.store.themeColor
Reducer<GlobalState> buildReducer(){

  return asReducer(

    <Object, Reducer<GlobalState>>{

      GlobalAction.changeThemeColor: _onChangeThemeColor,

    },

  );

}

List<Color> _colors = <Color>[

  Colors.green,

  Colors.red,

  Colors.black,

  Colors.blue

];

GlobalState _onChangeThemeColor(GlobalState state, Action action) {

  final Color next =

  _colors[((_colors.indexOf(state.store.themeColor) + 1) % _colors.length)];

  return state.clone()..store.themeColor = next;

}
下面俩个模块代码没有改动,但是为了思路完整,同样贴出来
- action
enum GlobalAction { changeThemeColor }

class GlobalActionCreator{

  static Action onChangeThemeColor(){

    return const Action(GlobalAction.changeThemeColor);

  }

}
- store
class GlobalStore{

  static Store<GlobalState> _globalStore;

  static Store<GlobalState> get store => _globalStore ??= createStore<GlobalState>(GlobalState(), buildReducer());

}
子模块使用
- 这里就用计数器模块的来举例,因为仅仅只需要改动少量代码,且只涉及state和view,所以其它模块代码也不重复贴出了
- state
- 因为是用中间实体,所以在clone方法里面必须将实现的store字段加上,不然会报空指针
class CountState implements Cloneable<CountState>, GlobalBaseState {

  int count;

  @override

  CountState clone() {

    return CountState()

      ..count = count

      ..store = store;

  }

  @override

  StoreModel store;

}

CountState initState(Map<String, dynamic> args) {

  return CountState()..count = 0;

}
- view
- 这里面仅仅改动了一行,在AppBar里面加了backgroundColor,然后使用state里面的全局主题色
Widget buildView(CountState state, Dispatch dispatch, ViewService viewService) {

  return _bodyWidget(state, dispatch);

}

Widget _bodyWidget(CountState state, Dispatch dispatch) {

  return Scaffold(

    appBar: AppBar(

      title: Text("FishRedux"),

      ///全局主题,仅仅在此处改动了一行

      backgroundColor: state.store.themeColor,

    ),

    ///下面其余代码省略....

}
- 如果其他模块也需要做主题色,也按照此处逻辑改动即可
调用
- 调用和上面说的一样,用下述全局方式在合适的地方调用
GlobalStore.store.dispatch(GlobalActionCreator.onChangeThemeColor());
体验
通过上面的优化,使用体验提升不是一个级别,大大提升的全局模式的扩展性,我们就算后期增加了大量的全局字段,也可以一个个模块慢慢改,不用一次爆肝全改完,猝死的概率又大大减少了!

Component使用
Component是个比较常用的模块,上面使用列表的时候,就使用到了Component,这次我们来看看,在页面中直接使用Component,可插拔式使用!Component的使用总的来说是比较简单了,比较关键的是在State中建立起连接。
效果图

- 上图的效果是在页面中嵌入了俩个Component,改变子Component的操作是在页面中完成的
- 先看下页面结构
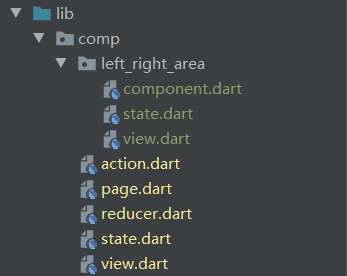
Component
这地方写了一个Component,代码很简单,来看看吧
- component
这地方代码是自动生成了,没有任何改动,就不贴了
- state
- initState():我们需要注意,Component中的initState()方法在内部没有调用,虽然自动生成的代码有这个方法,但是无法起到初始化作用,可以删掉该方法
class AreaState implements Cloneable<AreaState> {

  String title;

  String text;

  Color color;

  AreaState({

    this.title = "",

    this.color = Colors.blue,

    this.text = "",

  });

  @override

  AreaState clone() {

    return AreaState()

      ..color = color

      ..text = text

      ..title = title;

  }

}
- view
Widget buildView(

    AreaState state, Dispatch dispatch, ViewService viewService) {

  return Scaffold(

    appBar: AppBar(

      title: Text(state.title),

      automaticallyImplyLeading: false,

    ),

    body: Container(

      height: double.infinity,

      width: double.infinity,

      alignment: Alignment.center,

      color: state.color,

      child: Text(state.text),

    ),

  );

}
Page
CompPage中,没用到effete这层,就没创建该文件,老规矩,先看看state
- state
- 这地方是非常重要的地方,XxxxConnecto的实现形式是看官方代码写的
- computed():该方法是必须实现的,这个类似直接的get()方法,但是切记不能像get()直接返回state.leftAreaState()或state.rightAreaState,某些场景初始化无法刷新,因为是同一个对象,会被判断未更改,所以会不刷新控件
- 注意了注意了,这边做了优化,直接返回clone方法,这是对官方赋值写法的一个优化,也可以避免上面说的问题,大家可以思考思考
- set():该方法是Component数据流回推到页面的state,保持俩者state数据一致;如果Component模块更新了自己的State,不写这个方法会报错的
class CompState implements Cloneable<CompState> {

  AreaState leftAreaState;

  AreaState rightAreaState;

  @override

  CompState clone() {

    return CompState()

      ..rightAreaState = rightAreaState

      ..leftAreaState = leftAreaState;

  }

}

CompState initState(Map<String, dynamic> args) {

  ///初始化数据

  return CompState()

    ..rightAreaState = AreaState(

      title: "LeftAreaComponent",

      text: "LeftAreaComponent",

      color: Colors.indigoAccent,

    )

    ..leftAreaState = AreaState(

      title: "RightAreaComponent",

      text: "RightAreaComponent",

      color: Colors.blue,

    );

}

///左边Component连接器

class LeftAreaConnector extends ConnOp<CompState, AreaState>

    with ReselectMixin<CompState, AreaState> {

  @override

  AreaState computed(CompState state) {

    return state.leftAreaState.clone();

  }

  @override

  void set(CompState state, AreaState subState) {

    state.leftAreaState = subState;

  }

}

///右边Component连接器

class RightAreaConnector extends ConnOp<CompState, AreaState>

    with ReselectMixin<CompState, AreaState> {

  @override

  AreaState computed(CompState state) {

    return state.rightAreaState.clone();

  }

  @override

  void set(CompState state, AreaState subState) {

    state.rightAreaState = subState;

  }

}
- page
- 写完连接器后,我们在Page里面绑定下,就能使用Component了
class CompPage extends Page<CompState, Map<String, dynamic>> {

  CompPage()

      : super(

          initState: initState,

          reducer: buildReducer(),

          view: buildView,

          dependencies: Dependencies<CompState>(

              adapter: null,

              slots: <String, Dependent<CompState>>{

                //绑定Component

                "leftArea": LeftAreaConnector() + AreaComponent(),

                "rightArea": RightAreaConnector() + AreaComponent(),

              }),

          middleware: <Middleware<CompState>>[],

        );

}
- view
- 使用Component就非常简单了:viewService.buildComponent("xxxxxx")
Widget buildView(CompState state, Dispatch dispatch, ViewService viewService) {

  return Container(

    color: Colors.white,

    child: Column(

      children: [

        ///Component组件部分

        Expanded(

          flex: 3,

          child: Row(

            children: [

              Expanded(child: viewService.buildComponent("leftArea")),

              Expanded(child: viewService.buildComponent("rightArea")),

            ],

          ),

        ),

        ///按钮

        Expanded(

            flex: 1,

            child: Center(

              child: RawMaterialButton(

                fillColor: Colors.blue,

                shape: StadiumBorder(),

                onPressed: () => dispatch(CompActionCreator.change()),

                child: Text("改变"),

              ),

            ))

      ],

    ),

  );

}
- action
enum CompAction { change }

class CompActionCreator {

  static Action change() {

    return const Action(CompAction.change);

  }

}
- reducer
Reducer<CompState> buildReducer() {

  return asReducer(

    <Object, Reducer<CompState>>{

      CompAction.change: _change,

    },

  );

}

CompState _change(CompState state, Action action) {

  final CompState newState = state.clone();

  //改变leftAreaComponent中state

  newState.leftAreaState.text = "LeftAreaState:${Random().nextInt(1000)}";

  newState.leftAreaState.color =

      Color.fromRGBO(randomColor(), randomColor(), randomColor(), 1);

  //改变rightAreaComponent中state

  newState.rightAreaState.text = "RightAreaState:${Random().nextInt(1000)}";

  newState.rightAreaState.color =

      Color.fromRGBO(randomColor(), randomColor(), randomColor(), 1);

  return newState;

}

int randomColor() {

  return Random().nextInt(255);

}
总结下
总的来说,Component的使用还是比较简单的;如果我们把某个复杂的列表提炼出一个Component的,很明显有个初始化的过程,这里我们需要将:请求参数调体或列表详情操作,在page页面处理好,然后再更新给我们绑定的子Component的State,这样就能起到初始化某个模块的作用;至于刷新,下拉等后续操作,就让Component内部自己去处理了
广播
fish_redux中是带有广播的通信方式,使用的方式很简单,这本是effect层,ctx参数自带的一个api,这里简单介绍一下
使用
- action
- 广播事件单独写了一个action文件,便于统一管理
enum BroadcastAction { toNotify }

class BroadcastActionCreator {

  ///广播通知

  static Action toNotify(String msg) {

    return Action(BroadcastAction.toNotify, payload: msg);

  }

}
- 发送广播
- 这是页面跳转的方法,就在此处写了,如果想看详细代码的话,可以去demo地址里面看下
void _backFirst(Action action, Context<SecondState> ctx) {

  //广播通信

  ctx.broadcast(BroadcastActionCreator.toNotify("页面二发送广播通知"));

}
- 接受广播
Effect<FirstState> buildEffect() {

  return combineEffects(<Object, Effect<FirstState>>{

    //接受发送的广播消息

    BroadcastAction.toNotify: _receiveNotify,

  });

}

void _receiveNotify(Action action, Context<FirstState> ctx) async {

  ///接受广播

  print("跳转一页面:${action.payload}");

}
说明
广播的使用还是挺简单的,基本和dispatch的使用是一致的,dispatch是模块的,而broadcast是有页面栈,就能通知其他页面,很多情况下,我们在一个页面进行了操作,其他页面也需要同步做一些处理,使用广播就很简单了
注意: 广播发送和接受是一对多的关系,一处发送,可以在多处接受;和dispatch发送事件,如果在effect里面接受,在reducer就无法接受的情况是不一样的(被拦截了)
开发小技巧
弱化reducer
无限弱化了reducer层作用
- 在日常使用fish_redux和flutter_bloc后,实际能深刻体会reducer层实际上只是相当于bloc中yield
或emit关键字的作用,职能完全可以弱化为,仅仅作为状态刷新;这样可以大大简化开发流程,只需要关注
view -> action -> effect (reducer:使用统一的刷新事件) - 下面范例代码,处理数据的操作直接在effect层处理,如需要更改数据,直接对ctx.state进行操作,涉及刷新页面的操作,统一调用onRefresh事件;对于一个页面有几十个表单的情况,这种操作,能大大提升你的开发速度和体验,亲身体验,大家可以尝试下
Reducer<TestState> buildReducer() {

  return asReducer(

    <Object, Reducer<TestState>>{

      TestAction.onRefresh: _onRefresh,

    },

  );

}

TestState _onRefresh(TreeState state, Action action) {

  return state.clone();

}
- 具体可以查看 玩android 项目代码;花了一些时间,把玩android项目代码所有模块全部重构了,肝痛
widget组合式开发
说明
这种开发形式,可以说是个惯例,在android里面是封装一个个View,View里有对应的一套,逻辑自洽的功能,然后在主xm里面组合这些View;这种思想完全可以引申到Flutter里,而且,开发体验更上几百层楼,让你的widget组合可以更加灵活百变,百变星君
view模块中,页面使用widget组合的方式去构造的,只传入必要的数据源和保留一些点击回调
为什么用widget组合方式构造页面?
- 非常复杂的界面,必须将页面分成一个个小模块,然后再将其组合, 每个小模块Widget内部应当对自身的的职能,能逻辑自洽的去处理;这种组合的方式呈现的代码,会非常的层次分明,不会让你的代码写着写着,突然就变成shit
组合widget关键点
- 一般来说,我们并不关注widget内部页面的实现,只需要关心的是widget需要的数据源, 以及widget对交互的反馈;例如:我点击widget后,widget回调事件,并传达一些数据给我;至于内部怎么实现, 外部并不关心,请勿将dispatch传递到封装的widget内部,这会使我们关注的事件被封装在内部
具体请查看 玩android 项目代码
最后
这片文章,说实话,花了不少精力去写的,也花了不少时间构思;主要是例子,必须要自己重写下,反复思考例子是否合理等等,头皮微凉。
代码地址:代码demo地址
fish_redux版-玩Android:fish_redux版-玩android
大家如果觉得有收获,就给我点个赞吧!你的点赞,是我码字的最大动力!

fish_redux使用详解---看完就会用!的更多相关文章
- Python虚拟环境和包管理工具Pipenv的使用详解--看完这一篇就够了
前言 Python虚拟环境是一个虚拟化,从电脑独立开辟出来的环境.在这个虚拟环境中,我们可以pip安装各个项目不同的依赖包,从全局中隔离出来,利于管理. 传统的Python虚拟环境有virtualen ...
- 【甘道夫】HBase基本数据操作详解【完整版,绝对精品】
引言 之前详细写了一篇HBase过滤器的文章,今天把基础的表和数据相关操作补上. 本文档参考最新(截止2014年7月16日)的官方Ref Guide.Developer API编写. 所有代码均基于“ ...
- HBase基本数据操作详解【完整版,绝对精品】
欢迎转载,请注明来源: http://blog.csdn.net/u010967382/article/details/37878701 概述 对于建表,和RDBMS类似,HBase也有namespa ...
- 【转载】HBase基本数据操作详解【完整版,绝对精品】
转载自: http://blog.csdn.net/u010967382/article/details/37878701 概述 对于建表,和RDBMS类似,HBase也有namespace的概念,可 ...
- 第206天:http协议终极详解---看这一篇就够了
HTTP简介 HTTP协议是Hyper Text Transfer Protocol(超文本传输协议)的缩写,是用于从万维网(WWW:World Wide Web )服务器传输超文本到本地浏览器的传送 ...
- kafka3.x原理详解看这篇就够了
一.概述 (一).kafka的定义 1.定义 1)kafka传统的定义:kafka是一个分布式的基于发布/订阅模式的消息队列,主要用于大数据实时处理领域 2)kafka最新的定义:kafka是一个开源 ...
- nginx配置文件详解( 看着好长,其实不长,看了就知道了,精心整理,有些配置也是没用到呢 )
user www www; #定义Nginx运行的用户和用户组 worker_processes ; #nginx进程数,建议设置为CPU核数2倍. error_log var/log/ ...
- smb.conf详解[未完]
看着玩意看的吐血!!!! baidu\google充斥着一堆错误的文章及翻译,samba.org上动辄就是this document is old and might be incurrent. 不过 ...
- 史上最全IO流详解,看着一篇足矣
一:要了解IO,首先了解File类 File类里面的部分常量,方法 No. 方法或常量 类型 描述 1 public static final String pathSeparator 常量 表示路径 ...
随机推荐
- (专题一)06 MATLAB的算术运算
基本算术运算 乘法运算:A的行数等于B的列数(A,B两矩阵维数和大小相容) 除法运算 逻辑运算 真为1,假为0 优先级,算术运算的优先级最高,逻辑运算的优先级最低,但逻辑非运算是单目运算,他的优先级比 ...
- vue大型项目高性能优化----想说爱你真的不容易
一.背景 目前公司的电子合同采用表单设计器+合同业务配合实现,做了半年多后终于上线,但是下边员工普遍反映卡顿,甚至卡死,爆栈.尤其是新增和修改合同页面,因为这部分数据量大,逻辑复杂,很容易崩溃,所 ...
- Envoy 代理中的请求的生命周期
Envoy 代理中的请求的生命周期 翻译自Envoy官方文档. 目录 Envoy 代理中的请求的生命周期 术语 网络拓扑 配置 高层架构 请求流 总览 1.Listener TCP连接的接收 2.监听 ...
- 腾讯云ClickHouse如何实现自动化的数据均衡?
一.引言 ClickHouse 是一个用于联机分析( OLAP )的列式数据库管理系统( DBMS ).它于 2016 年以 Apache 2.0 协议开源,以优秀的查询性能,深受广大大数据工程师欢 ...
- 搜索引擎学习(三)Lucene查询索引
一.查询理论 创建查询:构建一个包含了文档域和语汇单元的文档查询对象.(例:fileName:lucene) 查询过程:根据查询对象的条件,在索引中找出相应的term,然后根据term找到对应的文档i ...
- C#实现创建、编辑NX表达式
在NX8.5中使用C#编辑表达式中有个坑,part.Expressions.Edit该方法鲁棒性很差,当表达式有错时也能编辑成功(手动在NX中增加错误表达式会有弹框,无法创建,而该方法却可以,疑是bu ...
- dpwwn-01靶机渗透
dpwwn-01 主机发现+端口扫描 发现3306端口,80端口. 访问80端口,进行目录爆破,没有什么发现,主要点还是在数据库. 登录,没有密码. 进入数据库,查找敏感信息. 查看到ssh的用户,进 ...
- 有没有异常处理翻车过的,绩效还被打了C
絮叨 因为程序异常处理问题,就在前几天龙叔的服务挂了几秒钟. 完了,马上季度末打绩效,竟然在这里翻车了,心如刀绞啊. 虽然没有影响到用户体验,但是找到问题并解决掉问题是工程师日常追求之一. 作为一个优 ...
- 使用kind搭建kubernetes
使用kind搭建kubernetes 目录 使用kind搭建kubernetes kind架构 创建集群 将镜像加载到kind的node中 配置kind集群 配置多节点 多控制面 指定Kubernet ...
- LDA主题模型困惑度计算
对于LDA模型,最常用的两个评价方法困惑度(Perplexity).相似度(Corre). 其中困惑度可以理解为对于一篇文章d,所训练出来的模型对文档d属于哪个主题有多不确定,这个不确定成都就是困惑度 ...