
Tensorflow&CNN:裂纹分类
版权声明:本文为博主原创文章,转载 请注明出处:https://blog.csdn.net/sc2079/article/details/90478551
- 写在前面
本科毕业设计终于告一段落了。特写博客记录做毕业设计(路面裂纹识别)期间的踩过的坑和收获。希望对你有用。
目前有:
1.Tensorflow&CNN:裂纹分类
2.Tensorflow&CNN:验证集预测与模型评价
3.PyQt5多个GUI界面设计
本篇讲CNN的训练与预测(以裂纹分类为例)。任务目标:将裂纹图片数据集自动分类:纵向裂纹、横向裂纹、块状裂纹、龟裂裂纹、无裂纹共五类。
本篇主要参照博客tensorflow: 花卉分类。
- 环境配置安装
运行环境:Python3.6、Spyder
依赖模块:Skimage、Tensorflow(CPU)、Numpy 、Matlpotlib、Cv2等
- 开始工作
1.CNN架构
所使用的CNN架构如下:


一共有十三层。
2.训练
所使用的训练代码如下:
from skimage import io,transform

import glob

import os

import tensorflow as tf

import numpy as np

import time

import matplotlib.pyplot as plt

import pandas as pd

start_time = time.time()

tf.reset_default_graph()   #清除过往tensorflow数据记录

#训练图片集地址

path='..//img5//'

#将所有的图片resize成100*100

w=100

h=100

c=3

#归一化

def normlization(img):

    X=img.copy()

    X1= np.mean(X, axis = 0) # 减去均值,使得以0为中心

    X2=X-X1

    X3= np.std(X2, axis = 0) # 归一化

    X4=X2/X3

    return X4

#读取图片

def read_img(path):

    cate=[path+x for x in os.listdir(path)]

    imgs=[]

    labels=[]

    for idx,folder in enumerate(cate):

        for im in glob.glob(folder+'/*.jpg'):

            #print('reading the images:%s'%(im))

            img=io.imread(im)

            img=transform.resize(img,(w,h))

            #img=normlization(img)

            imgs.append(img)

            labels.append(idx)

    return np.asarray(imgs,np.float32),np.asarray(labels,np.int32)

data,label=read_img(path)

#打乱顺序

num_example=data.shape[0]

arr=np.arange(num_example)

np.random.shuffle(arr)

data=data[arr]

label=label[arr]

#将所有数据分为训练集和验证集

ratio=0.8

s=np.int(num_example*ratio)

x_train=data[:s]

y_train=label[:s]

x_val=data[s:]

y_val=label[s:]

#-----------------构建网络----------------------

#占位符

x=tf.placeholder(tf.float32,shape=[None,w,h,c],name='x')

y_=tf.placeholder(tf.int32,shape=[None,],name='y_')

def inference(input_tensor, train, regularizer):

    with tf.variable_scope('layer1-conv1'):

        conv1_weights = tf.get_variable("weight",[5,5,3,32],initializer=tf.truncated_normal_initializer(stddev=0.1))

        conv1_biases = tf.get_variable("bias", [32], initializer=tf.constant_initializer(0.0))

        conv1 = tf.nn.conv2d(input_tensor, conv1_weights, strides=[1, 1, 1, 1], padding='SAME')

        relu1 = tf.nn.relu(tf.nn.bias_add(conv1, conv1_biases))

    with tf.name_scope("layer2-pool1"):

        pool1 = tf.nn.max_pool(relu1, ksize = [1,2,2,1],strides=[1,2,2,1],padding="VALID")

    with tf.variable_scope("layer3-conv2"):

        conv2_weights = tf.get_variable("weight",[5,5,32,64],initializer=tf.truncated_normal_initializer(stddev=0.1))

        conv2_biases = tf.get_variable("bias", [64], initializer=tf.constant_initializer(0.0))

        conv2 = tf.nn.conv2d(pool1, conv2_weights, strides=[1, 1, 1, 1], padding='SAME')

        relu2 = tf.nn.relu(tf.nn.bias_add(conv2, conv2_biases))

    with tf.name_scope("layer4-pool2"):

        pool2 = tf.nn.max_pool(relu2, ksize=[1, 2, 2, 1], strides=[1, 2, 2, 1], padding='VALID')

    with tf.variable_scope("layer5-conv3"):

        conv3_weights = tf.get_variable("weight",[3,3,64,128],initializer=tf.truncated_normal_initializer(stddev=0.1))

        conv3_biases = tf.get_variable("bias", [128], initializer=tf.constant_initializer(0.0))

        conv3 = tf.nn.conv2d(pool2, conv3_weights, strides=[1, 1, 1, 1], padding='SAME')

        relu3 = tf.nn.relu(tf.nn.bias_add(conv3, conv3_biases))

    with tf.name_scope("layer6-pool3"):

        pool3 = tf.nn.max_pool(relu3, ksize=[1, 2, 2, 1], strides=[1, 2, 2, 1], padding='VALID')

    with tf.variable_scope("layer7-conv4"):

        conv4_weights = tf.get_variable("weight",[3,3,128,128],initializer=tf.truncated_normal_initializer(stddev=0.1))

        conv4_biases = tf.get_variable("bias", [128], initializer=tf.constant_initializer(0.0))

        conv4 = tf.nn.conv2d(pool3, conv4_weights, strides=[1, 1, 1, 1], padding='SAME')

        relu4 = tf.nn.relu(tf.nn.bias_add(conv4, conv4_biases))

    with tf.name_scope("layer8-pool4"):

        pool4 = tf.nn.max_pool(relu4, ksize=[1, 2, 2, 1], strides=[1, 2, 2, 1], padding='VALID')

        nodes = 6*6*128

        reshaped = tf.reshape(pool4,[-1,nodes])

    with tf.variable_scope('layer9-fc1'):

        fc1_weights = tf.get_variable("weight", [nodes, 1024],

                                      initializer=tf.truncated_normal_initializer(stddev=0.1))

        if regularizer != None: tf.add_to_collection('losses', regularizer(fc1_weights))

        fc1_biases = tf.get_variable("bias", [1024], initializer=tf.constant_initializer(0.1))

        fc1 = tf.nn.relu(tf.matmul(reshaped, fc1_weights) + fc1_biases)

        if train: fc1 = tf.nn.dropout(fc1, 0.5)

    with tf.variable_scope('layer10-fc2'):

        fc2_weights = tf.get_variable("weight", [1024, 512],

                                      initializer=tf.truncated_normal_initializer(stddev=0.1))

        if regularizer != None: tf.add_to_collection('losses', regularizer(fc2_weights))

        fc2_biases = tf.get_variable("bias", [512], initializer=tf.constant_initializer(0.1))

        fc2 = tf.nn.relu(tf.matmul(fc1, fc2_weights) + fc2_biases)

        if train: fc2 = tf.nn.dropout(fc2, 0.5)

    with tf.variable_scope('layer11-fc3'):

        fc3_weights = tf.get_variable("weight", [512, 5],

                                      initializer=tf.truncated_normal_initializer(stddev=0.1))

        if regularizer != None: tf.add_to_collection('losses', regularizer(fc3_weights))

        fc3_biases = tf.get_variable("bias", [5], initializer=tf.constant_initializer(0.1))

        logit = tf.matmul(fc2, fc3_weights) + fc3_biases

    return logit

#训练参数

n_epoch=14

batch_size=32

batch_size2=32

learning_rate=0.001

#---------------------------网络结束---------------------------

regularizer = tf.contrib.layers.l2_regularizer(0.0001)

logits = inference(x,False,regularizer)

#(小处理)将logits乘以1赋值给logits_eval,定义name,方便在后续调用模型时通过tensor名字调用输出tensor

b = tf.constant(value=1,dtype=tf.float32)

logits_eval = tf.multiply(logits,b,name='logits_eval')

# 利用交叉熵定义损失

loss=tf.nn.sparse_softmax_cross_entropy_with_logits(logits=logits, labels=y_)

mean_loss = tf.reduce_mean(loss)  # 平均损失

train_op=tf.train.AdamOptimizer(learning_rate).minimize(loss)

correct_prediction = tf.equal(tf.cast(tf.argmax(logits,1),tf.int32), y_)

acc= tf.reduce_mean(tf.cast(correct_prediction, tf.float32))

#定义一个函数,按批次取数据

def minibatches(inputs=None, targets=None, batch_size=None, shuffle=False):

    assert len(inputs) == len(targets)

    if shuffle:

        indices = np.arange(len(inputs))

        np.random.shuffle(indices)

    for start_idx in range(0, len(inputs) - batch_size + 1, batch_size):

        if shuffle:

            excerpt = indices[start_idx:start_idx + batch_size]

        else:

            excerpt = slice(start_idx, start_idx + batch_size)

        yield inputs[excerpt], targets[excerpt]

saver=tf.train.Saver()

sess=tf.Session()

sess.run(tf.global_variables_initializer())

traloss,traacc,valloss,valacc=[],[],[],[]

for epoch in range(n_epoch):

    #training

    train_loss, train_acc, n_batch = [],[], 0

    for x_train_a, y_train_a in minibatches(x_train, y_train, batch_size, shuffle=True):

        _,err,ac=sess.run([train_op,mean_loss,acc], feed_dict={x: x_train_a, y_: y_train_a})

        train_loss.append(err); train_acc.append(ac); n_batch += 1

    tra_loss=round(np.sum(train_loss)/ n_batch,3)

    tra_acc=round(np.sum(train_acc)/ n_batch,3)

    traloss.append(tra_loss)

    traacc.append(tra_acc)

    print("epoch: %d    train loss: %.3f    train acc: %.3f"%(epoch,tra_loss,tra_acc))

    #validation

    validation_loss, validation_acc, n_batch = [], [], 0

    for x_val_a, y_val_a in minibatches(x_val, y_val, batch_size2, shuffle=False):

        err, ac = sess.run([mean_loss,acc], feed_dict={x: x_val_a, y_: y_val_a})

        validation_loss.append(err); validation_acc.append(ac); n_batch += 1

    val_loss=round(np.sum(validation_loss)/ n_batch,3)

    val_acc=round(np.sum(validation_acc)/ n_batch,3)

    valloss.append(val_loss)

    valacc.append(val_acc)

    print("epoch: %d    validation loss: %.3f    validation acc: %.3f"%(epoch,val_loss,val_acc))

end_time = time.time()

print("   train loss: %f" %tra_loss)

print("   train acc: %f" %tra_acc)

print("   validation loss: %f" %val_loss)

print("   validation acc: %f" %val_acc)

print("   consume: %f s" %(end_time-start_time))

timeArray = time.localtime(end_time)

now=time.strftime("%Y_%m_%d", timeArray)  #时间

saver.save(sess,".//model//model-" + str(epoch)+'-'+now)

sess.close()
3.训练记录存储
训练过程存储,主要是训练批次、训练集损失率、训练集准确率、验证集损失率、验证集准确率。
将其存入csv方法如下:
#字典中的key值即为csv中列名

dataframe = pd.DataFrame({'traloss':traloss,'traacc':traacc,'valloss':valloss,'valacc':valacc})

#将DataFrame存储为csv,index表示是否显示行名,default=True

dataframe.to_csv("test.csv",index=['traloss','traacc','valloss','valacc'],sep=',')
另外为了记录每次训练更详细信息,便于选择最合适的训练参数,需要将训练时的参数一并加以保存。使用txt方法保存:
#数据记录

with open('log.txt','a+')as file:

    file.write('\n'+now+'\n')

    file.write('n_epoch:'+str(n_epoch)+'  '+

           'batch_size:'+str(batch_size)+'  '+

           'batch_size2:'+str(batch_size2)+'  '+

           'learning_rate:'+str(learning_rate)+'\n')

    for i in range(len(traloss)):

        file.write(str(traloss[i])+','+

               str(traacc[i])+','+

               str(valloss[i])+','+

               str(valacc[i])+'\n')
4.绘制训练集和验证集的损失准确率曲线
def map_loss_acc(_type,loss,acc):

    plt.figure()

    fig, ax1 = plt.subplots()

    ax2 = ax1.twinx()

    lns1 = ax1.plot(np.arange(n_epoch), loss, label="Loss")

    lns2 = ax2.plot(np.arange(n_epoch), acc, 'r', label="Accuracy")

    ax1.set_xlabel('epoch')

    ax1.set_ylabel(_type+'loss')

    ax2.set_ylabel(_type+'accuracy')

    # 合并图例

    lns = lns1 + lns2

    labels = ["Loss", "Accuracy"]

    plt.legend(lns, labels, loc=7)
直接调用即可。
map_loss_acc('training',traloss,traacc)

map_loss_acc('validation',valloss,valacc)
- 结果展示
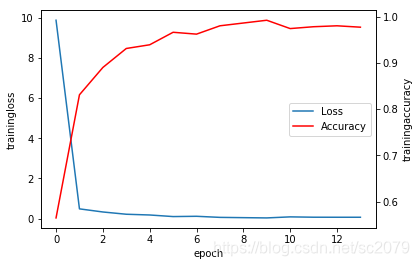

可以看出验证集的准确率达到了92.1%,对于在数据集不足、计算力有限的情况下还是挺不错的。
Tensorflow&CNN:裂纹分类的更多相关文章
- Tensorflow&CNN:验证集预测与模型评价
版权声明:本文为博主原创文章,转载 请注明出处:https://blog.csdn.net/sc2079/article/details/90480140 - 写在前面 本科毕业设计终于告一段落了.特 ...
- Android+TensorFlow+CNN+MNIST 手写数字识别实现
Android+TensorFlow+CNN+MNIST 手写数字识别实现 SkySeraph 2018 Email:skyseraph00#163.com 更多精彩请直接访问SkySeraph个人站 ...
- CNN车型分类总结
最近在做一个CNN车型分类的任务,首先先简要介绍一下这个任务. 总共30个类,训练集图片为车型图片,类似监控拍摄的车型图片,训练集测试集安6:4分,训练集有22302份数据,测试集有14893份数据. ...
- 强智教务系统验证码识别 Tensorflow CNN
强智教务系统验证码识别 Tensorflow CNN 一直都是使用API取得数据,但是API提供的数据较少,且为了防止API关闭,先把验证码问题解决 使用Tensorflow训练模型,强智教务系统的验 ...
- tensorflow CNN 卷积神经网络中的卷积层和池化层的代码和效果图
tensorflow CNN 卷积神经网络中的卷积层和池化层的代码和效果图 因为很多 demo 都比较复杂,专门抽出这两个函数,写的 demo. 更多教程:http://www.tensorflown ...
- [DL学习笔记]从人工神经网络到卷积神经网络_3_使用tensorflow搭建CNN来分类not_MNIST数据(有一些问题)
3:用tensorflow搭个神经网络出来 为什么用tensorflow呢,应为谷歌是亲爹啊,虽然有些人说caffe更适合图像啊mxnet效率更高等等,但爸爸就是爸爸,Android都能那么火,一个道 ...
- tensorflow学习之(十)使用卷积神经网络(CNN)分类手写数字0-9
#卷积神经网络cnn import tensorflow as tf from tensorflow.examples.tutorials.mnist import input_data #数据包,如 ...
- CNN tensorflow text classification CNN文本分类的例子
from:http://deeplearning.lipingyang.org/tensorflow-examples-text/ TensorFlow examples (text-based) T ...
- TensorFlow—CNN—CIFAR数据集分类
随机推荐
- yaml文件实例:nginx+ingress
[root@lab3 nginx]# cat nginx-test.yaml apiVersion: extensions/v1beta1 kind: Deployment metadata: nam ...
- MySQL插入大批量数据时报错“The total number of locks exceeds the lock table size”的解决办法
事情的原因是:我执行了一个load into语句的SQL将一个很大的文件导入到我的MySQL数据库中,执行了一段时间后报错"The total number of locks exceeds ...
- C# 获取或设置指定 config 文件的值
ExeConfigurationFileMap 这个类提供了修改.获取指定 config 的功能:新建一个 ExeConfigurationFileMap 的实例 ecf :并设置 ExeConfig ...
- sudo启动程序引发的进程个数不对
这几天把自己负责的服务改成了多进程模型,然后使用sudo来启动进程,示例程序如下: int main(void) { fork(); while(1); } 编译: `gcc ...
- 时空卷积网络TCN
1.写在前面 实验表明,RNN 在几乎所有的序列问题上都有良好表现,包括语音/文本识别.机器翻译.手写体识别.序列数据分析(预测)等. 在实际应用中,RNN 在内部设计上存在一个严重的问题:由于网络一 ...
- Struts笔记3
struts标签 form表单标签 Action:请求地址.直接写动作名称,不用写contextPath <s:form action="/user/register.action&q ...
- (十七)springMvc 对表单提交的日期以及JSON中的日期的参数绑定
文章目录 前言 `Ajax`提交表单数据 `Ajax`提交`JSON` 格式数据 解决输出JSON乱码的问题 控制JSON输出日期格式 小记 前言 springMVC 提供强大的参数绑定功能,使得我们 ...
- python学习-40 生产者和消费者模型
import time def buy(name): # 消费者 print('%s上街去买蛋' %name) while True: eggs=yield print('%s买了%s' %(name ...
- PAT(B) 1064 朋友数(Java)
题目链接:1064 朋友数 (20 point(s)) 题目描述 如果两个整数各位数字的和是一样的,则被称为是"朋友数",而那个公共的和就是它们的"朋友证号". ...
- Scratch编程:游来游去的鱼(二)
“ Scratch编程学习环境搭建好了吗?让我们一起来进行游戏吧!” 01 — 游戏介绍 这是一款简单的小游戏,实现了一条小鱼在池塘里游来游去. 02 — 设计思路 1,这个游戏主要由一个池塘背景和一 ...