
eclipse和scala整合,打包配置文件及打包步骤
我写的是maven项目,pom文件为:
<project xmlns="http://maven.apache.org/POM/4.0.0" xmlns:xsi="http://www.w3.org/2001/XMLSchema-instance" xsi:schemaLocation="http://maven.apache.org/POM/4.0.0 http://maven.apache.org/xsd/maven-4.0.0.xsd">
<modelVersion>4.0.0</modelVersion>
<groupId>kafkaStreaming</groupId>
<artifactId>kafkaStreaming</artifactId>
<version>0.0.1-SNAPSHOT</version>
<properties>
<maven.compiler.source>1.7</maven.compiler.source>
<maven.compiler.target>1.7</maven.compiler.target>
<encoding>UTF-8</encoding>
<scala.version>2.10.4</scala.version>
<spark.version>1.6.3</spark.version>
<hadoop.version>2.6.4</hadoop.version>
<project.build.sourceEncoding>UTF-8</project.build.sourceEncoding>
</properties> <dependencies>
<dependency>
<groupId>org.scala-lang</groupId>
<artifactId>scala-library</artifactId>
<version>${scala.version}</version>
<scope>compile</scope>
</dependency> <dependency>
<groupId>org.apache.spark</groupId>
<artifactId>spark-core_2.10</artifactId>
<version>${spark.version}</version>
</dependency> <dependency>
<groupId>org.apache.hadoop</groupId>
<artifactId>hadoop-client</artifactId>
<version>${hadoop.version}</version>
</dependency> <dependency>
<groupId>org.apache.spark</groupId>
<artifactId>spark-sql_2.10</artifactId>
<version>${spark.version}</version>
</dependency> <dependency>
<groupId>org.apache.spark</groupId>
<artifactId>spark-streaming_2.10</artifactId>
<version>${spark.version}</version>
</dependency> <dependency>
<groupId>dom4j</groupId>
<artifactId>dom4j</artifactId>
<version>1.6.1</version>
</dependency> <dependency>
<groupId>org.apache.spark</groupId>
<artifactId>spark-streaming-kafka_2.10</artifactId>
<version>1.6.1</version>
</dependency> <dependency>
<groupId>org.apache.spark</groupId>
<artifactId>spark-streaming-flume_2.10</artifactId>
<version>${spark.version}</version>
</dependency>
<dependency>
<groupId>log4j</groupId>
<artifactId>log4j</artifactId>
<version>1.2.12</version>
</dependency>
<dependency>
<groupId>com.google.code.gson</groupId>
<artifactId>gson</artifactId>
<version>2.5</version>
</dependency>
<dependency>
<groupId>com.alibaba</groupId>
<artifactId>fastjson</artifactId>
<version>1.2.4</version>
</dependency> <dependency>
<groupId>redis.clients</groupId>
<artifactId>jedis</artifactId>
<version>2.8.0</version>
</dependency>
<!-- 2017-5-6添加hbase -->
<!-- hbase依赖 -->
<dependency>
<groupId>org.apache.hbase</groupId>
<artifactId>hbase-common</artifactId>
<version>1.1.2</version>
</dependency>
<dependency>
<groupId>org.apache.hbase</groupId>
<artifactId>hbase-client</artifactId>
<version>1.1.2</version>
</dependency>
<dependency>
<groupId>org.apache.hbase</groupId>
<artifactId>hbase-server</artifactId>
<version>1.1.2</version>
</dependency> <dependency>
<groupId>org.apache.spark</groupId>
<artifactId>spark-hive_2.10</artifactId>
<version>${spark.version}</version>
</dependency> <!-- hive依赖 -->
<dependency>
<groupId>org.apache.hive</groupId>
<artifactId>hive-exec</artifactId>
<version>1.2.1</version>
</dependency>
<dependency>
<groupId>org.apache.hive</groupId>
<artifactId>hive-jdbc</artifactId>
<version>1.2.1</version>
</dependency>
<dependency>
<groupId>org.apache.hive</groupId>
<artifactId>hive-service</artifactId>
<version>1.2.1</version>
</dependency>
<!-- <dependency> <groupId>cn.itcast.spark</groupId> <artifactId>bigdata</artifactId>
<version>2.0</version> </dependency> -->
<dependency>
<groupId>org.apache.zookeeper</groupId>
<artifactId>zookeeper</artifactId>
<version>3.4.6</version>
</dependency>
<!-- 添加oracle jdbc driver -->
<dependency>
<groupId>com.oracle</groupId>
<artifactId>ojdbc14</artifactId>
<version>10.2.0.5.0</version>
</dependency>
<dependency>
<groupId>commons-collections</groupId>
<artifactId>commons-collections</artifactId>
<version>3.2.2</version>
</dependency>
<dependency>
<groupId>commons-lang</groupId>
<artifactId>commons-lang</artifactId>
<version>2.6</version>
</dependency>
<dependency>
<groupId>org.apache.commons</groupId>
<artifactId>commons-lang3</artifactId>
<version>3.5</version>
</dependency> <dependency>
<groupId>com.google.guava</groupId>
<artifactId>guava</artifactId>
<version>18.0</version>
</dependency> <!-- kafka -->
<!-- <dependency>
<groupId>org.apache.kafka</groupId>
<artifactId>kafka_2.11</artifactId>
<version>0.11.0.0</version>
</dependency -->
</dependencies> <build>
<resources>
<resource>
<directory>src/main/resources</directory>
</resource>
</resources>
<plugins>
<plugin>
<groupId>org.apache.maven.plugins</groupId>
<artifactId>maven-resources-plugin</artifactId>
<configuration>
<encoding>${project.build.sourceEncoding}</encoding>
</configuration>
<executions>
<execution>
<goals>
<goal>copy-resources</goal>
</goals>
</execution>
</executions>
</plugin>
<plugin>
<groupId>net.alchim31.maven</groupId>
<artifactId>scala-maven-plugin</artifactId>
<version>3.2.2</version>
<configuration>
<recompileMode>incremental</recompileMode>
<args>
<arg>-target:jvm-1.7</arg>
</args>
<javacArgs>
<javacArg>-source</javacArg>
<javacArg>1.7</javacArg>
<javacArg>-target</javacArg>
<javacArg>1.7</javacArg>
</javacArgs>
</configuration>
<executions>
<execution>
<id>scala-compile-first</id>
<phase>process-resources</phase>
<goals>
<goal>compile</goal>
</goals>
<configuration>
<args>
<arg>-make:transitive</arg>
<arg>-dependencyfile</arg>
<arg>${project.build.directory}/.scala_dependencies</arg>
</args>
</configuration>
</execution>
<execution>
<id>scala-test-compile</id>
<phase>process-test-resources</phase>
<goals>
<goal>testCompile</goal>
</goals>
<configuration>
<args>
<arg>-make:transitive</arg>
<arg>-dependencyfile</arg>
<arg>${project.build.directory}/.scala_dependencies</arg>
</args>
</configuration>
</execution>
</executions>
</plugin>
<plugin>
<groupId>org.apache.maven.plugins</groupId>
<artifactId>maven-compiler-plugin</artifactId>
<configuration>
<source>1.7</source>
<target>1.7</target>
</configuration>
<executions>
<execution>
<phase>compile</phase>
<goals>
<goal>compile</goal>
</goals>
</execution>
</executions>
</plugin>
<plugin>
<groupId>org.apache.maven.plugins</groupId>
<artifactId>maven-shade-plugin</artifactId>
<version>2.4.3</version>
<executions>
<execution>
<phase>package</phase>
<goals>
<goal>shade</goal>
</goals>
<configuration>
<filters>
<filter>
<artifact>*:*</artifact>
<excludes>
<exclude>META-INF/*.SF</exclude>
<exclude>META-INF/*.DSA</exclude>
<exclude>META-INF/*.RSA</exclude>
</excludes>
</filter>
</filters>
</configuration>
</execution>
</executions>
</plugin> </plugins>
<pluginManagement>
<plugins>
<!--This plugin's configuration is used to store Eclipse m2e settings
only. It has no influence on the Maven build itself. -->
<plugin>
<groupId>org.eclipse.m2e</groupId>
<artifactId>lifecycle-mapping</artifactId>
<version>1.0.0</version>
<configuration>
<lifecycleMappingMetadata>
<pluginExecutions>
<pluginExecution>
<pluginExecutionFilter>
<groupId>
net.alchim31.maven
</groupId>
<artifactId>
scala-maven-plugin
</artifactId>
<versionRange>
[3.1.6,)
</versionRange>
<goals>
<goal>compile</goal>
<goal>testCompile</goal>
</goals>
</pluginExecutionFilter>
<action>
<ignore></ignore>
</action>
</pluginExecution>
</pluginExecutions>
</lifecycleMappingMetadata>
</configuration>
</plugin>
<!-- 可运行jar包 -->
<plugin>
<groupId>org.apache.maven.plugins</groupId>
<artifactId>maven-shade-plugin</artifactId>
<executions>
<execution>
<phase>package</phase>
<goals>
<goal>shade</goal>
</goals>
<configuration>
<transformers>
<transformer implementation="org.apache.maven.plugins.shade.resource.ManifestResourceTransformer">
<mainClass>kafkaSparkStream.KafkaToSpark</mainClass>
</transformer>
</transformers>
<filters>
<filter>
<artifact>*:*</artifact>
<excludes>
<exclude>META-INF/*.SF</exclude>
<exclude>META-INF/*.DSA</exclude>
<exclude>META-INF/*.RSA</exclude>
</excludes>
</filter>
</filters>
</configuration>
</execution>
</executions>
</plugin>
</plugins>
</pluginManagement>
</build> </project>
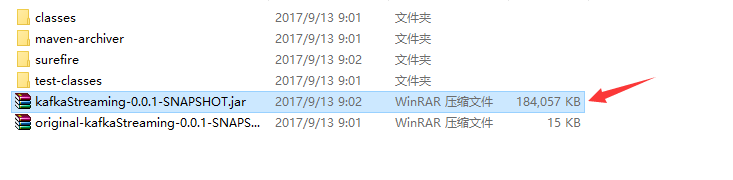
打包步骤:
因为pom文件中已经写有全类名,所以打的包是可运行的jar包
《1》右键pom文件

《2》先clean一下

《3》、在install
《4》、打包好,选择jar,选择那个大的
eclipse和scala整合,打包配置文件及打包步骤的更多相关文章
- Eclipse+Maven+Scala Project+Spark | 编译并打包wordcount程序
学习用Eclipse+Maven来构建并打包一个简单的单词统计的例程. 本项目源码已托管于Github –>[Spark-wordcount] 第一步 在EclipseIDE中安装Scala插件 ...
- springmvc 项目完整示例02 项目创建-eclipse创建动态web项目 配置文件 junit单元测试
包结构 所需要的jar包直接拷贝到lib目录下 然后选定 build path 之后开始写项目代码 配置文件 ApplicationContext.xml <?xml version=" ...
- iOS开发之 xcode6 APP 打包提交审核详细步骤
一. 在xcode6.1和ios10.10.1环境下实现app发布 http://blog.csdn.net/mad1989/article/details/8167529 http://jingya ...
- 给Eclipse中hibernate.cfg.xml配置文件加提示
在hibernate框架需要的jar包中找到hibernate3.jar,并用压缩软件打开,如图: 2 选择org文件夹--打开下一级文件夹 3 点击类型,方便找到dtd文件,下拉查看dtd文件,有两 ...
- 基于Eclipse的scala应用开发
原创文章,转载请注明: 转载自www.cnblogs.com/tovin/p/3823968.html 为了更好的学习scala语言,本文介绍如何基于Maven来构建scala项目 1.首先参照www ...
- eclipse的scala环境搭建
两种方法使eclipse安装scala环境(eclipse luna) 1.下载eclipse for scala IDE http://scala-ide.org/download/sdk.html ...
- android-xBuild apk差分与合成,zip差分与合成,lua打包,apk打包,png/jpg图片压缩
android-xBuild 是一项集成了apk差分与合成,zip差分与合成,lua打包.apk打包,png/jpg图片压缩五大功能的开源项目 (github地址:https://github.com ...
- [error] eclipse编写spring等xml配置文件时只有部分提示,tx无提示
eclipse编写spring等xml配置文件时只有<bean>.<context>等有提示,其他标签都没有提示 这时就需要做以下两步操作(下面以事务管理标签为例) 1,添加命 ...
- Eclipse+maven+scala+spark环境搭建
准备条件 我用的Eclipse版本 Eclipse Java EE IDE for Web Developers. Version: Luna Release (4.4.0) 我用的是Eclipse ...
随机推荐
- Python之匿名函数使用示例
#!/usr/bin/env python # -*- coding:utf8 -*- # #匿名函数 # y = lambda x:x+1 # print(y(10)) name = 'AK' #一 ...
- 数据结构-单链表-类定义2-C++
上一次的C++链表实现两个单链表的连接不太理想,此次听了一些视频课,自己补了个尾插法,很好的实现了两个链表的连接,当然了,我也是刚接触,可能是C++的一些语法还不太清楚,不过硬是花了一些时间尽量在数据 ...
- stdmap 用 at() 取值,如果 key 不存在,不好意思,程序崩溃。QMap 用 value()取值,如果 key 不存在,不会崩溃,你还可以指定默认值
我觉得 Qt6 最应该升级的是容器类 stdmap 在遍历的时候,同时获取 key 与 value 非常方便: for(auto& var:map){ qDebug()<<v ...
- NodeJS入门--环境搭建 IntelliJ IDEA
NodeJS入门–环境搭建 IntelliJ IDEA 本人也刚开始学习NodeJS,所以以此做个笔记,欢迎大家提出意见. 1.首先 下载安装NodeJS,下载安装IntelliJ IDEA 2.接下 ...
- 微信小程序使用 iconfont
小程序中使用 iconfont 在 iconfont.cn 中下载图标库, 直接将其中的 iconfont.css 复制到小程序目录中,并将扩展名改为 wxss: 在使用时在对应的样式文件 wxss ...
- 【SoloPi】SoloPi使用4-功能使用,一机多控
Soloπ是什么Soloπ是一个无线化.非侵入式的Android自动化工具,公测版拥有录制回放.性能测试.一机多控三项主要功能,能为测试开发人员节省宝贵时间. 一机多控功能Soloπ支持通过操作一台主 ...
- SQL Server2008数据库报错与解决方法
一. 报错信息 启动MSSQLSERVER时有以下报错信息 打开SQL SERVER配置管理器,发现以下情况报错: 原因:由于先前安装了2005版VS,然后又安装了2015版VS 解决办法:卸载Loc ...
- django.http.request中HttpRequest对象的一些属性与方法
HttpRequest对象的属性 属性 描述 path 表示提交请求页面完整地址的字符串,不包括域名,如 "/music/bands/the_beatles/". method 表 ...
- mysql各版本驱动
http://central.maven.org/maven2/mysql/mysql-connector-java/5.1.9/
- Java软件编码习惯
1.再删除某个类时候,一定别忘记把对应的import也删除掉: 可以手动删除,也可以 Ctrl+Shift+O快捷键自动删除和导入.