
Linux高级网络设置——将多个网卡设置成一个网卡
Linux下可以设置网卡模式
模式0:负载均衡
模式1:主备模式,不提高网络带宽
模式3:多网卡同时发送相同的数据
准备实验环境:
Redhat 6.4 企业版64位,最小化安装。
给虚拟机添加网卡


此时我虚拟机有2块网卡,但是真正启用工作的只有一块,使用ifconfig也只能看到一块网卡。ifconfig -a可以看到我们加入的另一块网卡,此时这块网卡还没有启用。
[root@51cto network-scripts]# ifconfig -a

eth0      Link encap:Ethernet  HWaddr :0C:::AA:8B

          inet addr:192.168.80.222  Bcast:192.168.80.255  Mask:255.255.255.0

          inet6 addr: fe80::20c:29ff:fe82:aa8b/ Scope:Link

          UP BROADCAST RUNNING MULTICAST  MTU:  Metric:

          RX packets: errors: dropped: overruns: frame:

          TX packets: errors: dropped: overruns: carrier:

          collisions: txqueuelen:

          RX bytes: (10.8 KiB)  TX bytes: (11.8 KiB)

eth1      Link encap:Ethernet  HWaddr :0C:::AA:

          BROADCAST MULTICAST  MTU:  Metric:

          RX packets: errors: dropped: overruns: frame:

          TX packets: errors: dropped: overruns: carrier:

          collisions: txqueuelen:

          RX bytes: (0.0 b)  TX bytes: (0.0 b)

lo        Link encap:Local Loopback

          inet addr:127.0.0.1  Mask:255.0.0.0

          inet6 addr: ::/ Scope:Host

          UP LOOPBACK RUNNING  MTU:  Metric:

          RX packets: errors: dropped: overruns: frame:

          TX packets: errors: dropped: overruns: carrier:

          collisions: txqueuelen:

          RX bytes: (0.0 b)  TX bytes: (0.0 b)
可见原来的那块网卡IP没变,新加的网卡没有IP。现在将两块网卡绑定成一块网卡,并设置新地址为192.168.80.240。这就要求这两个网卡各自不设置地址,绑定后设置公共地址。
具体流程如下:
①创建绑定网卡的配置文件
[root@51cto network-scripts]# vi /etc/sysconfig/network-scripts/ifcfg-bond0

[root@51cto network-scripts]# cat ifcfg-bond0

DEVICE=bond0

IPADDR=192.168.80.240

PREFIX=

GATEWAY=192.168.80.1

ONBOOT=yes

BOOTPROTO=none

USERCTL=no

BONDING_OPTS="mode=0 miimon=50"
[root@51cto network-scripts]# cat ifcfg-eth0

DEVICE=eth0

ONBOOT=yes

BOOTPROTO=none

MASTER=bond0

SLAVE=yes

USERCTL=no

[root@51cto network-scripts]# cat ifcfg-eth1

DEVICE=eth1

ONBOOT=yes

BOOTPROTO=none

MASTER=bond0

SLAVE=yes

USERCTL=no
③添加驱动支持
[root@51cto modprobe.d]# pwd

/etc/modprobe.d

[root@51cto modprobe.d]# ls

anaconda.conf  blacklist.conf  dist-alsa.conf  dist.conf  dist-oss.conf  openfwwf.conf

[root@51cto modprobe.d]#  vi /etc/modprobe.d/bonding.conf

[root@51cto modprobe.d]# cat bonding.conf

alias bond0 bonding
④重启网络服务

在xshell中测试,192.168.80.222这个绑定前的IP不通了,绑定后的公共IP通
[c:\~]$ ping 192.168.80.222

正在 Ping 192.168.80.222 具有  字节的数据:

请求超时。

192.168.80.222 的 Ping 统计信息:

    数据包: 已发送 = ,已接收 = ,丢失 =  (% 丢失),

^C

[c:\~]$ ping 192.168.80.240

正在 Ping 192.168.80.240 具有  字节的数据:

来自 192.168.80.240 的回复: 字节= 时间<1ms TTL=

来自 192.168.80.240 的回复: 字节= 时间<1ms TTL=

192.168.80.240 的 Ping 统计信息:

    数据包: 已发送 = ,已接收 = ,丢失 =  (% 丢失),

往返行程的估计时间(以毫秒为单位):

    最短 = 0ms,最长 = 0ms,平均 = 0ms
查看绑定的配置,显示网卡工作模式为负载均衡
Ethernet Channel Bonding Driver: v3.6.0 (September 26, 2009)
MII Status: up
MII Polling Interval (ms): 50
Up Delay (ms): 0
Down Delay (ms): 0
MII Status: up
Speed: 1000 Mbps
Duplex: full
Link Failure Count: 0
Permanent HW addr: 00:0c:29:82:aa:8b
Slave queue ID: 0
MII Status: up
Speed: 1000 Mbps
Duplex: full
Link Failure Count: 0
Permanent HW addr: 00:0c:29:82:aa:95
Slave queue ID: 0
验证网卡工作状态是否是负载均衡
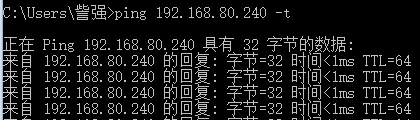
物理机上保持ping 192.168.80.240,在虚拟机系统里面每隔几秒钟执行ifconfig查看发送接收数据包变化。
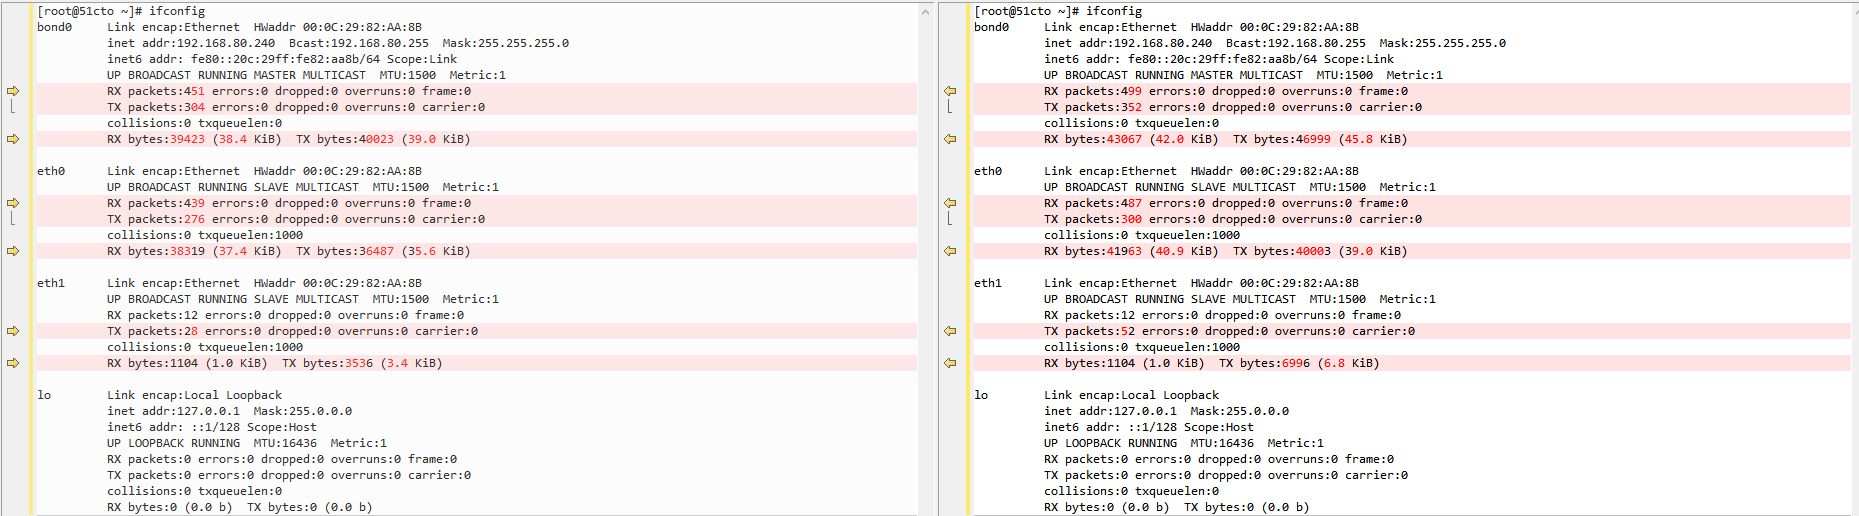
但是这种验证方法太笨
借助watch命令,可以设置间隔多少时间执行一次ifconfig
watch -n ifconfig
上面验证的是负载均衡模式,如果是主备模式至于需要在ifcfg-bond0配置文件里面吧模式改为0即可
如果需要拔掉虚拟机的网卡,如下设置

Linux高级网络设置——将多个网卡设置成一个网卡的更多相关文章
- Linux高级网络设置——给网卡绑定多个IP
假设这样一种场景: 某运营商的Linux服务器上装配了2家互联网公司的Web服务,每个Web服务分配了一个公网IP地址.但是运营商的Linux服务器只有一块网卡.这就需要在一块网卡上绑定多个IP地址. ...
- Linux 高级网络编程
设置套接字函数: #include<sys/socket.h> int setsockopt(int sockfd, int level, int optname, const void* ...
- ubuntu 使用ifupdown 进行高级网络设置
ifupdown ubuntu 本身支持linux的网络底层设置命令:ifconfig,route,ip 等命令,但为了让网络设置更加简单,Debian 提供了一个标准的高级网络设置工具,包含 ifu ...
- Linux CentOS6.x ip设置(网卡设置)
修改IP永久生效按以下方法vi /etc/sysconfig/network-scripts/ifcfg-eth0(eth0,第一块网卡,如果是第二块则为eth1)按如下修改ip: DEVICE=et ...
- CentOS/Linux 网卡设置 IP地址配置
CentOS/Linux下设置IP地址 1:临时修改:1.1:修改IP地址# ifconfig eth0 192.168.100.100 1.2:修改网关地址# route add default g ...
- 【整理】Virtualbox中的网络类型(NAT,桥接等),网卡,IP地址等方面的设置
之前是把相关的内容,放到: [已解决]实现VirtualBox中的(Guest OS)Mac和主机(Host OS)Win7之间的文件和文件夹共享 中的,现在把关于网络配置方面内容,单独提取出来,专门 ...
- Linux下双物理网卡设置成虚拟网卡
为了提供网络的高可用我们须要将多块网卡绑定设置成一块虚拟的网卡对外提供服务,这样能够防止一块网卡损坏或者防止网线连接故障造成的连接中断. 以下我们使用eth0与eth1来虚拟成为bond0为例:--- ...
- linux虚拟机网络设置(本机使用wiff,自己的网)
一.linux虚拟机网络设置(https://jingyan.baidu.com/album/4e5b3e1957979d91901e24f1.html?picindex=16) 选中虚拟机,点击 ...
- LInux:网络连接的设置
主机名的配置 主机名的配置(配置文件/etc/hostname) 1.使用 hostname 命令临时设置主机名 命令格式:hostname [新主机名] 2.永久设置主机名 命令格式:hostnam ...
随机推荐
- iOS-AVPlayer
MPMoviePlayerController足够强大,几乎不用写几行代码就能完成一个播放器,但是正是由于它的高度封装使得要自定义这个播放 器变得很复杂,甚至是不可能完成.例如有些时候需要自定义播放器 ...
- iOS面试考察点
)自我介绍.项目经历.专业知识.自由提问 (2)准备简历.投发简历.笔试(电话面试.).面试.复试.终面试.试用.转正.发展.跳槽(加薪升职) 1闲聊 a)自我介绍:自我认识能力 b)评价上一家公司: ...
- springmvc+mybatis多数据源配置,AOP注解动态切换数据源
springmvc与springboot没多大区别,springboot一个jar包配置几乎包含了所有springmvc,也不需要繁琐的xml配置,springmvc需要配置多种jar包,需要繁琐的x ...
- Ubuntu16.04下KeepAlived+Nginx 布署
前言 网上已经有很多相关文章,对各种概念介绍的比较清楚,也有各种详细的步骤,这里主要记录本要在ubuntu16.04下的布署过程,主要记录编译安装keepalived时遇到的坑及解决办 ...
- python全栈索引
书签 python基础 太白金星 TigerLee python基础一 pytcharm安装详细教程 python基础二 python基础数据类型 Python最详细,最深入的代码块小数据池剖析 深浅 ...
- Java使用icepdf转高清图片
<dependency> <groupId>org.icepdf.os</groupId> <artifactId>icepdf-core</ar ...
- Airflow怎么删除系统自带的DAG任务
点击这个按钮 找到dag文件所在路径,并进入路径将其文件删除即可
- Linux之问题诊断工具strace
转载于:https://www.cnblogs.com/lidabo/p/4523755.html 引言 “Oops,系统挂死了..." “Oops,程序崩溃了..." “Oops ...
- css — 选择器、盒子模型
目录 1. css引入方式 2. css选择器 3. css的盒模型 css: 层叠样式表 1. css引入方式 行内样式 <div style='color:red;'>mjj</ ...
- System函数的使用说明
#inlcude<stdlib.h> int system(const char* command) 功能:在已经运行的程序中调用另一个外部程序 参数:外部可执行程序的名字 返回值:不同系 ...