
Spring详解(十)------spring 环境切换
软件开发过程一般涉及“开发 -> 测试 -> 部署上线”多个阶段,每个阶段的环境的配置参数会有不同,如数据源,文件路径等。为避免每次切换环境时都要进行参数配置等繁琐的操作,可以通过spring的profile功能来进行配置参数的切换。
以我用到的项目的实际情况为例,首先可以在resources文件夹下分别为每个环境建立单独的文件夹(也可以额外建立一个common文件夹,用于存放公共的参数配置文件),每个文件夹下面存放对应的环境所需的配置文件,就像这样子:
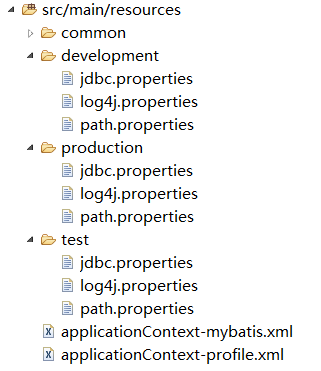
在resources文件夹下建立applicationContext-profile.xml文件,用来定义不同的profile:
<?xml version="1.0" encoding="UTF-8"?>

<beans xmlns="http://www.springframework.org/schema/beans"

    xmlns:c="http://www.springframework.org/schema/c" xmlns:xsi="http://www.w3.org/2001/XMLSchema-instance"

    xmlns:p="http://www.springframework.org/schema/p" xmlns:jdbc="http://www.springframework.org/schema/jdbc"

    xmlns:jee="http://www.springframework.org/schema/jee" xmlns:context="http://www.springframework.org/schema/context"

    xsi:schemaLocation="http://www.springframework.org/schema/beans

    http://www.springframework.org/schema/beans/spring-beans.xsd

    http://www.springframework.org/schema/context

    http://www.springframework.org/schema/context/spring-context.xsd

    http://www.springframework.org/schema/jdbc

    http://www.springframework.org/schema/jdbc/spring-jdbc.xsd

    http://www.springframework.org/schema/jee

    http://www.springframework.org/schema/jee/spring-jee.xsd">

    <description>spring profile配置</description>

    <!-- 开发环境配置文件 -->

    <beans profile="development">

        <context:property-placeholder

            location="classpath*:common/*.properties, classpath*:development/*.properties" />

    </beans>

    <!-- 测试环境配置文件 -->

    <beans profile="test">

        <context:property-placeholder

            location="classpath*:common/*.properties, classpath*:test/*.properties" />

    </beans>

    <!-- 生产环境配置文件 -->

    <beans profile="production">

        <context:property-placeholder

            location="classpath*:common/*.properties, classpath*:production/*.properties" />

    </beans>

</beans>
这样就实现了通过profile标记不同的环境,接下来就可以通过设置spring.profiles.default和spring.profiles.active这两个属性来激活和使用对应的配置文件。default为默认,如果没有通过active来指定,那么就默认使用default定义的环境。
这两个属性可以通过多种方法来设置:
- 在web.xml中作为web应用的上下文参数context-param;
- 在web.xml中作为DispatcherServlet的初始化参数;
- 作为JNDI条目;
- 作为环境变量;
- 作为JVM的系统属性;
- 在集成测试类上,使用@ActiveProfiles注解配置。
前两者都可以在web.xml文件中设置:
<?xml version="1.0" encoding="UTF-8"?>

<web-app version="3.0" xmlns="http://java.sun.com/xml/ns/javaee"

    xmlns:xsi="http://www.w3.org/2001/XMLSchema-instance"

    xsi:schemaLocation="http://java.sun.com/xml/ns/javaee

    http://java.sun.com/xml/ns/javaee/web-app_3_0.xsd">

    <display-name>Archetype Created Web Application</display-name>

    <context-param>

        <param-name>contextConfigLocation</param-name>

        <param-value>

            classpath*:/applicationContext*.xml

        </param-value>

    </context-param>

    <!-- 在上下文context-param中设置profile.default的默认值 -->

    <context-param>

        <param-name>spring.profiles.default</param-name>

        <param-value>development</param-value>

    </context-param>

    <!-- 在上下文context-param中设置profile.active的默认值 -->

    <!-- 设置active后default失效,web启动时会加载对应的环境信息 -->

    <context-param>

        <param-name>spring.profiles.active</param-name>

        <param-value>development</param-value>

    </context-param>

    <servlet>

        <servlet-name>appServlet</servlet-name>

        <servlet-class>org.springframework.web.servlet.DispatcherServlet</servlet-class>

        <!-- 在DispatcherServlet参数中设置profile的默认值,active同理 -->

        <init-param>

            <param-name>spring.profiles.default</param-name>

            <param-value>development</param-value>

        </init-param>

        <load-on-startup>1</load-on-startup>

    </servlet>

    <servlet-mapping>

        <servlet-name>appServlet</servlet-name>

        <url-pattern>/</url-pattern>

    </servlet-mapping>

</web-app>
激活指定的环境,也可以通过JVM参数来设置,可以在tomcat的启动脚本中加入以下JVM参数来激活:
-Dspring.profiles.active="production"
在程序中,也可以通过 @Profile("...") 对某些资源进行注解,这样只有当选择对应的环境时,才会产生对应的bean,如:
/**

 * 容器配置类

 * 用于测试@Profile注解

 */

@Configuration

@PropertySource(value = {"classpath:/dbconfig.properties"})

public class ProfileBeanConfig implements EmbeddedValueResolverAware {

    //数据库连接用户名

    @Value(value = "${jdbc.username}")

    private String username;

    //数据库连接密码

    private String password;

    //开发环境数据源

    @Bean(value = "dataSourceDev")

    @Profile(value = "dev")

    public DataSource dataSourceDev(@Value("${jdbc.driverClass}") String driverClass) throws PropertyVetoException {

        ComboPooledDataSource comboPooledDataSource = new ComboPooledDataSource();

        comboPooledDataSource.setUser(this.username);

        comboPooledDataSource.setPassword(this.password);

        comboPooledDataSource.setDriverClass(driverClass);

        comboPooledDataSource.setJdbcUrl("jdbc:mysql://localhost:3306/dev");

        return comboPooledDataSource;

    }

    //测试环境数据源

    @Bean(value = "dataSourceTest")

    @Profile("test")

    public DataSource dataSourceTest(@Value("${jdbc.driverClass}") String driverClass) throws PropertyVetoException {

        ComboPooledDataSource comboPooledDataSource = new ComboPooledDataSource();

        comboPooledDataSource.setUser(this.username);

        comboPooledDataSource.setPassword(this.password);

        comboPooledDataSource.setDriverClass(driverClass);

        comboPooledDataSource.setJdbcUrl("jdbc:mysql://localhost:3306/test");

        return comboPooledDataSource;

    }

    //生产环境数据源

    @Bean(value = "dataSourceProduction")

    @Profile("production")

    public DataSource dataSourceProduction(@Value("${jdbc.driverClass}") String driverClass) throws PropertyVetoException {

        ComboPooledDataSource comboPooledDataSource = new ComboPooledDataSource();

        comboPooledDataSource.setUser(this.username);

        comboPooledDataSource.setPassword(this.password);

        comboPooledDataSource.setDriverClass(driverClass);

        comboPooledDataSource.setJdbcUrl("jdbc:mysql://localhost:3306/production");

        return comboPooledDataSource;

    }

    //获取字符串解析器

    @Override

    public void setEmbeddedValueResolver(StringValueResolver resolver) {

        //解析配置文件,然后对数据库连接密码进行赋值

        this.password = resolver.resolveStringValue("jdbc.password");

    }

}
以下是切换数据源示例
//创建匿名容器

AnnotationConfigApplicationContext applicationContext = new AnnotationConfigApplicationContext();

//设置环境,其值为@Profile注解的属性值

applicationContext.getEnvironment().setActiveProfiles("test");

//注册容器类

applicationContext.register(ProfileBeanConfig.class);

//刷新容器

applicationContext.refresh();
Spring详解(十)------spring 环境切换的更多相关文章
- 超全详解Java开发环境搭建
摘自:https://www.cnblogs.com/wangjiming/p/11278577.html 超全详解Java开发环境搭建 在项目产品开发中,开发环境搭建是软件开发的首要阶段,也是必 ...
- NPOI2.2.0.0实例详解(十)—设置EXCEL单元格【文本格式】 NPOI 单元格 格式设为文本 HSSFDataFormat
NPOI2.2.0.0实例详解(十)—设置EXCEL单元格[文本格式] 2015年12月10日 09:55:17 阅读数:3150 using System; using System.Collect ...
- Spring详解(一)------概述
本系列教程我们将对 Spring 进行详解的介绍,相信你在看完后一定能够有所收获. 1.什么是 Spring ? Spring是一个开源框架,Spring是于2003 年兴起的一个轻量级的Java 开 ...
- Spring详解
https://gitee.com/xiaomosheng888老师的码云 1.核心容器:核心容器提供 Spring 框架的基本功能(Spring Core).核心容器的主要组件是 BeanFacto ...
- Spring详解------概述
1.什么是 Spring ? Spring是一个开源框架,Spring是于2003 年兴起的一个轻量级的Java 开发框架,由Rod Johnson 在其著作Expert One-On-One J2E ...
- RabbitMQ Exchange详解以及Spring中Topic实战
前言 AMQP,即Advanced Message Queuing Protocol,高级消息队列协议,是应用层协议的一个开放标准,为面向消息的中间件设计.消息中间件主要用于组件之间的解耦. 业务需求 ...
- Spring系列20:注解详解和Spring注解增强(基础内功)
有部分小伙伴反馈说前面基于注解的Spring中大量使用注解,由于对Java的注解不熟悉,有点难受.建议总结一篇的Java注解的基础知识,那么,它来了! 本文内容 什么是注解? 如何定义注解 如何使用注 ...
- Spring事务隔离级别与传播机制详解,spring+mybatis+atomikos实现分布式事务管理
原创说明:本文为本人原创作品,绝非他处转载,转账请注明出处 1.事务的定义:事务是指多个操作单元组成的合集,多个单元操作是整体不可分割的,要么都操作不成功,要么都成功.其必须遵循四个原则(ACID). ...
- Spring Boot Admin 详解(Spring Boot 2.0,基于 Eureka 的实现)
原文:https://blog.csdn.net/hubo_88/article/details/80671192 Spring Boot Admin 用于监控基于 Spring Boot 的应用,它 ...
随机推荐
- 求数组的子数组之和的最大值III(循环数组)
新的要求:一维数组改成循环数组,只是涉及简单算法,只是拿了小数做测试 想法:从文件读取数组,然后新建数组,将文件读取的数组在新数组中做一下连接,成为二倍长度的数组,然后再遍历,将每次遍历的子数组的和存 ...
- ArrayList 深入浅出
ArrayList 特点:按添加顺序排列.可重复.非线程安全: 底层实现:数组 扩容原理:初始化集合时,默认容量为 0,第一次添加元素时扩容为 10,容量不够时扩容为原来容量的 1.5 倍. 这里扩容 ...
- sql-4-函数
常见函数 1.运算函数 select ABS(-8) -- 绝对值 select ceiling(9.4) -- 向上取整 select floor(9.4) -- 向下取整 select rand( ...
- 如何使用odoo的compute方法,自动计算odoo字段
前言 在odoo的ORM创建数据字段的过程中,我们会经常需要定义一些字段用来计算某一些字段只和或其他计算结果. 今天介绍一个很好用的方法compute计算属性,这个方法其实是属于写在odoo fiel ...
- 记一次 .NET 某云采购平台API 挂死分析
一:背景 1. 讲故事 大概有两个月没写博客了,关注我的朋友应该知道我最近都把精力花在了星球,这两个月时间也陆陆续续的有朋友求助如何分析dump,有些朋友太客气了,给了大大的红包,哈哈,手里面也攒了1 ...
- HCNA Routing&Switching之OSPF度量值和基础配置命令总结
前文我们了解了OSPF的网络类型,OSPF中的DR和BDR的选举规则.作用等相关话题,回顾请参考https://www.cnblogs.com/qiuhom-1874/p/15054938.html: ...
- 01_Nginx下载安装
一.简介 Nginx 是由俄罗斯人 Igor Sysoev 设计开发的,开发工作从2002 年开始,第一次公开发布在 2004 年 10 月 4 日. 官方网站为:http://nginx.org/ ...
- 远程访问Jupyter Notebook的两种方式:命令行和配置文件
远程访问Jupyter Notebook的两种方式:命令行和配置文件 相关配置:Ubuntu 16.04服务器,本地Win10,使用了Xshell,Xftp工具. 相关配置主要分为三步: 服务器上的J ...
- 手写Pascal解释器(三)
目录 一.part7 抽象语法树和具体语法树(解析树) 代码实现 二.part8 一.part7 资料来源:https://ruslanspivak.com/lsbasi-part7/ 看作者博客的标 ...
- MySQL 中删除的数据都去哪儿了?
不知道大家有没有想过下面这件事? 我们平时调用 DELETE 在 MySQL 中删除的数据都去哪儿了? 这还用问吗?当然是被删除了啊 那么这里又有个新的问题了,如果在 InnoDB 下,多事务并发的情 ...