ASP.NET MVC 之表格分页
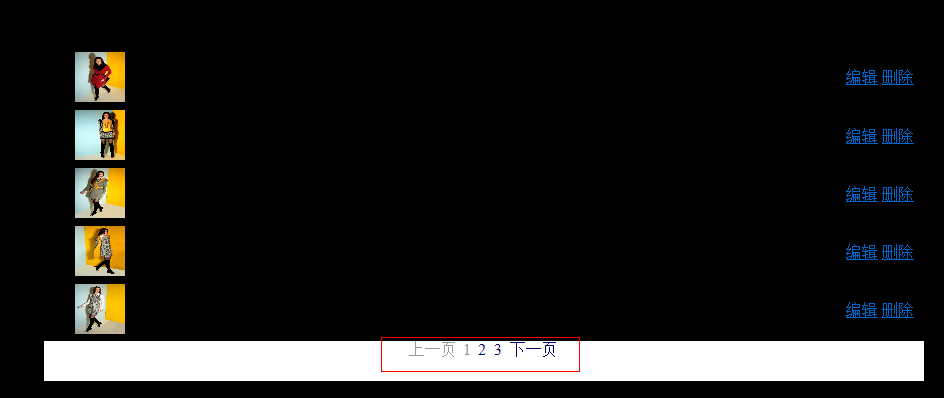
简单效果图:(框架:MVC+NHibernate)
要点:
(1)首先建立表格分页Model(GridModel.cs)
(2)然后建立数据展示页(PageCloth.cshtml)
(3)再建分页版页(_Pager.cshtml)
(4)建立分页链接功能(_SmartLink.cshtml)
(5)调用分页功能(HomeController.cs)
详细步骤:
1、建立表格分页Model(GridModel.cs)
using System;

using System.Collections.Generic;

using System.Linq;

using System.Web;

using Entity;

using System.Runtime.Serialization;

namespace BLUS.Models

{

    public class GridModel

    {

        /// <summary>

        /// 总记录数

        /// </summary>

        public int TotalRecordCount { set; get; }

        /// <summary>

        /// 页大小-每页显示几条记录

        /// </summary>

        public int PageSiae { set; get; }

        /// <summary>

        /// 当前第几页

        /// </summary>

        public int CurrentPageIndex { set; get; }

        /// <summary>

        /// 总页数

        /// </summary>

        public int PageCount

        {

            get

            {

                return TotalRecordCount % PageSiae ==  ? TotalRecordCount / PageSiae : TotalRecordCount / PageSiae + ;

            }

        }

        /// <summary>

        /// 默认分页,页大小5,当前第一页

        /// </summary>

        public GridModel()

        {

            this.PageSiae = ;

            this.CurrentPageIndex = ;

        }

        public IList<Cloth> Clothes

        {

            get;

            set;

        }

    }

}
2、然后建立数据展示页(PageCloth.cshtml)
@model BLUS.Models.GridModel

@{

    Layout = null;

}

<!DOCTYPE html>

<html>

<head>

    <meta name="viewport" content="width=device-width" />

    <title>GetClothByGenreId</title>

    <link href="../../Content/Manage.css" rel="stylesheet" type="text/css" />

</head>

<body>

    <div style=" width:880px;">

        <table style=" width:100%;">

            <tr>

                <th class="width25">

                    序号

                </th>

                <th class="width65">

                    图片

                </th>

                <th class="width700">

                    描述

                </th>

                <th class="width50">

                    价格

                </th>

                <th class="width80">

                    操作

                </th>

            </tr>

            <tbody>

                @{

                    int n = ;

                    foreach (var cloth in Model.Clothes)

                    {

                        n += ;

                    <tr>

                        <td>

                            @n

                        </td>

                        <td>

                            <img  style=" width:50px; height:50px;" alt="@cloth.Title" src="../FlashImageUpload/ImageList/@cloth.ImgName" />

                        </td>

                        <td>

                            @cloth.Title

                        </td>

                        <td>

                            @cloth.Price

                        </td>

                        <td>

                            @Html.ActionLink("编辑", "ClothEdit", "Home", new { clothId = cloth.ClothId }, null)

                            @Html.ActionLink("删除", "ClothDel", "Home", new { clothId = cloth.ClothId }, null)

                        </td>

                    </tr>

                    }

                }

            </tbody>

        </table>

        <div style=" width:880px; height:40px;  background-color:White; text-align:center;">

         @Html.Partial("_Pager", Model)

         </div>

    </div>

</body>

</html>
3、再建分页版页(_Pager.cshtml)
@model BLUS.Models.GridModel
@{
ViewBag.Title = "_Pager";
}
<div>
@{
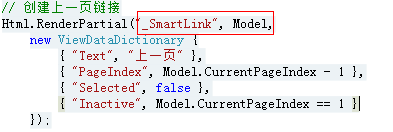
// 创建上一页链接
Html.RenderPartial("_SmartLink", Model,
new ViewDataDictionary {
{ "Text", "上一页" },
{ "PageIndex", Model.CurrentPageIndex - },
{ "Selected", false },
{ "Inactive", Model.CurrentPageIndex == }
}); //获取第一页和最后一页
var startPageIndex = Math.Max(, Model.CurrentPageIndex - Model.PageCount / );
var endPageIndex = Math.Min(Model.PageCount, Model.CurrentPageIndex + Model.PageCount / );
// 添加中间的页码 如: 上一页 1 2 3 4 下一页
for (var i = startPageIndex; i <= endPageIndex; i++)
{
Html.RenderPartial("_SmartLink", Model,
new ViewDataDictionary {
{ "Text", i },
{ "PageIndex", i },
{ "Selected", i == Model.CurrentPageIndex },
{ "Inactive", i == Model.CurrentPageIndex }
});
} // 创建下一页
Html.RenderPartial("_SmartLink", Model,
new ViewDataDictionary {
{ "Text", "下一页" },
{ "PageIndex", Model.CurrentPageIndex + },
{ "Selected", false },
{ "Inactive", Model.CurrentPageIndex == Model.PageCount }
});
}
</div>
4、建立分页链接功能(_SmartLink.cshtml)
@model BLUS.Models.GridModel
@{
ViewBag.Title = "_SmartLink";
}
<style type="text/css">
a.pagerButton, a.pagerButton:visited
{
border: solid 0px black;
padding: 1px;
text-decoration: none;
color: #;
margin: 0px 1px 0px 1px;
} a.pagerButton:hover
{
border: solid 1px red;
color: Black;
} a.pagerButtonCurrentPage
{
border: solid 1px #00a;
padding: 1px;
text-decoration: none;
color: White;
background-color: #;
margin: 0px 1px 0px 1px;
} .pagerButtonDisabled
{
border: none;
color: #;
padding: 1px;
}
</style>
@{
//文本编写器
var razorWriter = ViewContext.Writer; //判断当前链接是否选中
if ((bool)ViewData["Inactive"])
{
//将当前的Text输出 加入了css样式 该样式可以写在样式表、母版页、当前页中
razorWriter.Write(string.Format("<span class=\"{0}\">{1}</span>", "pagerButtonDisabled", ViewData["Text"]));
}
else
{
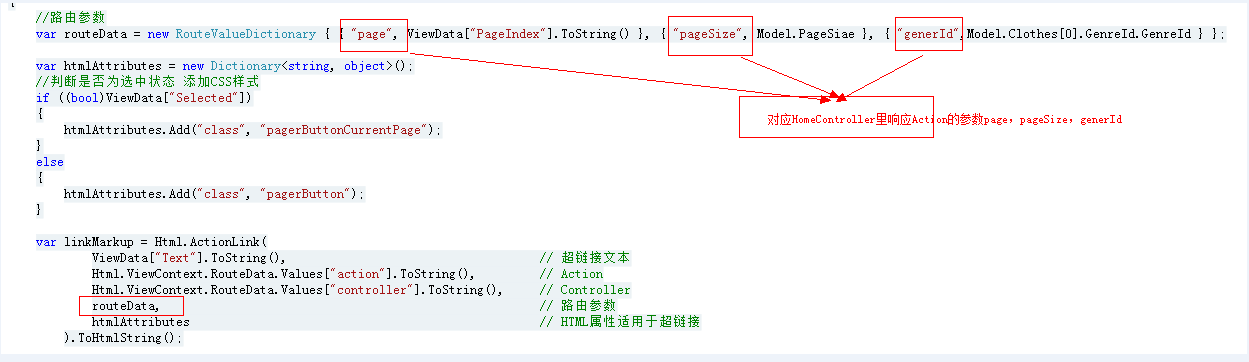
//路由参数
var routeData = new RouteValueDictionary { { "page", ViewData["PageIndex"].ToString() }, { "pageSize", Model.PageSiae }, { "generId",Model.Clothes[].GenreId.GenreId } }; var htmlAttributes = new Dictionary<string, object>();
//判断是否为选中状态 添加CSS样式
if ((bool)ViewData["Selected"])
{
htmlAttributes.Add("class", "pagerButtonCurrentPage");
}
else
{
htmlAttributes.Add("class", "pagerButton");
} var linkMarkup = Html.ActionLink(
ViewData["Text"].ToString(), // 超链接文本
Html.ViewContext.RouteData.Values["action"].ToString(), // Action
Html.ViewContext.RouteData.Values["controller"].ToString(), // Controller
routeData, // 路由参数
htmlAttributes // HTML属性适用于超链接
).ToHtmlString(); razorWriter.Write(linkMarkup);
}
}
5、调用分页功能(HomeController.cs)
  public ActionResult PageCloth(int page = , int pageSize = , int generId = )

        {

            string sql = "SELECT * FROM Cloth WHERE GenreId={0}";

            sql = string.Format(sql, generId);

            var model = new GridModel

            {

                CurrentPageIndex = page,

                PageSiae = pageSize,

                //确定记录总数(才能计算出PageCount页数)

                TotalRecordCount = clothlService.GetListBySql(sql).Count()

            };

            model.Clothes = clothlService.GetListByPage(model, generId);

            return View(model);

        }
附:
(1)数据展示页引入分页功能:

(2)分页版页加入链接:
(3)分页链接 响应路径:
(4)注意各页面之间的数据Model传递。
ASP.NET MVC 之表格分页的更多相关文章
- ASP.NET MVC利用PagedList分页(二)PagedList+Ajax+JsRender
(原文) 昨天在ASP.NET MVC利用PagedList分页(一)的 最后一节提到,一个好的用户体验绝对不可能是点击下一页后刷新页面,所以今天来说说利用Ajax+PagedList实现无刷新(个人 ...
- asp.net mvc easyui datagrid分页
提到 asp.net mvc 中的分页,很多是在用aspnetpager,和easyui datagrid结合的分页却不多,本文介绍的是利用easyui 中默认的分页控件,实现asp.net mvc分 ...
- ASP.NET MVC利用PagedList分页(一)
前几天看见博客园上有人写ASP.NET MVC的分页思想,这让我不禁想起了PagedList.PagedList是NuGet上提供的一个分页的类库,能对任何IEnumerable<T>进行 ...
- ASP.NET MVC 简单的分页思想与实现
首先我们通过VS创建一个空的基于Razor视图引擎的ASP.NET MVC3 Web应用程序,命名为JohnConnor.Web 对创建过程或Razor不太了解的看官,请移步 ASP.NET MVC ...
- asp.net mvc多条件+分页查询解决方案
开发环境vs2010 css:bootstrap js:jquery bootstrap paginator 原先只是想做个mvc的分页,但是一般的数据展现都需要检索条件,而且是多个条件,所以就变成了 ...
- 实现Asp.Net MVC无刷新分页
整个过程主要就是:一开始进入页面是,在页面加载完成之后直接通过$(function(){ LoadRegisterUserInfo(1,10,0,0);//加载注册用户信息 });无条件加载数据,调 ...
- asp.net mvc 导出表格
适合使用的场合: .net 中从前台中的table导出成excel文件,兼容各种浏览器. 使用工具: org.in2bits.MyXls.dll 从前台获取表格的thead和表格的tbody,将其转化 ...
- Asp.NET MvC EF实现分页
打开Visual Studio 2017 选择 项目----->管理nuget包 其他版本也有 输入paged 下载安装 pagedList和pagedList.mvc 在model文件新建一 ...
- Asp.net Mvc使用PagedList分页
git:https://github.com/troygoode/PagedList 1. Nuget 安装package watermark/2/text/aHR0cDovL2Jsb2cuY3Nkb ...
随机推荐
- QlikView实现部分载入数据的功能(Partial Load)
问题背景: 一直非常想不通,公司花了N多钱请了一帮QlikView的Consultant做出来的solution居然没有涉及Reload的部分,以至于每次刷新数据都须要刷新整个Data Model,之 ...
- 再关于IE11
微软在上周刚刚发布了用于Windows 8.1上的首个Internet Explorer 11的预览版.我们已经确认Internet Explorer 11中的一些新特性,包括对WebGL的支持.预抓 ...
- cxf的使用及安全校验-02创建简单的客户端接口
上一篇文章中,我们已经讲了如果简单的创建一个webservice接口 http://www.cnblogs.com/snowstar123/p/3395568.html 现在我们创建一个简单客户端接口 ...
- ORACLE控制文件一致性【weber出品】
一.首先控制文件有什么作用呢? 控制文件记录了如下信息:1.数据库的创建时间2.数据文件的位置3.日志文件的位置等作用是指导数据库 找到数据文件,日志文件并将数据库启动到 open 状态. 与其用文字 ...
- silverlight 打印
加引用: using System.Windows.Printing; xaml文件里: //定义图片和文本打印变量 PrintDocument printImage; public BeginCo ...
- 此项目的默认Web访问模式设置为文件共享, 但是无法从路径(此为转贴)
故障现象: 当你打开ASP.NET Web项目时,如果出现这样的错误提示:提示窗口标题: Web访问失败提示内容: 此项目的默认Web访问模式设置为文件共享, 但是无法从路径“...”打开“...”处 ...
- OC基础 单例
#undef AS_SINGLETON #define AS_SINGLETON( __class ) \ + (__class *)sharedInstance; #un ...
- 1、shell 简介
Shell 本身是一个用C语言编写的程序,它是用户使用Unix/Linux的桥 梁,用户的大部分工作都是通过Shell完成的.Shell既是一种命令语言,又是一种程序设计语言.作为命令语言,它交互式地 ...
- Python爬虫——抓取糗百段子
在别人博客里学习的 抓取糗百段子,由于糗百不断的更新,代码需要改正. 抓取网页:http://www.qiushibaike.com/hot/page/1 修改后的代码如下: # -*- coding ...
- 解决django关于图片无法显示的问题
http://python.usyiyi.cn/django/index.html http://m.blog.csdn.net/blog/qingyuanluofeng/44877399 http: ...