ceph install
Ceph : performance, reliability and scalability storage solution
Contents
|
|
|
| Software version | 0.72.2 |
|---|---|
| Operating System | Debian 7 |
| Website | Ceph Website |
| Last Update | 02/06/2014 |
| Others | |
1 Introduction
Ceph is an open-source, massively scalable, software-defined storage system which provides object, block and file system storage in a single platform. It runs on commodity hardware-saving you costs, giving you flexibility and because it’s in the Linux kernel, it’s easy to consume.[1]
Ceph is able to manage :
- Object Storage : Ceph provides seamless access to objects using native language bindings or radosgw, a REST interface that’s compatible with applications written for S3 and Swift.
- Block Storage : Ceph’s RADOS Block Device (RBD) provides access to block device images that are striped and replicated across the entire storage cluster.
- File System : Ceph provides a POSIX-compliant network file system that aims for high performance, large data storage, and maximum compatibility with legacy applications (not yet stable)
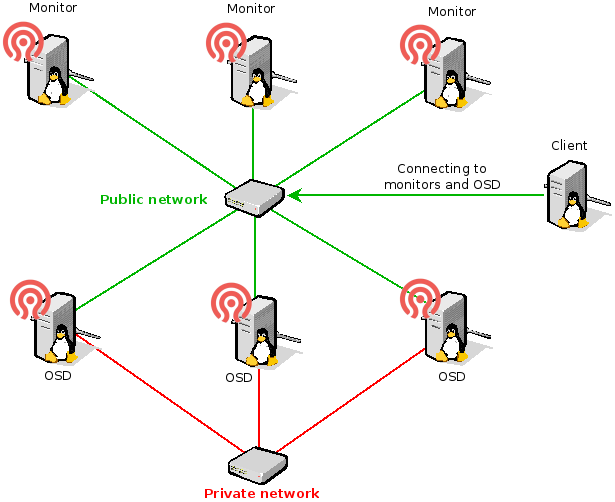
Whether you want to provide Ceph Object Storage and/or Ceph Block Device services to Cloud Platforms, deploy a Ceph Filesystem or use Ceph for another purpose, all Ceph Storage Cluster deployments begin with setting up each Ceph Node, your network and the Ceph Storage Cluster. A Ceph Storage Cluster requires at least one Ceph Monitor and at least two Ceph OSD Daemons. The Ceph Metadata Server is essential when running Ceph Filesystem clients.
- OSDs: A Ceph OSD Daemon (OSD) stores data, handles data replication, recovery, backfilling, rebalancing, and provides some monitoring information to Ceph Monitors by checking other Ceph OSD Daemons for a heartbeat. A Ceph Storage Cluster requires at least two Ceph OSD Daemons to achieve an active + clean state when the cluster makes two copies of your data (Ceph makes 2 copies by default, but you can adjust it).
- Monitors: A Ceph Monitor maintains maps of the cluster state, including the monitor map, the OSD map, the Placement Group (PG) map, and the CRUSH map. Ceph maintains a history (called an “epoch”) of each state change in the Ceph Monitors, Ceph OSD Daemons, and PGs.
- MDSs: A Ceph Metadata Server (MDS) stores metadata on behalf of the Ceph Filesystem (i.e., Ceph Block Devices and Ceph Object Storage do not use MDS). Ceph Metadata Servers make it feasible for POSIX file system users to execute basic commands like ls, find, etc. without placing an enormous burden on the Ceph Storage Cluster.
Ceph stores a client’s data as objects within storage pools. Using the CRUSH algorithm, Ceph calculates which placement group should contain the object, and further calculates which Ceph OSD Daemon should store the placement group. The CRUSH algorithm enables the Ceph Storage Cluster to scale, rebalance, and recover dynamically.
1.1 Testing case
If you want to test with Vagrant and VirtualBox, I've made a Vagrantfile for it running on Debian Wheezy :
 Vagrantfile Vagrantfile |
# -*- mode: ruby -*- |
This will spawn VMs with correct hardware to run. It will also install Ceph as well. After booting those instances, you will have all the Ceph servers like that :
2 Installation
2.1 First node
To get the latest version, we're going to use the official repositories :
 |
wget -q -O- 'https://ceph.com/git/?p=ceph.git;a=blob_plain;f=keys/release.asc' | sudo apt-key add - |
Then we're going to install Ceph and ceph-deploy which help us to install in a faster way all the components :
| aptitude |
aptitude update |
Openntpd is not mandatory, but you need all your machine to be clock synchronized !
 WARNING WARNING |
|
You absolutely need well named servers (hostname) and dns names available. A dns server is mandatory. |
2.2 Other nodes
To install ceph from the first (admin) node for any kind of nodes, here is a simple solution that avoid to enter the apt key etc... :
| ceph-deploy |
ceph-deploy install <node_name> |
| WARNING |
| For production usage, you should choose an LTS version like emperor |
|
ceph-deploy install --release emperor <node_name> |
 Notes Notes |
|
You need to exchange SSH keys to remotely be able to connect to the target machines. |
3 Deploy
First of all, your Ceph configuration will be generated in the current directory, so it's suggested to create a dedicated folder for it :
|
mkdir ceph-config |
| WARNING |
|
Be sure of your network configuration for Monitor nodes as it's a nightmare to change later !!! |
3.1 Cluster
The first machine on which you'll want to start, you'll need to create the Ceph cluster. I'll do it here on the monitor server named mon1 :
| ceph-deploy |
> ceph-deploy new mon1 |
3.2 Monitor
A Ceph Monitor maintains maps of the cluster state, including the monitor map, the OSD map, the Placement Group (PG) map, and the CRUSH map. Ceph maintains a history (called an “epoch”) of each state change in the Ceph Monitors, Ceph OSD Daemons, and PGs.
3.2.1 Add the first monitor
To create the first (only the first today because ceph-deploy got problems) monitor node (mon1 here) :
| ceph-deploy |
> ceph-deploy --overwrite-conf mon create mon1 |
3.2.2 Add a monitor
To add 2 others monitors nodes (mon2 and mon3) in the cluster, you'll need to edit the configuration on a monitor and admin node. You'll have to set the mon_host, mon_initial_members and public_network configuration in :
| /etc/ceph/ceph.conf |
[global] |
Then update the current cluster configuration :
|
ceph-deploy --overwrite-conf config push mon2 or ceph-deploy --overwrite-conf config push mon2 mon3 |
You now need to update the new configuration on all your monitor nodes :
| ceph-deploy |
ceph-deploy --overwrite-conf config push mon1 mon2 mon3 |
| WARNING |
| For production usage, you need at least 3 nodes |
3.2.3 Remove a monitor
If you need to remove a monitor for maintenance :
| ceph-deploy |
ceph-deploy mon destroy mon1 |
3.3 Admin node
To get the first admin node, you'll need to gather keys on a monitor node. To make it simple, all ceph-deploy should be done from that machine :
| ceph-deploy |
> ceph-deploy gatherkeys mon1 |
Then you need to exchange SSH keys to remotely be able to connect to the target machines.
3.4 OSD
Ceph OSD Daemon (OSD) stores data, handles data replication, recovery, backfilling, rebalancing, and provides some monitoring information to Ceph Monitors by checking other Ceph OSD Daemons for a heartbeat. A Ceph Storage Cluster requires at least two Ceph OSD Daemons to achieve an active + clean state when the cluster makes two copies of your data (Ceph makes 2 copies by default, but you can adjust it).
3.4.1 Add an OSD
To deploy Ceph OSD, we'll first start to erase the remote disk and create a gpt table on the dedicated disk 'sdb' :
| ceph-deploy |
> ceph-deploy disk zap osd1:sdb |
It will create a journalized partition and a data one. Then we could create partitions on the on 'osd1' server and prepare + activate this OSD :
| ceph-deploy |
> ceph-deploy --overwrite-conf osd create osd1:sdb |
You can see there's an error but it works :
| ceph |
> ceph -s |
3.4.2 Get OSD status
To know the OSD status :
| ceph |
> ceph osd tree |
3.4.3 Remove an OSD
To remove an OSD, it's unfortunately not yet integrated in ceph-deploy. So first, look at the current status :
| ceph |
> ceph osd tree |
Here I want to remove the osd.0 :
|
osd='osd.0' |
If the OSD wasn't down, I should put it down with this command :
| ceph |
> ceph osd out $osd |
Then I remove it from the crushmap :
|
> ceph osd crush remove $osd |
Delete the authentication part (Paxos) :
|
ceph auth del $osd |
Then remove the OSD :
| ceph |
ceph osd rm $osd |
And now, it's definitively out :
| ceph |
> ceph osd tree |
3.5 RBD
To make Block devices, you need to have a correct OSD configuration done with a created pool. You don't have anything else to have :-)
4 Configuration
4.1 OSD
4.1.1 OSD Configuration
4.1.1.1 Global OSD configuration
The Ceph Client retrieves the latest cluster map and the CRUSH algorithm calculates how to map the object to a placement group, and then calculates how to assign the placement group to a Ceph OSD Daemon dynamically. By default Ceph have 2 replicas and you can change it by 3 in adding those line to the Ceph configuration[2] :
|
[global] |
- osd pool default size : the number of replicas
- osd pool default min size : set the minimum available replicas before putting OSD down
Configure the placement group (Total PGs = (number of OSD * 100) / replicas numbers) :
|
[global] |
Then you can push your new configuration :
| ceph-deploy |
ceph-deploy --overwrite-conf config push mon1 mon2 mon3 |
4.1.1.2 Network configuration
For the OSD, you've got 2 network interfaces (private and public). So to configure it properly on your admin machine by updating your configuration file as follow :
| ceph.conf |
[osd] |
But if you want to add specific configuration :
| ceph.conf |
[osd.0] |
Then you can push your new configuration :
| ceph-deploy |
ceph-deploy --overwrite-conf config push mon1 mon2 mon3 |
4.1.2 Create an OSD pool
To create an OSD pool :
| ceph |
ceph osd pool create <pool_name> <pg_num> <pgp_num> |
4.1.3 List OSD pools
You can list OSD :
| ceph |
> ceph osd lspools |
| ceph |
> ceph osd dump |
4.2 Crush map
The Crushmap[3] contain a list of OSDs, a list of 'buckets' for aggregating the devices into physical locations. You can edit[4] it to manage it manually.
To show the complete map of your Ceph :
|
ceph osd tree |
To get crushmap and to edit it :
|
ceph osd getcrushmap -o mymap |
To set a new crushmap after editing :
|
crushtool -c mymap.txt -o mynewmap |
To get quorum status for the monitors :
|
ceph quorum_status --format json-pretty |
5 Usage
5.1 Check health
You can check cluster health :
| ceph |
> ceph -s |
5.2 Change configuration on the fly
To avoid service restart on a simple modification, you can interact directly with Ceph to change some values. First of all, you can get all current values of your Ceph cluster :
|
> ceph --admin-daemon /var/run/ceph/ceph-mon.mon1-pub.asok config show |
Now if I want to change one of those values :
|
> ceph tell osd.* injectargs '--mon_clock_drift_allowed 1' |
You can change '*' by the name of an OSD if you want to apply this configuration to a specific node.
Then do not forget to add it to your Ceph configuration and push it !
5.3 Use object storage
5.3.1 Add object
When you have an Ceph OSD pool ready, you can add a file :
| rados |
rados put <object_name> <file_to_upload> --pool=<pool_name> |
5.3.2 List objects in a pool
You can list your pool content :
| rados |
> rados -p <pool_name> ls |
You can see where it has been stored :
| ceph |
> ceph osd map <pool_name> <filename> |
To locate the file on the hard drive, look at this folder (/var/lib/ceph/osd/ceph-1/current). Then look at the previous result (3.47) and the filename af0f2847. So the file will be placed here :
| ls |
> ls /var/lib/ceph/osd/ceph-1/current/3.47_head |
5.3.3 Remove objects
To finish, remove it :
|
rados rm <filename> --pool=<pool_name> |
5.4 Use blocks device storage
This part becomes very interesting if you start using block devices storage. From an admin node, launch client install :
| aptitude |
ceph-deploy install <client> |
On the client, load the module and add it to launch at boot :
|
modprobe rbd |
5.4.1 Create a block device
Now to create a block device (you can do it on the client node if you want has it gets the admin key last pushed by ceph-deploy) :
| rbd |
rbd create <name> --size <size_in_megabytes> [--pool <pool_name>] |
If you don't specify the pool name option, it will automatically be created in the 'rbd' pool.
5.4.2 List available block devices
This is so simple :
| rbd |
> rbd ls |
And you can show mapped :
| rbd |
> rbd showmapped |
5.4.3 Get block device informations
You may need to grab informations on the device block to know where it is physically or simply the size :
|
> rbd info <name> |
5.4.4 Map and mount a block device
First your need to map it to make it appears in your device list :
| rbd |
rbd map <name> [--pool <pool_name>] |
You can now format it :
| mkfs.ext4 |
mkfs.ext4 /dev/rbd/pool_name/name |
And now mount it :
|
mount /dev/rbd/pool_name/name /mnt |
That's it :-)
5.4.5 Remove a block device
To remove, once again it's simple :
| rbd |
rbd rm <name> [--pool <pool_name>] |
5.4.6 Umount and unmap a block device
Umount and umap is as easy as you think :
|
umount /mnt |
5.4.7 Advanced usage
I won't list all features, but you can look at the man to :
- clone
- export/import
- snapshot
- bench write
...
6 FAQ
6.1 Reset a node
You sometime needs to reset a node. It's generally needed when you're doing tests. From the admin node run this :
| ceph-deploy |
ceph-deploy purge <node_name> |
Then reinstall it with :
| ceph-deploy |
ceph-deploy install <node_name> |
6.2 Can't add a new monitor node
If you can't add a new monitor mon (here mon2)[5] :
| ceph-deploy |
> ceph-deploy --overwrite-conf mon create mon2 |
You have to add public network and monitor to the list in configuration file. Look here to see how to add correctly a new mon.
6.3 health HEALTH_WARN clock skew detected
If you get this kind of problem :
| ceph |
> ceph -s |
You need to install an NTP server. The millisecond is important. Here is a workaround :
| ceph.conf |
[global] |
This set the possible delta to avoid the warning message.
7 References
ceph install的更多相关文章
- install ceph by ceph-deploy
使用阿里云源安装ceph Luminous https://liuxu.co/2017/09/19/install-ceph-Luminous-on-centos7-with-ceph-deploy/ ...
- ceph_deploy部署ceph分布式文件系统
1.前期准备:centos6.5 minimal版本3台 选择其中一台作为一个安装节点,能无密码登录其他机器.ssh-keygen ssh-keygen -i ~/.ssh/id_rsa.pub no ...
- 构建ceph deb 安装包
前言:本文基于ubuntu 14.04.5 LTS 和ceph v0.94.3 之上做的实验 一.编译ceph包1.1.克隆ceph代码,切换分支 git clone --recursive http ...
- ceph与openstack对接
对接分为三种,也就是存储为openstack提供的三类功能1.云盘,就好比我们新加的硬盘2.原本的镜像也放在ceph里,但是我没有选择这种方式,原因是因为后期有要求,但是我会把这个也写出来,大家自己对 ...
- ceph实践: 搭建环境
作者:吴香伟 发表于 2014/09/26 版权声明:可以任意转载,转载时务必以超链接形式标明文章原始出处和作者信息以及版权声明 本节主要参考官网的ADDING/REMOVING OSDS章节. 同步 ...
- Ceph性能测试工具和方法。
0. 测试环境 同 Ceph 的基本操作和常见故障排除方法 一文中的测试环境. 1. 测试准备 1.1 磁盘读写性能 1.1.1 单个 OSD 磁盘写性能,大概 165MB/s. root@ceph1 ...
- 理解 OpenStack + Ceph (8): 基本的 Ceph 性能测试工具和方法
本系列文章会深入研究 Ceph 以及 Ceph 和 OpenStack 的集成: (1)安装和部署 (2)Ceph RBD 接口和工具 (3)Ceph 物理和逻辑结构 (4)Ceph 的基础数据结构 ...
- 理解 OpenStack + Ceph (7): Ceph 的基本操作和常见故障排除方法
本系列文章会深入研究 Ceph 以及 Ceph 和 OpenStack 的集成: (1)安装和部署 (2)Ceph RBD 接口和工具 (3)Ceph 物理和逻辑结构 (4)Ceph 的基础数据结构 ...
- 理解 OpenStack + Ceph (3):Ceph RBD 接口和工具 [Ceph RBD API and Tools]
本系列文章会深入研究 Ceph 以及 Ceph 和 OpenStack 的集成: (1)安装和部署 (2)Ceph RBD 接口和工具 (3)Ceph 物理和逻辑结构 (4)Ceph 的基础数据结构 ...
随机推荐
- BZOJ 1034: [ZJOI2008]泡泡堂BNB( 贪心 )
贪心...用最弱的赢最弱的,用最强的赢最强的,否则用最弱的和最强的比... (贴个官方题解:将双方的选手均按从强到弱排序,然后第一次扫描尽可能用当前剩下的选手中能赢对手当前最强选手中最弱的一个去赢得胜 ...
- html5 geolocation API
清单 1. 检查浏览器支持性if (navigator.geolocation) 清单 2. 单次定位请求 API void getCurrentPosition(updateLocation, op ...
- jbpmAPI-6
第六章流程. 6.1. What is BPMN 2.0 业务流程模型和符号(BPMN)2.0规范是OMG规范,不仅定义了一个标准的业务流程的图形化表述(如BPMN 1. x),但现在还包括执行语义定 ...
- .net 更改时间格式
/// <summary> /// 更改时间格式[HH:mm:ss]到[HHmmss] /// </summary> /// <param name="inpu ...
- BootStrap学习1 输入提示
首先参考这个页面http://www.bootcss.com/javascript.html#typeahead 我只是把里面最基本的东西抠出来了 <!DOCTYPE html> < ...
- golang并发编程
golang并发编程 引子 golang提供了goroutine快速实现并发编程,在实际环境中,如果goroutine中的代码要消耗大量资源时(CPU.内存.带宽等),我们就需要对程序限速,以防止go ...
- XML中SystemID和PublicID的区别
http://hi.baidu.com/binboot007/item/1533f91d52113d7c7b5f259c http://supportweb.cs.bham.ac.uk/documen ...
- Json.Net系列教程 4.Linq To JSON
原文 Json.Net系列教程 4.Linq To JSON 更改历史 2013-05-31 添加一个FAQ 一.Linq to JSON是用来干什么的? Linq to JSON是用来操作JSO ...
- TCP/IP笔记 四.应用层(1)——DNS
1. DNS DNS(Domain Name System ):域名系统,是因特网的一项核心服务,它作为可以将域名和IP地址相互映射的一个分布式数据库,能够使人更方便的访问互联网,而不用去记住能够被机 ...
- 细数C++和C的差别
C++语言是对C语言的扩展.所以熟悉C语言的人会发现.本书的第01~18章讲的内容基本上和C语言的内容差点儿相同. C++一方面对C语言的语法进行了改动.还有一方面又加入一些新的概念. C++中新增的 ...