SpringBoot入门(0) HelloWorld的实现与原理分析
SpringBoot(0) HelloWorld的实现与原理分析
一、环境准备
1.1 环境约束
–jdk1.8:Spring Boot 推荐jdk1.7及以上;java version “1.8.0_121”
–maven3.x:maven 3.3以上版本;Apache Maven 3.6.0
–IntelliJIDEA2018:IntelliJ IDEA 2018.2.7 x64、STS
–SpringBoot 2.1.2.RELEASE:2.1.2;
1.2 IDEA整合Maven
整合maven到IDEA(适用于初次在idea使用maven)
A.maven设置
<profile>

  <id>jdk-1.8</id>

  <activation>

    <activeByDefault>true</activeByDefault>

    <jdk>1.8</jdk>

  </activation>

  <properties>

    <maven.compiler.source>1.8</maven.compiler.source>

    <maven.compiler.target>1.8</maven.compiler.target>

    <maven.compiler.compilerVersion>1.8</maven.compiler.compilerVersion>

  </properties>

</profile>
B.IDEA设置

二、SpringBoot开发HelloWorld
一个功能:
浏览器发送hello请求,服务器接受请求并处理,响应Hello World字符串。
2.1 创建一个maven工程
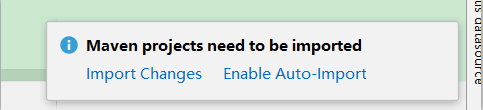
创建完成后选择Enable Auto-Import自动引入需要的jar包,若是忘记了,需要右下角小方块选择Maven project,然后点看开后点击循环更新的按钮手动更新。
2.2 pom文件中导入springboot相关的依赖
 <!--   spring boot官网 复制springboot2.1.2版本所需要的maven配置-->

    <!-- Inherit defaults from Spring Boot -->

    <parent>

        <groupId>org.springframework.boot</groupId>

        <artifactId>spring-boot-starter-parent</artifactId>

        <version>2.1.2.RELEASE</version>

    </parent>

    <!--spring-boot场景启动器;这里帮我们导入了web模块正常运行所依赖的组件-->

    <!-- Add typical dependencies for a web application -->

    <dependencies>

        <dependency>

            <groupId>org.springframework.boot</groupId>

            <artifactId>spring-boot-starter-web</artifactId>

        </dependency>

    </dependencies>
2.3 编写主程序启动springboot应用
/**

 *  @SpringBootApplication 来标注一个主程序类,说明这是一个Spring Boot应用

 */

@SpringBootApplication

public class Example {

    public static void main(String[] args) {

        SpringApplication.run(Example.class, args);

    }

}
2.4 编写相关的Controller、Service
@Controller

public class HelloController {

    @ResponseBody

    @RequestMapping("/hello")

    public String hello(){

        return "Hello World!";

    }

}
2.5 运行主程序

三、HelloWorld输出过程探究
3.1 pom.xml文件
 <!--   spring boot官网 复制springboot2.1.2版本所需要的maven配置-->

    <!-- Inherit defaults from Spring Boot -->

    <parent>

        <groupId>org.springframework.boot</groupId>

        <artifactId>spring-boot-starter-parent</artifactId>

        <version>2.1.2.RELEASE</version>

    </parent>

它的父项目是

  <parent>

        <groupId>org.springframework.boot</groupId>

        <artifactId>spring-boot-dependencies</artifactId>

        <version>2.1.2.RELEASE</version>

        <relativePath>../../spring-boot-dependencies</relativePath>

    </parent>

    <artifactId>spring-boot-starter-parent</artifactId>

    <packaging>pom</packaging>   .....

用来真正管理Spring Boot应用里面的所有依赖版本
Spring Boot的版本仲裁中心;
以后我们导入依赖默认是不需要写版本;(没有在dependencies里面管理的依赖自然需要声明版本号)
3.2 启动器
  <!--spring-boot场景启动器;这里帮我们导入了web模块正常运行所依赖的组件-->

    <!-- Add typical dependencies for a web application -->

    <dependencies>

        <dependency>

            <groupId>org.springframework.boot</groupId>

            <artifactId>spring-boot-starter-web</artifactId>

        </dependency>

    </dependencies>
spring-boot-starter-web:
spring-boot-starter:spring-boot场景启动器;帮我们导入了web模块正常运行所依赖的组件;
Spring Boot将所有的功能场景都抽取出来,做成一个个的starters(启动器),只需要在项目里面引入这些starter相关场景的所有依赖都会导入进来。要用什么功能就导入什么场景的启动器
3.3 主程序类、主入口类
/**

 *  @SpringBootApplication 来标注一个主程序类,说明这是一个Spring Boot应用

 */

@SpringBootApplication

public class Example {

    public static void main(String[] args) {

        SpringApplication.run(Example.class, args);

    }

}
3.3.1 @SpringBootApplication
@SpringBootApplication: Spring Boot应用标注在某个类上说明这个类是SpringBoot的主配置类,SpringBoot就应该运行这个类的main方法来启动SpringBoot应用;
SpringBootApplication.class:
@Target({ElementType.TYPE})

@Retention(RetentionPolicy.RUNTIME)

@Documented

@Inherited

@SpringBootConfiguration

@EnableAutoConfiguration

@ComponentScan(

    excludeFilters = {@Filter(

    type = FilterType.CUSTOM,

    classes = {TypeExcludeFilter.class}

), @Filter(

    type = FilterType.CUSTOM,

    classes = {AutoConfigurationExcludeFilter.class}

)}

)

public @interface SpringBootApplication {
@SpringBootConfiguration:Spring Boot的配置类;
标注在某个类上,表示这是一个Spring Boot的配置类;
3.3.2 @SpringBootConfiguration
SpringBootConfiguration.class:
@Target({ElementType.TYPE})

@Retention(RetentionPolicy.RUNTIME)

@Documented

@Configuration

public @interface SpringBootConfiguration {

}
@Configuration:配置类上来标注这个注解;
配置类 ----- 配置文件;配置类也是容器中的一个组件;@Component
Configuration.class:
@Target({ElementType.TYPE})

@Retention(RetentionPolicy.RUNTIME)

@Documented

@Component

public @interface Configuration {

    @AliasFor(

        annotation = Component.class

    )

    String value() default "";

}
3.3.3 @EnableAutoConfiguration
@EnableAutoConfiguration:开启自动配置功能;
以前我们需要配置的东西,Spring Boot帮我们自动配置;@EnableAutoConfiguration告诉SpringBoot开启自动配置功能;这样自动配置才能生效;
EnableAutoConfiguration.class:
@Target({ElementType.TYPE})

@Retention(RetentionPolicy.RUNTIME)

@Documented

@Inherited

@AutoConfigurationPackage

@Import({AutoConfigurationImportSelector.class})

public @interface EnableAutoConfiguration {

    String ENABLED_OVERRIDE_PROPERTY = "spring.boot.enableautoconfiguration";

    Class<?>[] exclude() default {};

    String[] excludeName() default {};

}
3.3.3.1 @AutoConfigurationPackage
@AutoConfigurationPackage:自动配置包
@Import(Registrar.class):
Spring的底层注解@Import,给容器中导入一个组件;导入的组件由Registrar.class指定;
将主配置类(@SpringBootApplication标注的类)的所在包及下面所有子包里面的所有组件扫描到Spring容器;
AutoConfigurationPackage.class:
@Target({ElementType.TYPE})

@Retention(RetentionPolicy.RUNTIME)

@Documented

@Inherited

@Import({Registrar.class})

public @interface AutoConfigurationPackage {

}
AutoConfigurationPackage.class:
static class Registrar implements ImportBeanDefinitionRegistrar, DeterminableImports {

    Registrar() {

    }

    public void registerBeanDefinitions(AnnotationMetadata metadata, BeanDefinitionRegistry registry) {

        AutoConfigurationPackages.register(registry, (new AutoConfigurationPackages.PackageImport(metadata)).getPackageName());

    }

    public Set<Object> determineImports(AnnotationMetadata metadata) {

        return Collections.singleton(new AutoConfigurationPackages.PackageImport(metadata));

    }

}
3.3.3.2 @Import
@Import({AutoConfigurationImportSelector.class});
给容器中导入组件?
AutoConfigurationImportSelector:导入哪些组件的选择器;
将所有需要导入的组件以全类名的方式返回;这些组件就会被添加到容器中;
会给容器中导入非常多的自动配置类(xxxAutoConfiguration);就是给容器中导入这个场景需要的所有组件,并配置好这些组件;
AutoConfigurationImportSelector.class:
//	将所有需要导入的组件以全类名的方式返回;这些组件就会被添加到容器中;

public String[] selectImports(AnnotationMetadata annotationMetadata) {

        if (!this.isEnabled(annotationMetadata)) {

            return NO_IMPORTS;

        } else {

            AutoConfigurationMetadata autoConfigurationMetadata = AutoConfigurationMetadataLoader.loadMetadata(this.beanClassLoader);

            AutoConfigurationImportSelector.AutoConfigurationEntry autoConfigurationEntry = this.getAutoConfigurationEntry(autoConfigurationMetadata, annotationMetadata);

            return StringUtils.toStringArray(autoConfigurationEntry.getConfigurations());

        }

    }

   protected AutoConfigurationImportSelector.AutoConfigurationEntry getAutoConfigurationEntry(AutoConfigurationMetadata autoConfigurationMetadata, AnnotationMetadata annotationMetadata) {

        if (!this.isEnabled(annotationMetadata)) {

            return EMPTY_ENTRY;

        } else {

            AnnotationAttributes attributes = this.getAttributes(annotationMetadata);

            List<String> configurations = this.getCandidateConfigurations(annotationMetadata, attributes);

            configurations = this.removeDuplicates(configurations);

            Set<String> exclusions = this.getExclusions(annotationMetadata, attributes);

            this.checkExcludedClasses(configurations, exclusions);

            configurations.removeAll(exclusions);

            configurations = this.filter(configurations, autoConfigurationMetadata);

            this.fireAutoConfigurationImportEvents(configurations, exclusions);

            return new AutoConfigurationImportSelector.AutoConfigurationEntry(configurations, exclusions);

        }

    }
有了自动配置类,免去了我们手动编写配置注入功能组件等的工作;

SpringFactoriesLoader.loadFactoryNames(EnableAutoConfiguration.class,classLoader);
AutoConfigurationImportSelector.class:
 protected List<String> getCandidateConfigurations(AnnotationMetadata metadata, AnnotationAttributes attributes) {

        List<String> configurations = SpringFactoriesLoader.loadFactoryNames(this.getSpringFactoriesLoaderFactoryClass(), this.getBeanClassLoader());

        Assert.notEmpty(configurations, "No auto configuration classes found in META-INF/spring.factories. If you are using a custom packaging, make sure that file is correct.");

        return configurations;

    }
SpringFactoriesLoader.class:
Spring Boot在启动的时候从类路径下的META-INF/spring.factories中获取EnableAutoConfiguration指定的值,将这些值作为自动配置类导入到容器中,自动配置类就生效,帮我们进行自动配置工作;以前我们需要自己配置的东西,自动配置类都帮我们;
public final class SpringFactoriesLoader {

    public static final String FACTORIES_RESOURCE_LOCATION = "META-INF/spring.factories";

    private static final Log logger = LogFactory.getLog(SpringFactoriesLoader.class);

    private static final Map<ClassLoader, MultiValueMap<String, String>> cache = new ConcurrentReferenceHashMap();

    private SpringFactoriesLoader() {

    }

    .....

    public static List<String> loadFactoryNames(Class<?> factoryClass, @Nullable ClassLoader classLoader) {

        String factoryClassName = factoryClass.getName();

        return (List)loadSpringFactories(classLoader).getOrDefault(factoryClassName, Collections.emptyList());

    }

    private static Map<String, List<String>> loadSpringFactories(@Nullable ClassLoader classLoader) {

        MultiValueMap<String, String> result = (MultiValueMap)cache.get(classLoader);

        if (result != null) {

            return result;

        } else {

            try {

                Enumeration<URL> urls = classLoader != null ? classLoader.getResources("META-INF/spring.factories") : ClassLoader.getSystemResources("META-INF/spring.factories");

                LinkedMultiValueMap result = new LinkedMultiValueMap();

                while(urls.hasMoreElements()) {

                    URL url = (URL)urls.nextElement();

                    UrlResource resource = new UrlResource(url);

                    Properties properties = PropertiesLoaderUtils.loadProperties(resource);

 ....
J2EE的整体整合解决方案和自动配置都在spring-boot-autoconfigure-2.1.2.RELEASE.jar;
四、使用Spring Initializer快速创建Spring Boot项
IDEA:使用 Spring Initializer快速创建项目
IDE都支持使用Spring的项目创建向导快速创建一个Spring Boot项目;
选择我们需要的模块;向导会联网创建Spring Boot项目;
默认生成的Spring Boot项目;
- 主程序已经生成好了,我们只需要我们自己的逻辑
- resources文件夹中目录结构
- static:保存所有的静态资源; js css images;
- templates:保存所有的模板页面;(Spring Boot默认jar包使用嵌入式的Tomcat,默认不支持JSP页面);可以使用模板引擎(freemarker、thymeleaf);
- application.properties:Spring Boot应用的配置文件;可以修改一些默认设置;
(如有错误,请指正)
SpringBoot入门(0) HelloWorld的实现与原理分析的更多相关文章
- SpringBoot 2.0 中 HikariCP 数据库连接池原理解析
作为后台服务开发,在日常工作中我们天天都在跟数据库打交道,一直在进行各种CRUD操作,都会使用到数据库连接池.按照发展历程,业界知名的数据库连接池有以下几种:c3p0.DBCP.Tomcat JDBC ...
- Java入门系列之线程池ThreadPoolExecutor原理分析思考(十五)
前言 关于线程池原理分析请参看<http://objcoding.com/2019/04/25/threadpool-running/>,建议对原理不太了解的童鞋先看下此文然后再来看本文, ...
- SpringBoot入门 (一) HelloWorld
一 什么是springboot springboot是一个全新的框架,它设计的目的简化spring项目的初始环境的搭建和开发,主要有以下几个特点: 1.简化初始配置 ,可与主流框架集成: 2.内置Se ...
- SpringBoot入门之HelloWorld
1.SpringBoot简介 百度百科:Spring Boot是由Pivotal团队提供的全新框架,其设计目的是用来简化新Spring应用的初始搭建以及开发过程.该框架使用了特定的方式来进行配置,从而 ...
- SpringBoot入门系列HelloWorld
根据咱们程序员学习的惯例,学习一门新技术都是从HelloWorld开始的. 感觉编程是一件非常富有意义的事情,程序员也是一群可爱的人,渴望被关怀和关注,因为我们总在和世界say Hi. 好了进入正题 ...
- springboot入门学习-helloworld实例
今天学习了springboot,发现使用springboot创建项目确实非常方便,创建第一个springboot项目之前先看一下下面两个问题. 一.什么是springboot? Spring Boot ...
- SpringBoot入门基础
目录 SpringBoot入门 (一) HelloWorld. 2 一 什么是springboot 1 二 入门实例... 1 SpringBoot入门 (二) 属性文件读取... 16 一 自定义属 ...
- SpringBoot入门教程(二)CentOS部署SpringBoot项目从0到1
在之前的博文<详解intellij idea搭建SpringBoot>介绍了idea搭建SpringBoot的详细过程, 并在<CentOS安装Tomcat>中介绍了Tomca ...
- Springboot 2.0 - 集成redis
序 最近在入门SpringBoot,然后在感慨 SpringBoot较于Spring真的方便多时,顺便记录下自己在集成redis时的一些想法. 1.从springboot官网查看redis的依赖包 & ...
随机推荐
- 百度echarts 3.0版本和2.0版本的兼容问题
前一段时间,项目中要用到统计图表,之前也用过jqplot的图表插件,这次开发的内容中基于地图的展示还很多,所以后来选择了百度的echarts插件(echarts.baidu.com).刚开始用的时候, ...
- [LeetCode]题100:Same Tree
Given two binary trees, write a function to check if they are the same or not. Two binary trees are ...
- localStorage、sessionStorage用法以及区别
设置: sessionStorage.setItem("key", "value");localStorage.setItem("site" ...
- 传统企业IT为什么对微服务叶公好龙的心态?(转)
这两年来,“微服务”.“云计算”.“大数据”.“人工智能”的概念在IT界成了新的宠儿:珠联壁合.声名远播.势如破竹.如日中天!从实践落地的情况来看:微服务诞生于互联网,当然是首先在互联网界遍地开花,高 ...
- 洛谷 P2661信息传递
图论——>并查集 P2661 本蒟蒻啥也不会 这题还WA了1次 = = 最后看题解A 哭了 看题是多个(N<=200000)东西之间的关系维护 果断想到并查集 在第i个位置的a[i] 表 ...
- Django框架(四)
八.Django 模型层(2) 多表操作 创建模型 实例:我们来假定下面这些概念,字段和关系 作者模型:一个作者有姓名和年龄. 作者详细模型:把作者的详情放到详情表,包含生日,手机号,家庭住址等信息. ...
- 算法-最通俗易懂的KMP算法详解
有些算法,适合从它产生的动机,如何设计与解决问题这样正向地去介绍.但KMP算法真的不适合这样去学.最好的办法是先搞清楚它所用的数据结构是什么,再搞清楚怎么用,最后为什么的问题就会有恍然大悟的感觉.我试 ...
- learning makefile static model
- erlang大法好
可惜haxe不能生成erlang.不过没关系,s6k输入法的实际执行方案,现在由typescript改用haxe.cdt3的ts地位不变. 以后这个博客大部分内容都是跟haxe/typescript相 ...
- leetcode 翻转二叉树
翻转二叉树的步骤: 1.翻转根节点的左子树(递归调用当前函数) 2.翻转根节点的右子树(递归调用当前函数) 3.交换根节点的左子节点与右子节点 class Solution{ public: void ...