『TensorFlow』读书笔记_进阶卷积神经网络_分类cifar10_下
数据读取部分实现
文中采用了tensorflow的从文件直接读取数据的方式,逻辑流程如下,
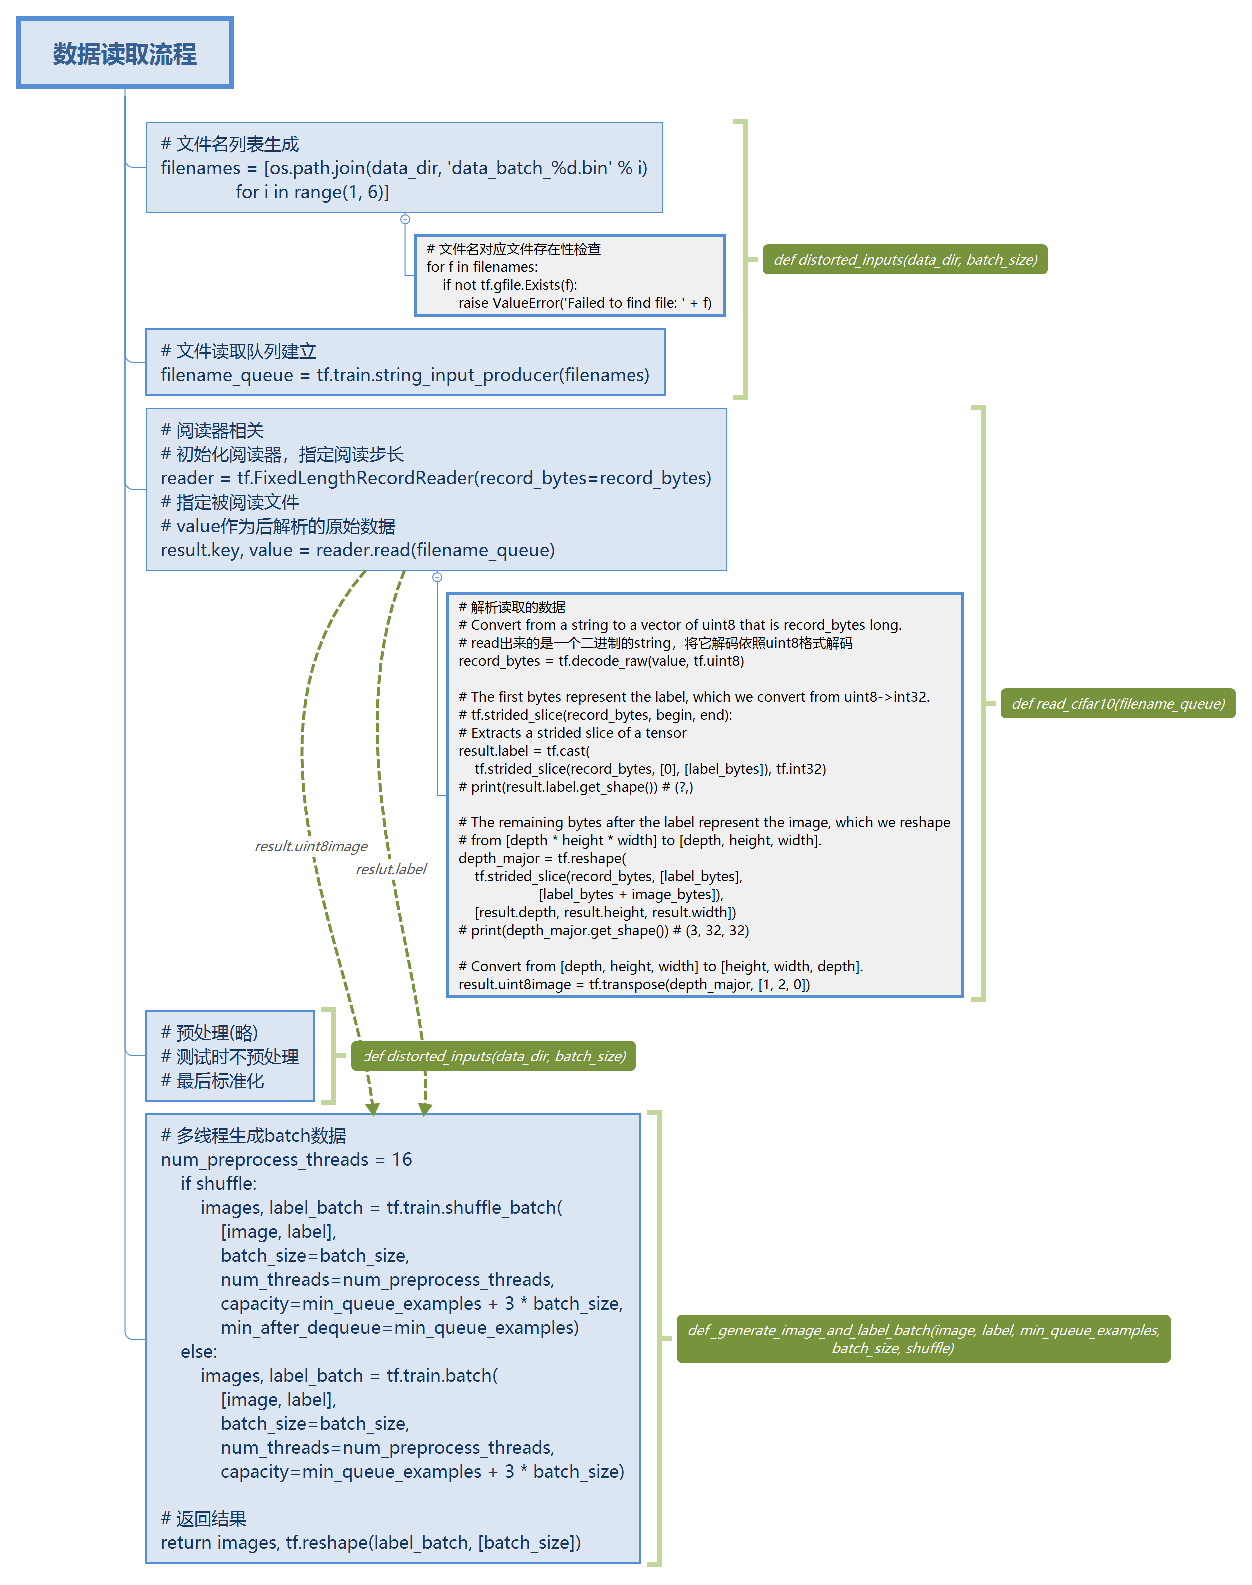
实现如下,
# Author : Hellcat

# Time   : 2017/12/9

import os

import tensorflow as tf

IMAGE_SIZE = 24

NUM_CLASSES = 10

NUM_EXAMPLES_PER_EPOCH_FOR_TRAIN = 50000

NUM_EXAMPLES_PER_EPOCH_FOR_EVAL = 10000

def read_cifar10(filename_queue):

      """Reads and parses examples from CIFAR10 data files.

      Recommendation: if you want N-way read parallelism, call this function

      N times.  This will give you N independent Readers reading different

      files & positions within those files, which will give better mixing of

      examples.

      Args:

        filename_queue: A queue of strings with the filenames to read from.

      Returns:

        An object representing a single example, with the following fields:

          height: number of rows in the result (32)

          width: number of columns in the result (32)

          depth: number of color channels in the result (3)

          key: a scalar string Tensor describing the filename & record number

            for this example.

          label: an int32 Tensor with the label in the range 0..9.

          uint8image: a [height, width, depth] uint8 Tensor with the image data

      """

      class CIFAR10Record(object):

        pass

      result = CIFAR10Record()

      # Dimensions of the images in the CIFAR-10 dataset.

      label_bytes = 1  # 2 for CIFAR-100

      result.height = 32

      result.width = 32

      result.depth = 3

      image_bytes = result.height * result.width * result.depth

      record_bytes = label_bytes + image_bytes

      # Read a record, getting filenames from the filename_queue.

      # No header or footer in the CIFAR-10 format, so we leave header_bytes

      # and footer_bytes at their default of 0.

      # 初始化阅读器

      reader = tf.FixedLengthRecordReader(record_bytes=record_bytes)

      # 指定被阅读文件

      result.key, value = reader.read(filename_queue)

      # Convert from a string to a vector of uint8 that is record_bytes long.

      # read出来的是一个二进制的string,将它解码依照uint8格式解码

      record_bytes = tf.decode_raw(value, tf.uint8)

      # The first bytes represent the label, which we convert from uint8->int32.

      # tf.strided_slice(record_bytes, begin, end):

      # Extracts a strided slice of a tensor

      result.label = tf.cast(

          tf.strided_slice(record_bytes, [0], [label_bytes]), tf.int32)

      # print(result.label.get_shape()) # (?,)

      # The remaining bytes after the label represent the image, which we reshape

      # from [depth * height * width] to [depth, height, width].

      depth_major = tf.reshape(

          tf.strided_slice(record_bytes, [label_bytes],

                           [label_bytes + image_bytes]),

          [result.depth, result.height, result.width])

      # print(depth_major.get_shape()) # (3, 32, 32)

      # Convert from [depth, height, width] to [height, width, depth].

      result.uint8image = tf.transpose(depth_major, [1, 2, 0])

      return result

def distorted_inputs(data_dir, batch_size):

    '''

    读入&预处理图片

    :param data_dir: bin文件位置

    :param batch_size: 单批输出大小

    :return:

    '''

    # 读取文件名

    filenames = [os.path.join(data_dir, 'data_batch_%d.bin' % i)

               for i in range(1, 6)]

    # 检查文件名对应的文件是否存在

    for f in filenames:

        if not tf.gfile.Exists(f):

            raise ValueError('Failed to find file: ' + f)

    # 建立文件名队列

    filename_queue = tf.train.string_input_producer(filenames)

    # 读取文件得到图片,转为tf.float32

    read_input = read_cifar10(filename_queue)

    reshaped_image = tf.cast(read_input.uint8image, tf.float32)

    height = IMAGE_SIZE

    width = IMAGE_SIZE

    # 随机裁剪

    distorted_image = tf.random_crop(reshaped_image, [height, width, 3])

    # 随机翻转

    distorted_image = tf.image.random_flip_left_right(distorted_image)

    # 随机亮度

    distorted_image = tf.image.random_brightness(distorted_image,max_delta=63)

    # 随机对比度

    distorted_image = tf.image.random_contrast(distorted_image,lower=0.2, upper=1.8)

    # 标准化

    float_image = tf.image.per_image_standardization(distorted_image)

    '''

    tf.Tensor.set_shape() 方法(method)会更新(updates)一个 Tensor 对象的静态 shape ,

    当静态 shape 信息不能够直接推导得出的时候,此方法常用来提供额外的 shape 信息。

    它不改变此 tensor 动态 shape 的信息。

    tf.reshape() 操作(operation)会以不同的动态 shape 创建一个新的 tensor。

    tf.strided_slice()由于不会显示的计算tensor形状,所以其返回shape是?的,所以label

    需要使用set_shape,而image在skice之后已经reshape了,所以其tensor是有静态shape的。

    '''

    # Set the shapes of tensors.

    # float_image.set_shape([height, width, 3])

    read_input.label.set_shape([1])

    # Ensure that the random shuffling has good mixing properties.

    min_fraction_of_examples_in_queue = 0.4

    min_queue_examples = int(NUM_EXAMPLES_PER_EPOCH_FOR_TRAIN *

                           min_fraction_of_examples_in_queue)

    print ('Filling queue with %d CIFAR images before starting to train. '

         'This will take a few minutes.' % min_queue_examples)

    # Generate a batch of images and labels by building up a queue of examples.

    return _generate_image_and_label_batch(float_image, read_input.label,

                                         min_queue_examples, batch_size,

                                         shuffle=True)

def _generate_image_and_label_batch(image, label, min_queue_examples,

                                    batch_size, shuffle):

    '''

    单batch数据生成

    :param image: reader读取的值经过处理后的tensor

    :param label: reader读取的值经过处理后的tensor

    :param min_queue_examples: 最短队列长度

    :param batch_size: batch尺寸

    :param shuffle: 是否随机化

    :return: batch的图片和标签

    '''

    num_preprocess_threads = 16

    if shuffle:

        images, label_batch = tf.train.shuffle_batch(

            [image, label],

            batch_size=batch_size,

            num_threads=num_preprocess_threads,

            capacity=min_queue_examples + 3 * batch_size,

            min_after_dequeue=min_queue_examples)

    else:

        images, label_batch = tf.train.batch(

            [image, label],

            batch_size=batch_size,

            num_threads=num_preprocess_threads,

            capacity=min_queue_examples + 3 * batch_size)

    # Display the training images in the visualizer.

    tf.summary.image('images', images)

    return images, tf.reshape(label_batch, [batch_size])

def inputs(eval_data, data_dir, batch_size):

    """Construct input for CIFAR evaluation using the Reader ops.

    Args:

    eval_data: bool, indicating if one should use the train or eval data set.

    data_dir: Path to the CIFAR-10 data directory.

    batch_size: Number of images per batch.

    Returns:

    images: Images. 4D tensor of [batch_size, IMAGE_SIZE, IMAGE_SIZE, 3] size.

    labels: Labels. 1D tensor of [batch_size] size.

    """

    # 建立文件名队列

    if not eval_data:

        filenames = [os.path.join(data_dir, 'data_batch_%d.bin' % i)

                     for i in range(1, 6)]

        num_examples_per_epoch = NUM_EXAMPLES_PER_EPOCH_FOR_TRAIN

    else:

        filenames = [os.path.join(data_dir, 'test_batch.bin')]

        num_examples_per_epoch = NUM_EXAMPLES_PER_EPOCH_FOR_EVAL

    # 确认文件是否存在

    for f in filenames:

        if not tf.gfile.Exists(f):

            raise ValueError('Failed to find file: ' + f)

    # 读取文件名队列

    filename_queue = tf.train.string_input_producer(filenames)

    # 读取文件

    read_input = read_cifar10(filename_queue)

    reshaped_image = tf.cast(read_input.uint8image, tf.float32)

    height = IMAGE_SIZE

    width = IMAGE_SIZE

    # 重置图片大小,简单裁剪或填充

    resized_image = tf.image.resize_image_with_crop_or_pad(reshaped_image,

                                                         height, width)

    # 标准化

    float_image = tf.image.per_image_standardization(resized_image)

    # Set the shapes of tensors.

    float_image.set_shape([height, width, 3])

    read_input.label.set_shape([1])

    # Ensure that the random shuffling has good mixing properties.

    min_fraction_of_examples_in_queue = 0.4

    min_queue_examples = int(num_examples_per_epoch *

                           min_fraction_of_examples_in_queue)

    # Generate a batch of images and labels by building up a queue of examples.

    return _generate_image_and_label_batch(float_image, read_input.label,

                                         min_queue_examples, batch_size,

                                         shuffle=False)
TensorFlow使用总结
tensorflow直接从文件读取数据流程
1.建立文件名队列
filename_queue = tf.train.string_input_producer(filenames)
2.阅读器初始化 & 单次读取规则设定
# 初始化阅读器

reader = tf.FixedLengthRecordReader(record_bytes=record_bytes)

# 指定被阅读文件

result.key, value = reader.read(filename_queue)
3.对单次读取的数据tensor进行处理
# Convert from a string to a vector of uint8 that is record_bytes long.

# read出来的是一个二进制的string,将它解码依照uint8格式解码

record_bytes = tf.decode_raw(value, tf.uint8)

…… ……
由于读取来的tensor不具有静态shape,需要使用tensor.set_shape()指定shape(或者在处理中显示的赋予shape如使用reshape等函数),否则无法建立图
read_input.label.set_shape([1])
4.将最后的规则tensor传入batch生成池节点中,输出的张量可以直接feed进网络
images_train, labels_train = cifar10_input.distorted_inputs(data_dir=data_dir,

                                                            batch_size=batch_size)

…… ……

image_batch, label_batch = sess.run([images_train, labels_train])

_, loss_value = sess.run(

           [train_op, loss],

                   feed_dict={image_holder:image_batch, label_holder:label_batch})
5.初始化队列(相关的线程控制器组件添加也在这里)
# 启动数据增强队列

tf.train.start_queue_runners()
附上线程控制组件使用示意,
import tensorflow as tf

sess = tf.Session()

coord = tf.train.coordinator()

threads = tf.train.start_queue_runners(sess=sess,coord=coord)

# 训练过程

coord.request_stop()

coord.join(threads)
『TensorFlow』读书笔记_进阶卷积神经网络_分类cifar10_下的更多相关文章
- 『TensorFlow』读书笔记_降噪自编码器
『TensorFlow』降噪自编码器设计 之前学习过的代码,又敲了一遍,新的收获也还是有的,因为这次注释写的比较详尽,所以再次记录一下,具体的相关知识查阅之前写的文章即可(见上面链接). # Aut ...
- 『TensorFlow』读书笔记_进阶卷积神经网络_分类cifar10_上
完整项目见:Github 完整项目中最终使用了ResNet进行分类,而卷积版本较本篇中结构为了提升训练效果也略有改动 本节主要介绍进阶的卷积神经网络设计相关,数据读入以及增强在下一节再与介绍 网络相关 ...
- 『TensorFlow』读书笔记_VGGNet
VGGNet网络介绍 VGG系列结构图, 『cs231n』卷积神经网络工程实践技巧_下 1,全部使用3*3的卷积核和2*2的池化核,通过不断加深网络结构来提升性能. 所有卷积层都是同样大小的filte ...
- 『TensorFlow』读书笔记_ResNet_V2
『PyTorch × TensorFlow』第十七弹_ResNet快速实现 要点 神经网络逐层加深有Degradiation问题,准确率先上升到饱和,再加深会下降,这不是过拟合,是测试集和训练集同时下 ...
- 『TensorFlow』读书笔记_Inception_V3_上
1.网络背景 自2012年Alexnet提出以来,图像分类.目标检测等一系列领域都被卷积神经网络CNN统治着.接下来的时间里,人们不断设计新的深度学习网络模型来获得更好的训练效果.一般而言,许多网络结 ...
- 『TensorFlow』读书笔记_简单卷积神经网络
如果你可视化CNN的各层级结构,你会发现里面的每一层神经元的激活态都对应了一种特定的信息,越是底层的,就越接近画面的纹理信息,如同物品的材质. 越是上层的,就越接近实际内容(能说出来是个什么东西的那些 ...
- 『TensorFlow』读书笔记_多层感知机
多层感知机 输入->线性变换->Relu激活->线性变换->Softmax分类 多层感知机将mnist的结果提升到了98%左右的水平 知识点 过拟合:采用dropout解决,本 ...
- 『TensorFlow』读书笔记_Inception_V3_下
极为庞大的网络结构,不过下一节的ResNet也不小 线性的组成,结构大体如下: 常规卷积部分->Inception模块组1->Inception模块组2->Inception模块组3 ...
- 『TensorFlow』读书笔记_AlexNet
网络结构 创新点 Relu激活函数:效果好于sigmoid,且解决了梯度弥散问题 Dropout层:Alexnet验证了dropout层的效果 重叠的最大池化:此前以平均池化为主,最大池化避免了平均池 ...
随机推荐
- RoR - Introduction to Active Record
Active Record: ORM ( Object-relational Mapping)Bridges the gap between relational databases , which ...
- 在window 2008r2开发服务器上安装MSMQ消息队列
1.打开”服务器管理器“------”功能“-------”添加功能“,勾选”消息队列“,如下图: 如果之前已经勾选,则忽略此步. 2.”功能“------”消息队列“------”专有对列“---- ...
- git操作常见错误处理
1.Error:The authenticity of host 'github.com (192.30.255.112)' can't be established. Git密钥认证github时出 ...
- python 控制语句基础---->代码块:以为冒号作为开始,用缩进来划分作用域,代表一个整体,是一个代码块,一个文件(模块)也称为一个代码块 | 作用域:作用的范围
# ### 代码块:以为冒号作为开始,用缩进来划分作用域,代表一个整体,是一个代码块,一个文件(模块)也称为一个代码块 # ### 作用域:作用的范围 print(11) print(12) prin ...
- Ch05 类 - 练习
1. 改进5.1节的Counter类,让它不要在Int.MaxValue是变成负数. class Counter{ private var value = Int.MaxValue d ...
- 6种原型设计工具大比对! Axure,Invision, 墨刀……哪款适合你?
每一年的毕业季都是找工作高峰时期,产品经理.UI设计师这些岗位都会接触到原型设计工具.选择原型设计工具最重要的一点:适合自己的才是最好的! 下文将对目前超火的原型工具进行大对比,快来看看那一款于你而言 ...
- C#设计模式(6)——原型模式(Prototype Pattern)(转)
一.引言 在软件系统中,当创建一个类的实例的过程很昂贵或很复杂,并且我们需要创建多个这样类的实例时,如果我们用new操作符去创建这样的类实例,这未免会增加创建类的复杂度和耗费更多的内存空间,因为这样在 ...
- centos----------centos下安装谷歌浏览器
1.首先你已经安装了带有可视化界面的centos系统. 2.打开里面自带的一个浏览器,输入网址 http://chrome.richardlloyd.org.uk/install_chrome.sh ...
- Ansible学习实战手记-你想要知道的可能都在这里了
最近接触了ansible工具,查找了一些资料,也做了一些总结.希望能给刚接触的新手带来一些帮助. 此总结有实际例子,大部分也是从实践中用到才逐一总结的. 当然可能肯定一定会存在一些错误和纰漏,还望大家 ...
- Sitecore Aliases
Sitecore别名 出于各种原因,有时您希望页面URL简短且易于记忆.例如,如果您在网站上运行任何广告系列或某些广告,则需要轻松记住该网址.在Sitecore中,有一种方法可以为名为Sitecore ...