SpringBoot入门之基于Druid配置Mybatis多数据源
上一篇了解了Druid进行配置连接池的监控和慢sql处理,这篇了解下使用基于基于Druid配置Mybatis多数据源。SpringBoot默认配置数据库连接信息时只需设置url等属性信息就可以了,SpringBoot就会基于约定根据配置信息实例化对象,但是一般大型的项目都是有多个子系统或者多个数据源组成,那怎么使用SpringBoot进行Mybatis多数据源配置呢?
一、数据库准备
我们这里准备使用主从两个数据库来进行演示多数据源配置。一个主库用来写write,一个从库用来读read.至于两个数据库的数据同步问题这里暂时不考虑。两个数据库只是数据库名不一样,主库为mybatis1,从库为mybatis,表结构是一样的。
主库(write):
CREATE DATABASE `mybatis1` /*!40100 DEFAULT CHARACTER SET utf8 */;

CREATE TABLE `user` (

  `id` int(11) NOT NULL AUTO_INCREMENT,

  `name` varchar(20) DEFAULT NULL,

  `age` int(11) DEFAULT NULL,

  PRIMARY KEY (`id`)

) ENGINE=InnoDB AUTO_INCREMENT=19 DEFAULT CHARSET=utf8;
从库(read):
CREATE DATABASE `mybatis` /*!40100 DEFAULT CHARACTER SET utf8 */;

CREATE TABLE `user` (

  `id` int(11) NOT NULL AUTO_INCREMENT,

  `name` varchar(20) DEFAULT NULL,

  `age` int(11) DEFAULT NULL,

  PRIMARY KEY (`id`)

) ENGINE=InnoDB AUTO_INCREMENT=19 DEFAULT CHARSET=utf8;
二、引入依赖
这里主要引入mysql数据库、mybatis架构、Druid相关的SpringBoot依赖。下面的是由于要使用jsp显示内容所以也假如了jsp相关的依赖。
<?xml version="1.0" encoding="UTF-8"?>

<project xmlns="http://maven.apache.org/POM/4.0.0" xmlns:xsi="http://www.w3.org/2001/XMLSchema-instance"

    xsi:schemaLocation="http://maven.apache.org/POM/4.0.0 http://maven.apache.org/xsd/maven-4.0.0.xsd">

    <modelVersion>4.0.0</modelVersion>

    <groupId>com.example</groupId>

    <artifactId>demo</artifactId>

    <version>0.0.1-SNAPSHOT</version>

    <packaging>jar</packaging>

    <name>demo</name>

    <description>Demo project for Spring Boot</description>

    <parent>

        <groupId>org.springframework.boot</groupId>

        <artifactId>spring-boot-starter-parent</artifactId>

        <version>2.0.1.RELEASE</version>

        <relativePath/> <!-- lookup parent from repository -->

    </parent>

    <properties>

        <project.build.sourceEncoding>UTF-8</project.build.sourceEncoding>

        <project.reporting.outputEncoding>UTF-8</project.reporting.outputEncoding>

        <java.version>1.8</java.version>

    </properties>

    <dependencies>

        <dependency>

            <groupId>org.springframework.boot</groupId>

            <artifactId>spring-boot-starter-web</artifactId>

        </dependency>

        <!-- https://mvnrepository.com/artifact/org.thymeleaf/thymeleaf-spring5

        <dependency>

            <groupId>org.thymeleaf</groupId>

            <artifactId>thymeleaf-spring5</artifactId>

            <version>3.0.9.RELEASE</version>

        </dependency>

         -->

       <dependency>

            <groupId>org.apache.tomcat.embed</groupId>

            <artifactId>tomcat-embed-jasper</artifactId>

            <scope>provided</scope>

        </dependency>

        <dependency>

            <groupId>javax.servlet</groupId>

            <artifactId>jstl</artifactId>

            <scope>provided</scope>

        </dependency>

        <dependency>

            <groupId>javax.servlet</groupId>

            <artifactId>javax.servlet-api</artifactId>

            <scope>provided</scope>

        </dependency>

        <dependency>

            <groupId>org.springframework.boot</groupId>

            <artifactId>spring-boot-starter-test</artifactId>

            <scope>test</scope>

        </dependency>

        <!-- https://mvnrepository.com/artifact/org.mybatis.spring.boot/mybatis-spring-boot-starter -->

        <dependency>

            <groupId>org.mybatis.spring.boot</groupId>

            <artifactId>mybatis-spring-boot-starter</artifactId>

            <version>1.3.2</version>

        </dependency>

        <!-- https://mvnrepository.com/artifact/mysql/mysql-connector-java -->

        <dependency>

            <groupId>mysql</groupId>

            <artifactId>mysql-connector-java</artifactId>

            <version>8.0.11</version>

        </dependency>

        <dependency>

           <groupId>com.alibaba</groupId>

           <artifactId>druid-spring-boot-starter</artifactId>

           <version>1.1.10</version>

        </dependency>

        <dependency>

            <groupId>org.springframework.boot</groupId>

            <artifactId>spring-boot-configuration-processor</artifactId>

            <optional>true</optional>

        </dependency>

    </dependencies>

    <build>

        <plugins>

            <plugin>

                <groupId>org.springframework.boot</groupId>

                <artifactId>spring-boot-maven-plugin</artifactId>

            </plugin>

        </plugins>

    </build>

</project>
三、创建Mapper
从这里开始就比较坑了,为了写这篇博客昨天搞到夜里两点中,Druid官方介绍的比较少,demo也不是与mybatis相结合,就倒置怎么把mapper与数据源配置对照上也是问题,因为默认单数据源的话,配置下数据源信息以及Mapper就好,但是如果是多数据源那就要手动指定数据源在哪里,怎么和Mapper对照上。
这里先创建两个Mappe,一个是写的一个是读的。这里要注意的地方是要加上@Mapper注解。

ReadUserMapper:
package com.example.read.mapper;

import java.util.List;

import com.example.model.User;

import org.apache.ibatis.annotations.Delete;

import org.apache.ibatis.annotations.Insert;

import org.apache.ibatis.annotations.Mapper;

import org.apache.ibatis.annotations.Result;

import org.apache.ibatis.annotations.Results;

import org.apache.ibatis.annotations.Select;

import org.apache.ibatis.annotations.Update;

@Mapper

public interface  ReadUserMapper {

    @Select("SELECT name FROM user")

    @Results({

        @Result(property = "Name", column = "name")

    })

    List<User> getAll();

    @Select("SELECT name FROM user WHERE id = #{id}")

    @Results({

        @Result(property = "Name", column = "name")

    })

    User getOne(int id);

    @Insert("INSERT INTO user(name,age) VALUES(#{name}, #{age})")

    void insert(User user);

    @Update("UPDATE user SET name=#{name},age=#{age} WHERE id =#{id}")

    void update(User user);

    @Delete("DELETE FROM user WHERE id =#{id}")

    void delete(int id);

}
WriteUserMapper:
package com.example.write.mapper;

import java.util.List;

import org.apache.ibatis.annotations.Delete;

import org.apache.ibatis.annotations.Insert;

import org.apache.ibatis.annotations.Mapper;

import org.apache.ibatis.annotations.Result;

import org.apache.ibatis.annotations.Results;

import org.apache.ibatis.annotations.Select;

import org.apache.ibatis.annotations.Update;

import com.example.model.*;

@Mapper

public interface  WriteUserMapper {

    @Select("SELECT name FROM user")

    @Results({

        @Result(property = "Name", column = "name")

    })

    List<User> getAll();

    @Select("SELECT name FROM user WHERE id = #{id}")

    @Results({

        @Result(property = "Name", column = "name")

    })

    User getOne(int id);

    @Insert("INSERT INTO user(name,age) VALUES(#{name}, #{age})")

    void insert(User user);

    @Update("UPDATE user SET name=#{name},age=#{age} WHERE id =#{id}")

    void update(User user);

    @Delete("DELETE FROM user WHERE id =#{id}")

    void delete(int id);

}
四、配置数据源
如果使用SpringBoot默认配置类,可以直接在application.properties中配置就好了,它会自动扫描mapper类与数据源进行关联,但是如果是多个数据源的话,那就需要进行手动配置。这里分别创建了读DataSourceReadConfig、写DataSourceWriteConfig数据源配置类。
DataSourceWriteConfig:
package com.example.config;

import javax.sql.DataSource;

import org.apache.ibatis.session.SqlSessionFactory;

import org.mybatis.spring.SqlSessionFactoryBean;

import org.mybatis.spring.SqlSessionTemplate;

import org.mybatis.spring.annotation.MapperScan;

import org.springframework.beans.factory.annotation.Qualifier;

import org.springframework.boot.context.properties.ConfigurationProperties;

import org.springframework.context.annotation.Bean;

import org.springframework.context.annotation.Configuration;

import org.springframework.context.annotation.Primary;

import org.springframework.jdbc.datasource.DataSourceTransactionManager;

import org.springframework.stereotype.Component;

import com.alibaba.druid.spring.boot.autoconfigure.DruidDataSourceBuilder;

@Configuration

@MapperScan(basePackages = "com.example.write.mapper", sqlSessionTemplateRef  = "writeSqlSessionTemplate")

public class DataSourceWriteConfig {

    @Bean(name = "writeDataSource")

    @ConfigurationProperties(prefix = "spring.datasource.druid.write")

    @Qualifier("writeDataSource")

    @Primary

    public DataSource writeDataSource() {

        return DruidDataSourceBuilder.create().build();

    }

    @Bean(name = "writeSqlSessionFactory")

    @Primary

    public SqlSessionFactory writeSqlSessionFactory(@Qualifier("writeDataSource") DataSource dataSource) throws Exception {

        SqlSessionFactoryBean bean = new SqlSessionFactoryBean();

        bean.setDataSource(dataSource);

        return bean.getObject();

    }

    @Bean(name = "writeTransactionManager")

    @Primary

    public DataSourceTransactionManager writeTransactionManager(@Qualifier("writeDataSource") DataSource dataSource) {

        return new DataSourceTransactionManager(dataSource);

    }

    @Bean(name = "writeSqlSessionTemplate")

    @Primary

    public SqlSessionTemplate writeSqlSessionTemplate(@Qualifier("writeSqlSessionFactory") SqlSessionFactory sqlSessionFactory) throws Exception {

        return new SqlSessionTemplate(sqlSessionFactory);

    }

}
DataSourceReadConfig:
package com.example.config;

import javax.sql.DataSource;

import org.apache.ibatis.session.SqlSessionFactory;

import org.mybatis.spring.SqlSessionFactoryBean;

import org.mybatis.spring.SqlSessionTemplate;

import org.mybatis.spring.annotation.MapperScan;

import org.springframework.beans.factory.annotation.Qualifier;

import org.springframework.boot.context.properties.ConfigurationProperties;

import org.springframework.context.annotation.Bean;

import org.springframework.context.annotation.Configuration;

import org.springframework.jdbc.datasource.DataSourceTransactionManager;

import com.alibaba.druid.spring.boot.autoconfigure.DruidDataSourceBuilder;

@Configuration

@MapperScan(basePackages = "com.example.read.mapper", sqlSessionTemplateRef  = "readSqlSessionTemplate")

public class DataSourceReadConfig {

    @Bean(name = "readDataSource")

    @ConfigurationProperties(prefix = "spring.datasource.druid.read")

    @Qualifier("readDataSource")

    public DataSource readDataSource() {

        return DruidDataSourceBuilder.create().build();

    }

    @Bean(name = "readSqlSessionFactory")

    public SqlSessionFactory readSqlSessionFactory(@Qualifier("readDataSource") DataSource dataSource) throws Exception {

        SqlSessionFactoryBean bean = new SqlSessionFactoryBean();

        bean.setDataSource((javax.sql.DataSource) dataSource);

        return bean.getObject();

    }

    @Bean(name = "readTransactionManager")

    public DataSourceTransactionManager readTransactionManager(@Qualifier("readDataSource") DataSource dataSource) {

        return new DataSourceTransactionManager(dataSource);

    }

    @Bean(name = "readSqlSessionTemplate")

    public SqlSessionTemplate readSqlSessionTemplate(@Qualifier("readSqlSessionFactory") SqlSessionFactory sqlSessionFactory) throws Exception {

        return new SqlSessionTemplate(sqlSessionFactory);

    }

}
这部分是遇到坑最多的地方,由于Druid官方github上并没有具体参考的demo,看其他的博客又与gitgub介绍的有出入,比如获取配置类中获取DataSource方法中,其他我看使用的是DataSourceBuilder,但Druid GitHub上的是DruidDataSourceBuilder,不知道是不是版本的问题,如果使用DataSourceBuilder,配置多数据库时不起作用。github上也有这句话:Spring Boot 2.X 版本不再支持配置继承,多数据源的话每个数据源的所有配置都需要单独配置,否则配置不会生效。还有就是DataSource引入的包名,我开始引入的并不是import javax.sql.DataSource;这个也是一个坑。
五、Druid多数据源配置
这里也遇到了坑,由于在配置数据源类中并未使用DruidDataSourceBuilder,而是使用的DataSourceBuilder,这就导致下面配置的没用,而且在设置数据库url还报错,需要使用jdbc-url.
spring.mvc.view.prefix=/view/ spring.mvc.view.suffix=.jsp
mybatis.type-aliases-package=com.example.model
#mybatis.config-location=classpath:mybatis/mybatis-config.xml
#mybatis.mapper-locations=classpath:mybatis/mapper/*.xml spring.datasource.druid.read.web-stat-filter.enabled=true
spring.datasource.druid.read.web-stat-filter.url-pattern=/*
spring.datasource.druid.read.web-stat-filter.exclusions=*.js,*.gif,*.jpg,*.png,*.css,*.ico,/druid/*
spring.datasource.druid.read.web-stat-filter.session-stat-enable=true
spring.datasource.druid.read.web-stat-filter.session-stat-max-count=1000
spring.datasource.druid.read.stat-view-servlet.enabled= true
spring.datasource.druid.read.stat-view-servlet.url-pattern=/druid/*
spring.datasource.druid.read.stat-view-servlet.reset-enable=true
spring.datasource.druid.read.stat-view-servlet.login-username=druid
spring.datasource.druid.read.stat-view-servlet.login-password=123456
spring.datasource.druid.read.stat-view-servlet.allow=127.0.0.1
spring.datasource.druid.read.stat-view-servlet.deny=192.168.0.19
spring.datasource.druid.read.aop-patterns=com.example.read.mapper.* spring.datasource.druid.read.url =jdbc:mysql://127.0.0.1:3306/mybatis?useUnicode=true&characterEncoding=UTF-8&serverTimezone=UTC
spring.datasource.druid.read.username = root
spring.datasource.druid.read.password = 123456
spring.datasource.druid.read.driver-class-name=com.mysql.cj.jdbc.Driver
spring.datasource.druid.read.type=com.alibaba.druid.pool.DruidDataSource spring.datasource.druid.write.max-active=20
spring.datasource.druid.write.initial-size=1
spring.datasource.druid.write.max-wait=60000
spring.datasource.druid.write.pool-prepared-statements=true
spring.datasource.druid.write.max-pool-prepared-statement-per-connection-size=20
spring.datasource.druid.write.connection-properties=druid.stat.mergeSql=true;druid.stat.slowSqlMillis=5000
spring.datasource.druid.write.min-idle=1
spring.datasource.druid.write.time-between-eviction-runs-millis=60000
spring.datasource.druid.write.min-evictable-idle-time-millis=300000
spring.datasource.druid.write.validation-query=select 1 from dual
spring.datasource.druid.write.test-while-idle=true
spring.datasource.druid.write.test-on-borrow=true
spring.datasource.druid.write.test-on-return=true spring.datasource.druid.write.web-stat-filter.enabled=true
spring.datasource.druid.write.web-stat-filter.url-pattern=/*
spring.datasource.druid.write.web-stat-filter.exclusions=*.js,*.gif,*.jpg,*.png,*.css,*.ico,/druid/*
spring.datasource.druid.write.web-stat-filter.session-stat-enable=true
spring.datasource.druid.write.web-stat-filter.session-stat-max-count=1000
spring.datasource.druid.write.stat-view-servlet.enabled= true
spring.datasource.druid.write.stat-view-servlet.url-pattern=/druid/*
spring.datasource.druid.write.stat-view-servlet.reset-enable=true
spring.datasource.druid.write.stat-view-servlet.login-username=druid
spring.datasource.druid.write.stat-view-servlet.login-password=123456
spring.datasource.druid.write.stat-view-servlet.allow=127.0.0.1
spring.datasource.druid.write.stat-view-servlet.deny=192.168.0.19
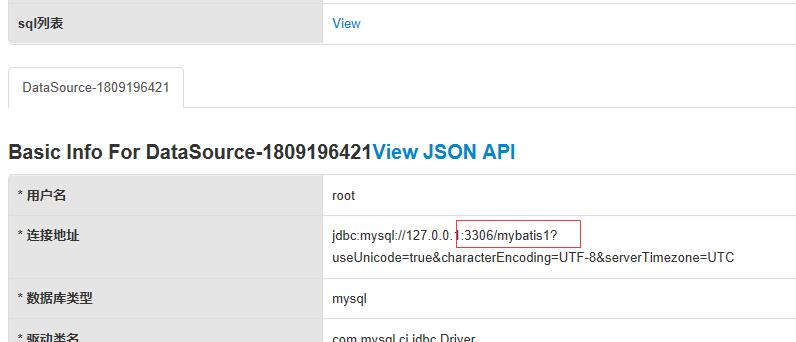
spring.datasource.druid.write.url =jdbc:mysql://127.0.0.1:3306/mybatis1?useUnicode=true&characterEncoding=UTF-8&serverTimezone=UTC
spring.datasource.druid.write.aop-patterns=com.example.write.mapper.*
spring.datasource.druid.write.username = root
spring.datasource.druid.write.password = 123456
spring.datasource.druid.write.driver-class-name=com.mysql.cj.jdbc.Driver
spring.datasource.druid.write.type=com.alibaba.druid.pool.DruidDataSource
六、多数据源的使用
这里并未设置Service层,而是直接在Controller中使用。在Controller中会装配一个写的mapper一个读的mapper,分别进行查询和新增操作。
package com.example.demo;

import java.util.List;

import org.springframework.beans.factory.annotation.Autowired;

import org.springframework.stereotype.Controller;

import org.springframework.ui.Model;

import org.springframework.web.bind.annotation.RequestMapping;

import org.springframework.web.bind.annotation.RequestMethod;

import com.example.model.User;

import com.example.read.mapper.ReadUserMapper;

import com.example.write.mapper.WriteUserMapper;

@Controller

@RequestMapping("/user")

public class UserController {

    @Autowired

    private WriteUserMapper userMapperWrite;

    @Autowired

    private ReadUserMapper userMapperRead;

    @RequestMapping(value = "/alluser.do",method = RequestMethod.GET)

    public String getallusers(Model model) {

       List<User> users=userMapperRead.getAll();

       model.addAttribute("users", users);

       return "userlist";

    }

    @RequestMapping(value = "/insert.do",method = RequestMethod.GET)

    public String adduser(Model model) {

       User user=new User();

       user.setName("cuiyw");

       user.setAge(27);

       userMapperWrite.insert(user);

       List<User> users=userMapperWrite.getAll();

       model.addAttribute("users", users);

       return "userlist";

    }

}
七、指定数据源配置文件位置
上面基本把配置信息都配置好了,但是如果这样运行还是会报错误,它还是不能找到这个mapper,此时需要在main方法文件增加注解@ComponentScan(basePackages={"com.example.config","com.example.demo"}),让它扫描配置文件的包,然后在配置文件的包里面有配置@MapperScan来查找到mapper。
package com.example.demo;

import org.springframework.boot.SpringApplication;

//import org.springframework.boot.autoconfigure.EnableAutoConfiguration;

import org.springframework.boot.autoconfigure.SpringBootApplication;

//import org.springframework.boot.autoconfigure.jdbc.DataSourceAutoConfiguration;

import org.springframework.context.annotation.ComponentScan;

//@EnableAutoConfiguration(exclude= {DataSourceAutoConfiguration.class})

@ComponentScan(basePackages={"com.example.config","com.example.demo"})

@SpringBootApplication

public class DemoApplication {

    public static void main(String[] args) {

        SpringApplication.run(DemoApplication.class, args);

    }

}
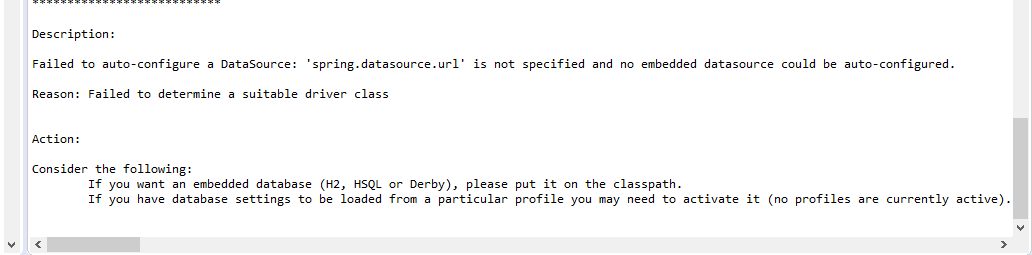
Description:

Field userMapperWrite in com.example.demo.UserController required a bean of type 'com.example.write.mapper.WriteUserMapper' that could not be found.

Action:

Consider defining a bean of type 'com.example.write.mapper.WriteUserMapper' in your configuration.
八、其他问题
1.这里还遇到404找不到路径的错误,这里还需要在@ComponentScan注解加上Controller对应的包,所以上面代码有@ComponentScan(basePackages={"com.example.config","com.example.demo"})。
This application has no explicit mapping for /error, so you are seeing this as a fallback.

Sun Jul 22 23:58:27 CST 2018

There was an unexpected error (type=Not Found, status=404).

No message available
2.设置手动配置问题
由于开始使用的是DataSourceBuilder,但在application.properties还是使用spring.datasource.druid.read这种方法进行配置,并没spring.datasource.url这样配置,导致报下面的错误。因为使用的是DataSourceBuilder所以SpringBoot还是认为用的默认配置,所以就找spring.datasource.url,此时可以使用@EnableAutoConfiguration(exclude= {DataSourceAutoConfiguration.class})注解来设置手动注解。
九、测试
这里还是分别输入http://localhost:8080/user/alluser.do,http://localhost:8080/user/insert.do,然后查看两个数据库user表的数据是否有没有改变,读数据库数据未变,写数据库数据增加。Druid的数据源监测也是有两条数据源信息。

SpringBoot入门之基于Druid配置Mybatis多数据源的更多相关文章
- SpringBoot入门之基于XML的Mybatis
上一博客介绍了下SpringBoot基于注解引入Mybatis,今天介绍基于XML引入Mybatis.还是在上一篇demo的基础上进行修改. 一.Maven引入 这个与上一篇的一样,需要引入mybat ...
- SpringBoot入门之基于注解的Mybatis
今天学习下SpringBoot集成mybatis,集成mybatis一般有两种方式,一个是基于注解的一个是基于xml配置的.今天先了解下基于注解的mybatis集成. 一.引入依赖项 因为是mybat ...
- (一)SpringBoot入门【基于2.x版本】
SpringBoot入门[基于2.x版本] 一.SpringBoot简介 首先大家学习SpringBoot的话,我希望大家是有一定java基础的,如果是有Spring的基础的话,上手会更加得心应手,因 ...
- SpringBoot系列之集成Druid配置数据源监控
SpringBoot系列之集成Druid配置数据源监控 继上一篇博客SpringBoot系列之JDBC数据访问之后,本博客再介绍数据库连接池框架Druid的使用 实验环境准备: Maven Intel ...
- SpringBoot入门之集成Druid
Druid:为监控而生的数据库连接池.这篇先了解下它的简单使用,下篇尝试用它做多数据源配置.主要参考:https://github.com/alibaba/druid/wiki/常见问题 https: ...
- SpringBoot入门 (六) 数据库访问之Mybatis
本文记录学习在SpringBoot中使用Mybatis. 一 什么是Mybatis MyBatis 是一款优秀的持久层框架,它支持定制化 SQL.存储过程以及高级映射.MyBatis 避免了几乎所有的 ...
- SpringBoot入门之内嵌Tomcat配置
spring boot默认web程序启用tomcat内嵌容器tomcat,监听8080端口,servletPath默认为 / .需要用到的就是端口.上下文路径的修改,在spring boot中其修改方 ...
- Springboot入门2-配置druid
Druid是Java语言中最好的数据库连接池,在连接池之外,还提供了非常优秀的监控功能. 下面来说明如何在 Spring Boot 中配置使用Druid 1.添加Maven依赖 (或jar包) < ...
- SpringBoot入门-多环境文件配置(二)
pom.xml <name>springboot-application</name> <description>A project for Spring Boot ...
随机推荐
- Python(五) 字典
- MD5加密算法的Java版本
网上搜索Java实现MD5的资料很多,错误的也很多. 之前编写的一个阿里云直播鉴权原理算法需要用到MD5算法,网上找了几个,都是不行,浪费了时间,现在贴一个,做备用. import java.secu ...
- Centos7通过yum安装最新MySQL
一:去官网查看最新安装包 https://dev.mysql.com/downloads/repo/yum/ 二:下载MySQL源安装包 wget http://dev.mysql.com/get/m ...
- 【慕课网实战】Spark Streaming实时流处理项目实战笔记十八之铭文升级版
铭文一级: 功能二:功能一+从搜索引擎引流过来的 HBase表设计create 'imooc_course_search_clickcount','info'rowkey设计:也是根据我们的业务需求来 ...
- centos7图形界面
安装centOS7服务器版本,系统默认是不会安装GUI的图形界面程序,这个需要手动安装CentOS7 Gnome GUI包. 安装GUI包.开机自动启动图形界面.重启 # yum groupinsta ...
- 1.Spring框架入门案例
一.简单入门案例 入门案例:IoC 1.项目创建与结构 2.接口与实现类 User.java接口 package com.jd.ioc; /** * @author weihu * @date 201 ...
- volatile和synchronized
volatile是变量修饰符,而synchronized则作用于一段代码或方法:看如下三句get代码: int i1; int geti1() {return i1;} vo ...
- [UWP] 用 AudioGraph 来增强 UWP 的音频处理能力
Audio Graph AudioGraph 是 Windows.Media.Audio 命名空间下提供的音频处理接口之一. 可以通过 AudioGraph 的静态方法 CreateAsync 来实例 ...
- 【接口时序】4、SPI总线的原理与Verilog实现
一. 软件平台与硬件平台 软件平台: 1.操作系统:Windows-8.1 2.开发套件:ISE14.7 3.仿真工具:ModelSim-10.4-SE 硬件平台: 1. FPGA型号:Xilinx公 ...
- Mybatis延迟加载、缓存
一.Mybatis中的延迟加载 1.延迟加载背景:Mybatis中Mapper配置文件中的resultMap可以实现高级映射(使用association.collection实现一对一及一对多(多对多 ...