Myeclipse 创建 Web Maven项目
1、创建Web项目
添加Maven支持

2、pom.xml 报如下错误:

解决办法:
pom.xml里面添加依赖:
<dependency>

        <groupId>com.thoughtworks.xstream</groupId>

        <artifactId>xstream</artifactId>

        <version>1.4.7</version>

</dependency>
重启Myeclipse, 在项目上 右键->maven4Myeclipse->update project Configrotion->勾选force update of……即可;
3、补全目录
项目右击-> new -> source folder 建立如下目录结构 resources下面一般放配置文件;

4、修改一下 index.jsp文件,改为 Hello Maven!
5、部署 在server视图中 点击如下按钮

6、启动项目,在浏览器中输入:http://localhost:8080/helloMaven/ 即可!

7、下面的开发工作与Web开发大体相同,区别在于以下两点:
① 引入jar包时,不需要收工引入,在pom.xml添加依赖即可
② 测试相关的放在test目录下,代码相关的放在Java目录下,配置相关的放在resource下面
8、一个简单示例项目结构如下:


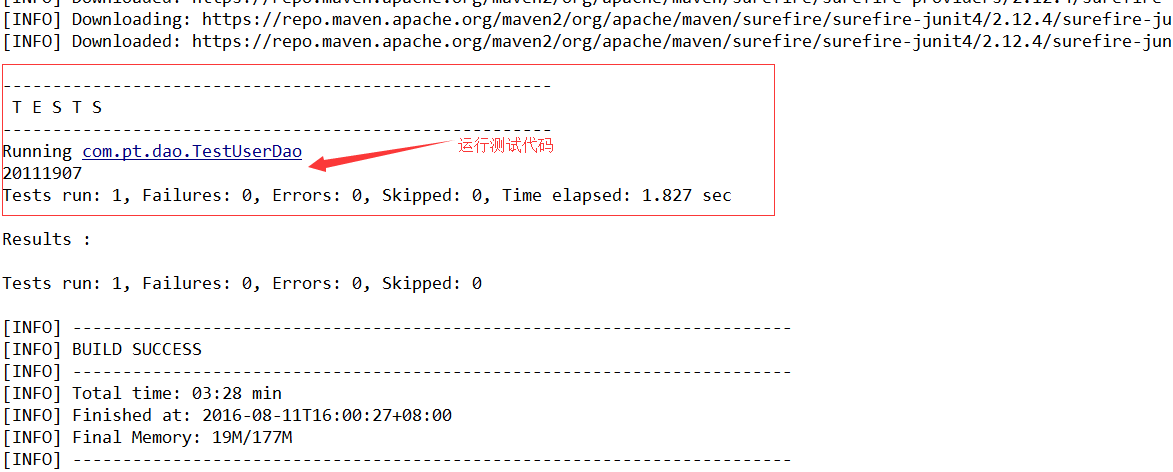
9、下面介绍一些常用的命令
Maven test --运行项目中的测试代码,在正式运行之前,可能需要下载很多其他文件,需要等待一些时间
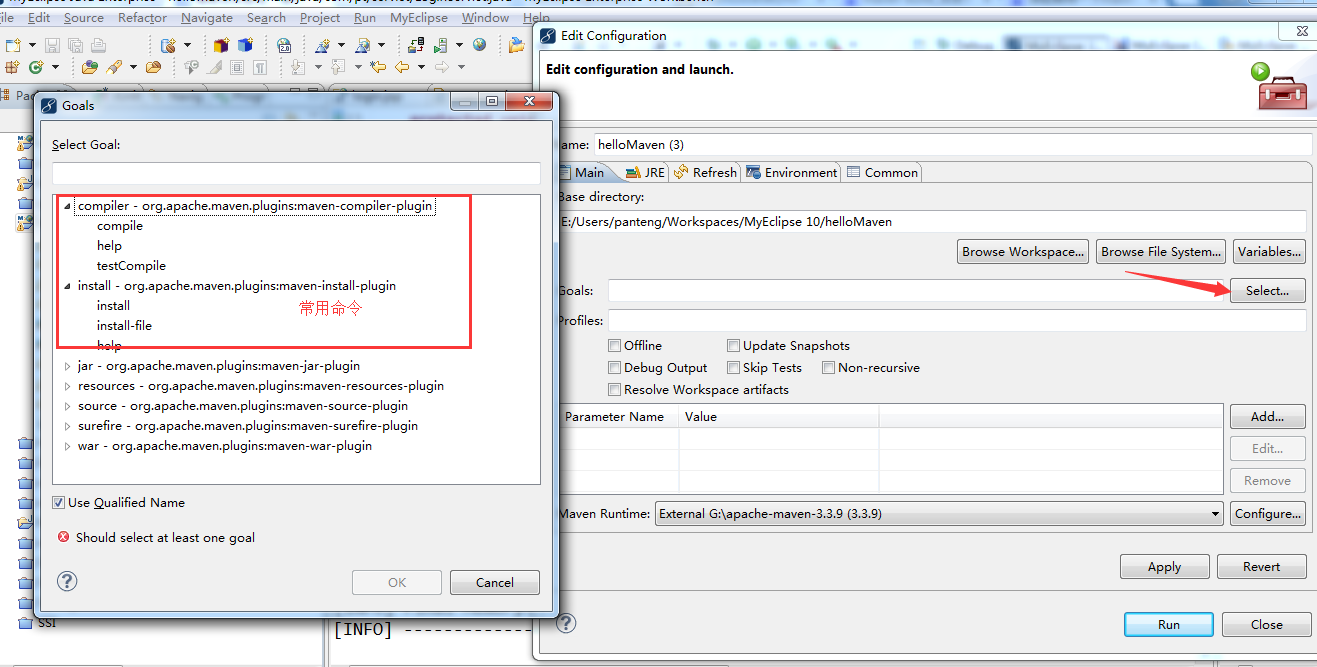
Maven build... ---执行Maven命令,在弹出的对话框中 的Goals里面输入要执行的命令,点击run即可执行命令。

Maven install ------将项目输出构件部署到本地仓库
Maven clean ------将target里面的class类清除,但配置文件不会清除
myeclipse中执行Maven命令:
选择 Maven build ...... 点击select
10.Maven 远程发布到中央仓库
首先配置鉴权(安全认证),在本地setting.xml文件的servers标签下面添加:
<server>

      <id>releases</id>

      <username>admin</username>

      <password>admin123</password>

    </server>

    <server>

      <id>snapshots</id>

      <username>admin</username>

      <password>admin123</password>

</server>
其中:id 是仓库名,使用username和userpassword登录后,点击左侧的Repositories即可看到;

项目配置,修改pom.xml文件
<distributionManagement>

      <repository>

          <id>releases</id>    <!-- 与setting.xml中的server id对应 -->

          <name>panteng_release</name>

          <!-- 此URL在Repositories可以看到 -->

          <url>http://192.168.63.133:9434/nexus/content/repositories/releases/</url>

      </repository>

  </distributionManagement>
run - build... - deploy命令即可;
如果返回401 一般是用户权限设置错误,在setting.xml中配置用户权限
返回400 可能是不允许部署,进行如下操作:

或者可能是pom.xml中的version标签包含了 0.0.1-SNAPSHOT,把 -SNAPSHOT去掉即可(http://www.codeweblog.com/maven-deploy-return-code-is-400)
 <project xmlns="http://maven.apache.org/POM/4.0.0" xmlns:xsi="http://www.w3.org/2001/XMLSchema-instance"

     xsi:schemaLocation="http://maven.apache.org/POM/4.0.0 http://maven.apache.org/maven-v4_0_0.xsd">

     <modelVersion>4.0.0</modelVersion>

     <groupId>com.hi19pay.comm.ctp</groupId>

     <artifactId>demo-parent</artifactId>

     <version>0.0.1-SNAPSHOT</version>

     <packaging>pom</packaging>

     <name>demo-parent</name>

     <description>19pay comm demo-parent project</description>

     <licenses>

         <license>

             <name>19pay CTPI parent</name>

             <url>http://www.19pay.com.cn</url>

             <distribution>repo</distribution>

             <comments>A business-friendly OSS license</comments>

         </license>

     </licenses>

     <organization>

         <name>hi19pay</name>

         <url>http://www.19pay.com.cn</url>

     </organization>

     <developers>

         <developer>

             <name>jiangzx</name>

             <organization>hi19pay</organization>

             <organizationUrl>//www.19pay.com.cn</organizationUrl>

             <roles>

                 <role>comm developer</role>

             </roles>

             <email>jiangzx@19pay.com.cn</email>

         </developer>

     </developers>

     <modules>

         <module>demo-util</module>

         <module>demo-entity</module>

         <module>demo-dao</module>

         <module>demo-service</module>

         <module>demo-web</module>

     </modules>

     <properties>

         <project.build.sourceEncoding>UTF-8</project.build.sourceEncoding>

         <springversion>3.0.1.RELEASE-A</springversion>

         <junitversion>4.12</junitversion>

     </properties>

     <build>

         <pluginManagement>

             <plugins>

                 <!-- 编译源代码 -->

                 <plugin>

                     <groupId>org.apache.maven.plugins</groupId>

                     <artifactId>maven-compiler-plugin</artifactId>

                     <version>3.3</version>

                     <configuration>

                         <source>1.6</source>

                         <target>1.6</target>

                         <compilerArguments>

                             <!-- 指定外部lib路径 -->

                             <extdirs>${project.basedir}/lib</extdirs>

                         </compilerArguments>

                     </configuration>

                 </plugin>

                 <!-- 打包源代码 -->

                 <plugin>

                     <groupId>org.apache.maven.plugins</groupId>

                     <artifactId>maven-source-plugin</artifactId>

                     <version>3.0.1</version>

                     <executions>

                         <execution>

                             <id>attach-sources</id>

                             <goals>

                                 <goal>jar</goal>

                             </goals>

                         </execution>

                     </executions>

                 </plugin>

                 <!-- 生成javadoc -->

                 <plugin>

                     <groupId>org.apache.maven.plugins</groupId>

                     <artifactId>maven-javadoc-plugin</artifactId>

                     <version>2.10.4</version>

                     <executions>

                         <execution>

                             <id>attach-javadocs</id>

                             <goals>

                                 <goal>jar</goal>

                             </goals>

                         </execution>

                     </executions>

                     <configuration>

                         <aggregate>true</aggregate>  <!-- 多模块工程中,将javadoc集中到父工程 -->

                         <encoding>UTF-8</encoding>

                     </configuration>

                 </plugin>

                 <!-- Test -->

                 <plugin>

                     <groupId>org.apache.maven.plugins</groupId>

                     <artifactId>maven-surefire-plugin</artifactId>

                     <version>2.18.1</version>

                     <configuration>

                         <skipTests>true</skipTests>        <!-- 打包过程忽略Junit测试 -->

                     </configuration>

                 </plugin>

                 <!-- 将外部lib一起打成war包 -->

                 <plugin>

                     <groupId>org.apache.maven.plugins</groupId>

                     <artifactId>maven-war-plugin</artifactId>

                     <configuration>

                         <webResources>

                             <resource>

                                 <directory>${project.basedir}/lib</directory>

                                 <targetPath>WEB-INF/lib</targetPath>

                                 <includes>

                                     <include>**/*.jar</include>

                                 </includes>

                             </resource>

                         </webResources>

                     </configuration>

                 </plugin>

                 <!-- 生成manifest文件-->

                 <plugin>

                     <groupId>org.apache.maven.plugins</groupId>

                     <artifactId>maven-jar-plugin</artifactId>

                     <version>2.3.1</version>

                     <configuration>

                         <archive>

                             <manifest>

                                 <addClasspath>true</addClasspath>  <!-- 依赖的jar-->

                             </manifest>

                         </archive>

                     </configuration>

                 </plugin>

                 <!-- mybatis代码生成工具 -->

                 <plugin>

                     <groupId>org.mybatis.generator</groupId>

                     <artifactId>mybatis-generator-maven-plugin</artifactId>

                     <version>1.3.2</version>

                     <configuration>

                         <verbose>true</verbose>        <!--允许移动生成的文件-->

                         <overwrite>true</overwrite>        <!--允许覆盖生成的文件-->

                     </configuration>

                 </plugin>

             </plugins>

         </pluginManagement>

     </build>

     <distributionManagement>

         <repository>

             <id>releases</id>

             <name>Internal Releases</name>

             <url>http://192.168.63.133:9434/nexus/content/repositories/releases/

             </url>

         </repository>

         <snapshotRepository>

             <id>snapshots</id>

             <name>Internal Snapshots</name>

             <url>http://192.168.63.133:9434/nexus/content/repositories/snapshots/

             </url>

         </snapshotRepository>

     </distributionManagement>

     <dependencyManagement>

         <dependencies>

             <dependency>

                 <groupId>javax.servlet</groupId>

                 <artifactId>javax.servlet-api</artifactId>

                 <version>3.0.1</version>

             </dependency>

             <dependency>

                 <groupId>javax.servlet.jsp</groupId>

                 <artifactId>jsp-api</artifactId>

                 <version>2.2</version>

             </dependency>

             <dependency>

                 <groupId>javax.servlet</groupId>

                 <artifactId>jstl</artifactId>

                 <version>1.2</version>

             </dependency>

             <dependency>

                 <groupId>org.slf4j</groupId>

                 <artifactId>slf4j-log4j12</artifactId>

                 <version>1.7.7</version>

             </dependency>

             <dependency>

                 <groupId>junit</groupId>

                 <artifactId>junit</artifactId>

                 <version>${junitversion}</version>

                 <scope>test</scope>

             </dependency>

             <dependency>

                 <groupId>org.apache.commons</groupId>

                 <artifactId>commons-lang3</artifactId>

                 <version>3.3.2</version>

             </dependency>

             <dependency>

                 <groupId>org.apache.commons</groupId>

                 <artifactId>commons-collections4</artifactId>

                 <version>4.0</version>

             </dependency>

             <!-- Apache Commons Codec -->

             <dependency>

                 <groupId>commons-codec</groupId>

                 <artifactId>commons-codec</artifactId>

                 <version>1.10</version>

             </dependency>

             <dependency>

                 <groupId>org.dom4j</groupId>

                 <artifactId>dom4j</artifactId>

                 <version>2.0.0</version>

             </dependency>

         </dependencies>

     </dependencyManagement>

 </project>
多模块企业级项目配置实例 pom.xml
Myeclipse 创建 Web Maven项目的更多相关文章
- IntelliJ IDEA中创建Web聚合项目(Maven多模块项目)
Eclipse用多了,IntelliJ中创建Maven聚合项目可能有小伙伴还不太熟悉,我们今天就来看看. IntelliJ中创建普通的Java聚合项目相对来说比较容易,不会涉及到web操作,涉及到we ...
- 38.IntelliJ IDEA中创建Web聚合项目(Maven多模块项目)
转自:https://blog.csdn.net/u012702547/article/details/77431765 Eclipse用多了,IntelliJ中创建Maven聚合项目可能有小伙伴还不 ...
- maven命令创建web骨架项目
maven命令创建web骨架项目有以下两种方式: mvn archetype:create -DgroupId=org.seckill -DartifactId=seckill -Darchetype ...
- IntelliJ IDEA中创建Web聚合项目(Maven多模块项目)(转载)
创建parent项目 1.打开IDEA,注意这里不要勾选模板,用模板创建过maven项目的小伙伴都知道模板创建项目非常慢,所以这里不要选模板,需要的文件夹我们后面自己来创建就可以了.所以这个页面直接点 ...
- maven系列之二maven项目的创建和maven项目的结构
maven系列之一简单介绍了maven的基本信息,安装和配置,大家对maven有一个大概的了解,但是在maven项目开发中远远不够,为了进一步了解maven,现在我们介绍maven项目的创建和mave ...
- eclipse中创建一个maven项目
1.什么是Maven Apache Maven 是一个项目管理和整合工具.基于工程对象模型(POM)的概念,通过一个中央信息管理模块,Maven 能够管理项目的构建.报告和文档. Maven工程结构和 ...
- 使用Intellij Idea创建简单Maven项目(转)
我是学Java Web的,基本靠自学,在网上收集了各种视频资料,逐一的看,代码逐一的敲.学习了这么久之前一直未成想过要把自己的学习路程记录下来,在网上也看到过很多人把自己的学习历程以及遇到的问题写在了 ...
- eclipse 创建聚合maven项目
本人不想花太多时间去排版,所以这里排版假设不好看,请多多包涵! 一直都在用maven,可是却基本没有自己创建过maven项目,今天也试着创建一个. 1.打开eclipse.然后new,other,然后 ...
- Maven(一)如何用Eclipse创建一个Maven项目
1.什么是Maven Apache Maven 是一个项目管理和整合工具.基于工程对象模型(POM)的概念,通过一个中央信息管理模块,Maven 能够管理项目的构建.报告和文档. Maven工程结构和 ...
随机推荐
- Hierarchyid(层次结构)数据类型
实例表结构 CREATE TABLE [dbo].[Emp]( ,), ), [Org] [hierarchyid], ) INSERT INTO Emp(Name,Org) VALUES('吴xx' ...
- PHP命名空间(Namespace)的使用详解
对于命名空间,官方文档已经说得很详细[查看],我在这里做了一下实践和总结. 命名空间一个最明确的目的就是解决重名问题,PHP中不允许两个函数或者类出现相同的名字,否则会产生一个致命的错误.这种情况下只 ...
- UITableView简单使用
在iOS开发中UITableView可以说是使用最广泛的控件,我们平时使用的软件中到处都可以看到它的影子,类似于微信.QQ.新浪微博等软件基本上随处都是UITableView.当然它的广泛使用自然离不 ...
- Django的用户认证
Django中用户登陆的实例: 逻辑流程 1.客户端发起请求,根据url规则会首先转至index函数, 2.在index函数上添加一个装饰器('@login_required',django自带).加 ...
- .Net Core 读取appsettings.json的配置
在.net core中是没有*.config 文件的 配置文件都是*.json 1.在project.json里下面这行代码 "Microsoft.Extensions.Options.Co ...
- .Net Core 常见问题整理
1.安装时报0x80070490 找不到元素 这里应该是vs只装了web没有装c++ 下载一个 VC_redist.x64.exe 安装就行了 https://github.com/dotnet/co ...
- <pre>标记的使用...
<!DOCTYPE html> <html> <head> <meta charset="UTF-8"> <title> ...
- Openjudge-计算概论(A)-比饭量
描述: 3个人比饭量,每人说了两句话: A说:B比我吃的多,C和我吃的一样多 B说:A比我吃的多,A也比C吃的多 C说:我比B吃得多,B比A吃的多. 事实上,饭量和正确断言的个数是反序的关系. 请编程 ...
- lucene索引的创建与搜索
package com.cs.multi; import java.io.File;import java.io.IOException; import org.apache.lucene.analy ...
- 【实验室笔记】C#上位机学习笔记
用C#编写上位机,基本流程是[1]串口配置,[2]串口发送数据,[3]串口接收数据. [1]串口配置 串口的属性配置包括: No.1串口端口号 No.2串口波特率 No.3串口数据位 No.4串口停止 ...