省市区三级联动 pickerView
效果图

概述
关于 省市区 三级联动的 pickerView,我想大多数的 iOS 开发者应该都遇到过这样的需求。在遇到这样的需求的时候,大多数人都会觉的这个很复杂,一时无从下手。其实真的没那么复杂。在这里我们来一起看看,怎么去实现这样的 pickerView,并做一个简单的封装,使其使用的更加简单,从而也减少了 ViewController 中的代码。
实现思路
如何封装
- 我们使用一个 View(IDAddressPickerView) 来封装 PickerView,来处理 PickerView 的 dataSource 和 delegate,将原本需要在 ViewController处理的 逻辑封装的 View 中。
- ViewController 只需要为 IDAddressPickerView 提供 dataSource,并获取选中的 Address。而不去关心其他逻辑,不如说:联动逻辑,数据格式化。
- IDAddressPickerView 使用委托模式来获取 ViewController 提供的数据源。
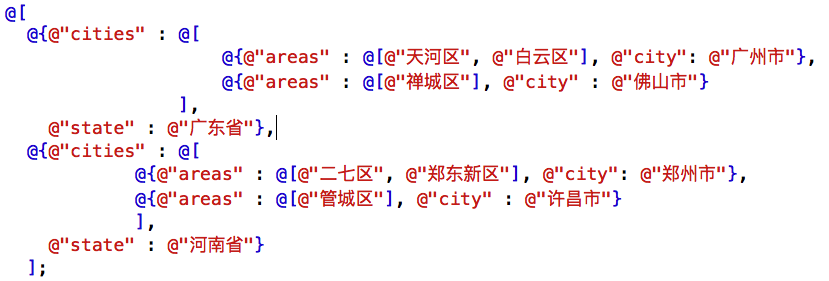
数据如何组织
IDAddressPickerView 的数据源是一个数组,且需要满足一定的格式,这在一定程度上降低了其使用灵活性。
目前 IDAddressPickerView 数据源的需要满足的格式如图:
获取选中的地址
- 选中地址的格式,目前是通过固定的 key 包装在一个 Dictionary,灵活性不高。
- 在此没有使用委托等模式,而是通过一个属性保存当前选中的地址,让用户(IDAddressPickerView 的使用者)主动去获取选中的地址。
期望结果
- 目前实现的 IDAddressPickerView 的数据源缺乏灵活性,尽管我们可以与后台沟通约定数据格式,但是对于一个封装的 IDAddressPickerView 来说,显然是不妥当的。
- 我期望实现的结果是,在为 IDAddressPickerView 提供数据源的时候,指定一个 dataFormatter,IDAddressPickerView 根据 dataFormatter 去解析数据源的数据。而不是现在的根据固定的格式解析数据。
- 由于这些问题的存在,我将项目代码上传到 github 上,还希望有兴趣的小伙伴们多提宝贵意见。
具体实现
IDAddressPickerView
自定义 UIView 的 子类 IDAddressPickerView
@interface IDAddressPickerView : UIView

@end
添加 UIPickerView 子控件
- (UIPickerView *)pickerView {

    if (_pickerView == nil) {

        _pickerView = [[UIPickerView alloc] init];

        _pickerView.dataSource = self;

        _pickerView.delegate = self;

    }

    return _pickerView;

}
UIPickerView 的数据源
- (NSInteger)numberOfComponentsInPickerView:(UIPickerView *)pickerView {

    return 3;

}

- (NSInteger)pickerView:(UIPickerView *)pickerView numberOfRowsInComponent:(NSInteger)component {

    NSInteger numberOfRowsInComponent = 0;

    switch (component) {

        case 0:

            numberOfRowsInComponent = self.addressArray.count;

            break;

        case 1:

        {

            NSDictionary *province = self.addressArray[self.provinceIndex];

            numberOfRowsInComponent = [province[@"cities"] count];

        }

            break;

        case 2:

        {

            NSDictionary *province = self.addressArray[self.provinceIndex];

            NSDictionary *cities = province[@"cities"][self.cityIndex];

            numberOfRowsInComponent = [cities[@"areas"] count];

        }

            break;

    }

    return numberOfRowsInComponent;

}

- (NSString *)pickerView:(UIPickerView *)pickerView titleForRow:(NSInteger)row forComponent:(NSInteger)component {

    NSString *titleForRow = @"";

    switch (component) {

        case 0:

            titleForRow = self.addressArray[row][@"state"];

            break;

        case 1:

        {

            NSDictionary *province = self.addressArray[self.provinceIndex];

            titleForRow = province[@"cities"][row][@"city"];

        }

            break;

        case 2:

        {

            NSDictionary *province = self.addressArray[self.provinceIndex];

            NSDictionary *city = province[@"cities"][self.cityIndex];

            titleForRow = city[@"areas"][row];

        }

            break;

    }

    return titleForRow;

}
UIPickerView 的代理
- (void)pickerView:(UIPickerView *)pickerView didSelectRow:(NSInteger)row inComponent:(NSInteger)component {

    switch (component) {

        case 0:

        {

            self.provinceIndex = row;

            self.cityIndex = 0;

            self.areaIndex = 0;

            [pickerView reloadComponent:1];

            [pickerView reloadComponent:2];

            [pickerView selectRow:0 inComponent:1 animated:NO];

            [pickerView selectRow:0 inComponent:2 animated:NO];

            /**

             *  更新选中的 addresss,包括:市,区

             */

            NSDictionary *province = self.addressArray[self.provinceIndex];

            NSDictionary *city = province[@"cities"][self.cityIndex];

            self.selectedAddress[ProvinceKey] = self.addressArray[row][@"state"];

            if ([province[@"cities"] count] > 0) {

                self.selectedAddress[CityKey] = province[@"cities"][0][@"city"];

            } else {

                self.selectedAddress[CityKey] = @"";

            }

            if ([city[@"areas"] count] > 0) {

                self.selectedAddress[AreaKey] = city[@"areas"][0];

            } else {

                self.selectedAddress[AreaKey] = @"";

            }

        }

            break;

        case 1:

        {

            self.cityIndex = row;

            self.areaIndex = 0;

            [pickerView reloadComponent:2];

            [pickerView selectRow:0 inComponent:2 animated:NO];

            /**

             *  更新选中的 addresss,包括:区

             */

            NSDictionary *province = self.addressArray[self.provinceIndex];

            NSDictionary *city = province[@"cities"][self.cityIndex];

            self.selectedAddress[CityKey] = province[@"cities"][row][@"city"];

            if ([city[@"areas"] count] > 0) {

                self.selectedAddress[AreaKey] = city[@"areas"][0];

            } else {

                self.selectedAddress[AreaKey] = @"";

            }

        }

            break;

        case 2:

        {

            self.areaIndex = row;

            /**

             *  更新选中的 addresss

             */

            NSDictionary *province = self.addressArray[self.provinceIndex];

            NSDictionary *city = province[@"cities"][self.cityIndex];

            self.selectedAddress[AreaKey] = city[@"areas"][row];

        }

            break;

    }

}
关于 UIPickerView 的数据源
UIPickerView 的数据源 通过 IDAddressPickerViewDataSource 协议获得
- (NSArray *)addressArray {

    if (_addressArray == nil) {

        if ([self.dataSource respondsToSelector:@selector(addressArray)]) {

            _addressArray = [self.dataSource addressArray];

        } else {

            _addressArray = [NSArray array];

        }

    }

    return _addressArray;

}
联动效果的实现
原理
- 基本的原理是通过更新数据源的方式,来实现选中一列中的某一行时,更新后继(更深层次)的列。
具体实现
在此使用三个属性分别记录省市区三个层次的对应的列中选中的行,UIPickerView 通过这三个属性来获取对应的数据源。
选中一列中的某一行时,需要更新当前列及其后继列所对应的选中行信息。
/** 选中的省份 */

@property (nonatomic, assign) NSInteger provinceIndex;

/** 选中的城市 */

@property (nonatomic, assign) NSInteger cityIndex;

/** 选中的省份 */

@property (nonatomic, assign) NSInteger areaIndex;
更新后继的列
- 来实现选中一列中的某一行时,更新 所有 后继列,默认选中第一行。即,选中第一列时,更新第二列和第三列;选中第二列时,更新第三列;选中第三列时。
- (void)pickerView:(UIPickerView *)pickerView didSelectRow:(NSInteger)row inComponent:(NSInteger)component {

    switch (component) {

        case 0:

        {

            self.provinceIndex = row;

            self.cityIndex = 0;

            self.areaIndex = 0;

            [pickerView reloadComponent:1];

            [pickerView reloadComponent:2];

            [pickerView selectRow:0 inComponent:1 animated:NO];

            [pickerView selectRow:0 inComponent:2 animated:NO];

            /**

             *  更新选中的 addresss,包括:市,区

             */

            NSDictionary *province = self.addressArray[self.provinceIndex];

            NSDictionary *city = province[@"cities"][self.cityIndex];

            self.selectedAddress[ProvinceKey] = self.addressArray[row][@"state"];

            if ([province[@"cities"] count] > 0) {

                self.selectedAddress[CityKey] = province[@"cities"][0][@"city"];

            } else {

                self.selectedAddress[CityKey] = @"";

            }

            if ([city[@"areas"] count] > 0) {

                self.selectedAddress[AreaKey] = city[@"areas"][0];

            } else {

                self.selectedAddress[AreaKey] = @"";

            }

        }

            break;

        case 1:

        {

            self.cityIndex = row;

            self.areaIndex = 0;

            [pickerView reloadComponent:2];

            [pickerView selectRow:0 inComponent:2 animated:NO];

            /**

             *  更新选中的 addresss,包括:区

             */

            NSDictionary *province = self.addressArray[self.provinceIndex];

            NSDictionary *city = province[@"cities"][self.cityIndex];

            self.selectedAddress[CityKey] = province[@"cities"][row][@"city"];

            if ([city[@"areas"] count] > 0) {

                self.selectedAddress[AreaKey] = city[@"areas"][0];

            } else {

                self.selectedAddress[AreaKey] = @"";

            }

        }

            break;

        case 2:

        {

            self.areaIndex = row;

            /**

             *  更新选中的 addresss

             */

            NSDictionary *province = self.addressArray[self.provinceIndex];

            NSDictionary *city = province[@"cities"][self.cityIndex];

            self.selectedAddress[AreaKey] = city[@"areas"][row];

        }

            break;

    }

}
IDAddressPickerViewDataSource 协议
@protocol IDAddressPickerViewDataSource <NSObject>

/**

 *  地址信息,指定格式的数组

 */

- (NSArray *)addressArray;

@end
使用示例
设置 textField 的 inputView 为 IDAddressPickerView
_textField.inputView = self.addressPickerView;

// getter

- (IDAddressPickerView *)addressPickerView {

    if (_addressPickerView == nil) {

        _addressPickerView = [[IDAddressPickerView alloc] init];

        _addressPickerView.dataSource = self;

    }

    return _addressPickerView;

}
IDAddressPickerViewDataSource 提供数据
#pragma mark - IDAddressPickerViewDataSource

- (NSArray *)addressArray {

    NSString *path = [[NSBundle mainBundle] pathForResource:@"address" ofType:@"plist"];

    NSArray *addressInfo = [NSArray arrayWithContentsOfFile:path];

    return addressInfo;

}
获取选中的地址
- (void)touchesBegan:(NSSet<UITouch *> *)touches withEvent:(UIEvent *)event {

    NSLog(@"%@", self.addressPickerView.selectedAddress);

}
声明
项目代码已经上传到 gitHub,若需要请自行获取:IDAddressPickerView
省市区三级联动 pickerView的更多相关文章
- jQuery省市区三级联动插件
体验效果:http://hovertree.com/texiao/bootstrap/4/支持PC和手机移动端. 手机扫描二维码体验效果: 代码如下: <!DOCTYPE html> &l ...
- JS省市区三级联动
不需要访问后台服务器端,不使用Ajax,无刷新,纯JS实现的省市区三级联动. 当省市区数据变动是只需调正js即可. 使用方法: <!DOCTYPE html><html>< ...
- ajax省市区三级联动
jdbc+servlet+ajax开发省市区三级联动 技术点:jdbc操作数据库,ajax提交,字符拦截器,三级联动 特点:局部刷新达到省市区三级联动,举一反三可以做商品分类等 宗旨:从实战中学习 博 ...
- QQ JS省市区三级联动
如下图: 首先写一个静态的页面: <!DOCTYPE html> <html> <head> <title>QQ JS省市区三级联动</title ...
- 省市区三级联动(二)JS部分简单版
通过对上一篇<省市区三级联动>的学习发现JScript部分省市区的填充代码几乎相同,所以可以写成一个函数. 注意:html部分和chuli.php部分不变 1.下拉列表填充可以写成带参数的 ...
- 从QQ网站中提取的纯JS省市区三级联动
在 http://ip.qq.com/ 的网站中有QQ自己的JS省市区三级联动 QQ是使用引用外部JS来实现三级联动的.JS如下:http://ip.qq.com/js/geo.js <!DOC ...
- 基于ThinkPHP+AJAX的省市区三级联动
练习,就当练习. 省市区三级联动,样式如下图所示: 1,导入两个js文件并且导入数据库文件. 两个js文件分别是jquery-2.1.4.min.js和jquery-1.js,数据库文件,见附件. 2 ...
- java的JCombobox实现中国省市区三级联动
源代码下载:点击下载源代码 用xml存储中国各大城市的数据. xml数据太多了就不贴上了,贴个图片: 要解释xml,添加了一个jdom.jar,上面的源代码下载里面有. 解释xml的类: packag ...
- jquery省市区三级联动
jquery省市区三级联动(数据来源国家统计局官网)内附源码下载 很久很久没有写博了. 今天更新了项目的省市区三级联动数据,更新后最新的海南三沙都有,分享给所有需要的小伙伴们... JQUERY + ...
随机推荐
- Util应用程序框架公共操作类(五):异常公共操作类
任何系统都需要处理错误,本文介绍的异常公共操作类,用于对业务上的错误进行简单支持. 对于刚刚接触.Net的新手,碰到错误的时候,一般喜欢通过返回bool值的方式指示是否执行成功. public boo ...
- 清除页面广告?身为前端,自己做一款简易的chrome扩展吧
大家肯定有这样的经历,浏览网页的时候,左右两端广告,诸如“屠龙宝刀,点击就送”,以及最近火的不行的林子聪37传奇霸业什么“霸业面具,霸业吊坠”的魔性广告总是充斥我们的眼球. 当然有现成的扩展程序或者插 ...
- Sublime写MarkDown实时预览
[TOC] Sublime写MarkDown实时预览 Sublime作为神器,实至名归. 首先 1.安装Sublime,并安装Package Control,这里不多说. 2.安装MarkDown P ...
- Android 数据库框架OrmLite的使用(一)
在这里记录下最基本的用法,官网上可了解相关的介绍. 1.下载OrmLite jar 在下载android的:ormlite-android-4.48.jar和ormlite-core-4.48.jar ...
- HTTP在.NET中的一些应用和解析
谈到HTTP协议(超文本传输协议),HTTP协议是一个基于请求与响应模式的.无状态的.应用层的协议,常基于TCP的连接方式,HTTP1.1版本中给出一种持续连接的机制,绝大多数的Web开发,都是构建在 ...
- js构建ui的统一异常处理方案(二)
上一篇文章,我分析了同步代码做异常处理是基于责任链模式,而通过try.catch等语句可以很容易地实现这种责任链模式.但是如果是异步调用,我们无法直接通过try.catch语句实现责任链模式,并且通过 ...
- Android之实现ViewPagerIndicator
PS:最近一直忙于学习任务,一直没有时间去写博客.今天周六,终于有时间了. 学习任务: 1.打造一个自己的ViewPagerIndicator 最近被安排了一大堆的学习任务,感觉老板还是很好的,让 ...
- 使用 PowerShell 自动化 CloudServices 发布
在软件的开发过程中,自动化的编译和部署能够带来很多的优势.如果可以通过一个脚本实现软件的自动化部署,那么就可以节省大量的时间去做其它事情. 下面介绍如何将云应用程序通过 PowerShell 自动发布 ...
- Python_Day_05 计数器(counter),有序字典(OrderDict),默认字典(defaultdict),可命名元祖(namedtuple),双向队列(deque),单项队列(deuqe.Queue)
Counter(计数器) 是一个字典的子类,存储形式同样为字典,其中存储的键为字典的元素,值为元素出现的次数,在使用之前我们需要先导入文件 import collections 初始化一个计数器 im ...
- Xamarin.Android之给我们的应用加点过渡效果
零.前言 试想一下,我们的应用正在请求一些数据,假设网络不是很好,要花比较长的时间等待,这个时候界面什么反应也没有, 一动不动,用户可能就会认为应用挂掉了,这么久都没反应的,说不定下一分钟用户就把它卸 ...