day38 14-Spring的Bean的属性的注入:集合属性的注入
集合:List、Set、Map。


package cn.itcast.spring3.demo6; import java.util.List;
import java.util.Map;
import java.util.Properties;
import java.util.Set;
//集合属性的注入
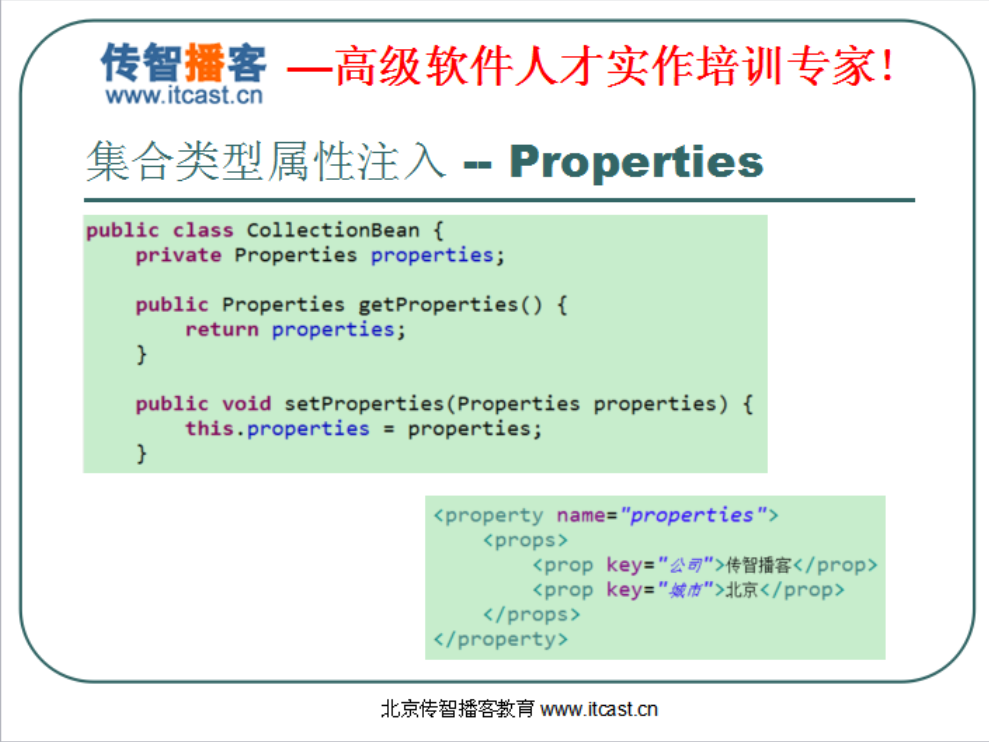
public class CollectionBean {
private List<String> list;
private Set<String> set;
private Map<String,Integer> map;
private Properties properties;//还可以注入属性对象
//这个属性对象Properties它底层继承HashTable,就是线程安全的那个对象
//还可以注入数组,数组的注入和List是一样的.
// public List<String> getList() {
// return list;
// } /* public Set<String> getSet() {
return set;
}*/ public void setSet(Set<String> set) {
this.set = set;
} public void setList(List<String> list) {
this.list = list;
} /* @Override
public String toString() {
return "CollectionBean [list=" + list + ", set=" + set + "]";
}*/ /* public Map<String, Integer> getMap() {
return map;
}*/ public void setMap(Map<String, Integer> map) {
this.map = map;
} /* @Override
public String toString() {
return "CollectionBean [list=" + list + ", set=" + set + ", map=" + map
+ "]";
}*/ /* public Properties getProperties() {
return properties;
}*/ public void setProperties(Properties properties) {
this.properties = properties;
} @Override
public String toString() {
return "CollectionBean [list=" + list + ", set=" + set + ", map=" + map
+ ", properties=" + properties + "]";
} /* @Override
public String toString() {
return "CollectionBean [list=" + list + "]";
}*/ /* public List<String> getList() {
return list;
}*/ }
package cn.itcast.spring3.demo6;

import org.junit.Test;

import org.springframework.context.ApplicationContext;

import org.springframework.context.support.ClassPathXmlApplicationContext;

public class SpringTest6 {

@Test

public void demo1(){//注入list

    ApplicationContext applicationContext = new ClassPathXmlApplicationContext("applicationContext.xml");

    CollectionBean collectionBean = (CollectionBean) applicationContext.getBean("collectionBean");

    System.out.println(collectionBean);

}

}
<?xml version="1.0" encoding="UTF-8"?>

<!-- 别去schema,schema是文件,本地的文件,你得引那个头 -->

<beans xmlns="http://www.springframework.org/schema/beans"

       xmlns:p="http://www.springframework.org/schema/p"

       xmlns:xsi="http://www.w3.org/2001/XMLSchema-instance"

       xsi:schemaLocation="

http://www.springframework.org/schema/beans http://www.springframework.org/schema/beans/spring-beans.xsd">

<!-- demo1快速入门================================================= -->

<!-- 把接口和实现类在这个配置文件中配置,有了实现类的全路径之后到时候才能用工厂反射 -->

   <!-- 通过一个<bean>标签来设置类的信息,通过id属性为类起个标识. -->

    <!-- 接口,实现类,配置文件也都有了 -->

    <!-- 现在有一个工厂Spring为我们提供好了,其实就是解析这个XML文件 -->

    <!-- 这个工厂你自己写会不会写?你用dom4j找里面的bean标签,找到class的属性值,然后就可以Class.forName()反射生成类的实例.其实Spring

         也是这么做的,只不过工厂由Spring提供好了

     -->

    <bean id="helloService" class="cn.itcast.spring3.demo1.HelloServiceImpl">

         <!-- 使用<property>标签注入属性

         value指的是普通值

         ref指的是对象

         -->

    <property name="info"  value="传智播客"></property>

    </bean>

    <!-- demo1快速入门 -->

    <!-- demo2Bean的实例化 -->

    <!-- 默认情况下使用的就是无参数的构造方法. -->

    <!--

    <bean id="bean1" class="cn.itcast.spring3.demo2.Bean1"></bean>

    -->

    <!--

    <bean name="bean1" class="cn.itcast.spring3.demo2.Bean1"></bean>

    -->

    <!-- 第二种使用静态工厂实例化 不能写class了,因为现在不是由Spring直接帮你创建对象了-->

    <!--

    <bean id="bean2" class="cn.itcast.spring3.demo2.Bean2Factory" factory-method="getBean2"></bean>

    -->

    <!-- 第三种使用实例工厂实例化 -->

    <!--

    <bean id="bean3" factory-bean="bean3Factory" factory-method="getBean3"></bean>

    -->

    <!-- 要先把Bean3Factory实例化 -->

    <!--

    <bean id="bean3Factory" class="cn.itcast.spring3.demo2.Bean3Factory"></bean>

    -->

    <!-- demo2Bean的实例化======================  end-->

    <!-- demo3Bean的作用范围======================= -->

    <!--

    <bean id="customer" class="cn.itcast.spring3.demo3.Customer" scope="prototype"></bean>

    -->

    <!--

    <bean id="product" class="cn.itcast.spring3.demo3.Product" init-method="setup" destroy-method="teardown" scope="singleton">

       <property name="name" value="空调">-->

       <!-- 把Product类的属性name注入进来 -->

       <!--

       </property>

    </bean>

 -->

       <!-- demo4Bean的生命周期======================= -->

       <!--

       <bean id="customerService" class="cn.itcast.spring3.demo4.CustomerServiceImpl" init-method="setup"  destroy-method="teardown">

          <property name="name" value="itcast"></property>

       </bean>

       -->

       <!-- 后处理Bean是由Spring容器自动调用不用你管,我们起个id是为了我们在程序中去获得它。但是这个类不用由我们获得, 由Spring自动调用。cn.itcast.spring3.demo4.MyBeanPostProcessor是后处理Bean-->

        <!-- <bean class="cn.itcast.spring3.demo4.MyBeanPostProcessor"></bean>-->

       <!-- demo5Bean的属性注入=====================================================================================================================================-->

       <!-- 构造方法的注入 -->

       <bean id="car" class="cn.itcast.spring3.demo5.Car">

        <constructor-arg name="name" value="宝马"><!-- 通过这个标签为类注入属性 -->

        </constructor-arg>

        <constructor-arg name="price" value="1000000"><!-- 通过这个标签为类注入属性 -->

        </constructor-arg>

        <!--

        <constructor-arg index="0" type="java.lang.String" value="奔驰">--><!-- 通过这个标签为类注入属性 -->

        <!-- </constructor-arg>-->

        <!--

        <constructor-arg index="1" type="java.lang.Double" value="2000000">--><!-- 通过这个标签为类注入属性 -->

       <!-- </constructor-arg>-->

       </bean>

       <!--

       <bean id="car2" class="cn.itcast.spring3.demo5.Car2">

       -->

       <!-- <property>标签中name就是属性名称,value是普通属性的值,

       ref:引用其他的对象

       -->

       <!--

       <property name="name" value="保时捷奇瑞QQ"></property>

       <property name="price" value="500000020000"></property>

       </bean>

       -->

       <!--  p名称空间的写法

       <bean id="car2" class="cn.itcast.spring3.demo5.Car2" p:name="宝马" p:price="400000">

       </bean>

       -->

       <!-- SpEL写法 -->

       <bean id="car2" class="cn.itcast.spring3.demo5.Car2" >

       <property name="name" value="#{'大众'}"></property>

       <property name="price" value="#{'120000'}"></property>

       </bean>

       <!--

       <bean id="person" class="cn.itcast.spring3.demo5.Person">

           <property name="name" value="任童"></property>

           <property name="car2" ref="car2"></property>

       </bean>

       -->

       <!-- p名称空间的写法 -->

       <!--

       <bean id="person" class="cn.itcast.spring3.demo5.Person" p:name="童童" p:car2-ref="car2">

       </bean>

       -->

       <!-- SpEL写法 -->

       <bean id="person" class="cn.itcast.spring3.demo5.Person">

       <!--

           <property name="name" value="#{'小边'}"></property>

           -->

           <!--

           <property name="name" value="#{personInfo.name}"></property>

           -->

           <property name="name" value="#{personInfo.showName()}"></property>

           <property name="car2" value="#{car2}"></property>

       </bean>

       <!--

       <property name="name" value="任童"></property>

           <property name="car2" ref="car2"></property>

       -->

        <bean id="personInfo" class="cn.itcast.spring3.demo5.PersonInfo">

        <property name="name" value="张三"></property>

        </bean>

        <!-- demo5Bean的属性的注入============================================================== -->

        <!-- demo6Bean的集合属性的注入 ==============================================================-->

        <bean id="collectionBean" class="cn.itcast.spring3.demo6.CollectionBean">

            <!-- 注入List集合 -->

           <property name="list">

               <list>

               <value>童童</value>

               <value>小凤</value>

               </list>

           </property>

           <!-- 注入set集合 -->

           <property name="set">

                 <set>

                    <value>杜宏</value>

                    <value>如花</value>

                 </set>

           </property>

           <!-- 注入map集合 -->

          <property name="map">

          <map>

             <entry key="刚刚" value="111"></entry>

             <entry key="娇娇" value="333"></entry>

          </map>

          </property>

          <property name="properties">

          <props>

              <prop key="username">root</prop><!-- prop有key和value的形式,属性文件就是key和value的形式 -->

              <prop key="password">123</prop>

          </props>

          </property>

        </bean>

</beans>
day38 14-Spring的Bean的属性的注入:集合属性的注入的更多相关文章
- [原创]java WEB学习笔记98:Spring学习---Spring Bean配置及相关细节:如何在配置bean,Spring容器(BeanFactory,ApplicationContext),如何获取bean,属性赋值(属性注入,构造器注入),配置bean细节(字面值,包含特殊字符,引用bean,null值,集合属性list map propert),util 和p 命名空间
本博客的目的:①总结自己的学习过程,相当于学习笔记 ②将自己的经验分享给大家,相互学习,互相交流,不可商用 内容难免出现问题,欢迎指正,交流,探讨,可以留言,也可以通过以下方式联系. 本人互联网技术爱 ...
- Spring学习(三)几种集合属性的注入方式
1.前言 众所周知.java中不只有八大简单类型.还有一些集合类型.本文围绕集合类型的注入做一个总结. 2.项目骨架 3.过程 1.创建实体类AllCollectionType package com ...
- 使用Jquery动态加入对象的集合属性,提交集合属性到表单
1.设置模型,引入构造函数,初始化集合 public class Person { public Person() //引入构造函数,初始化集合.如果未设置构造函数,集合会出现错误. { Skills ...
- Spring学习--集合属性
Spring 中可以通过一组内置的 xml 标签(例如: <list> , <set> 或 <map>) 来配置集合属性. 配置java.util.Set 需要使用 ...
- IoC容器-Bean管理XML方式(注入集合类型属性)
Ico操作Bean管理(xml注入集合属性) 1,注入数组类型属性 2,注入List集合类型属性 3,注入Map集合类型属性 (1)创建类,定义数组.list.map.set类型属性,生成对应set方 ...
- 编写高质量代码改善C#程序的157个建议——建议25:谨慎集合属性的可写操作
建议25:谨慎集合属性的可写操作 如果类型的属性中有集合属性,那么应该保证属性对象是由类型本身产生的.如果将属性设置为可写,则会增加抛出异常的几率.一般情况下,如果集合属性没有值,则它返回的Count ...
- (转)Hibernate框架基础——映射集合属性
http://blog.csdn.net/yerenyuan_pku/article/details/52745486 集合映射 集合属性大致有两种: 单纯的集合属性,如像List.Set或数组等集合 ...
- Spring - 配置Bean - 自动装配 关系 作用域 引用外部属性文件
1 Autowire自动装配1.1 使用:只需在<bean>中使用autowire元素<bean id="student" class="com.kej ...
- Spring框架bean的配置(2):SpEL:引用 Bean、属性和方法。。。
将这些架包放入在工程目录下建立的lib文件夹里,并解压 commons-logging-1.1.1 spring-aop-4.0.0.RELEASE spring-beans-4.0.0.RELEAS ...
- spring中bean的scope属性理解
bean的scope属性有prototype,singleton,request, session几个属性 spring和struts2整合的时候,struts2的action要配置成scope=&q ...
随机推荐
- activiti 连线
实际使用中工作流往往不是一条直线进行下去,例如请假的话可以部门经理直接同意,或者报总经理同意,流程图示意如下. 可以看到,面对一个事情,重要的才要总经理审批否则仅部门经理审批即可.因此在完成任务的时候 ...
- linux删除登录日志及历史命令
参考:https://blog.51cto.com/study2008/2301555 基本常用清理linux日志: # echo > /var/log/wtmp //清除用户登录记录 # ec ...
- 数据库顶会VLDB论文解读:阿里数据库智能参数优化的创新与实践
前言 一年一度的数据库领域顶级会议VLDB 2019于美国当地时间8月26日-8月30日在洛杉矶召开.在本届大会上,阿里云数据库产品团队多篇论文入选Research Track和Industrial ...
- Django项目:CRM(客户关系管理系统)--85--75PerfectCRM实现CRM扩展权限
# sales_urls.py # ————————47PerfectCRM实现CRM客户报名流程———————— from django.conf.urls import url from bpm. ...
- psu online course
https://onlinecourses.science.psu.edu/statprogram/programs Graduate Online Course Overviews Printer- ...
- 63 搜索旋转排序数组II
原题网址:https://www.lintcode.com/problem/search-in-rotated-sorted-array-ii/description 描述 跟进“搜索旋转排序数组”, ...
- 通过三个DEMO学会SignalR的三种实现方式 转载https://www.cnblogs.com/zuowj/p/5674615.html
一.理解SignalR ASP .NET SignalR 是一个ASP .NET 下的类库,可以在ASP .NET 的Web项目中实现实时通信(即:客户端(Web页面)和服务器端可以互相实时的通知消息 ...
- 原生JS实现动态时钟(优化)
<!doctype html> <html> <head> <meta charset="utf-8"> <title> ...
- 用wix制作属于自己的Flash网站
Wix 制作属于自己的Flash网站 Wix 是一款新兴的在线应用程序,它可以帮助用户轻松的创建出绘声绘色的Flash网站,而不需要任何相关的专业知识.Wix 是一家位于以色列的Startup开发的一 ...
- 原生JS与JQ获取元素的区别
刚学JQ不久,有时候可能会把JS和JQ获取元素的方式搞错,接下来获取属性方法什么的就一发不可收拾了,现在把两者获取获取元素的代码整理下. 一.原生JS获取元素. 1.常用的三种方式获取元素对象(将指定 ...