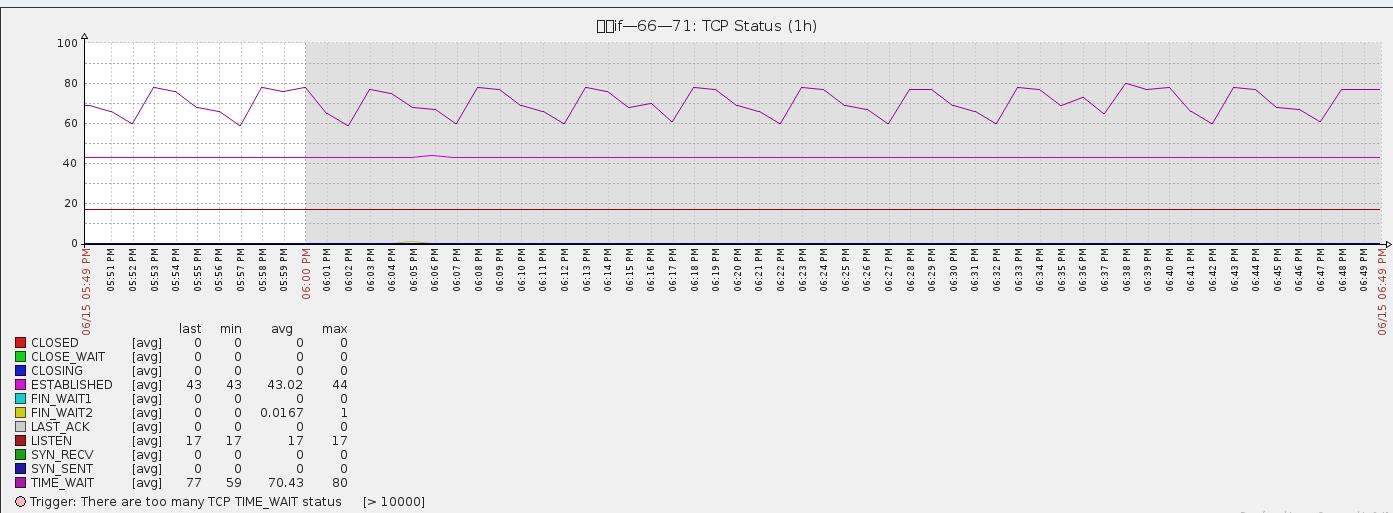
zabbix加入TCP连接数及状态的监控
一 监控原理:
[root@ nginx]# /bin/netstat -an|awk '/^tcp/{++S[$NF]}END{for(a in S) print a,S[a]}'

TIME_WAIT

FIN_WAIT2

ESTABLISHED

LISTEN
可以使用man netstat查看TCP的各种状态信息描述

ESTABLISHED       socket已经建立连接

CLOSED            socket没有被使用,无连接

CLOSING           服务器端和客户端都同时关闭连接

CLOSE_WAIT        等待关闭连接

TIME_WAIT         表示收到了对方的FIN报文,并发送出了ACK报文,等待2MSL后就可回到CLOSED状态

LAST_ACK          远端关闭,当前socket被动关闭后发送FIN报文,等待对方ACK报文

LISTEN            监听状态

SYN_RECV          接收到SYN报文

SYN_SENT          已经发送SYN报文

FIN_WAIT1         The socket is closed, and the connection is shutting down

FIN_WAIT2         Connection is closed, and the socket is waiting for a shutdown from the remote end.
二 监控脚本:
tcp_conn_status.sh,放在zabbix-agent的应用服务器上/usr/local/zabbix/bin/tcp_conn_status.sh
#!/bin/bash

#this script is used to get tcp and udp connetion status

#tcp status

metric=$

tmp_file=/tmp/tcp_status.txt

/bin/netstat -an|awk '/^tcp/{++S[$NF]}END{for(a in S) print a,S[a]}' > $tmp_file

case $metric in

   closed)

          output=$(awk '/CLOSED/{print $2}' $tmp_file)

          if [ "$output" == "" ];then

             echo

          else

             echo $output

          fi

        ;;

   listen)

          output=$(awk '/LISTEN/{print $2}' $tmp_file)

          if [ "$output" == "" ];then

             echo

          else

             echo $output

          fi

        ;;

   synrecv)

          output=$(awk '/SYN_RECV/{print $2}' $tmp_file)

          if [ "$output" == "" ];then

             echo

          else

             echo $output

          fi

        ;;

   synsent)

          output=$(awk '/SYN_SENT/{print $2}' $tmp_file)

          if [ "$output" == "" ];then

             echo

          else

             echo $output

          fi

        ;;

   established)

          output=$(awk '/ESTABLISHED/{print $2}' $tmp_file)

          if [ "$output" == "" ];then

             echo

          else

             echo $output

          fi

        ;;

   timewait)

          output=$(awk '/TIME_WAIT/{print $2}' $tmp_file)

          if [ "$output" == "" ];then

             echo

          else

             echo $output

          fi

        ;;

   closing)

          output=$(awk '/CLOSING/{print $2}' $tmp_file)

          if [ "$output" == "" ];then

             echo

          else

             echo $output

          fi

        ;;

   closewait)

          output=$(awk '/CLOSE_WAIT/{print $2}' $tmp_file)

          if [ "$output" == "" ];then

             echo

          else

             echo $output

          fi

        ;;

   lastack)

          output=$(awk '/LAST_ACK/{print $2}' $tmp_file)

          if [ "$output" == "" ];then

             echo

          else

             echo $output

          fi

         ;;

   finwait1)

          output=$(awk '/FIN_WAIT1/{print $2}' $tmp_file)

          if [ "$output" == "" ];then

             echo

          else

             echo $output

          fi

         ;;

   finwait2)

          output=$(awk '/FIN_WAIT2/{print $2}' $tmp_file)

          if [ "$output" == "" ];then

             echo

          else

             echo $output

          fi

         ;;

         *)

          echo -e "\e[033mUsage: sh  $0 [closed|closing|closewait|synrecv|synsent|finwait1|finwait2|listen|established|lastack|timewait]\e[0m"

esac
三 zabbix-agent配置
1、修改tcp_conn_status.sh文件权限:
chmod o+x /usr/local/zabbix/bin/tcp_conn_status.sh
2、在/usr/local/zabbix/etc目录下,创建文件tcp-status-params.conf
vi /usr/local/zabbix/etc/tcp-status-params.conf
3、在tcp-status-params.conf加入以下内容:
UserParameter=tcp.status[*],/usr/local/zabbix/bin/tcp_conn_status.sh $1
4、创建日志文件
# vi /tmp/tcp_status.txt

# chown zabbix:zabbix tcp_status.txt

# chmod  tcp_status.txt
5、在/usr/local/zabbix/etc/zabbix_agentd.conf加入以下配置:
UserParameter=tcp.status[*],/usr/local/zabbix/bin/tcp_conn_status.sh $
四 重启zabbix-agent服务
/etc/init.d/zabbix_agentd restart
五 添加监控模板
<?xml version="1.0" encoding="UTF-8"?>
<zabbix_export>
<version>2.0</version>
<date>--04T09::57Z</date>
<groups>
<group>
<name>Templates</name>
</group>
</groups>
<templates>
<template>
<template>Template TCP Connection Status</template>
<name>Template TCP Connection Status</name>
<groups>
<group>
<name>Templates</name>
</group>
</groups>
<applications>
<application>
<name>TCP Status</name>
</application>
</applications>
<items>
<item>
<name>CLOSED</name>
<type></type>
<snmp_community/>
<multiplier></multiplier>
<snmp_oid/>
<key>tcp.status[closed]</key>
<delay></delay>
<history></history>
<trends></trends>
<status></status>
<value_type></value_type>
<allowed_hosts/>
<units/>
<delta></delta>
<snmpv3_contextname/>
<snmpv3_securityname/>
<snmpv3_securitylevel></snmpv3_securitylevel>
<snmpv3_authprotocol></snmpv3_authprotocol>
<snmpv3_authpassphrase/>
<snmpv3_privprotocol></snmpv3_privprotocol>
<snmpv3_privpassphrase/>
<formula></formula>
<delay_flex/>
<params/>
<ipmi_sensor/>
<data_type></data_type>
<authtype></authtype>
<username/>
<password/>
<publickey/>
<privatekey/>
<port/>
<description/>
<inventory_link></inventory_link>
<applications>
<application>
<name>TCP Status</name>
</application>
</applications>
<valuemap/>
</item>
<item>
<name>CLOSE_WAIT</name>
<type></type>
<snmp_community/>
<multiplier></multiplier>
<snmp_oid/>
<key>tcp.status[closewait]</key>
<delay></delay>
<history></history>
<trends></trends>
<status></status>
<value_type></value_type>
<allowed_hosts/>
<units/>
<delta></delta>
<snmpv3_contextname/>
<snmpv3_securityname/>
<snmpv3_securitylevel></snmpv3_securitylevel>
<snmpv3_authprotocol></snmpv3_authprotocol>
<snmpv3_authpassphrase/>
<snmpv3_privprotocol></snmpv3_privprotocol>
<snmpv3_privpassphrase/>
<formula></formula>
<delay_flex/>
<params/>
<ipmi_sensor/>
<data_type></data_type>
<authtype></authtype>
<username/>
<password/>
<publickey/>
<privatekey/>
<port/>
<description/>
<inventory_link></inventory_link>
<applications>
<application>
<name>TCP Status</name>
</application>
</applications>
<valuemap/>
</item>
<item>
<name>CLOSING</name>
<type></type>
<snmp_community/>
<multiplier></multiplier>
<snmp_oid/>
<key>tcp.status[closing]</key>
<delay></delay>
<history></history>
<trends></trends>
<status></status>
<value_type></value_type>
<allowed_hosts/>
<units/>
<delta></delta>
<snmpv3_contextname/>
<snmpv3_securityname/>
<snmpv3_securitylevel></snmpv3_securitylevel>
<snmpv3_authprotocol></snmpv3_authprotocol>
<snmpv3_authpassphrase/>
<snmpv3_privprotocol></snmpv3_privprotocol>
<snmpv3_privpassphrase/>
<formula></formula>
<delay_flex/>
<params/>
<ipmi_sensor/>
<data_type></data_type>
<authtype></authtype>
<username/>
<password/>
<publickey/>
<privatekey/>
<port/>
<description/>
<inventory_link></inventory_link>
<applications>
<application>
<name>TCP Status</name>
</application>
</applications>
<valuemap/>
</item>
<item>
<name>ESTABLISHED</name>
<type></type>
<snmp_community/>
<multiplier></multiplier>
<snmp_oid/>
<key>tcp.status[established]</key>
<delay></delay>
<history></history>
<trends></trends>
<status></status>
<value_type></value_type>
<allowed_hosts/>
<units/>
<delta></delta>
<snmpv3_contextname/>
<snmpv3_securityname/>
<snmpv3_securitylevel></snmpv3_securitylevel>
<snmpv3_authprotocol></snmpv3_authprotocol>
<snmpv3_authpassphrase/>
<snmpv3_privprotocol></snmpv3_privprotocol>
<snmpv3_privpassphrase/>
<formula></formula>
<delay_flex/>
<params/>
<ipmi_sensor/>
<data_type></data_type>
<authtype></authtype>
<username/>
<password/>
<publickey/>
<privatekey/>
<port/>
<description/>
<inventory_link></inventory_link>
<applications>
<application>
<name>TCP Status</name>
</application>
</applications>
<valuemap/>
</item>
<item>
<name>FIN_WAIT1</name>
<type></type>
<snmp_community/>
<multiplier></multiplier>
<snmp_oid/>
<key>tcp.status[finwait1]</key>
<delay></delay>
<history></history>
<trends></trends>
<status></status>
<value_type></value_type>
<allowed_hosts/>
<units/>
<delta></delta>
<snmpv3_contextname/>
<snmpv3_securityname/>
<snmpv3_securitylevel></snmpv3_securitylevel>
<snmpv3_authprotocol></snmpv3_authprotocol>
<snmpv3_authpassphrase/>
<snmpv3_privprotocol></snmpv3_privprotocol>
<snmpv3_privpassphrase/>
<formula></formula>
<delay_flex/>
<params/>
<ipmi_sensor/>
<data_type></data_type>
<authtype></authtype>
<username/>
<password/>
<publickey/>
<privatekey/>
<port/>
<description/>
<inventory_link></inventory_link>
<applications>
<application>
<name>TCP Status</name>
</application>
</applications>
<valuemap/>
</item>
<item>
<name>FIN_WAIT2</name>
<type></type>
<snmp_community/>
<multiplier></multiplier>
<snmp_oid/>
<key>tcp.status[finwait2]</key>
<delay></delay>
<history></history>
<trends></trends>
<status></status>
<value_type></value_type>
<allowed_hosts/>
<units/>
<delta></delta>
<snmpv3_contextname/>
<snmpv3_securityname/>
<snmpv3_securitylevel></snmpv3_securitylevel>
<snmpv3_authprotocol></snmpv3_authprotocol>
<snmpv3_authpassphrase/>
<snmpv3_privprotocol></snmpv3_privprotocol>
<snmpv3_privpassphrase/>
<formula></formula>
<delay_flex/>
<params/>
<ipmi_sensor/>
<data_type></data_type>
<authtype></authtype>
<username/>
<password/>
<publickey/>
<privatekey/>
<port/>
<description/>
<inventory_link></inventory_link>
<applications>
<application>
<name>TCP Status</name>
</application>
</applications>
<valuemap/>
</item>
<item>
<name>LAST_ACK</name>
<type></type>
<snmp_community/>
<multiplier></multiplier>
<snmp_oid/>
<key>tcp.status[lastack]</key>
<delay></delay>
<history></history>
<trends></trends>
<status></status>
<value_type></value_type>
<allowed_hosts/>
<units/>
<delta></delta>
<snmpv3_contextname/>
<snmpv3_securityname/>
<snmpv3_securitylevel></snmpv3_securitylevel>
<snmpv3_authprotocol></snmpv3_authprotocol>
<snmpv3_authpassphrase/>
<snmpv3_privprotocol></snmpv3_privprotocol>
<snmpv3_privpassphrase/>
<formula></formula>
<delay_flex/>
<params/>
<ipmi_sensor/>
<data_type></data_type>
<authtype></authtype>
<username/>
<password/>
<publickey/>
<privatekey/>
<port/>
<description/>
<inventory_link></inventory_link>
<applications>
<application>
<name>TCP Status</name>
</application>
</applications>
<valuemap/>
</item>
<item>
<name>LISTEN</name>
<type></type>
<snmp_community/>
<multiplier></multiplier>
<snmp_oid/>
<key>tcp.status[listen]</key>
<delay></delay>
<history></history>
<trends></trends>
<status></status>
<value_type></value_type>
<allowed_hosts/>
<units/>
<delta></delta>
<snmpv3_contextname/>
<snmpv3_securityname/>
<snmpv3_securitylevel></snmpv3_securitylevel>
<snmpv3_authprotocol></snmpv3_authprotocol>
<snmpv3_authpassphrase/>
<snmpv3_privprotocol></snmpv3_privprotocol>
<snmpv3_privpassphrase/>
<formula></formula>
<delay_flex/>
<params/>
<ipmi_sensor/>
<data_type></data_type>
<authtype></authtype>
<username/>
<password/>
<publickey/>
<privatekey/>
<port/>
<description/>
<inventory_link></inventory_link>
<applications>
<application>
<name>TCP Status</name>
</application>
</applications>
<valuemap/>
</item>
<item>
<name>SYN_RECV</name>
<type></type>
<snmp_community/>
<multiplier></multiplier>
<snmp_oid/>
<key>tcp.status[synrecv]</key>
<delay></delay>
<history></history>
<trends></trends>
<status></status>
<value_type></value_type>
<allowed_hosts/>
<units/>
<delta></delta>
<snmpv3_contextname/>
<snmpv3_securityname/>
<snmpv3_securitylevel></snmpv3_securitylevel>
<snmpv3_authprotocol></snmpv3_authprotocol>
<snmpv3_authpassphrase/>
<snmpv3_privprotocol></snmpv3_privprotocol>
<snmpv3_privpassphrase/>
<formula></formula>
<delay_flex/>
<params/>
<ipmi_sensor/>
<data_type></data_type>
<authtype></authtype>
<username/>
<password/>
<publickey/>
<privatekey/>
<port/>
<description/>
<inventory_link></inventory_link>
<applications>
<application>
<name>TCP Status</name>
</application>
</applications>
<valuemap/>
</item>
<item>
<name>SYN_SENT</name>
<type></type>
<snmp_community/>
<multiplier></multiplier>
<snmp_oid/>
<key>tcp.status[synsent]</key>
<delay></delay>
<history></history>
<trends></trends>
<status></status>
<value_type></value_type>
<allowed_hosts/>
<units/>
<delta></delta>
<snmpv3_contextname/>
<snmpv3_securityname/>
<snmpv3_securitylevel></snmpv3_securitylevel>
<snmpv3_authprotocol></snmpv3_authprotocol>
<snmpv3_authpassphrase/>
<snmpv3_privprotocol></snmpv3_privprotocol>
<snmpv3_privpassphrase/>
<formula></formula>
<delay_flex/>
<params/>
<ipmi_sensor/>
<data_type></data_type>
<authtype></authtype>
<username/>
<password/>
<publickey/>
<privatekey/>
<port/>
<description/>
<inventory_link></inventory_link>
<applications>
<application>
<name>TCP Status</name>
</application>
</applications>
<valuemap/>
</item>
<item>
<name>TIME_WAIT</name>
<type></type>
<snmp_community/>
<multiplier></multiplier>
<snmp_oid/>
<key>tcp.status[timewait]</key>
<delay></delay>
<history></history>
<trends></trends>
<status></status>
<value_type></value_type>
<allowed_hosts/>
<units/>
<delta></delta>
<snmpv3_contextname/>
<snmpv3_securityname/>
<snmpv3_securitylevel></snmpv3_securitylevel>
<snmpv3_authprotocol></snmpv3_authprotocol>
<snmpv3_authpassphrase/>
<snmpv3_privprotocol></snmpv3_privprotocol>
<snmpv3_privpassphrase/>
<formula></formula>
<delay_flex/>
<params/>
<ipmi_sensor/>
<data_type></data_type>
<authtype></authtype>
<username/>
<password/>
<publickey/>
<privatekey/>
<port/>
<description/>
<inventory_link></inventory_link>
<applications>
<application>
<name>TCP Status</name>
</application>
</applications>
<valuemap/>
</item>
</items>
<discovery_rules/>
<macros/>
<templates/>
<screens/>
</template>
</templates>
<triggers>
<trigger>
<expression>{Template TCP Connection Status:tcp.status[timewait].last()}></expression>
<name>There are too many TCP TIME_WAIT status</name>
<url/>
<status></status>
<priority></priority>
<description/>
<type></type>
<dependencies/>
</trigger>
</triggers>
<graphs>
<graph>
<name>TCP Status</name>
<width></width>
<height></height>
<yaxismin>0.0000</yaxismin>
<yaxismax>100.0000</yaxismax>
<show_work_period></show_work_period>
<show_triggers></show_triggers>
<type></type>
<show_legend></show_legend>
<show_3d></show_3d>
<percent_left>0.0000</percent_left>
<percent_right>0.0000</percent_right>
<ymin_type_1></ymin_type_1>
<ymax_type_1></ymax_type_1>
<ymin_item_1></ymin_item_1>
<ymax_item_1></ymax_item_1>
<graph_items>
<graph_item>
<sortorder></sortorder>
<drawtype></drawtype>
<color>C80000</color>
<yaxisside></yaxisside>
<calc_fnc></calc_fnc>
<type></type>
<item>
<host>Template TCP Connection Status</host>
<key>tcp.status[closed]</key>
</item>
</graph_item>
<graph_item>
<sortorder></sortorder>
<drawtype></drawtype>
<color>00C800</color>
<yaxisside></yaxisside>
<calc_fnc></calc_fnc>
<type></type>
<item>
<host>Template TCP Connection Status</host>
<key>tcp.status[closewait]</key>
</item>
</graph_item>
<graph_item>
<sortorder></sortorder>
<drawtype></drawtype>
<color>0000C8</color>
<yaxisside></yaxisside>
<calc_fnc></calc_fnc>
<type></type>
<item>
<host>Template TCP Connection Status</host>
<key>tcp.status[closing]</key>
</item>
</graph_item>
<graph_item>
<sortorder></sortorder>
<drawtype></drawtype>
<color>C800C8</color>
<yaxisside></yaxisside>
<calc_fnc></calc_fnc>
<type></type>
<item>
<host>Template TCP Connection Status</host>
<key>tcp.status[established]</key>
</item>
</graph_item>
<graph_item>
<sortorder></sortorder>
<drawtype></drawtype>
<color>00C8C8</color>
<yaxisside></yaxisside>
<calc_fnc></calc_fnc>
<type></type>
<item>
<host>Template TCP Connection Status</host>
<key>tcp.status[finwait1]</key>
</item>
</graph_item>
<graph_item>
<sortorder></sortorder>
<drawtype></drawtype>
<color>C8C800</color>
<yaxisside></yaxisside>
<calc_fnc></calc_fnc>
<type></type>
<item>
<host>Template TCP Connection Status</host>
<key>tcp.status[finwait2]</key>
</item>
</graph_item>
<graph_item>
<sortorder></sortorder>
<drawtype></drawtype>
<color>C8C8C8</color>
<yaxisside></yaxisside>
<calc_fnc></calc_fnc>
<type></type>
<item>
<host>Template TCP Connection Status</host>
<key>tcp.status[lastack]</key>
</item>
</graph_item>
<graph_item>
<sortorder></sortorder>
<drawtype></drawtype>
<color></color>
<yaxisside></yaxisside>
<calc_fnc></calc_fnc>
<type></type>
<item>
<host>Template TCP Connection Status</host>
<key>tcp.status[listen]</key>
</item>
</graph_item>
<graph_item>
<sortorder></sortorder>
<drawtype></drawtype>
<color></color>
<yaxisside></yaxisside>
<calc_fnc></calc_fnc>
<type></type>
<item>
<host>Template TCP Connection Status</host>
<key>tcp.status[synrecv]</key>
</item>
</graph_item>
<graph_item>
<sortorder></sortorder>
<drawtype></drawtype>
<color></color>
<yaxisside></yaxisside>
<calc_fnc></calc_fnc>
<type></type>
<item>
<host>Template TCP Connection Status</host>
<key>tcp.status[synsent]</key>
</item>
</graph_item>
<graph_item>
<sortorder></sortorder>
<drawtype></drawtype>
<color></color>
<yaxisside></yaxisside>
<calc_fnc></calc_fnc>
<type></type>
<item>
<host>Template TCP Connection Status</host>
<key>tcp.status[timewait]</key>
</item>
</graph_item>
</graph_items>
</graph>
</graphs>
</zabbix_export>
zabbix加入TCP连接数及状态的监控的更多相关文章
- zabbix系列(七)zabbix3.0添加对tcp连接数及状态的监控
原理: netstat -an|awk '/^tcp/{++S[$NF]}END{for(a in S) print a,S[a]}' TIME_WAIT 79 ESTABLISHED 6 LISTE ...
- 使用ss命令对tcp连接数和状态的监控性能优化
之前对tcp的监控采用netstat命令,发现在服务器繁忙的时候效果不理想,这个命令占用大量的cpu有时候高达90%以上,可能会导致业务的不稳定,所以改用ss命令对脚本进行优化 对tcp连接数和状态的 ...
- zabbix3.0对tcp连接数和状态的监控优化
zabbix3.0对tcp连接数及状态的监控优化 之前对tcp的监控采用netstat命令,发现在服务器繁忙的时候效果不理想,这个命令占用大量的cpu有时候高达90%以上,可能会导致业务的不稳定,所以 ...
- zabbix3.0使用ss命令对tcp连接数和状态的监控性能优化
zabbix3.0对tcp连接数及状态的监控优化 之前对tcp的监控采用netstat命令,发现在服务器繁忙的时候效果不理想,这个命令占用大量的cpu有时候高达90%以上,可能会导致业务的不稳定,所以 ...
- Linux下查看tcp连接数及状态
netstat -n | awk ‘/^tcp/ {++S[$NF]} END {for(a in S) print a, S[a]}’ TIME_WAIT 8947FIN_WAIT1 15FIN_W ...
- zabbix 监控 tcp 连接数
一.zabbix-agent 服务器配置 1.编辑zabbix_agent配置文件,添加以下内容 vim /etc/zabbix/zabbix_agentd.conf ##添加此行 UserParam ...
- zabbix经常报警elasticsearch节点TCP连接数过高问题
单服务器最大tcp连接数及调优汇总 单机最大tcp连接数 网络编程 在tcp应用中,server事先在某个固定端口监听,client主动发起连接,经过三路握手后建立tcp连接.那么对单机,其最大并发t ...
- 服务器最大TCP连接数及调优汇总
启动线程数: 启动线程数=[任务执行时间/(任务执行时间-IO等待时间)]*CPU内核数 最佳启动线程数和CPU内核数量成正比,和IO阻塞时间成反比.如果任务都是CPU计算型任务,那么线程数最多不超过 ...
- 单服务器最大tcp连接数及调优汇总
启动线程数: 启动线程数=[任务执行时间/(任务执行时间-IO等待时间)]*CPU内核数 最佳启动线程数和CPU内核数量成正比,和IO阻塞时间成反比.如果任务都是CPU计算型任务,那么线程数最多不超过 ...
随机推荐
- nodejs开发——require与exports的使用
nodejs开发——require与exports的使用 另一片文章总结:http://www.cnblogs.com/hfultrastrong/p/8036682.html require req ...
- .gitignore不生效解决办法
.gitignore只能忽略那些原来没有被track的文件,如果某些文件已经被纳入了版本管理中,则修改.gitignore是无效的.那么解决方法就是先把本地缓存删除(改变成未track状态),然后再提 ...
- 如何配置propagation
配置spring事务代理时的事务属性. <prop key=“get*”>PROPAGATION_REQUIRED,readOnly</prop> 表示类方法名称是以get开头 ...
- C艹 指针和const的关系和注意事项(非常有意思)
有两种不同的形式将const关键字指向指针. 第一种:让指针指向一个常量对象 const float g_moon = 1.63; float * pm = &g_moon; // 不允许 n ...
- 根据URL获取参数值得出json结果集,对外给一个接口让别人调用
背景:测试接口的时候,经常都是后端get\post请求直接返回json结果集,很想知道实现方式,虽然心中也大概了解如何实现,但还不如自己来一遍踏实! 先来看一下结果吧: 以下对一个web的get接口进 ...
- 利用MATLAB进行曲线拟合
软件环境:MATLAB2013a 一.多项式拟合 多项式拟合是利用多项式最佳地拟合观测数据,使得在观测数据点处的误差平方和最小. 在MATLAB中,利用函数ployfit和ployval进行多项式拟合 ...
- Spring系列(一):Spring的基本概念及其核心
一.Spring是什么 Spring是一种多层的J2EE应用程序框架,其核心就是提供一种新的机制管理业务对象及其依赖关系. 二.为什么要使用Spring 1. 降低组件之间的耦合度,实现软件各层之间的 ...
- Java如何比较两个数组是否相等?
在Java中,如何检查两个数组是否相等? 示例 以下示例显示如何使用数组的equals()方法来检查两个数组是否相等. package com.yiibai; import java.util.*; ...
- unity---------------------关于BuildAssetBundles的使用(打包)
using UnityEditor;using UnityEngine; public class BuildAssetBundle{ /// <summary> /// 点击后,所有设置 ...
- C# 大图片压缩算法,减少图片体积
声明: 图片压缩算法,不建议对小图片进行压缩,一般文件小于1m的,真心没必要压缩, 图片很小的,例如:几百KB的图片,有可能不会减少图片体积,反而压缩后更大,也很正常, 请大家合理使用,并不是,所有图 ...