CentOS6.6+Puppet3.7.4分布式部署Nagios监控系统
测试框架
|
1
2
3
4
5
6
7
8
9
10
11
12
13
14
15
16
17
18
19
20
21
|
CentOS-6.6-x86_64(minimal)puppet-3.7.4nagios-4.0.8.tar.gznagios-plugins-2.0.3.tar.gznrpe-2.15.tar.gz192.168.188.10 mirrors.redking.com192.168.188.20 master.redking.com192.168.188.20 nagios.redking.com192.168.188.31 agent1.redking.com192.168.188.32 agent2.redking.com192.168.188.33 agent3.redking.com |
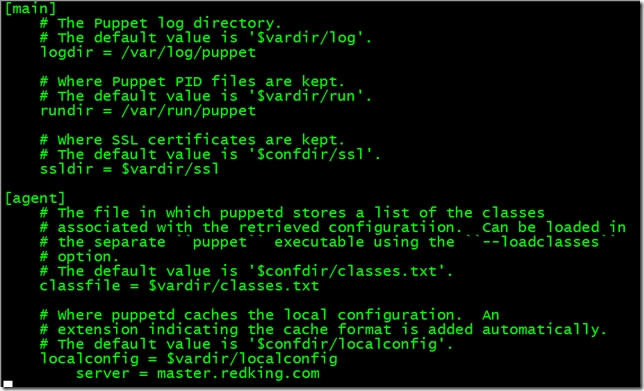
Puppet 要求所有机器有完整的域名(FQDN),如果没有 DNS 服务器提供域名的话,可以在两台机器上设置主机名(注意要先设置主机名再安装 Puppet,因为安装 Puppet 时会把主机名写入证书,客户端和服务端通信需要这个证书),因为我配置了DNS,所以就不用改hosts了,如果没有就需要改hosts文件指定。
1.关闭selinux,iptables,并设置ntp 采用CentOS-6.6-x86_64.iso进行minimal最小化安装
关闭selinux
|
1
2
3
4
5
6
7
8
9
10
11
12
13
14
15
16
17
18
19
20
21
22
23
24
25
26
27
28
29
30
31
32
33
34
35
36
37
38
39
40
41
42
43
44
45
46
47
|
[root@master ~]# cat /etc/selinux/config # This file controls the state of SELinux on the system. # SELINUX= can take one of these three values: # enforcing - SELinux security policy is enforced. # permissive - SELinux prints warnings instead of enforcing. # disabled - No SELinux policy is loaded. SELINUX=enforcing # SELINUXTYPE= can take one of these two values: # targeted - Targeted processes are protected, # mls - Multi Level Security protection. SELINUXTYPE=targeted [root@master ~]# sed -i '/SELINUX/ s/enforcing/disabled/g' /etc/selinux/config [root@master ~]# cat /etc/selinux/config # This file controls the state of SELinux on the system. # SELINUX= can take one of these three values: # enforcing - SELinux security policy is enforced. # permissive - SELinux prints warnings instead of enforcing. # disabled - No SELinux policy is loaded. SELINUX=disabled # SELINUXTYPE= can take one of these two values: # targeted - Targeted processes are protected, # mls - Multi Level Security protection. SELINUXTYPE=targeted [root@master ~]# setenforce 0 |
停止iptables
|
1
2
3
4
5
6
7
8
9
10
11
12
13
14
15
16
17
18
19
20
21
22
23
24
25
26
27
|
[root@node1 ~]# chkconfig --list |grep tables ip6tables 0:off 1:off 2:on 3:on 4:on 5:on 6:off iptables 0:off 1:off 2:on 3:on 4:on 5:on 6:off [root@node1 ~]# chkconfig ip6tables off [root@node1 ~]# chkconfig iptables off [root@node1 ~]# service ip6tables stop ip6tables: Setting chains to policy ACCEPT: filter [ OK ] ip6tables: Flushing firewall rules: [ OK ] ip6tables: Unloading modules: [ OK ] [root@node1 ~]# service iptables stop iptables: Setting chains to policy ACCEPT: filter [ OK ] iptables: Flushing firewall rules: [ OK ] iptables: Unloading modules: [ OK ] [root@node1 ~]# |
设置ntp
|
1
2
3
4
5
6
7
8
9
10
11
12
13
14
15
|
[root@master ~]# ntpdate pool.ntp.org[root@master ~]# chkconfig --list|grep ntp ntpd 0:off 1:off 2:off 3:off 4:off 5:off 6:off ntpdate 0:off 1:off 2:off 3:off 4:off 5:off 6:off [root@master ~]# chkconfig ntpd on [root@master ~]# service ntpd start Starting ntpd: [ OK ] [root@master ~]# |
2.安装puppet服务 puppet不在CentOS的基本源中,需要加入 PuppetLabs 提供的官方源:
|
1
2
3
4
5
|
[root@master ~]# wget http://yum.puppetlabs.com/el/6/products/x86_64/puppetlabs-release-6-7.noarch.rpm [root@master ~]# rpm -ivh puppetlabs-release-6-7.noarch.rpm [root@master ~]# yum update -y |
在 master上安装和启用 puppet 服务:
|
1
2
3
4
5
6
7
8
9
10
11
12
13
14
15
|
[root@master ~]# yum install -y puppet-server[root@master ~]# chkconfig puppet on [root@master ~]# chkconfig puppetmaster on[root@master ~]# service puppet startStarting puppet agent: [ OK ][root@master ~]# service puppetmaster startStarting puppetmaster: [ OK ][root@master ~]# |
在clients上安装puppet客户端
|
1
2
3
4
5
|
[root@agent1 ~]# yum install -y puppet [root@agent1 ~]# chkconfig puppet on [root@agent1 ~]# service puppet start |
3.配置puppet
对于puppet 客户端,修改/etc/puppet/puppet.conf,指定master服务器
并重启puppet服务
|
1
|
[root@agent1 ~]# service puppet restart |
4.Client申请证书 服务端自动签发证书设置 设置master自动签发所有的证书,我们只需要在/etc/puppet目录下创建 autosign.conf文件。(不需要修改 /etc/puppet/puppet.conf文件,因为我默认的autosign.conf 文件的位置没有修改)
|
1
2
3
4
5
6
7
8
9
10
11
12
13
|
[root@master ~]# cat > /etc/puppet/autosign.conf <<EOF > *.redking.com> EOF[root@master ~]# service puppetmaster restart Stopping puppetmaster: [ OK ]Starting puppetmaster: [ OK ][root@master ~]# |
这样就会对所有来自fisteam2.com的机器的请求,都自动签名。 client需要向服务器端发出请求, 让服务器对客户端进行管理. 这其实是一个证书签发的过程. 第一次运行 puppet 客户端的时候会生成一个 SSL 证书并指定发给 Puppet 服务端, 服务器端如果同意管理客户端,就会对这个证书进行签发,可以用这个命令来签发证书,由于我们已经在客户端设置了server地址,因此不需要跟服务端地址
|
1
|
[root@agent1 ~]# puppet agent --test |
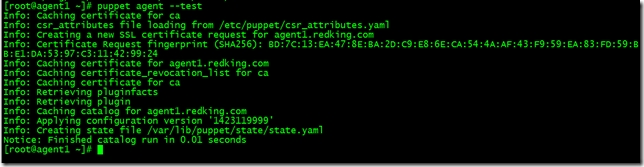
就可以申请证书了,由于我配置的自动签发证书,所以直接就签发了,在服务端执行
|
1
|
[root@master ~]# puppet cert list --all |

Nagios服务器安装
1.安装Nagios相关依赖包
|
1
|
[root@master ~]# yum install -y httpd php gcc glibc glibc-common gd gd-devel openssl-devel |
2.创建Nagios用户与组
|
1
2
3
|
[root@master ~]# useradd -m nagios[root@master ~]# passwd nagios |
创建nagcmd用户组以执行来自Web接口命令,并添加nagios和apache用户到此用户组
|
1
2
3
4
5
|
[root@master ~]# groupadd nagcmd[root@master ~]# usermod -a -G nagcmd nagios[root@master ~]# usermod -a -G nagcmd apache |
3.下载Nagios和Plugins软件包
http://www.nagios.org/download/下载Nagios Core和Nagios Plugins

4.编译安装Nagios
|
1
2
3
|
[root@master tmp]# tar zxf nagios-4.0.8.tar.gz [root@master tmp]# cd nagios-4.0.8 |
#运行Nagios配置脚本,并把nagcmd更改为之前所创建的组
|
1
|
[root@master nagios-4.0.8]# ./configure --with-command-group=nagcmd |
#编译Nagios源码
|
1
|
[root@master nagios-4.0.8]# make all |
#安装二进制文件、init脚本文件、sample配置文件,设置外部命令目录权限
|
1
2
3
4
5
6
7
|
[root@master nagios-4.0.8]# make install[root@master nagios-4.0.8]# make install-init[root@master nagios-4.0.8]# make install-config[root@master nagios-4.0.8]# make install-commandmode |
5.修改配置文件
样式配置文件位于/usr/local/nagios/etc目录,可以更改email地址
|
1
|
[root@master nagios-4.0.8]# vim /usr/local/nagios/etc/objects/contacts.cfg |
6.配置Web界面
在Apache的conf.d目录中安装Nagios Web配置文件
|
1
|
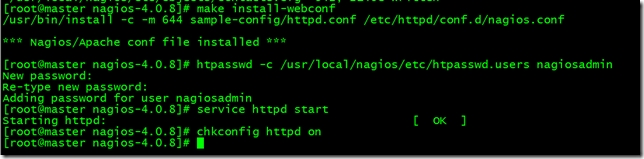
[root@master nagios-4.0.8]# make install-webconf |
创建nagiosadmin帐号登录Nagios Web接口
|
1
2
3
4
5
6
7
|
[root@master nagios-4.0.8]# htpasswd -c /usr/local/nagios/etc/htpasswd.users nagiosadmin[root@master nagios-4.0.8]# service httpd startStarting httpd: [ OK ][root@master nagios-4.0.8]# chkconfig httpd on |
开启httpd服务使配置生效并设置开机自启
7.编译安装Nagios Plugins
|
1
2
3
4
5
6
7
|
[root@master tmp]# tar zxvf nagios-plugins-2.0.3.tar.gz [root@master tmp]# cd nagios-plugins-2.0.3[root@master nagios-plugins-2.0.3]# ./configure --with-nagios-user=nagios --with-nagios-group=nagios[root@master nagios-plugins-2.0.3]# make && make install |
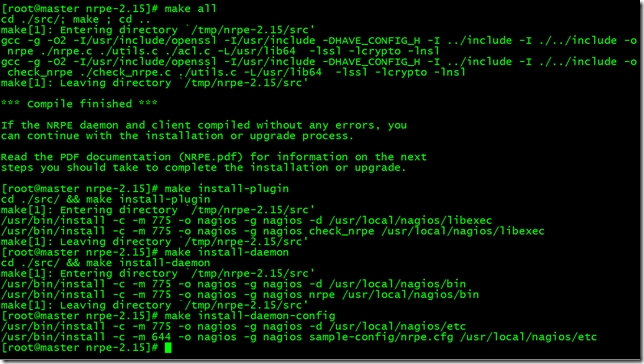
8.编译安装Nrpe
|
1
2
3
4
5
6
7
8
9
10
11
|
[root@master tmp]# tar zxvf nrpe-2.15.tar.gz[root@master nrpe-2.15]# ./configure[root@master nrpe-2.15]# make all[root@master nrpe-2.15]# make install-plugin[root@master nrpe-2.15]# make install-daemon[root@master nrpe-2.15]# make install-daemon-config |
9.启动Nagios
本机监控HTTP SSH的Notifications显示警告错误,解决方法
|
1
2
3
4
5
6
7
8
9
10
11
12
13
14
15
16
17
18
19
20
21
22
23
24
25
26
27
28
29
30
31
32
33
34
35
36
37
38
39
|
[root@master ~]# vim /usr/local/nagios/etc/objects/localhost.cfg# Define a service to check SSH on the local machine.# Disable notifications for this service by default, as not all users may have SSH enabled.define service{use local-service ; Name of service template to usehost_name localhostservice_description SSHcheck_command check_sshnotifications_enabled 1 #改为1,即可}# Define a service to check HTTP on the local machine.# Disable notifications for this service by default, as not all users may have HTTP enabled.define service{use local-service ; Name of service template to usehost_name localhostservice_description HTTPcheck_command check_httpnotifications_enabled 1 #改为1,即可}[root@master ~]# touch /var/www/html/index.html |
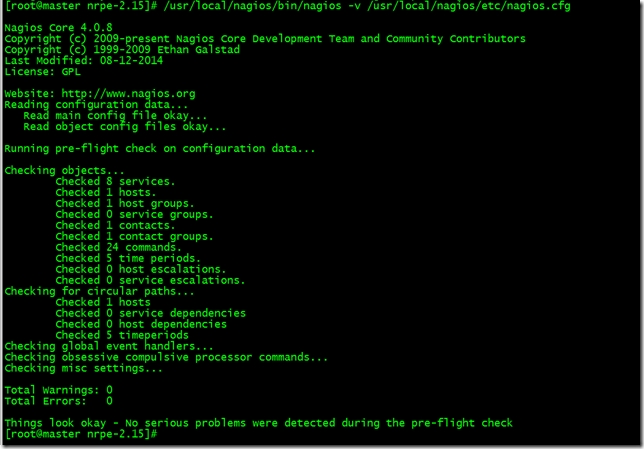
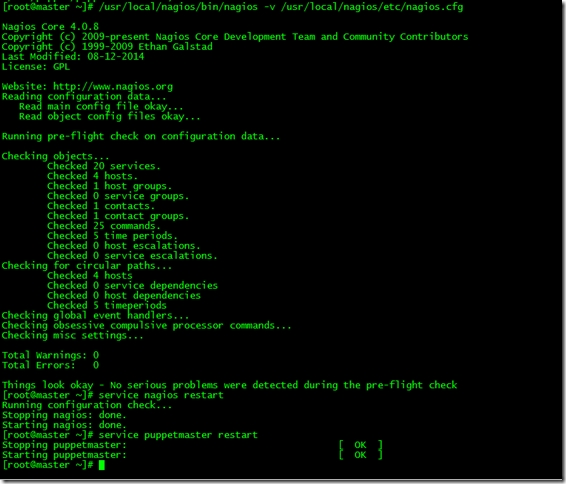
启动Nagios之前测试配置文件
|
1
|
[root@master ~]# /usr/local/nagios/bin/nagios -v /usr/local/nagios/etc/nagios.cfg |
启动Nagios、nrpe并设置开机自启
|
1
2
3
4
5
6
7
8
9
10
11
12
13
14
15
16
17
18
19
20
21
22
23
|
[root@master ~]# chkconfig nagios --add[root@master ~]# chkconfig --list |grep nagios nagios 0:off 1:off 2:off 3:on 4:on 5:on 6:off[root@master ~]# chkconfig nagios on[root@master ~]# service nagios startStarting nagios: done.[root@master ~]# echo "/usr/local/nagios/bin/nrpe -c /usr/local/nagios/etc/nrpe.cfg -d" >> /etc/rc.d/rc.local[root@master nrpe-2.15]# /usr/local/nagios/bin/nrpe -c /usr/local/nagios/etc/nrpe.cfg -d [root@master nrpe-2.15]# netstat -tunpl |grep nrpe tcp 0 0 0.0.0.0:5666 0.0.0.0:* LISTEN 70100/nrpetcp 0 0 :::5666 :::* LISTEN 70100/nrpe[root@master nrpe-2.15]# |
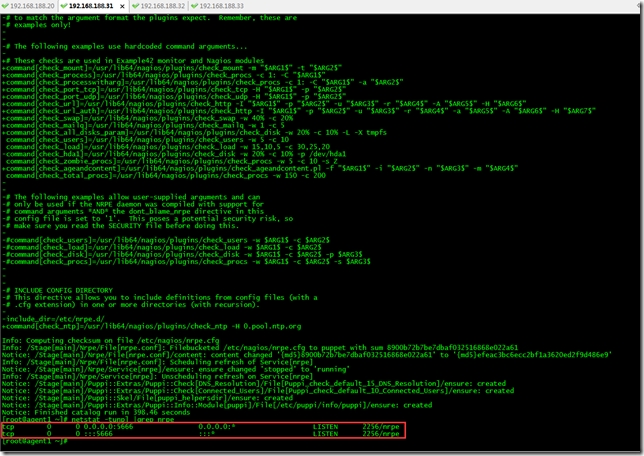
执行/usr/local/nagios/libexec/check_nrpe -H 127.0.0.1检查连接是否正常

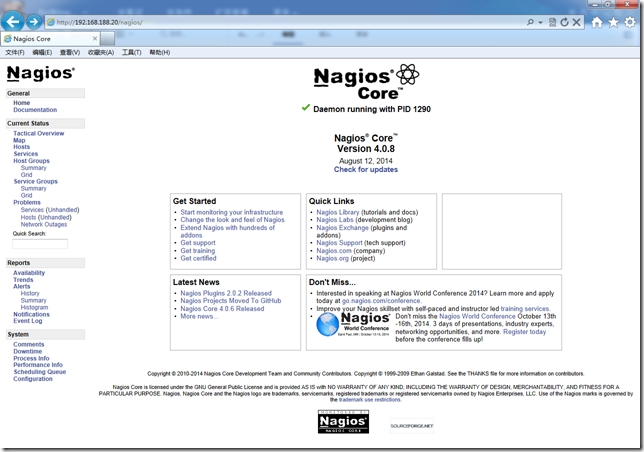
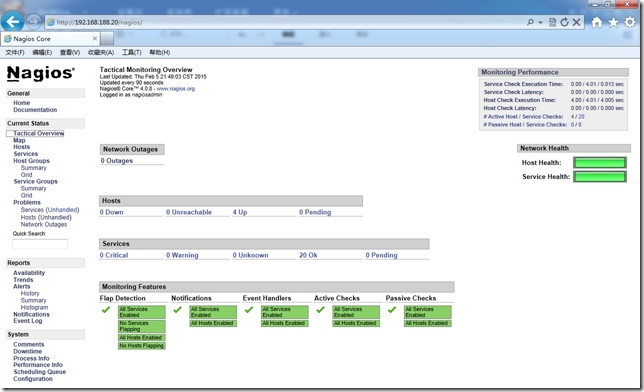
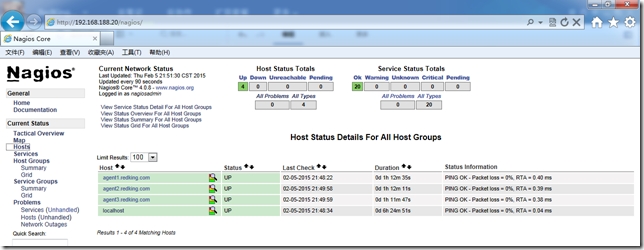
使用之前定义的nagiosadmin帐号与密码登录Nagios,地址:http://192.168.188.20/nagios/
创建Nagios客户端监控
1.Puppet Master安装相应模块
Nagios没有目前没有提供官方软件源,在批量部署时可以使用第三方epel源,采用Example42所提供的puppet-nrpe来实现Linux服务器批量部署。部署客户端使用官方3个模块:epel、nrpe、puppi。
epel模块用于安装nrpe软件,nrpe模块用于收集主机信息,puppi属于Example42模块组件,使用Example42模块时都需要加载此模块。
Puppi是一个Puppet模块和CLI命令,他可以标准化和自动化快速部署应用程序,并提供快速和标准查询命令,检查系统资源。
|
1
2
3
4
5
6
7
8
9
10
11
12
13
|
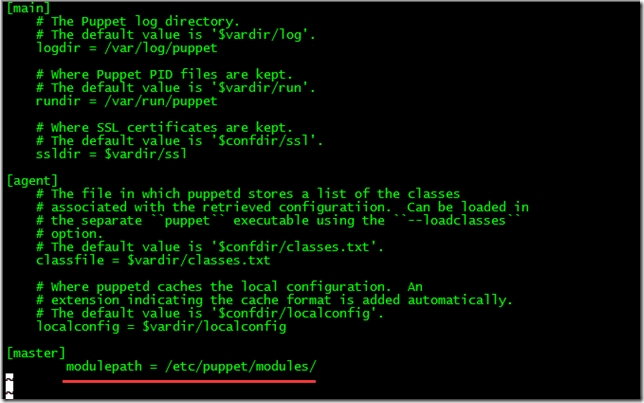
[root@master ~]# git clone https://github.com/puppetlabs/puppetlabs-stdlib /etc/puppet/modules/stdlib[root@master ~]# git clone https://github.com/example42/puppi /etc/puppet/modules/puppi[root@master ~]# git clone https://github.com/example42/puppet-nrpe /etc/puppet/modules/nrpe[root@master ~]# puppet module install stahnma/epel[root@master ~]# vim /etc/puppet/puppet.conf [master]modulepath = /etc/puppet/modules/ |
2.创建agent节点组配置文件
|
1
2
3
4
5
6
7
8
9
10
11
12
13
14
15
16
17
18
19
20
21
22
23
24
25
26
27
|
[root@master ~]# mkdir /etc/puppet/manifests/nodes[root@master ~]# vim /etc/puppet/manifests/nodes/agentgroup.ppnode /^agent\d+\.redking\.com$/ {include stdlibinclude epelclass { 'puppi': }class { 'nrpe': require => Class['epel'],allowed_hosts => ['127.0.0.1',$::ipaddress,'192.168.188.20'],template => 'nrpe/nrpe.cfg.erb',}}[root@master ~]# vim /etc/puppet/manifests/site.ppimport "nodes/agentgroup.pp" |
3.配置Nagios添加agent.redking.com主机监控
修改/usr/local/nagios/etc/objects/commands.cfg
command_name check_nrpe ——定义命令名称为check_nrpe,services.cfg必须使用
command_line $USER1$/check_nrpe -H $HOSTADDRESS$ -c $ARG1$ ——用$USER1$代替/usr/local/nagios/libexec
这是定义实际运行的插件程序.这个命令行的书写要完全按照check_nrpe这个命令的用法.不知道用法的就用check_nrpe –h查看; -c后面带的$ARG1$参数是传给nrpe daemon执行的检测命令,它必须是nrpe.cfg中所定义的5条命令中的其中一条。
|
1
2
3
4
5
6
7
8
9
10
11
|
[root@master ~]# vim /usr/local/nagios/etc/objects/commands.cfg # 'check_nrpe' command definitiondefine command{command_name check_nrpecommand_line $USER1$/check_nrpe -H $HOSTADDRESS$ -c $ARG1$} |
修改/usr/local/nagios/etc/nagios.cfg
|
1
2
3
4
5
6
7
|
[root@master ~]# vim /usr/local/nagios/etc/nagios.cfg cfg_file=/usr/local/nagios/etc/objects/agent1.redking.com.cfgcfg_file=/usr/local/nagios/etc/objects/agnet2.redking.com.cfgcfg_file=/usr/local/nagios/etc/objects/agent3.redking.com.cfg |
增加agent1~3.redking.com.cfg配置文件
|
1
2
3
4
5
6
7
8
9
10
11
12
13
14
15
16
17
18
19
20
21
22
23
24
25
26
27
28
29
30
31
32
33
34
35
36
37
38
39
40
41
42
43
44
45
46
47
48
49
50
51
52
53
54
55
56
57
58
59
60
61
|
# vim /usr/local/nagios/etc/objects/agent1.redking.com.cfgdefine host{use linux-serverhost_name agent1.redking.comalias agent1.redking.comaddress 192.168.188.31}define service{use generic-servicehost_name agent1.redking.comservice_description PINGcheck_command check_ping!100.0,20%!500.0,60%}define service{use generic-servicehost_name agent1.redking.comservice_description Current Userscheck_command check_nrpe!check_users!10!5}define service{use generic-servicehost_name agent1.redking.comservice_description Current Loadcheck_command check_nrpe!check_load!15,10,5!30,25,20}define service{use generic-servicehost_name agent1.redking.comservice_description Swap Usagecheck_command check_nrpe!check_swap!20!40} |
检测Nagios服务并重启使配置生效
|
1
2
3
4
5
|
[root@master ~]# /usr/local/nagios/bin/nagios -v /usr/local/nagios/etc/nagios.cfg [root@master ~]# service nagios restart[root@master ~]# service puppetmaster restart |
客户端测试
|
1
|
[root@agent1 ~]# puppet agent --test |
客户端自动部署nrpe
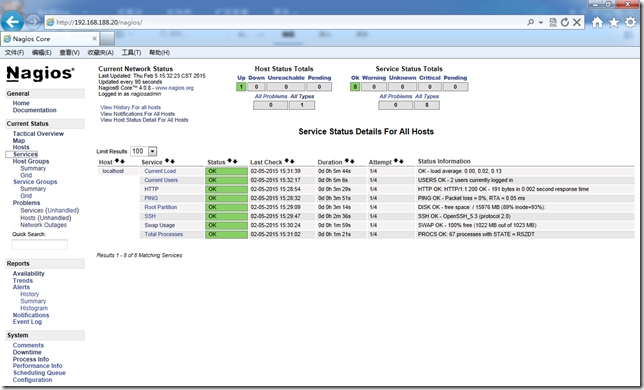
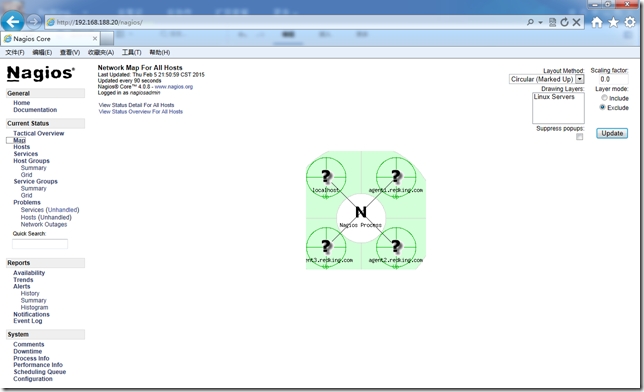
下面我们来看下客户端自动化部署nrpe后采集信息的nagios监控界面
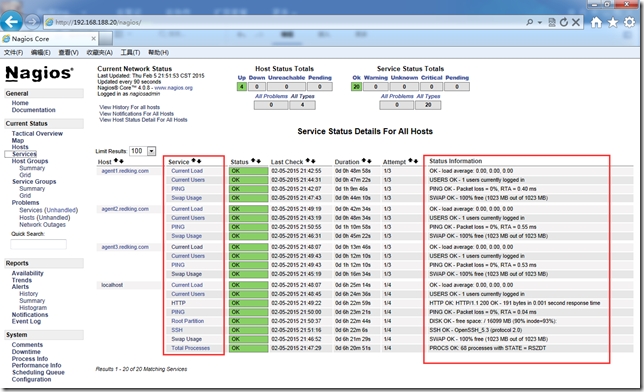
NRPE模块中定义的nrpe.cfg包含大量脚本,我们可以直接拿来使用当然也可以自己修改nrpe.cfg.erb模板内容。在批量部署时可以分别采用自己编写的模块或者现有模块来实现,利用现有模块几乎能实现系统管理日常工作中90%任务,剩余的10%我们可以根据生产业务来自己定制。
========================END=================================
http://redking.blog.51cto.com/27212/1612136
CentOS6.6+Puppet3.7.4分布式部署Nagios监控系统的更多相关文章
- CentOS 7.4 下安装部署Nagios监控系统详细攻略(三)
Nagios是一个流行的电脑系统和网络监控程序,它检测主机和服务,当异常发生和解除时能提醒用户.它是基于GPLv2开发的开源软件,可免费获得及使用. nagios工作原理 nagios的功能是监控服务 ...
- Nagios监控系统部署(源码)
1. 概述2. 部署Nagios2.1 创建Nagios用户组2.2 下载Nagios和Nagios-plugin源码2.3 编译安装3. 部署Nagios-plugin3.1 编译安装nagios- ...
- Nagios监控系统部署(源码)(四)
Nagios监控系统部署(源码) 1. 概述2. 部署Nagios2.1 创建Nagios用户组2.2 下载Nagios和Nagios-plugin源码2.3 编译安装3. 部署Nagios-pl ...
- Nagios 监控系统架设全攻略
Nagios 全名为(Nagios Ain’t Goona Insist on Saintood),最初项目名字是 NetSaint.它是一款免费的开源 IT 基础设施监控系统,其功能强大,灵活性强, ...
- CentOS 6.5安装部署Zabbix监控系统
CentOS 6.5安装部署Zabbix监控系统 先说一点废话,我没有用centos7做实验,讲真,centos 7我也不常用,喜欢新版本的同学其实可以尝试下,注意一点的就是centos 6.5只支持 ...
- Nagios 监控系统架构
Nagios 监控系统架设全攻略 简介: Nagios 全名为(Nagios Ain’t Goona Insist on Saintood),最初项目名字是 NetSaint.它是一款免费的开源 IT ...
- Ganglia+Nagios监控系统
第1章 简介 ganglia是一款为HPC(高性能计算) 集群设计的可扩展性 的分布式监控系统,它可以监视和显示集群中节点的各种状态信息,他由运行在各个节点上的gmond守护进程来采集 CPU.内存. ...
- Nagios监控系统的安装
环境:centOS 6.5 X86 64位 nagios-4.08 步骤: 1. 最小化安装系统 2. 修改安全特性 关闭SELINUX SELINUX=disabled 清除iptabl ...
- Hawkeye部署Github监控系统
2019独角兽企业重金招聘Python工程师标准>>> step1:python环境安装 #pwd /usr/local/soft #wget https://www.python. ...
随机推荐
- (转)探索C++的秘密之详解extern "C",这就是为什么很多.lib被我们正确调用确总是无法解析的。
(转载,绝对的有用) lib被我们正确调用确总是无法解析.这是C++编译和C编译的区别 时常在cpp的代码之中看到这样的代码: #ifdef __cplusplus extern "C&qu ...
- Vue2.X的路由管理记录之 钩子函数(切割流水线)2
$route可以在子组件任何地方调用,代表当前路由对象,这个属性是只读的,里面的属性是 immutable(不可变) 的,不过你可以 watch(监测变化) 它. 导航和钩子函数: 导航:路由正在发生 ...
- 基于tiny4412的Linux内核移植 -- SD卡驱动移植(五)
作者信息 作者: 彭东林 邮箱:pengdonglin137@163.com QQ:405728433 平台简介 开发板:tiny4412ADK + S700 + 4GB Flash 要移植的内核版本 ...
- 基于Nginx的开墙方案
Kubernetes集群内部通过服务名能进行相互调用,但如果Kubernetes中的pod需要调用外部服务,而且这些外部服务是属于不同的安全区域,就面临开墙的问题,因为Kubernetes Pod能够 ...
- go语言基础之iota枚举
1.iota (在常量的时候,当成枚举使用) 示例1 package main import "fmt" func main() { //1.iota常量自动生成器,每个一行,自动 ...
- http://m.blog.csdn.net/article/details?id=2630620
http://m.blog.csdn.net/article/details?id=2630620
- python灰帽子学习感想
Gray Hat Python Python Programming for hackers and reverse engineers Python灰帽子:黑客与逆向project师的Python编 ...
- python 实现计算数独
输入文件格式: 008309100900060004007504800036000540001000600042000970005907300600010008004608200 输出结果: yuan ...
- Kudu – 在快数据上的进行快分析的存储
转自: http://www.tuicool.com/articles/nmYf2uf Cloudera Impala Kudu – 在快数据上的进行快分析的存储 Kudu,对应中文的含义应该 ...
- SQL Server datetime数据类型设计、优化误区
一.场景 在SQL Server 2005中,有一个表TestDatetime,其中Dates这个字段的数据类型是datetime,如果你看到表的记录如下图所示,你最先想到的是什么呢? (图1:数据列 ...