EF6 CodeFirst+Repository+Ninject+MVC4+EasyUI实践(七)
前言
- 上一篇文章我们完成了系统角色管理的基本功能实现,也对系统层次结构进行了了解。这一篇我们将继续对系统的用户管理模块进行代码编写。代码没有做封装,所以大部分的逻辑代码都是相通的,只是在一些前端的细节上处理有些不同。源码将在文章的末尾给出,有兴趣的园友可以对代码做一些封装或重构,毕竟这可以减少很多的代码量。
Abstract层
- 在这一层添加对用户管理操作的业务接口IS_UserRepository,里面定义增删改查的业务接口。代码如下:
using Entities;

using System.Collections.Generic;

namespace Abstract

{

    public interface IS_UserRepository

    {

        bool Add(S_User model);

        bool Update(S_User model);

        bool Delete(long id);

        List<S_User> GetInfo(string strWhere, int rows, int page, out int total);

    }

}
Concrete层
- 这一层我们添加S_UserRepository类,实现用户管理需要的操作方法。由于在页面上操作需要显示用户所属的角色信息,所以在这里的查询会启用延迟加载。代码如下:
using System.Collections.Generic;

using System.Linq;

using Abstract;

using Entities;

namespace Concrete

{

    public class S_UserRepository : IS_UserRepository

    {

        private EFDbContext context = new EFDbContext();

        public bool Add(S_User model)

        {

            try

            {

                if (null != model)

                {

                    context.S_Users.Add(model);

                    context.SaveChanges();

                    return true;

                }

                else

                {

                    return false;

                }

            }

            catch

            {

                return false;

            }

        }

        public bool Update(S_User model)

        {

            try

            {

                if (null != model)

                {

                    S_User oldModel = context.S_Users.FirstOrDefault(x => x.ID == model.ID);

                    //oldModel.UserName = model.UserName;

                    //oldModel.UserPwd = model.UserPwd;

                    oldModel.Email = model.Email;

                    oldModel.IsUse = model.IsUse;

                    oldModel.Phone = model.Phone;

                    oldModel.Remark = model.Remark;

                    oldModel.RoleID = model.RoleID;

                    context.SaveChanges();

                    return true;

                }

                else

                {

                    return false;

                }

            }

            catch

            {

                return false;

            }

        }

        public bool Delete(long id)

        {

            try

            {

                if (null != id)

                {

                    S_User model = context.S_Users.FirstOrDefault(x => x.ID == id);

                    if (null != model)

                    {

                        context.S_Users.Remove(model);

                        context.SaveChanges();

                        return true;

                    }

                    else

                    {

                        return false;

                    }

                }

                else

                {

                    return false;

                }

            }

            catch

            {

                return false;

            }

        }

        public List<S_User> GetInfo(string strWhere, int rows, int page, out int total)

        {

            context.Configuration.ProxyCreationEnabled = true;

            context.Configuration.LazyLoadingEnabled = true;

            List<S_User> listData = new List<S_User>();

            if (!string.IsNullOrEmpty(strWhere))

            {

                listData = context.S_Users.Where(x => x.UserName.Contains(strWhere)).ToList();

            }

            else

            {

                listData = context.S_Users.ToList();

            }

            var results = listData.OrderByDescending(p => p.ID).Skip((page - ) * rows).Take(rows);

            total = listData.Count();

            return results.ToList();

        }

    }

}
Web层
- 首先在NinjectControllerFactory类中追加对用户管理的解耦操作的绑定,代码如下:
        private void AddBindings()

        {

            // put additional bindings here

             ninjectKernel.Bind<IS_RoleRepository>().To<S_RoleRepository>();

             ninjectKernel.Bind<IS_UserRepository>().To<S_UserRepository>();

        }
- 在MVC的Models中定义页面需要绑定的数据模型对象,这里我们将数据模型类都定义在mod_S_User类中。mod_S_User和mod_S_UserPage用于绑定EasyUI的datagrid中的数据集合。RoleData用户绑定EasyUI的combobox下拉框中的角色列表。代码如下:
using System.Collections.Generic;

namespace Web.Models

{

    public class mod_S_User

    {

        public long ID { get; set; }

        public long RoleID { get; set; }

        public string RoleName { get; set; }

        public string UserName { get; set; }

        public string UserPwd { get; set; }

        public string IsUse { get; set; }

        public string Phone { get; set; }

        public string Email { get; set; }

        public string Remark { get; set; }

    }

    public class RoleData

    {

        public long RoleID { get; set; }

        public string RoleName { get; set; }

    }

    public class mod_S_UserPage

    {

        public string total { get; set; }

        public List<mod_S_User> rows { get; set; }

    }

}
- 在MVC的SystemController中添加对用户管理接口IS_UserRepository的依赖注入,代码如下:
      private IS_RoleRepository IS_Role;

        private IS_UserRepository IS_User;

        public SystemController(IS_RoleRepository _S_Role, IS_UserRepository _S_User)

        {

            this.IS_Role = _S_Role;

            this.IS_User = _S_User;

        }
- 在MVC的SystemController中完成对用户管理操作的页面逻辑处理代码。代码如下:
#region log20150704 Create By Jack:系统用户操作

        public ActionResult UserList()

        {

            return View();

        }

        public ActionResult GetUsers(string strWhere, int rows, int page = )

        {

            mod_S_UserPage DataModel = new mod_S_UserPage();

            List<mod_S_User> listViewData = new List<mod_S_User>();

            int total;  //必须定义参数变量接收out参数

            List<S_User> listData = IS_User.GetInfo(strWhere, rows, page, out total);

            foreach (var item in listData)

            {

                mod_S_User model = new mod_S_User();

                model.ID = item.ID;

                model.UserName = item.UserName;

                model.UserPwd = item.UserPwd;

                model.RoleID = item.S_Role.ID;

                model.RoleName = item.S_Role.RoleName;

                model.IsUse = item.IsUse;

                model.Email = item.Email;

                model.Phone = item.Phone;

                model.Remark = item.Remark;

                listViewData.Add(model);

            }

            DataModel.total = total.ToString();

            DataModel.rows = listViewData;

            return Json(DataModel, JsonRequestBehavior.AllowGet);

        }

        public ActionResult CreateUser(S_User dataModel)

        {

            bool rtnFalg = false;

            if (Request.IsAjaxRequest())

            {

                if (dataModel.ID == )  //0为ID的默认值

                {

                    dataModel.ID = NewID.NewComb();

                    rtnFalg = IS_User.Add(dataModel);

                }

                else

                {

                    rtnFalg = IS_User.Update(dataModel);

                }

                if (rtnFalg == true)

                {

                    return Json(new { flag = true });

                }

                else

                {

                    return Json(new { flag = false });

                }

            }

            else

            {

                return Json(new { flag = false });

            }

        }

        [HttpPost]

        public ActionResult DeleteUser(long id)

        {

            if (id != )

            {

                bool rtnFlag = IS_User.Delete(id);

                if (rtnFlag == true)

                {

                    return Json(new { flag = true });

                }

                else

                {

                    return Json(new { flag = false });

                }

            }

            else

            {

                return Json(new { flag = false });

            }

        }

        public ActionResult BindRoles()

        {

            List<S_Role> listData = IS_Role.BindRoles();

            List<RoleData> BindData = new List<RoleData>();

            foreach (var item in listData)

            {

                RoleData model = new RoleData();

                model.RoleID = item.ID;

                model.RoleName = item.RoleName;

                BindData.Add(model);

            }

            return Json(BindData, JsonRequestBehavior.AllowGet);

        }

        #endregion
- 注意绑定页面角色下拉框中的角色列表的方法是定义在IS_RoleRepository中的,所以应该在S_RoleRepository中追加该方法的实现,代码如下:
    public List<S_Role> BindRoles()

        {

            context.Configuration.ProxyCreationEnabled = false;

            context.Configuration.LazyLoadingEnabled = false;

            List<S_Role> listData = new List<S_Role>();

            listData = context.S_Roles.ToList();

            return listData;

        }
- 添加对页面用户管理视图UserList的代码,在此页面有两个注意的地方:
- 页面的密码输入,需要验证两次输入的密码是否相等,这个可以通过Jquery的扩展方法解决。代码如下:
$.extend($.fn.validatebox.defaults.rules, {

    equalTo: { validator: function (value, param) { return $(param[]).val() == value; }, message: '字段不匹配' }

});
2. 页面的角色下拉框列表绑定是动态的,需要从数据库中读取。利用combobox的data-options属性,
我们可以向Controller中发起异步的get请求加载数据。代码如下:
<input class="easyui-combobox" id="RoleID" required="true"

                   name="RoleID"

                   data-options="

                    url:'/System/BindRoles',

                    method:'get',

                    valueField:'RoleID',

                    textField:'RoleName',

                    panelHeight:'auto',

                    width:">
3. UserList的完整代码如下:
@{

    ViewBag.Title = "UserList";

}

<script src="~/JSFunction/System_UserList.js"></script>

<style type="text/css">

    #fm {

        margin: ;

        padding: 10px 30px;

    }

    .ftitle {

        font-size: 14px;

        font-weight: bold;

        padding: 5px ;

        margin-bottom: 10px;

        border-bottom: 1px solid #ccc;

    }

    .fitem {

        margin-bottom: 5px;

    }

        .fitem label {

            display: inline-block;

            width: 80px;

        }

</style>

<div id="toolbar">

    <table cellpadding="">

        <tr>

            <td>用户ID:<input type="hidden" id="hid_optype" name="hid_optype" value="" /></td>

            <td><input class="easyui-validatebox textbox" type="text" name="ID" disabled="disabled"></input></td>

            <td>用户名:</td>

            <td><input class="easyui-validatebox textbox" type="text" name="UserName" id="txt_UserName"></input></td>

        </tr>

    </table>

    <div class="panelExten">

        <a href="javascript:void(0)" class="easyui-linkbutton" iconcls="icon-search" plain="true" onclick="ConditionSearch();">查询</a> |

        <a href="javascript:void(0)" class="easyui-linkbutton" iconcls="icon-add" plain="true" onclick="NewData();">新增</a> |

        <a href="javascript:void(0)" class="easyui-linkbutton" iconcls="icon-edit" plain="true" onclick="EditData();">编辑</a> |

        <a href="javascript:void(0)" class="easyui-linkbutton" iconcls="icon-remove" plain="true" onclick="DestroyData();">删除</a> |

        <a href="javascript:void(0)" class="easyui-linkbutton" iconcls="icon-undo" plain="true" onclick="ClearQuery();">清除</a>

    </div>

</div>

<table id="dg" class="easyui-datagrid" pagination="true"

       rownumbers="true" fit="true"

       fitcolumns="true" singleselect="true" toolbar="#toolbar" @*data-options="toolbar:toolbar"  *@

       fit="false" style=" height:500px;">

    <thead>

        <tr>

            <th data-options="field:'ck',checkbox:true"></th>

            <th field="ID" width="">

                主键ID

            </th>

            <th field="UserName" width="">

                用户名

            </th>

            <th field="Phone" width="">

                电话

            </th>

            <th field="Email" width="">

                邮箱

            </th>

            <th field="RoleID" width="" hidden="true">

                角色ID

            </th>

            <th field="RoleName" width="">

                所属角色

            </th>

            <th field="Remark" width="">

                备注

            </th>

        </tr>

    </thead>

</table>

<div id="dlg" class="easyui-dialog" style="width: 550px; height: 480px; padding: 10px 20px"

     closed="true" buttons="#dlg-buttons" modal="true">

    <form id="fm" method="post" novalidate>

        <div class="fitem" style=" display:none;">

            <label> 主键ID:</label>

            <input id="ID" name="ID" class="easyui-validatebox" required="true">

        </div>

        <div class="fitem">

            <label>用户名:</label>

            <input id="UserName" name="UserName" class="easyui-validatebox" required="true">

        </div>

        <div class="fitem" id="div_UserPwd">

            <label>密 码:</label>

            <input id="UserPwd" name="UserPwd" class="easyui-validatebox" required="true" type="password">

        </div>

        <div class="fitem" id="div_repassword">

            <label>确认密码:</label>

            <input name="repassword" id="repassword" class="easyui-validatebox" required="true" type="password"

                   validtype="equalTo['#UserPwd']" invalidmessage="两次输入密码不匹配" />

        </div>

        <div class="fitem">

            <label>是否启用:</label>

            <select class="easyui-combobox" name="IsUse" id="IsUse" style="width:134px;" required="true">

                <option value="是" selected>是</option>

                <option value="否">否</option>

            </select>

        </div>

        <div class="fitem">

            <label>所属角色:</label>

            <input class="easyui-combobox" id="RoleID" required="true"

                   name="RoleID"

                   data-options="

                    url:'/System/BindRoles',

                    method:'get',

                    valueField:'RoleID',

                    textField:'RoleName',

                    panelHeight:'auto',

                    width:

            ">

        </div>

        <div class="fitem">

            <label>邮箱:</label>

            <input name="Email" id="Email" class="easyui-validatebox" data-options="prompt:'请输入正确的邮箱地址',validType:'email'">

        </div>

        <div class="fitem">

            <label>电话:</label>

            <input id="Phone" name="Phone" class="easyui-textbox">

        </div>

        <div class="fitem">

            <label>备注:</label>

            <textarea id="Remark" name="Remark" cols="" rows=""> </textarea>

        </div>

    </form>

</div>

<div id="dlg-buttons">

    <a href="javascript:void(0)" class="easyui-linkbutton" iconcls="icon-ok" id="send" onclick="SaveData()"> 保存</a>

    <a href="javascript:void(0)" class="easyui-linkbutton" iconcls="icon-cancel" onclick="javascript:$('#dlg').dialog('close')">取消</a>

</div>
- 在JSFunction文件中添加对UserList页面逻辑处理的js文件System_UserList。代码如下:
//判断密码值是否相等

$.extend($.fn.validatebox.defaults.rules, {

    equalTo: { validator: function (value, param) { return $(param[]).val() == value; }, message: '字段不匹配' }

});

//页面加载时读取数据

$(function () {

    Search();

    var dg = $('#dg');

    var opts = dg.datagrid('options');

    var pager = dg.datagrid('getPager');

    pager.pagination({

        onSelectPage: function (pageNum, pageSize) {

            opts.pageNumber = pageNum;

            opts.pageSize = pageSize;

            pager.pagination('refresh', {

                pageNumber: pageNum,

                pageSize: pageSize

            });

            Search();  //从数据库中获取数据,并加载

        },

        pageList: [, , ], //可以设置每页记录条数的列表

        beforePageText: '第', //页数文本框前显示的汉字

        afterPageText: '页    共 {pages} 页',

        displayMsg: '当前显示 {from} - {to} 条记录   共 {total} 条记录'

    });

});

//从数据库中获取数据,并加载

function Search() {

    var page_Number = $('#dg').datagrid('options').pageNumber;   //pageNumber为datagrid的当前页码

    var page_Size = $('#dg').datagrid('options').pageSize;       //pageSize为datagrid的每页记录条数

    var optype = $('#hid_optype').val();

    $('#dg').datagrid("loading");

    //根据操作类型判断筛选条件

    var strUserName = $('#txt_UserName').val();

    var strWhere = strUserName;

    $.post('/System/GetUsers', { strWhere: strWhere, page: page_Number, rows: page_Size },

    function (data) {

        $('#dg').datagrid('loadData', data);

        $('#dg').datagrid("loaded");

    })

}

function ConditionSearch() {

    $('#hid_optype').val();  //操作:点击查询按钮筛选条件

    Search();

}

function NewData() {

    $('#dlg').dialog('open').dialog('setTitle', '新增用户信息');

    //$('#fm').form('clear');

    //页面上有绑定值,不能完全清空

    $('#UserName').val("");

    $('#UserPwd').val("");

    $('#repassword').val("");

    $('#Email').val("");

    $('#Phone').val("");

    $('#Remark').val("");

}

function EditData() {

    var row = $('#dg').datagrid('getSelected');

    if (row) {

        $('#dlg').dialog('open').dialog('setTitle', '编辑用户信息');

        $("#UserName").attr("disabled", true);

        $('#div_repassword').hide();

        $('#div_UserPwd').hide();

        $('#fm').form('load', row);

    }

}

function DestroyData() {

    var row = $('#dg').datagrid('getSelected');

    if (row) {

        $.messager.confirm('提醒', '确定删除这条数据吗?', function (r) {

            if (r) {

                var strWhere = row.ID;

                $.ajax({

                    url: '/System/DeleteUser',

                    type: 'POST',

                    data: { id: strWhere },

                    success: function (data) {

                        var t = data.flag;

                        if (t) {

                            $.messager.show({

                                title: '提示信息',

                                msg: '【系统提示】:操作成功!',

                                style: {

                                    right: '',

                                    top: document.body.scrollTop + document.documentElement.scrollTop,

                                    bottom: ''

                                }

                            });

                            //$('#dg_CommGreen').datagrid('reload'); // reload the user data

                            Search();

                        }

                    }

                })

            }

        });

    }

    else {

        $.messager.show({

            title: '提示信息',

            msg: '【系统提示】:请选择须要操作的数据!',

            style: {

                right: '',

                top: document.body.scrollTop + document.documentElement.scrollTop,

                bottom: ''

            }

        });

    }

}

function ClearQuery() {

    $('#txt_UserName').val("");

}

function SaveData() {

    var prod = {

        ID: $('#ID').val(),

        UserName: $('#UserName').val(),

        UserPwd: $('#UserPwd').val(),

        IsUse: $('#IsUse').combobox('getValue'),

        RoleID: $('#RoleID').combobox('getValue'),

        Email: $('#Email').val(),

        Phone: $('#Phone').val(),

        Remark: $('#Remark').val()

    };

    $.ajax({

        url: '/System/CreateUser',

        type: 'POST',

        data: JSON.stringify(prod),

        dataType: 'json',

        processData: false,

        contentType: 'application/json;charset=utf-8',

        complete: function (data) {

            $('#dlg').dialog('close');             // close the dialog

            $('#dg').datagrid('reload');           // reload the user data

        },

        success: function (data) {

            var t = data.flag;

            if (t) {

                $.messager.show({

                    title: '提示信息',

                    msg: '【系统提示】:操作成功!',

                    style: {

                        right: '',

                        top: document.body.scrollTop + document.documentElement.scrollTop,

                        bottom: ''

                    }

                });

                Search(); //添加成功后加载数据

            }

            else {

                $.messager.show({

                    title: '提示信息',

                    msg: '【系统提示】:操作失败!',

                    style: {

                        right: '',

                        top: document.body.scrollTop + document.documentElement.scrollTop,

                        bottom: ''

                    }

                });

            }

        },

        error: function () {

            $.messager.show({

                title: '提示信息',

                msg: '【系统提示】:操作失败!',

                style: {

                    right: '',

                    top: document.body.scrollTop + document.documentElement.scrollTop,

                    bottom: ''

                }

            });

        }

    });

}
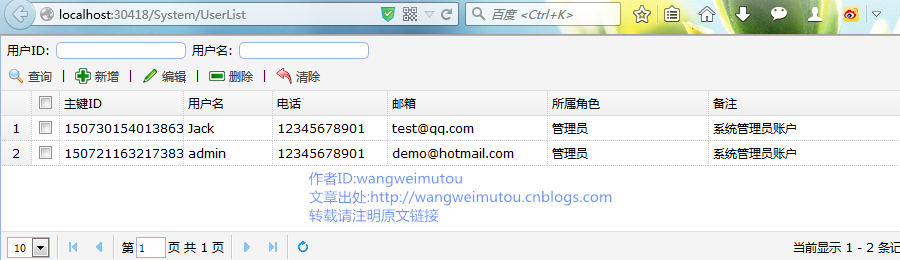
- 到此,用户管理模块完成,运行结果如下:
备注
- 这一篇,我们完成了用户管理操作的代码编写,后面还有菜单管理和权限设置。代码都很基础,不过因为都是采用的异步处理,所以有些细节点还是要注意。源码已放入网盘,点此下载。整个运行效果如下:
EF6 CodeFirst+Repository+Ninject+MVC4+EasyUI实践(七)的更多相关文章
- EF6 CodeFirst+Repository+Ninject+MVC4+EasyUI实践(一)
前言 本系列源自对EF6 CodeFirst的探索,但后来发现在自己项目中构建的时候遇到了一些问题以及一些解决方法,因此想作为一个系列写下来. 本系列并不是教你怎么做架构设计,但可以参照一下里面的方法 ...
- EF6 CodeFirst+Repository+Ninject+MVC4+EasyUI实践(六)
前言 在接下来的篇幅里将对系统的模块功能进行编写.主要以代码实现为主.这一篇我们需要完成系统模块“角色管理”的相关功能.完成后可以对系统框架结构有进一步了解. Abstract层 之前说过,Abstr ...
- EF6 CodeFirst+Repository+Ninject+MVC4+EasyUI实践(完)
前言 这一篇是本系列的最后一篇,虽然示例讲到这里就停止呢,但对于这些技术的学习远不能停止.虽然本示例讲的比较基础,但是正如我第一篇说到的,这个系列的目的不是说一些高端的架构设计,而是作为一个入门级,对 ...
- EF6 CodeFirst+Repository+Ninject+MVC4+EasyUI实践(八)
前言 本篇幅将对系统的菜单管理模块进行说明,系统的菜单采用树形结构,这样可以更好地方便层级设计和查看.本示例将说明如何通过EntityFramework读取递归的菜单树形结构,以及结合EasyUI的t ...
- EF6 CodeFirst+Repository+Ninject+MVC4+EasyUI实践(四)
前言 这一篇,我们终于到了讲解Entity Framework CodeFirst 的时刻了,首先创建实体对象模型,然后会通过配置Fluent API的方式来对实体对象模型进行完整的数据库映射操作. ...
- EF6 CodeFirst+Repository+Ninject+MVC4+EasyUI实践(三)
前言 在上一篇中,我们依靠着EasyUI强大的前端布局特性把前端登录界面和主界面给搭建完成了.这一篇我们就要尝试着把整个解决方案部署到云端呢,也就是Visual Studio Online(TFVC) ...
- EF6 CodeFirst+Repository+Ninject+MVC4+EasyUI实践(二)
前言 写完第一篇后,我一直在想接下来应该从哪一方面开始讲.后来我觉得不用那么死板的把每一个课程和大纲都列出来吧,毕竟我又不是教书的,呵呵...我觉得就像做实验一样,我们一部分一部分的完成,最后总个结果 ...
- EF6 CodeFirst+Repository+Ninject+MVC4+EasyUI实践(九)
前言 这一篇我们将完成系统的权限设置功能以及不同角色用户登录系统后动态加载菜单.注意:此示例权限只针对菜单级,如果园友需要更复杂的系统权限设置,可以拓展到按钮级或属性级. 用户的登录采用Form认证来 ...
- EF6 CodeFirst+Repository+Ninject+MVC4+EasyUI实践(五)
前言 在编写代码的时候,我遇到了很多关于EntityFramework6的疑问,所以现在就提前把这些问题列出来做一下解答,以便在以后的代码编写过程中减少不必要的Bug. EntityFramework ...
随机推荐
- [TCPIP] IP路由表及选路 Note
TCP/IP IP路由表及选路 1.路由表信息 路由表一般包含信息:目的IP地址.下一站路由器的IP地址.标志. 为数据报传送指定的一个网络接口. 查看路由表信息mac-abeen:~ abeen$ ...
- asp.net type=file在上传图片到服务器
前台 <html xmlns="http://www.w3.org/1999/xhtml"> <head runat="server"> ...
- HQL查询——from子句
HQL查询--from子句 1.from是最基本的HQL语句,from关键字后紧跟持久化类的类名: from Person 表示从Person持久化类中选出全部的实例. 2.推荐为持久化类的每个实例起 ...
- 中文 iOS/Mac 开发博客列表(转)
转自https://github.com/tangqiaoboy/iOSBlogCN 中文 iOS/Mac 开发博客列表 本博客列表会不断更新维护,如果有推荐的博客,请到此处提交博客信息. 本博客列表 ...
- 广度优先搜索(BFS)
定义 维基百科:https://en.wikipedia.org/wiki/Breadth-first_search 给定图G=(V,E)和一个可识别的源结点s,广度优先搜索对图G中的边进行系统性的探 ...
- 准备阶段-mongodb数据库安装
具体安装步骤,请参阅 mongoDB(win7_64位)使用手册1.0
- 基于东北F4的设计模式情景剧——第一幕 装饰模式(Decorator Pattern)
第一场 难题未解 布景:铁岭,晴天,午后,风.在一幢还算气派的写字楼的三层外墙上,挂着一条红色横幅,上面用歪歪扭扭的毛笔字写着"东北F4软件外包工作室".大风中,那早已褪色的条幅剧 ...
- 链表栈的C语言实现
#ifndef _CONST_H_#define _CONST_H_ #include <stdio.h>#include <stdlib.h> typedef enum { ...
- 【转】}目前比较全的CSS重设(reset)方法总结
在当今网页设计/开发实践中,使用CSS来为语义化的(X)HTML标记添加样式风格是重要的关键.在设计师们的梦想中都存在着这样的一个完美世界:所有的浏览器都能够理解和适用多有CSS规则,并且呈现相同的视 ...
- Stl源码剖析读书笔记之Alloc细节
阅读基础: Foo *pf = new Foo; 执行了两个步骤: 1)::operator new 向系统申请内存. 2) 调用Foo::Foo()构造函数构造实例. ==> 申请内存,构造 ...