
python_selenium自动化测试框架
设计思路
本文整理归纳以往的工作中用到的东西,现汇总成基础测试框架提供分享。
框架采用python3 + selenium3 + PO + yaml + ddt + unittest等技术编写成基础测试框架,能适应日常测试工作需要。
1、使用Page Object模式将页面定位和业务操作分开,分离测试对象(元素对象)和测试脚本(用例脚本),一个页面建一个对象类,提高用例的可维护性;
2、使用yaml管理页面控件元素数据和测试用例数据。例如元素ID等发生变化时,不需要去修改测试代码,只需要在对应的页面元素yaml文件中修改即可;
3、分模块管理,互不影响,随时组装,即拿即用。
GitHub项目地址:https://github.com/yingoja/DemoUI
测试框架分层设计

- 把常见的操作和查找封装成基础类,不管是什么产品,可直接拿来复用
- 业务层主要是封装对象页面类,一个页面建一个类,业务层页面继承基础层
- 用例层针对产品页面功能进行构造摸拟执行测试
- 框架层提供基础组件,支撑整个流程执行及功能扩展,给用例层提供各页面的元素数据、用例测试数据,测试报告输出等
测试框架目录结构
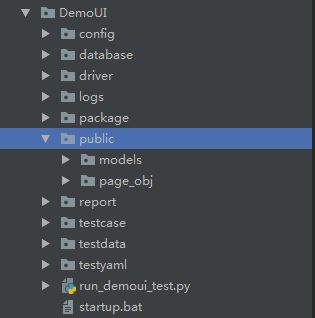
如下思维导图目录结构介绍:

编写用例方法
 testinfo:

       - id: test_login001

         title: 登录测试

         info: 打开抽屉首页

 testcase:

       - element_info: login-link-a

         find_type: ID

         operate_type: click

         info: 打开登录对话框

       - element_info: mobile

         find_type: ID

         operate_type: send_keys

         info: 输入手机号

       - element_info: mbpwd

         find_type: ID

         operate_type: send_keys

         info: 输入密码

       - element_info: //input[@class='keeplogin']

         find_type: XPATH

         operate_type: click

         info: 单击取消自动登录单选框

       - element_info: //span[text()='登录']

         find_type: XPATH

         operate_type: click

         info: 单击登录按钮

       - element_info: userProNick

         find_type: ID

         operate_type: perform

         info: 鼠标悬停账户菜单

       - element_info: //a[@class='logout']

         find_type: XPATH

         operate_type: click

         info: 选择退出

 check:

       - element_info: //div[@class='box-mobilelogin']/div[1]/span

         find_type: XPATH

         info: 检查输入手机号或密码,登录异常提示

       - element_info: userProNick

         find_type: ID

         info: 成功登录

       - element_info: reg-link-a

         find_type: ID

         info: 检查退出登录是否成功
login.yaml
例如,我们要新增登录功能测试用例:
首先,只需在testyaml目录下新增一个页面对象yaml文件,参考login.yaml格式编写即可。这些文件是提供给封装页面对象类调用并执行定位识别操作。
 -

   id: test_login001.1

   detail : 手机号和密码为空登录

   screenshot : phone_pawd_empty

   data:

     phone: ""

     password: ""

   check :

      - 手机号不能为空

 -

   id: test_login001.2

   detail : 手机号为空登录

   screenshot : phone_empty

   data :

     phone: ""

     password : aa

   check :

     - 手机号不能为空

 -

   id: test_login001.3

   detail : 密码为空登录

   screenshot : pawd_empty

   data :

     phone : 13511112222

     password: ""

   check :

     - 密码不能为空

 -

   id: test_login001.4

   detail : 非法手机号登录

   screenshot : phone_error

   data :

     phone : abc

     password: aa

   check :

     - 手机号格式不对

 -

   id: test_login001.5

   detail : 手机号或密码不匹配

   screenshot : pawd_error

   data :

     phone : 13511112222

     password: aa

   check :

     - 账号密码错误

 -

   id: test_login001.6

   detail : 手机号和密码正确

   screenshot : phone_pawd_success

   data :

     phone : 13865439800

     password: ********

   check :

     - yingoja

 login_data.yaml
login_data.yaml
其次,在testdata目录下新增一个login_data.yaml文件提供给登录接口传参的测试数据,编写格式参考login_data.yaml文件。
 #!/usr/bin/env python

 # _*_ coding:utf-8 _*_

 __author__ = 'YinJia'

 import os,sys

 sys.path.append(os.path.dirname(os.path.dirname(os.path.dirname(__file__))))

 from config import setting

 from selenium.webdriver.support.select import Select

 from selenium.webdriver.common.action_chains import ActionChains

 from selenium.webdriver.common.by import By

 from public.page_obj.base import Page

 from time import sleep

 from public.models.GetYaml import getyaml

 testData = getyaml(setting.TEST_Element_YAML + '/' + 'login.yaml')

 class login(Page):

     """

     用户登录页面

     """

     url = '/'

     dig_login_button_loc = (By.ID, testData.get_elementinfo(0))

     def dig_login(self):

         """

         首页登录

         :return:

         """

         self.find_element(*self.dig_login_button_loc).click()

         sleep(1)

     # 定位器,通过元素属性定位元素对象

     # 手机号输入框

     login_phone_loc = (By.ID,testData.get_elementinfo(1))

     # 密码输入框

     login_password_loc = (By.ID,testData.get_elementinfo(2))

     # 取消自动登录

     keeplogin_button_loc = (By.XPATH,testData.get_elementinfo(3))

     # 单击登录

     login_user_loc = (By.XPATH,testData.get_elementinfo(4))

     # 退出登录

     login_exit_loc = (By.ID, testData.get_elementinfo(5))

     # 选择退出

     login_exit_button_loc = (By.XPATH,testData.get_elementinfo(6))

     def login_phone(self,phone):

         """

         登录手机号

         :param username:

         :return:

         """

         self.find_element(*self.login_phone_loc).send_keys(phone)

     def login_password(self,password):

         """

         登录密码

         :param password:

         :return:

         """

         self.find_element(*self.login_password_loc).send_keys(password)

     def keeplogin(self):

         """

         取消单选自动登录

         :return:

         """

         self.find_element(*self.keeplogin_button_loc).click()

     def login_button(self):

         """

         登录按钮

         :return:

         """

         self.find_element(*self.login_user_loc).click()

     def login_exit(self):

         """

         退出系统

         :return:

         """

         above = self.find_element(*self.login_exit_loc)

         ActionChains(self.driver).move_to_element(above).perform()

         sleep(2)

         self.find_element(*self.login_exit_button_loc).click()

     def user_login(self,phone,password):

         """

         登录入口

         :param username: 用户名

         :param password: 密码

         :return:

         """

         self.open()

         self.dig_login()

         self.login_phone(phone)

         self.login_password(password)

         sleep(1)

         self.keeplogin()

         sleep(1)

         self.login_button()

         sleep(1)

     phone_pawd_error_hint_loc = (By.XPATH,testData.get_CheckElementinfo(0))

     user_login_success_loc = (By.ID,testData.get_CheckElementinfo(1))

     exit_login_success_loc = (By.ID,testData.get_CheckElementinfo(2))

     # 手机号或密码错误提示

     def phone_pawd_error_hint(self):

         return self.find_element(*self.phone_pawd_error_hint_loc).text

     # 登录成功用户名

     def user_login_success_hint(self):

         return self.find_element(*self.user_login_success_loc).text

     # 退出登录

     def exit_login_success_hint(self):

         return self.find_element(*self.exit_login_success_loc).text
loginPage.py
然后,在page_obj目录下新增一个loginPage.py文件,是用来封装登录页面对象类,执行登录测试流程操作。
 #!/usr/bin/env python

 # _*_ coding:utf-8 _*_

 __author__ = 'YinJia'

 import os,sys

 sys.path.append(os.path.dirname(os.path.dirname(__file__)))

 import unittest,ddt,yaml

 from config import setting

 from public.models import myunit,screenshot

 from public.page_obj.loginPage import login

 from public.models.log import Log

 try:

     f =open(setting.TEST_DATA_YAML + '/' + 'login_data.yaml',encoding='utf-8')

     testData = yaml.load(f)

 except FileNotFoundError as file:

     log = Log()

     log.error("文件不存在:{0}".format(file))

 @ddt.ddt

 class Demo_UI(myunit.MyTest):

     """抽屉新热榜登录测试"""

     def user_login_verify(self,phone,password):

         """

         用户登录

         :param phone: 手机号

         :param password: 密码

         :return:

         """

         login(self.driver).user_login(phone,password)

     def exit_login_check(self):

         """

         退出登录

         :return:

         """

         login(self.driver).login_exit()

     @ddt.data(*testData)

     def test_login(self,datayaml):

         """

         登录测试

         :param datayaml: 加载login_data登录测试数据

         :return:

         """

         log = Log()

         log.info("当前执行测试用例ID-> {0} ; 测试点-> {1}".format(datayaml['id'],datayaml['detail']))

         # 调用登录方法

         self.user_login_verify(datayaml['data']['phone'],datayaml['data']['password'])

         po = login(self.driver)

         if datayaml['screenshot'] == 'phone_pawd_success':

             log.info("检查点-> {0}".format(po.user_login_success_hint()))

             self.assertEqual(po.user_login_success_hint(), datayaml['check'][0], "成功登录,返回实际结果是->: {0}".format(po.user_login_success_hint()))

             log.info("成功登录,返回实际结果是->: {0}".format(po.user_login_success_hint()))

             screenshot.insert_img(self.driver, datayaml['screenshot'] + '.jpg')

             log.info("-----> 开始执行退出流程操作")

             self.exit_login_check()

             po_exit = login(self.driver)

             log.info("检查点-> 找到{0}元素,表示退出成功!".format(po_exit.exit_login_success_hint()))

             self.assertEqual(po_exit.exit_login_success_hint(), '注册',"退出登录,返回实际结果是->: {0}".format(po_exit.exit_login_success_hint()))

             log.info("退出登录,返回实际结果是->: {0}".format(po_exit.exit_login_success_hint()))

         else:

             log.info("检查点-> {0}".format(po.phone_pawd_error_hint()))

             self.assertEqual(po.phone_pawd_error_hint(),datayaml['check'][0] , "异常登录,返回实际结果是->: {0}".format(po.phone_pawd_error_hint()))

             log.info("异常登录,返回实际结果是->: {0}".format(po.phone_pawd_error_hint()))

             screenshot.insert_img(self.driver,datayaml['screenshot'] + '.jpg')

 if __name__=='__main__':

     unittest.main()
login_sta.py
最后,在testcase目录下创建测试用例文件login_sta.py,采用ddt数据驱动读取yaml测试数据文件
综上所述,编写用例方法只需要按以上四个步骤创建->编写即可。
执行如下主程序,可看输出的实际结果。
 #!/usr/bin/env python

 # _*_ coding:utf-8 _*_

 __author__ = 'YinJia'

 import os,sys

 sys.path.append(os.path.dirname(__file__))

 from config import setting

 import unittest,time

 from package.HTMLTestRunner import HTMLTestRunner

 from public.models.newReport import new_report

 from public.models.sendmail import send_mail

 # 测试报告存放文件夹,如不存在,则自动创建一个report目录

 if not os.path.exists(setting.TEST_REPORT):os.makedirs(setting.TEST_REPORT + '/' + "screenshot")

 def add_case(test_path=setting.TEST_DIR):

     """加载所有的测试用例"""

     discover = unittest.defaultTestLoader.discover(test_path, pattern='*_sta.py')

     return discover

 def run_case(all_case,result_path=setting.TEST_REPORT):

     """执行所有的测试用例"""

     now = time.strftime("%Y-%m-%d %H_%M_%S")

     filename =  result_path + '/' + now + 'result.html'

     fp = open(filename,'wb')

     runner = HTMLTestRunner(stream=fp,title='抽屉新热榜UI自动化测试报告',

                             description='环境:windows 7 浏览器:chrome',

                             tester='Jason')

     runner.run(all_case)

     fp.close()

     report = new_report(setting.TEST_REPORT) #调用模块生成最新的报告

     send_mail(report) #调用发送邮件模块

 if __name__ =="__main__":

     cases = add_case()

     run_case(cases)
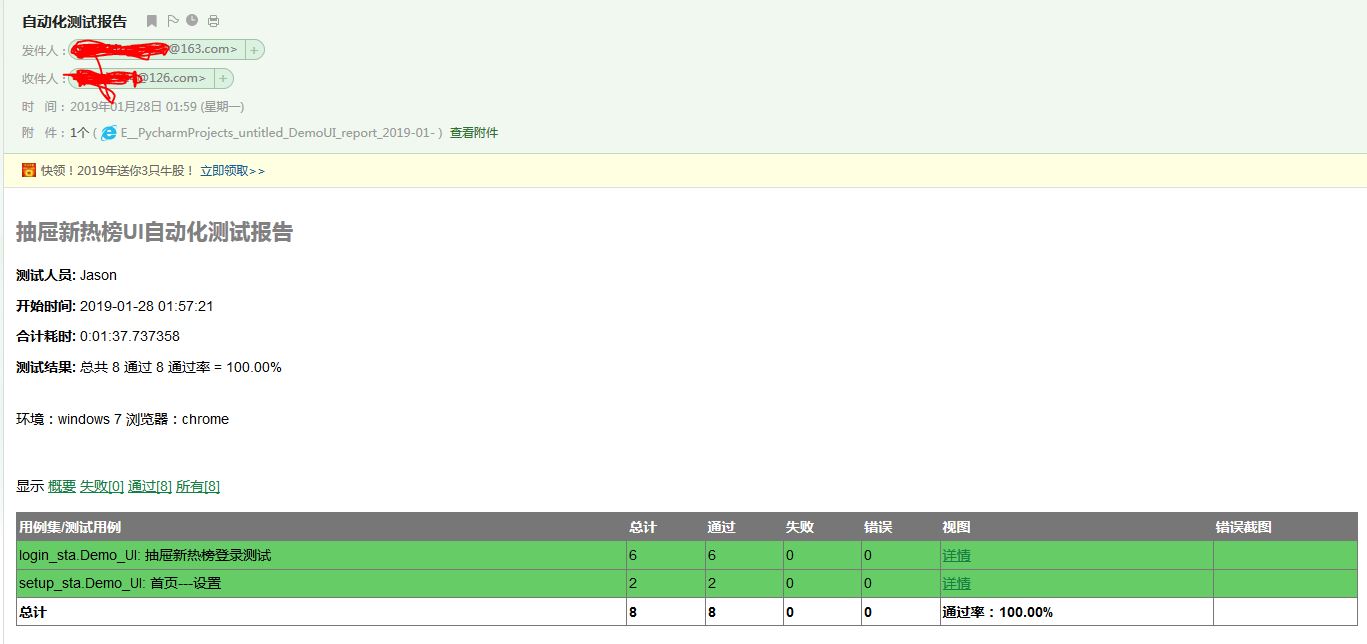
测试结果展示
- HTML报告日志

- HTML报告点击截图,弹出截图

- 测试报告通过的日志

- 自动截图存放指定的目录
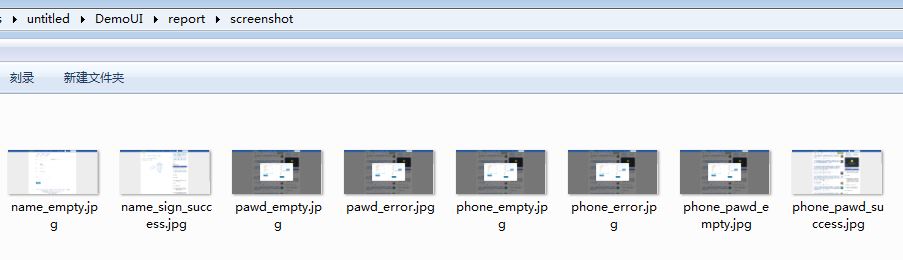
- 邮件测试报告
python_selenium自动化测试框架的更多相关文章
- 避免重复造轮子的UI自动化测试框架开发
一懒起来就好久没更新文章了,其实懒也还是因为忙,今年上半年的加班赶上了去年一年的加班,加班不息啊,好了吐槽完就写写一直打算继续的自动化开发 目前各种UI测试框架层出不穷,但是万变不离其宗,驱动PC浏览 ...
- [转]Android Studio 里搭建自动化测试框架Robotium
Android的自动化测试框架可选择的不多,后来选了Robotium(https://code.google.com/p/robotium/),它的语法及易用性挺像我们用在iOS里的KIF. 官方文档 ...
- 基于Ruby的Watir-WebDriver自动化测试框架
基于Ruby的watir-webdriver自动化测试方案与实施(五) 基于Ruby的watir-webdriver自动化测试方案与实施(四) 基于Ruby的watir-webdriver自动 ...
- Windows下部署Appium教程(Android App自动化测试框架搭建)
摘要: 1,appium是开源的移动端自动化测试框架: 2,appium可以测试原生的.混合的.以及移动端的web项目: 3,appium可以测试ios.android.firefox os: 4,a ...
- IntelliJ IDEA 自动化工具安装并添加自动化测试框架
IntelliJ IDEA是一个用于开发人员开发和测试人员自动化测试的测试工具,类似于eclipse. 优点:插件多自身可以携带,自身携带cucumber自动化测试框架,类似于junit一样 缺点:r ...
- Selenium自动化测试框架介绍
Selenium自动化测试框架介绍 1.测试架构作用 a.可维护性 b.提高编写脚本效率 c.提高脚本的可读性 2.框架的几大要素: Driver管理,脚本,数据,元素对象,LOG,报告,运行机制,失 ...
- UiAutomator自动化测试框架介绍
UiAutomator自动化测试框架介绍 环境搭建 1 必要条件 1.1 JDK 1.2 SDK(API高于15) 1.3 Eclipse 2 ...
- UI自动化测试框架(项目实战)python、Selenium(日志、邮件、pageobject)
其实百度UI自动化测试框架,会出来很多相关的信息,不过就没有找到纯项目的,无法拿来使用的:所以我最近就写了一个简单,不过可以拿来在真正项目中可以使用的测试框架. 项目的地址:https://githu ...
- Robotium自动化测试框架实用教程(图)
一.简介 Robotium是一款国外的Android自动化测试框架,主要针对Android平台的应用进行黑盒自动化测试,它提供了模拟各种手势操作(点击.长按.滑动等).查找和断言机制的API,能够对各 ...
随机推荐
- [Codeforces Gym] 100162B Circle of Stones
题意: 桌子上有 n 个石头围成一个环.每个石头都有一种颜色.每种颜色可以由小写英文字母表示.如果每一对相邻的石头都是不同颜色的,则称这 n 个石头构成的环是美丽的.现在,你可以从这 n 个石头中拿走 ...
- 什么是Docker并且它为什么这么受欢迎
什么是Docker (why it's so hot than hot) Docker是一个使用容器来方便快捷的创建,部署,运行程序的工具,容器允许开发人员将应用程序的一切打包(镜像),例如库和其他的 ...
- P2787 语文1(chin1)- 理理思维
P2787 语文1(chin1)- 理理思维 1.获取第x到第y个字符中字母k出现了多少次 2.将第x到第y个字符全部赋值为字母k 3.将第x到第y个字符按照A-Z的顺序排序 读字符串我再单个单个读我 ...
- Java基础-IO流对象之随机访问文件(RandomAccessFile)
Java基础-IO流对象之随机访问文件(RandomAccessFile) 作者:尹正杰 版权声明:原创作品,谢绝转载!否则将追究法律责任. 一.RandomAccessFile简介 此类的实例支持对 ...
- [Web] Web请求过程之二:DNS 域名解析
一.域名解析过程 1.浏览器检查缓存,域名缓存时间可以通过 TTL 属性来设置. 2.如果浏览器缓存中没有,浏览器会去查找操作系统缓存中是否有这个域名对应的 DNS 解析结果.如果要设置域名对应的 I ...
- MySQL数据库应用 从入门到精通 学习笔记
以下内容是学习<MySQL数据库应用 从入门到精通>过程中总结的一些内容提要,供以后自己复现使用. 一:数据库查看所有数据库: SHOW DATABASES创建数据库: CREATE DA ...
- 【数据库-MySql】清空所有表格的所有数据
方式一. drop procedure if exists del_all_tb; delimiter $$ create procedure del_all_tb(db char(20)) begi ...
- js便携小方法,你值得拥有
引言: 本章没有深奥的讲解js一些底层原理,比如this指针.作用域.原型啦,涉及的都是一些有利于平时开发时简化代码,提高执行效率,或者说可以当做一种经验方法来使用,篇幅都不长,小步快跑的让你阅读完整 ...
- iOS设备分辨率
CHENYILONG Blog iOS设备分辨率 © chenyilong. Powered by Postach.io Blog
- HDU 3535 AreYouBusy (混合背包之分组背包)
题目链接 Problem Description Happy New Term! As having become a junior, xiaoA recognizes that there is n ...