24-[jQuery]-案例
1、仿淘宝导航栏案例

<!DOCTYPE html>

<html lang="en">

<head>

    <meta charset="UTF-8">

    <title>仿淘宝导航栏案例</title>

    <style type="text/css">

        *{padding: 0;margin: 0;}

        div{width: 100%;}

        div img{width: 100%;}

        .nav{display: none;}

    </style>

</head>

<body>

    <div class="top">

        <img src="data:images/top.jpg" alt="" />

    </div>

    <div class="nav">

        <img src="data:images/nav.jpg"/>

    </div>

    <div class= 'taobao'>

        <img src="data:images/taobao1.png"/>

    </div>

</body>

    <script src="jquery-3.2.1.js"></script>

    <script type="text/javascript">

        $(function () {

            var h = $('.top').height();

            $(document).scroll(function () {

                var scrollTop = $(document).scrollTop();

                if(h<scrollTop){

                    $('.nav').css({display:'block',position:'fixed',top:0});

                }else{

                    $('.nav').css({display:'none',position:'static',top:0});

                }

            })

        })

    </script>

</html>
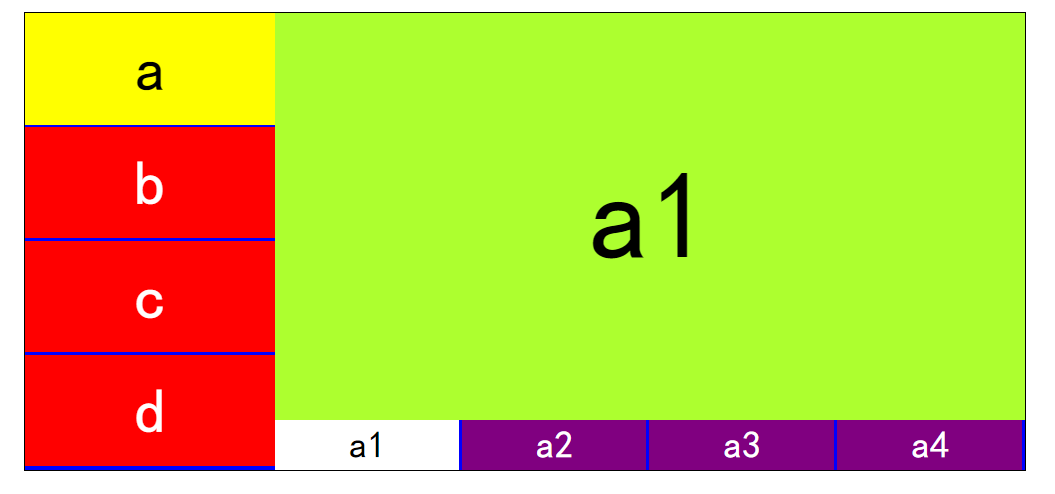
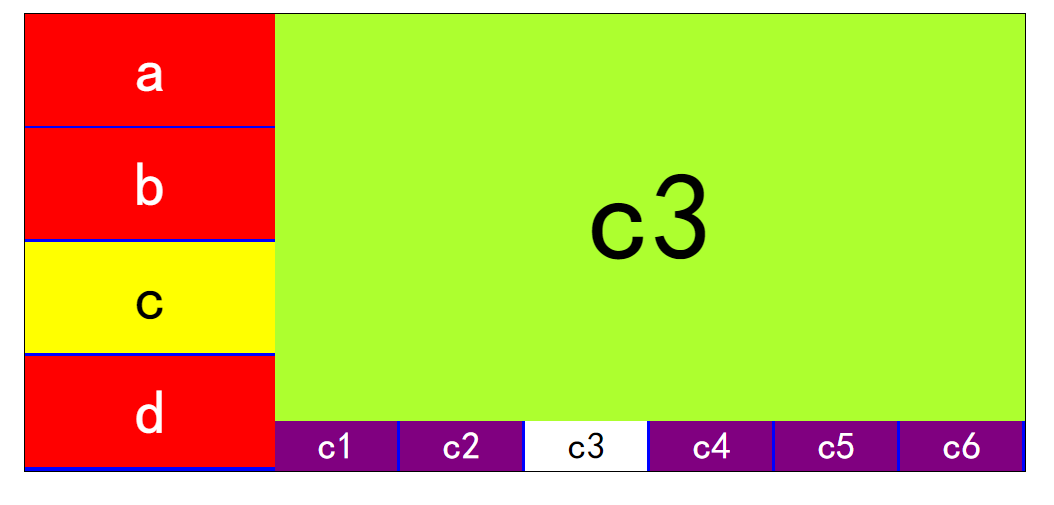
2、选项卡嵌套
<!DOCTYPE html>

<html lang="en">

<head>

    <meta charset="UTF-8">

    <title>选项卡嵌套</title>

    <style type="text/css">

        *{padding: 0;margin: 0;}

        ul{

            list-style: none;

        }

        /*清除浮动产生的问题*/

        #box:after{

            content: "";

            display: block;

            clear: both;

        }

        #box{width: 800px;border: 1px solid black;margin: 20px auto;background: blue;}

        #leftBox{width: 200px;float: left;}

        #leftBox li{width: 200px;height: 89px;background: red;margin-bottom: 2px;color: white;font: 50px/89px "黑体";  text-align: center;}

        #rightBox div{display: none;float: left; width: 600px;}

        #rightBox p{width:100%;height: 325px;font: 100px/325px "黑体";text-align: center;background: greenyellow }

        /*父元素设置display:table使它成为一个块级表格元素

        * 子元素设置display:table-cell使子元素成为表格单元格,就好比是在表格中一样*/

        #rightBox ul{width: 600px;display: table;}

        #rightBox li{display: table-cell;background: purple;height: 40px;border-right: 2px solid blue;

                     font: 30px/40px "黑体";text-align: center;color: white;}

        #leftBox .active{background: yellow;color: black;}

        #rightBox .active{background: white;color: black;}

    </style>

</head>

<body>

    <div id="box">

        <ul id="leftBox">

            <li>a</li>

            <li>b</li>

            <li>c</li>

            <li>d</li>

        </ul>

        <div id="rightBox">

            <div style="display: block">

                <p>a1</p>

                <ul>

                    <li class="active">a1</li>

                    <li>a2</li>

                    <li>a3</li>

                    <li>a4</li>

                </ul>

            </div>

            <div>

                <p>b1</p>

                <ul>

                    <li class="active">b1</li>

                    <li>b2</li>

                    <li>b3</li>

                    <li>b4</li>

                </ul>

            </div>

            <div>

                <p>c1</p>

                <ul>

                    <li class="active">c1</li>

                    <li>c2</li>

                    <li>c3</li>

                    <li>c4</li>

                    <li>c5</li>

                    <li>c6</li>

                </ul>

            </div>

            <div>

                <p>d1</p>

                <ul>

                    <li class="active">d1</li>

                    <li>d2</li>

                    <li>d3</li>

                    <li>d4</li>

                </ul>

            </div>

        </div>

    </div>

</body>

    <script src="jquery-3.2.1.js"></script>

    <script type="text/javascript">

        //鼠标移入得时候

        $('#leftBox li').mouseover(function () {

            $(this).addClass('active').siblings('li').removeClass('active');

            //修改右边得div

            $('#rightBox div').eq($(this).index()).show().siblings('div').hide();

        });

        $('#rightBox li').click(function () {

            $(this).addClass('active').siblings('li').removeClass('active');

            $(this).parent().prev().html($(this).html());

        })

    </script>

</html>
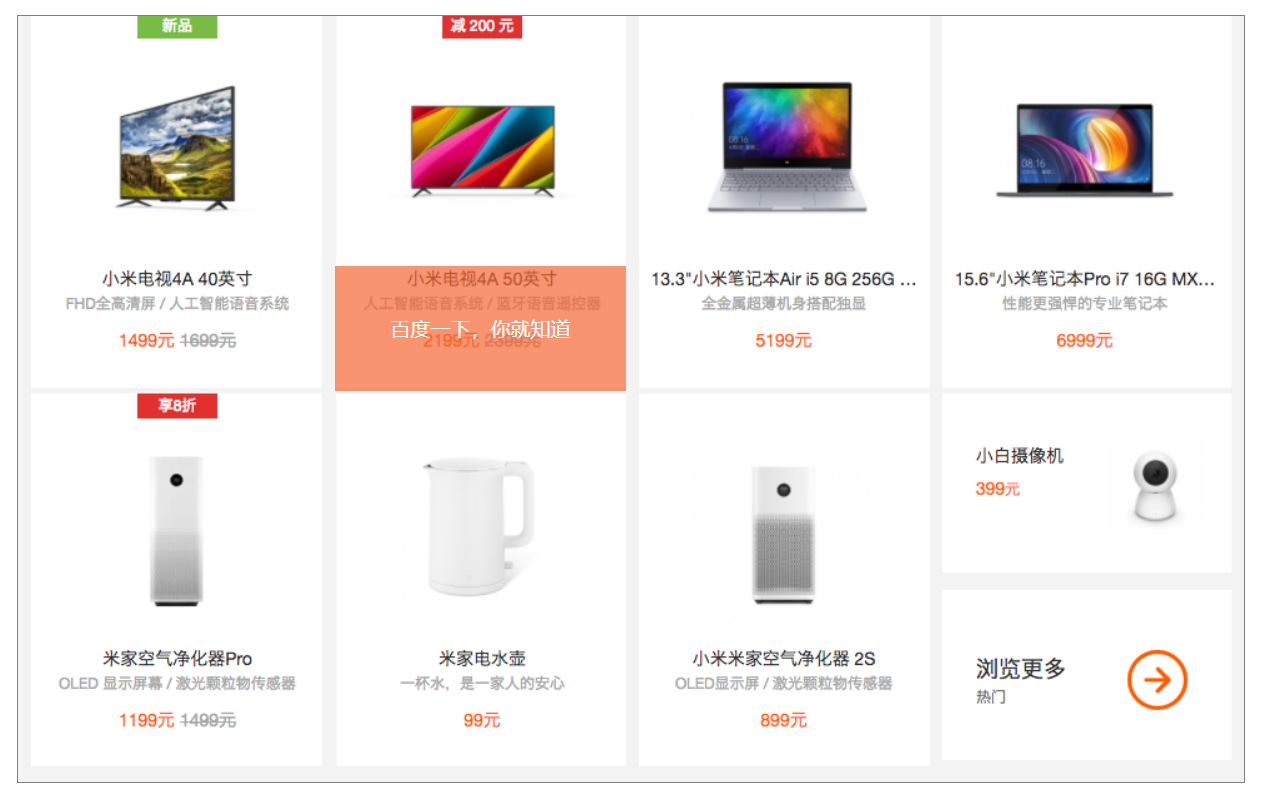
3、小米官网案例
<!DOCTYPE html>

<html lang="en">

<head>

    <meta charset="UTF-8">

    <title>小米官网手风琴</title>

    <style type="text/css">

        *{

            padding: 0;

            margin: 0;

        }

        ul{list-style: none;}

        .wrap{width: 980px;height: 612px;margin: 20px auto;background: #f4f3f4;border: 1px solid gray;}

        ul li{float: left;margin-left: 10px;position: relative;overflow: hidden;width: 233px;height: 300px;}

        ul li p{

            width: 233px;

            height: 100px;

            background: rgba(245,102,51,.7);

            position: absolute;

            bottom: -100px;

            text-align: center;

            color: white;

            line-height: 100px;

        }

    </style>

</head>

<body>

    <div class="wrap">

        <ul>

            <li><a href="#"><img src="data:images/xiaomi_01.png"/></a><p>百度一下,你就知道</p></li>

            <li><a href="#"><img src="data:images/xiaomi_02.png"/></a><p>百度一下,你就知道</p></li>

            <li><a href="#"><img src="data:images/xiaomi_03.png"/></a><p>百度一下,你就知道</p></li>

            <li><a href="#"><img src="data:images/xiaomi_04.png"/></a><p>百度一下,你就知道</p></li>

            <li><a href="#"><img src="data:images/xiaomi_05.png"/></a><p>百度一下,你就知道</p></li>

            <li><a href="#"><img src="data:images/xiaomi_07.png"/></a><p>百度一下,你就知道</p></li>

            <li><a href="#"><img src="data:images/xiaomi_08.png"/></a><p>百度一下,你就知道</p></li>

            <li><a href="#"><img src="data:images/xiaomi_09.png"/></a><p>百度一下,你就知道</p></li>

        </ul>

    </div>

</body>

    <script src="jquery-3.2.1.js"></script>

    <script type="text/javascript">

        //mouserenter 进入  mouseleave 离开

        $('.wrap li').hover(function () {

            $(this).children('p').stop(true).animate({bottom:'0px'},100); // 先停止 在启动动画

        },function () {

            $(this).children('p').stop(true).animate({bottom:'-100px'},100)

        })

    </script>

</html>
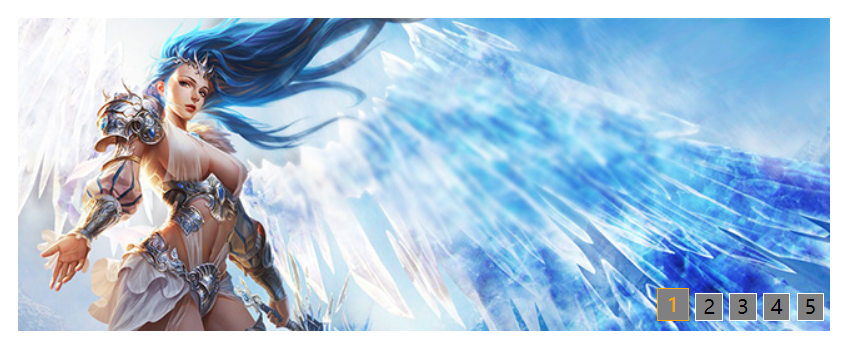
4、焦点轮播图

<!DOCTYPE html>

<html lang="en">

<head>

    <meta charset="UTF-8">

    <title>焦点轮播图</title>

    <style type="text/css">

        *{padding: 0;margin: 0;}

        ul,ol{list-style: none;}

        #wrap{width: 650px;height: 250px;margin: 100px auto 0;background: red;overflow: hidden;position: relative;}

        /*#wrap img{display: block;}*/

        #wrap ul{height: 250px;position: relative;z-index: 1;}

        #wrap ol{height: 30px;position: absolute;z-index: 2;bottom: 0;right: 0;}

        #wrap>ul>li{

            position: absolute;

            top:0;

            left: 0;

        }

        #wrap>ol>li{

            float: left;

            width: 20px;

            height: 20px;

            text-align: center;

            line-height: 20px;

            border: 1px solid white;

            background: gray;

            margin-right: 5px;

        }

        #wrap>ol>li:hover{

            /*设置鼠标形状*/

            cursor: pointer;

        }

        #wrap li.active{

            padding: 2px;

            color: orange;

            margin-top: -4px;

            border: 1px solid orange;

        }

    </style>

</head>

<body>

    <div id="wrap">

        <ul>

            <!--设置绝对定位之后 脱离标准流 最后一个盒子层级提升了-->

            <li style="z-index: 1;"><a href="#"><img src="./images/01.jpg"/></a></li>

            <li><a href="#"><img src="./images/02.jpg"/></a></li>

            <li><a href="#"><img src="./images/03.jpg"/></a></li>

            <li><a href="#"><img src="./images/04.jpg"/></a></li>

            <li><a href="#"><img src="./images/05.jpg"/></a></li>

        </ul>

        <ol>

            <li class="active">1</li>

            <li>2</li>

            <li>3</li>

            <li>4</li>

            <li>5</li>

        </ol>

    </div>

</body>

    <script src="jquery-3.2.1.js"></script>

    <script type="text/javascript">

        $(function () {

            //控制层级关系得索引

            var index = 0;

            $('#wrap>ol>li').mouseenter(function () {

                index++;

                //修改下标class

                $(this).addClass('active').siblings('li').removeClass('active');

                //修改图片

                $('#wrap>ul>li').eq($(this).index()).css({'left':'650px','z-index':index}).animate({'left':'0'},1000)

            })

        })

    </script>

</html>


5、动态实现轮播图


<!DOCTYPE html>

<html>

    <head>

        <meta charset="UTF-8">

        <title></title>

        <style type="text/css">

            *{padding: 0;margin: 0;}

            ul{list-style: none;}

            #box{

                /*图片的宽高 240px  180px*/

                width: 240px;

                height: 180px;

                position: relative;

                margin: 50px auto;

                overflow: hidden;

            }

            ul{

                width: 960px;

                position: absolute;

            }

            ul li{

                float: left;

            }

            p{

                position: absolute;

                left: 80px;

                bottom: 30px;

            }

            p span{

                color: red;

                display: inline-block;

                width: 20px;

                height: 20px;

                line-height: 20px;

                text-align: center;

                cursor: pointer;

            }

            p span.active{

                color: white;

                background: greenyellow;

            }

        </style>

    </head>

    <body>

        <div id="box">

            <ul>

                <!--显示轮播的图片-->

                <!--<li><img src="01.jpg" alt="" /></li>

                <li><img src="01.jpg" alt="" /></li>

                <li><img src="01.jpg" alt="" /></li>

                <li><img src="01.jpg" alt="" /></li>-->

            </ul>

            <p>

                <!--显示索引-->

            </p>

        </div>

        <button id="play">轮播吧!</button>

        <button id="stop">暂停!</button>

    </body>

    <script src="jquery-3.2.1.js"></script>

    <script type="text/javascript">

        $(function(){

            //1.获取本地的图片数据 以后再后面的课程中这些数据会从后端服务器获取

            var imgArr = ['./01.jpg','./02.jpg','./03.jpg','./04.jpg'];

            //2.动态的生成图片

            for(var i = 0; i < imgArr.length;i++){

                $('ul').append("<li><img src="+imgArr[i]+"></li>")

            }

            //3.生成索引

            var str = '';

            $('li').each(function(i,ele){

                str += "<span>"+(i+1)+"</span>"

            });

            console.log(str);

            $('p').html(str);

            //4.默认设置索引的第一个active

            $('span:first').addClass('active');

            var index = 0;

            //5.点击索引

            $('span').click(function(){

                $(this).addClass('active').siblings('span').removeClass('active');

                //获取我当前点击的索引

                index = $(this).index();

                //    $('ul').css("left",-240*index);

                $('ul').animate({

                    left:-240*index

                },100)

            });

            var timer = null;

            $('#play').click(function(){

                //0.开启定时器  1.索引跟着走 2.图片跟着走

                timer = setInterval(next,1000)

                function next(){

                    if(index == $('li').length-1){

                        //图片到头了了 到第四张

                        index = 0;

                        //修改span的第一个active

                        $('p span').eq(index).addClass('active').siblings('span').removeClass('active');

                        //修改ul的样式

                        $('ul').css('left',0);

                    }else{

                        index++;

                        console.log(index);

                        //修改后三个span标签的active

                        $('p span').eq(index).addClass('active').siblings('span').removeClass('active');

                        $('ul').css('left',-240*index);

                    }

                }

            });

            //6.关闭定时器

            $("#stop").click(function(){

                clearInterval(timer);

            })

        })

    </script>

</html>


24-[jQuery]-案例的更多相关文章
- python 学习笔记十四 jQuery案例详解(进阶篇)
1.选择器和筛选器 案例1 <!DOCTYPE html> <html lang="en"> <head> <meta charset=& ...
- Python之路【第十二篇续】jQuery案例详解
jQuery 1.jQuery和JS和HTML的关系 首先了HTML是实际展示在用户面前的用户可以直接体验到的,JS是操作HTML的他能改变HTML实际展示给用户的效果! 首先了解JS是一门语言,他是 ...
- JQuery案例一:实现表格隔行换色
<!DOCTYPE html> <html> <head> <meta charset="UTF-8"> <title> ...
- jQuery案例2
$(this).index用来获取取到的所有元素的序号 省市联动 <!DOCTYPE html><html xmlns="http://www.w3.org/1999/xh ...
- jquery案例
调用js成员 <!DOCTYPE html><html xmlns="http://www.w3.org/1999/xhtml"><head>& ...
- 黑马day16 jquery案例演示
案例一: <html> <head> <meta http-equiv="Content-Type" content="text/html; ...
- JQuery案例:折叠菜单
折叠菜单(jquery) <html> <head> <meta charset="UTF-8"> <title>accordion ...
- Jquery案例——某网站品牌列表的效果
一下是效果图.点击"显示全部品牌",高亮推荐品牌,并显示全部品牌. HTML文件: <!DOCTYPE html> <html lang="en&quo ...
- 24 AIDL案例
服务端 MainActivity.java package com.qf.day24_aidl_wordserver; import android.app.Activity; import andr ...
- JQuery案例二:实现全选、全不选和反选
<!DOCTYPE html> <html> <head> <meta charset="UTF-8"> <title> ...
随机推荐
- Oracle EBS 请求
SELECT t.responsibility_id, t.responsibility_key, t.responsibility_name, t.description, t.menu_id, f ...
- FileStream对文本进行读写操作
class FileHelper { /// <summary> /// 检验文件路径是否合法 /// </summary> /// <param name=" ...
- 封装NSMapTable并简易的使用
封装NSMapTable并简易的使用 NSMapTable是弱引用的字典,可以用来存储对象,该对象消失了也没有关系,对于控制器越级跳转相当有用:) WeakDictionary.h 与 WeakDic ...
- 一份非常完整的 MySQL 规范
源自:https://www.cnblogs.com/huchong/p/10219318.html 一.数据库命令规范 所有数据库对象名称必须使用小写字母并用下划线分割. 所有数据库对象名称禁止使用 ...
- 【转】什么是JavaScript
转自mdn学习网站-什么是JavaScript 什么是JavaScript? 欢迎来到 MDN JavaScript 初学者的课程! 在第一篇文章中,我们将会站在一定的高度来俯看 JavaScript ...
- esxcli software vib 命令为 ESXi 5.x/6.x 主机安装补丁程序 (2008939)
参考KB:https://kb.vmware.com/s/article/2008939?lang=zh_CN Symptoms 免责声明:本文为 “esxcli software vib” ...
- SpringBoot整合Redis初实践
Redis是一个开源(BSD许可),内存存储的数据结构服务器,可用作数据库,高速缓存和消息队列代理. 有时,为了提升整个网站的性能,在开发时会将经常访问的数据进行缓存,这样在调用这个数据接口时,可以提 ...
- 张高兴的 Windows 10 IoT 开发笔记:FM 电台模块 KT0803L
This is a Windows 10 IoT Core project on the Raspberry Pi 2/3, coded by C#. GitHub:https://github.co ...
- 【目录】利用Python进行数据分析(第2版)
第一章 准备工作 1.1 What Is This Book About(这本书是关于什么的) 1.2 Why Python for Data Analysis?(为什么使用Python做数据分析) ...
- Objective-C 与命名空间
http://blog.csdn.net/michelle__/article/details/52528172 Objective-C 在Objective-C应用中的所有类名都必须是全局唯一的.命 ...