
file 自定义上传附件并展示缩略图
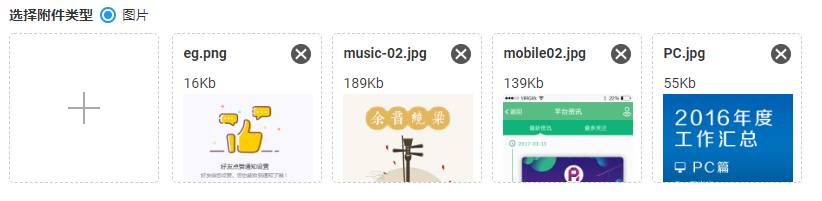
<div id="picInputDiv" style="display: none;"></div>
var newInput = $(this).clone();
newInput.attr("id","newInput"+(picFileLen-1));  //  picFileLen 是个变量。所以每次拿到的 input id 唯一,避免冲突
$("#picInputDiv").append(newInput);
// picInputDiv index>picIndex 角标依次 -1;
var inputLen = $("#picInputDiv").children().length;
var Dvalue = inputLen-1-parIndex;
if(Dvalue ==0) {
    $("#picInputDiv").find("#newInput"+parIndex).remove();
} else if(Dvalue > 0) {
    $("#picInputDiv").find("#newInput"+parIndex).remove();
    for(var i=1; i<Dvalue+1; i++){
        $("#newInput"+(parIndex+i)).attr("id","newInput"+(parIndex+i-1));
    }
}
- 样式不OK,
- 只能显示附件名称
- 不能显示附件缩略图
- 只能保留最后一次的上传结果,不能实现多个上传
// 监测是否超出限制
function checkLen(len,max){
    if(len<max){
        return true;
    } else {
        layer.msg("不能再上传了。已经满额 ");
        return false;
    }
}
/*
 点击上传附件
*/
.btn-add-div {
    width: 150px;
    height: 150px;
    position: relative;
    margin-right: 10px;
    display: inline-block;
}
#picShowDiv {
    display: inline-block;
}
.btn-add {
    position: absolute;
    display: block;
    width: 100%;
    height: 100%;
    opacity: 1;
    border: 1px dashed #ccc;
    border-radius: 5px;
    background: #fff;
    outline: none;
}
.btn-add:before {
    content: '';
    position: absolute;
    width: 32px;
    height: 2px;
    left: 50%;
    top: 50%;
    margin-left: -16px;
    margin-top: -1px;
    background: #aaa;
}
.btn-add:after {
    content: '';
    position: absolute;
    width: 2px;
    height: 32px;
    left: 50%;
    top: 50%;
    margin-left: -1px;
    margin-top: -16px;
    background: #aaa;
}
.btn-add-file {
    position: absolute;
    display: block;
    width: 100% !important;
    height: 100%;
    opacity: 0;
}
.btn-add-div:hover {
    cursor: pointer;
}
/* 缩略图 */
.pic-thumbnail {
    width: 150px;
    height: 150px;
    box-sizing: border-box;
    padding: 10px;
    overflow:  hidden;
    display: inline-block;
    border: 1px dashed #ccc;
    background: #fff;
    position: relative;
    border-radius: 5px;
    margin-right: 10px;
}
/* 删除 */
.delete-content {
    display: inline-block;
    position: absolute;
    right: 10px;
    top: 10px;
    width: 20px;
    height:20px;
    border-radius: 50%;
    background: #555;
    border: none;
    z-index: 10;
}
.delete-content:before {
    display: inline-block;
    content: '';
    position: absolute;
    width: 8px;
    height: 8px;
    left: 6px;
    top: 2px;
    border-width: 0 2px 2px 0;
    border-style: solid;
    border-color: #fff;
    transform: rotate(45deg);
}
.delete-content:after {
    display: inline-block;
    content: '';
    position: absolute;
    width: 8px;
    height: 8px;
    left: 6px;
    top: 10px;
    border-width: 0 2px 2px 0;
    border-style: solid;
    border-color: #fff;
    transform: rotate(-135deg);
}
.delete-content:hover {
    cursor: pointer;
    opacity: .7;
}
file 自定义上传附件并展示缩略图的更多相关文章
- Dynamics CRM 自定义上传附件的图片悬浮层显示
CRM中的附件是以流的形式保存在了数据库中,这样做的一个坏处是一旦系统运行时间久,附件上传的多了势必会导致数据库极速扩大,即影响系统的运行效率也对后期的迁移维护带来了不必要的麻烦.所以很多的客户都会要 ...
- salesforce零基础学习(八十九)使用 input type=file 以及RemoteAction方式上传附件
在classic环境中,salesforce提供了<apex:inputFile>标签用来实现附件的上传以及内容获取.salesforce 零基础学习(二十四)解析csv格式内容中有类似的 ...
- java上传附件,批量下载附件(一)
上传附件代码:借助commons-fileupload-1.2.jar package com.str; import java.io.BufferedInputStream;import java. ...
- AntD框架的upload组件上传图片时使用customRequest方法自定义上传行为
本次做后台管理系统,采用的是 AntD 框架.涉及到图片的上传,用的是AntD的 upload 组件. 我在上一篇文章<AntD框架的upload组件上传图片时使用customRequest方法 ...
- React项目中使用wangeditor以及扩展上传附件菜单
在最近的工作中需要用到富文本编辑器,结合项目的UI样式以及业务需求,选择了wangEditor.另外在使用的过程中发现wangEditor只有上传图片和视频的功能,没有上传文本附件的功能,所以需要对其 ...
- jquery 通过ajax FormData 对象上传附件
之前上传附件都是用插件,或者用form表单体检(这个是很久以前的方式了),今天突发奇想,自己来实现附件上传,具体实现如下 html: <div> 流程图: <input id=& ...
- Discuz模拟批量上传附件发帖
简介 对于很多用discuz做资源下载站来说,一个个上传附件,发帖是很繁琐的过程.如果需要批量上传附件发帖,就需要去模拟discuz 上传附件的流程. 模拟上传 discuz 附件逻辑 dz附件储存在 ...
- input file 图片上传
使用第三方:jquery.ajaxfileupload.jsinput中的name根据后端来定 <form method="post" enctype="multi ...
- Dynamic CRM 2013学习笔记(十三)附件上传 / 上传附件
上传附件可能是CRM里比较常用的一个需求了,本文将介绍如何在CRM里实现附件的上传.显示及下载.包括以下几个步骤: 附件上传的web页面 附件显示及下载的附件实体 调用上传web页面的JS文件 实体上 ...
随机推荐
- Python第十五天 datetime模块 time模块 thread模块 threading模块 Queue队列模块 multiprocessing模块 paramiko模块 fabric模块
Python第十五天 datetime模块 time模块 thread模块 threading模块 Queue队列模块 multiprocessing模块 paramiko模块 fab ...
- ANT property三种使用方式
方式一:引入*.properties文件 1.在cms.properties文件中定义属性 userName=admin 2.在build.xml中引入属性 <property file=&qu ...
- RuntimeException和Exception区别
1.java将所有的错误封装为一个对象,其根本父类为Throwable, Throwable有两个子类:Error和Exception. 2.Error是Throwable 的子类,用于指示合理的应用 ...
- python不能调试的原因
最近有一个python项目,打开项目不能登录,想调试一下看看为什么,发现不能调试了,郁闷了,搞了半天,发现是进程里有多个python.exe,结束掉就好了.
- LeetCode算法题-1-bit and 2-bit Characters(Java实现)
这是悦乐书的第302次更新,第321篇原创 01 看题和准备 今天介绍的是LeetCode算法题中Easy级别的第170题(顺位题号是717).有两个特殊字符,第一个字符可以用一个比特0表示,第二个字 ...
- MATLAB中“repmat”与“cat”函数的用法
MATLAB中“repmat”与“cat”函数的用法 作者:凯鲁嘎吉 - 博客园 http://www.cnblogs.com/kailugaji/ 1. repmat函数 >> z=re ...
- 五 Struts 配置文件
一.struts.xml详解1.package:包 属性:name=命名 namespace=在action访问路径前面加的前缀 extends=继承另外的包 action:name=action的访 ...
- pytorch中文文档-torch.nn.init常用函数-待添加
参考:https://pytorch.org/docs/stable/nn.html torch.nn.init.constant_(tensor, val) 使用参数val的值填满输入tensor ...
- 【数据库】+ powerdesigner
使用powerdesigner工具对现有数据库表 生成关系图:https://www.cnblogs.com/lusunqing/p/4128025.html 通过Excel生成PowerDesign ...
- vue 相关
1.vue v-for 循环一个数组,key值报错,但是数据是正常显示的 报错: v-for使用key,需要在key前加上:key;srcList是个数组,key值绑定不能是数据类型Object的it ...