Create an Azure SQL database in the Azure portal
Create a SQL database
An Azure SQL database is created with a defined set of compute and storage resources. The database is created within an Azure resource groupand in an Azure SQL Database logical server.
Follow these steps to create a SQL database containing the Adventure Works LT sample data.
Click the New button found on the upper left-hand corner of the Azure portal.
Select Databases from the New page, and select Create under SQL Database on the New page.
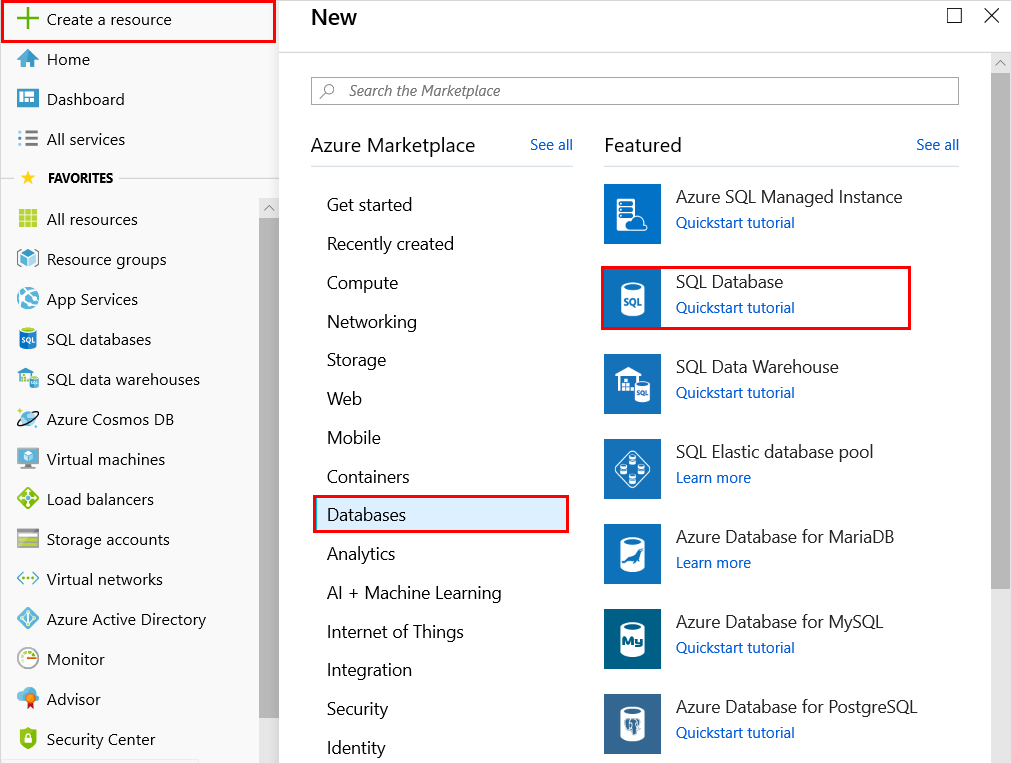
Fill out the SQL Database form with the following information, as shown on the preceding image:
| Setting | Suggested value | Description |
|---|---|---|
| Database name | mySampleDatabase | For valid database names, see Database Identifiers. |
| Subscription | Your subscription | For details about your subscriptions, see Subscriptions. |
| Resource group | myResourceGroup | For valid resource group names, see Naming rules and restrictions. |
| Source source | Sample (AdventureWorksLT) | Loads the AdventureWorksLT schema and data into your new database |
Important
You must select the sample database on this form because it is used in the remainder of this quick start.
Under Server, click Configure required settings and fill out the SQL server (logical server) form with the following information, as shown on the following image:
| Setting | Suggested value | Description |
|---|---|---|
| Server name | Any globally unique name | For valid server names, see Naming rules and restrictions. |
| Server admin login | Any valid name | For valid login names, see Database Identifiers. |
| Password | Any valid password | Your password must have at least 8 characters and must contain characters from three of the following categories: upper case characters, lower case characters, numbers, and and non-alphanumeric characters. |
| Subscription | Your subscription | For details about your subscriptions, see Subscriptions. |
| Resource group | myResourceGroup | For valid resource group names, see Naming rules and restrictions. |
| Location | Any valid location | For information about regions, see Azure Regions. |
Important
The server admin login and password that you specify here are required to log in to the server and its databases later in this quick start. Remember or record this information for later use.

When you have completed the form, click Select.
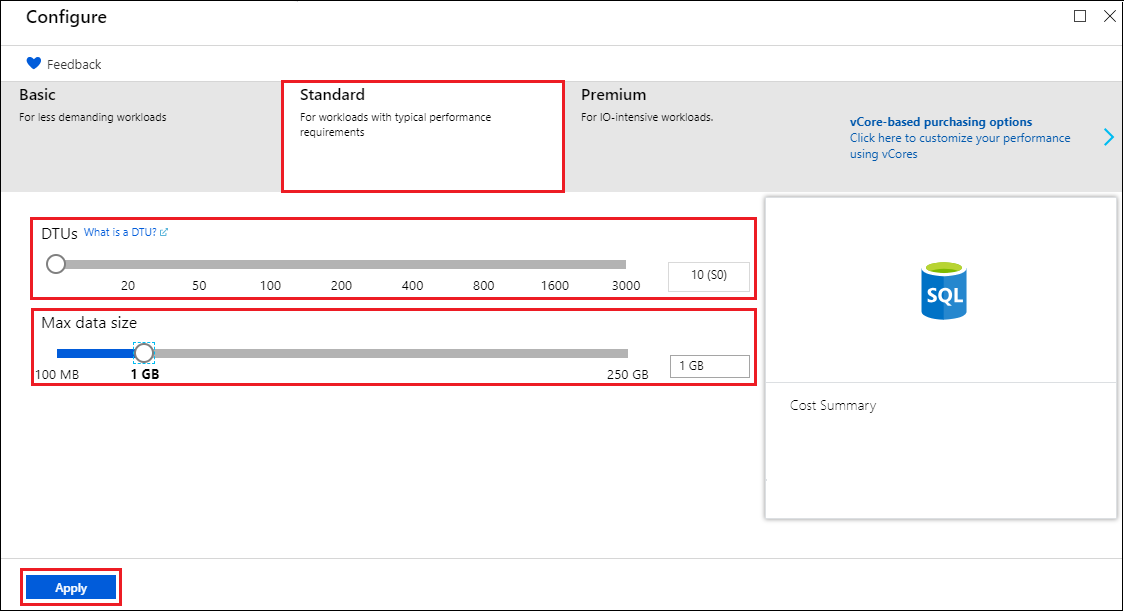
Click Pricing tier to specify the service tier, the number of DTUs, and the amount of storage. Explore the options for the amount of DTUs and storage that is available to you for each service tier.
Important
* Storage sizes greater than the amount of included storage are in preview and extra costs apply. For details, see SQL Database pricing.
* In the Premium tier, more than 1 TB of storage is currently available in the following regions: US East2, West US, US Gov Virginia, West Europe, Germany Central, South East Asia, Japan East, Australia East, Canada Central, and Canada East. See P11-P15 Current Limitations.
For this quick start tutorial, select the Standard service tier and then use the slider to select 100 DTUs (S3) and 400 GB of storage.
Accept the preview terms to use the Add-on Storage option.
Important
* Storage sizes greater than the amount of included storage are in preview and extra costs apply. For details, see SQL Database pricing.
* In the Premium tier, more than 1 TB of storage is currently available in the following regions: US East2, West US, US Gov Virginia, West Europe, Germany Central, South East Asia, Japan East, Australia East, Canada Central, and Canada East. See P11-P15 Current Limitations.
After selecting the server tier, the number of DTUs, and the amount of storage, click Apply.
Now that you have completed the SQL Database form, click Create to provision the database. Provisioning takes a few minutes.
On the toolbar, click Notifications to monitor the deployment process.

Create a server-level firewall rule
The SQL Database service creates a firewall at the server-level that prevents external applications and tools from connecting to the server or any databases on the server unless a firewall rule is created to open the firewall for specific IP addresses. Follow these steps to create a SQL Database server-level firewall rule for your client's IP address and enable external connectivity through the SQL Database firewall for your IP address only.
Note
SQL Database communicates over port 1433. If you are trying to connect from within a corporate network, outbound traffic over port 1433 may not be allowed by your network's firewall. If so, you cannot connect to your Azure SQL Database server unless your IT department opens port 1433.
After the deployment completes, click SQL databases from the left-hand menu and then click mySampleDatabase on the SQL databases page. The overview page for your database opens, showing you the fully qualified server name (such as mynewserver-20170824.database.windows.net) and provides options for further configuration.
Copy this fully qualified server name for use to connect to your server and its databases in subsequent quick starts.

Click Set server firewall on the toolbar as shown in the previous image. The Firewall settings page for the SQL Database server opens.

Click Add client IP on the toolbar to add your current IP address to a new firewall rule. A firewall rule can open port 1433 for a single IP address or a range of IP addresses.
Click Save. A server-level firewall rule is created for your current IP address opening port 1433 on the logical server.
Click OK and then close the Firewall settings page.
You can now connect to the SQL Database server and its databases using SQL Server Management Studio or another tool of your choice from this IP address using the server admin account created previously.
Important
By default, access through the SQL Database firewall is enabled for all Azure services. Click OFF on this page to disable for all Azure services.
Query the SQL database
Now that you have created a sample database in Azure, let’s use the built-in query tool within the Azure portal to confirm that you can connect to the database and query the data.
On the SQL Database page for your database, click Tools on the toolbar and then click Query editor (preview).

Click , click the Preview terms checkbox, and then click OK. The Query editor page opens.
Click Login, review the login information, and then click OK to log in using SQL server authentication with the server admin login and password that you created earlier.

Click OK to log in.
After you are authenticated as ServerAdmin, type the following query in the query editor pane.
SQLCopySELECT TOP 20 pc.Name as CategoryName, p.name as ProductName
FROM SalesLT.ProductCategory pc
JOIN SalesLT.Product p
ON pc.productcategoryid = p.productcategoryid;
Click Run and then review the query results in the Results pane.

Close the Query editor page, click OK to discard your unsaved edits, and then close the Tools page.
Clean up resources
Save these resources if you want to go to Next steps and learn how to connect and query your database using a number of different methods. If, however, you wish to delete the resources that you created in this quick start, use the following steps.
- From the left-hand menu in the Azure portal, click Resource groups and then click myResourceGroup.
- On your resource group page, click Delete, type myResourceGroup in the text box, and then click Delete.
Create an Azure SQL database in the Azure portal的更多相关文章
- [Windows Azure] Guidelines for Connecting to Windows Azure SQL Database
Guidelines for Connecting to Windows Azure SQL Database 6 out of 12 rated this helpful - Rate this t ...
- [转]Azure 表存储和 Windows Azure SQL Database - 比较与对照
本文转自:https://msdn.microsoft.com/library/azure/jj553018 更新时间: 2014年10月 作者:Valery Mizonov 和 Seth Manhe ...
- [Windows Azure] How to Create and Configure SQL Database
How to Create and Configure SQL Database In this topic, you'll step through logical server creation ...
- Azure SQL Database (21) 将整张表都迁移到Azure Stretch Database里
<Windows Azure Platform 系列文章目录> Azure SQL Database (19) Stretch Database 概览 Azure SQL Da ...
- Azure SQL Database (22) 迁移部分数据到Azure Stretch Database
<Windows Azure Platform 系列文章目录> Azure SQL Database (19) Stretch Database 概览 Azure SQL Da ...
- How to Use Lucene.NET with Windows Azure SQL Database
http://social.technet.microsoft.com/wiki/contents/articles/2367.how-to-use-lucene-net-with-windows-a ...
- Azure SQL Database (23) Azure SQL Database Dynamic Data Masking动态数据掩码
<Windows Azure Platform 系列文章目录> 我们在使用关系型数据的时候,有时候希望: - 管理员admin,可以查看到所有的数据 - 普通用户,某些敏感字段,比如信用卡 ...
- Azure SQL Database (25) Azure SQL Database创建只读用户
<Windows Azure Platform 系列文章目录> 本文将介绍如何在Azure SQL Database创建只读用户. 请先按照笔者之前的文章:Azure SQL Databa ...
- Azure SQL Database (22) Azure SQL Database支持中文值
<Windows Azure Platform 系列文章目录> 在笔者之前的文章里,已经介绍了如何使Azure SQL Database支持中文: SQL Azure(七) 在SQL Az ...
随机推荐
- 【mongoDB查询进阶】聚合管道(三)--表达式操作符
https://segmentfault.com/a/1190000010910985 管道操作符的分类 管道操作符可以分为三类: 阶段操作符(Stage Operators) 表达式操作符(Expr ...
- JSP报错:The superclass "javax.servlet.http.HttpServlet" was not found on the Java Build Path
今天使用Eclipse+Maven建立了一个Javaweb工程,并在eclipse中配置了Web容器Jboss eap 6.2.新建jsp页面,添加一个简单 的Java类.可是,JSP页面顶端出现“红 ...
- npm install 安装报错:npm ERR! EPERM npm ERR! -4048 npm ERR! Error: EPERM: operation not permitted, unlink 'D:\test\demo\code\materialT\node_modules\.staging'
更新项目依赖包,删除掉package-lock.json.node_modules,运行npm install,报如上错误信息,查询资料说是没有权限,本人用管理员身份打开powershell,运行np ...
- Java性能优化之String字符串优化
字符串是软件开发中最重要的对象之一.通常,字符串对象在内存中是占据了最大的空间块,因此如何高效地处理字符串,必将是提高整体性能的关键所在. 1.字符串对象及其特点 Java中八大基本数据类型没有Str ...
- jquery tooltip
这是个加了点淡入淡出效果的顶部tooltip控件,会自动消失 用法: <head> <title></title> <link href="base ...
- JS prototype 生成机制
默认的 prototype 属性是 Object() 对象,只不过每种类型或者自定义类型锁挂载的对象属性不同. 事实上,prototype 的生成是这样的: const Func = function ...
- netty同端口监听tcp和websocket协议
前言: 软件通信七层结构(osi模型)中由协议套协议最终组成最高级应用层协议(http等等),下三层结构偏向与数据通信,上三层更偏向于数据处理,中间的传输层则是连接上三层与下三层之间的桥梁,每一层都做 ...
- 阻止form表单中的input按下回车时提交表单
给form加属性:onsubmit="return false;"
- Centos7之Systemd(Service文件)详解
一.开机启动 对于那些支持 Systemd 的软件,安装的时候,会自动在/usr/lib/systemd/system目录添加一个配置文件. 如果你想让该软件开机启动,就执行下面的命令(以httpd. ...
- 用Flask+Redis维护代理池
GitHub:https://github.com/LXL-YAN/ProxyPool 视频讲解:https://www.bilibili.com/video/av19057145/?p=17