springboot与ActiveMQ整合
前言
很多项目, 都不是一个系统就做完了. 而是好多个系统, 相互协作来完成功能. 那, 系统与系统之间, 不可能完全独立吧?
如: 在学校所用的管理系统中, 有学生系统, 资产系统, 宿舍系统等等. 当学期结束之后, 是否需要对已经结束的期次进行归档操作. 假如归档功能在学生系统中, 那点击归档之后, 学生是不是还要关心宿舍那边是否已结束, 学生所领资产是否全都归还?
显然, 这并不是一个好的方式, 系统之间的耦合性做的太强了, 很不利于系统扩展, 而且, 一步操作, 可能要等很久很久, 才能完成. 用户可愿意等?
既然同步归档不可能了, 那是否有办法实现异步归档? 异步归档怎么实现呢?
我们其实可以通过消息队列来实现异步归档. 学生这边点击归档后, 发个消息到队列中, 其他系统自行去读取, 然后完成各自系统应该完成的工作.
ActiveMQ下载安装
下载地址: http://activemq.apache.org/download.html
安装过程比较简单, 在centos中, 解压出来, 就算是安装好了
运行方法:

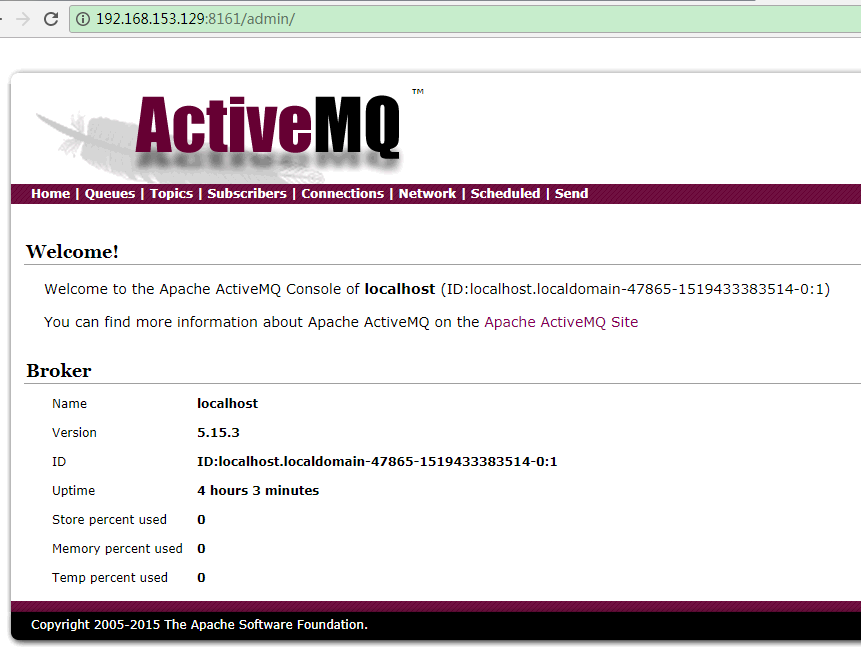
运行起来后, 可以通过 ip:8161 来查看是否成功.

点击红框中的链接, 会出现登录弹框, 账号密码默认都是admin.
springboot整合activemq
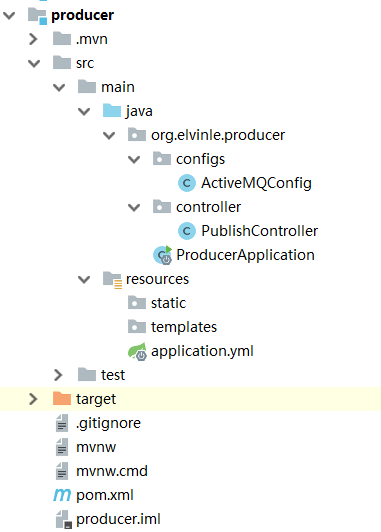
一. 目录结构

producer : 消息生产者
consumer-a : 消息消费者
consumer-b : 消息消费者
pom文件:
<dependency>

    <groupId>org.springframework.boot</groupId>

    <artifactId>spring-boot-starter-activemq</artifactId>

</dependency>
如果使用pool的话, 就需要在pom中加入以下依赖:
<dependency>

     <groupId>org.apache.activemq</groupId>

     <artifactId>activemq-pool</artifactId>

     <version>5.14.5</version>

</dependency>
二. producer
1. 目录结构
2. yml文件:
server:

  port: 8080

  context-path: /pro

spring:

  activemq:

    user: admin

    password: admin

    broker-url: tcp://192.168.153.129:

    pool:

      enabled: true

      max-connections: 10

queueName: publish.queue

topicName: publish.topic
这里我开启了连接池, 默认是不开的.
这里要注意端口, 不是之前的8161.
2. 配置文件 ActiveMQConfig
/**

 * @author: elvin

 */

@Configuration

public class ActiveMQConfig {

    @Value("${queueName}")

    private String queueName;

    @Value("${topicName}")

    private String topicName;

    @Value("${spring.activemq.user}")

    private String usrName;

    @Value("${spring.activemq.password}")

    private  String password;

    @Value("${spring.activemq.broker-url}")

    private  String brokerUrl;

    @Bean

    public Queue queue(){

        return new ActiveMQQueue(queueName);

    }

    @Bean

    public Topic topic(){

        return new ActiveMQTopic(topicName);

    }

    @Bean

    public ActiveMQConnectionFactory connectionFactory() {

        return new ActiveMQConnectionFactory(usrName, password, brokerUrl);

    }

    @Bean

    public JmsListenerContainerFactory<?> jmsListenerContainerQueue(ActiveMQConnectionFactory connectionFactory){

        DefaultJmsListenerContainerFactory bean = new DefaultJmsListenerContainerFactory();

        bean.setConnectionFactory(connectionFactory);

        return bean;

    }

    @Bean

    public JmsListenerContainerFactory<?> jmsListenerContainerTopic(ActiveMQConnectionFactory connectionFactory){

        DefaultJmsListenerContainerFactory bean = new DefaultJmsListenerContainerFactory();
        //设置为发布订阅方式, 默认情况下使用的生产消费者方式

        bean.setPubSubDomain(true);

        bean.setConnectionFactory(connectionFactory);

        return bean;

    }

}
这里本来不需要配置这么多的, 但是在consumer中也会用到, 所以就暂时弄一份一样的, 拷贝一下完事.
3. PublishController
/**

 * @author: elvin

 */

@RestController

@RequestMapping("/publish")

public class PublishController {

    @Autowired

    private JmsMessagingTemplate jms;

    @Autowired

    private Queue queue;

    @Autowired

    private Topic topic;

    @RequestMapping("/queue")

    public String queue(){

        for (int i = 0; i < 10 ; i++){

            jms.convertAndSend(queue, "queue"+i);

        }

        return "queue 发送成功";

    }

    @JmsListener(destination = "out.queue")

    public void consumerMsg(String msg){

        System.out.println(msg);

    }

    @RequestMapping("/topic")

    public String topic(){

        for (int i = 0; i < 10 ; i++){

            jms.convertAndSend(topic, "topic"+i);

        }

        return "topic 发送成功";

    }

}
三. consumer
1. 目录结构
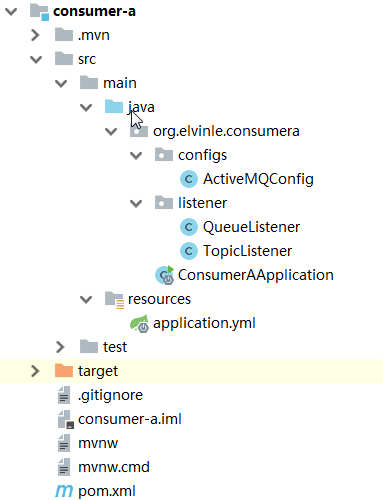
a,b是一样的, 只是显示的信息不同.
2. 配置文件
yml配置文件是一样的, 只是修改了端口和context-path.
ActiveMQConfig文件内容是一样的.
3. listener
/**

 * @author: elvin

 */

@Component

public class QueueListener {

    @JmsListener(destination = "publish.queue", containerFactory = "jmsListenerContainerQueue")

    @SendTo("out.queue")

    public String receive(String text){

        System.out.println("QueueListener: consumer-a 收到一条信息: " + text);

        return "consumer-a received : " + text;

    }

}
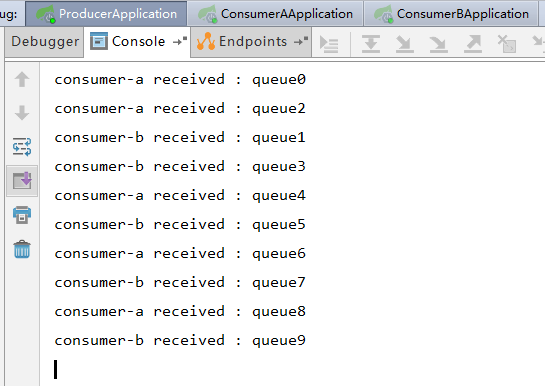
SendTo 会将此方法返回的数据, 写入到 queue : out.queue 中去.
/**

 * @author: elvin

 */

@Component

public class TopicListener {

    @JmsListener(destination = "publish.topic", containerFactory = "jmsListenerContainerTopic")

    public void receive(String text){

        System.out.println("TopicListener: consumer-a 收到一条信息: " + text);

    }

}
这里通过传入不同的factory, 来实现发送不同类型的信息.
四. 测试
1. queue测试
浏览器中访问: http://localhost:8080/pro/publish/queue
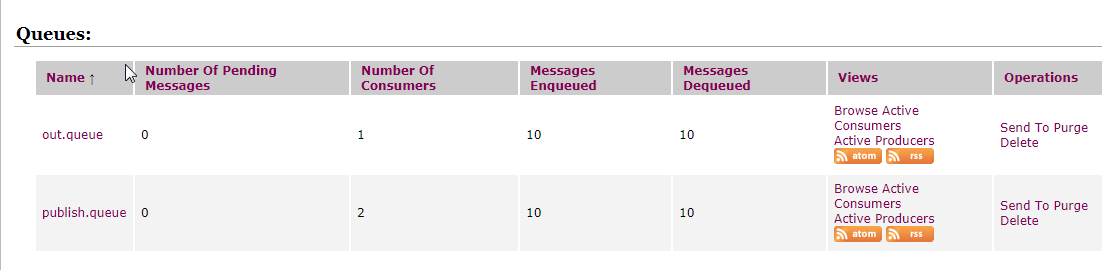
然后看一下, 控制台, 那些用户接收到了信息.
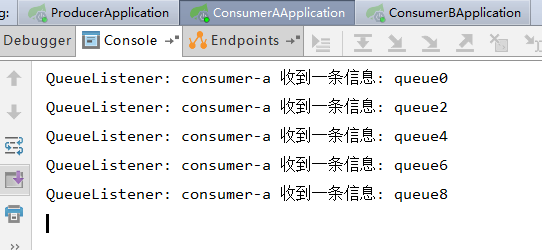

从上两幅图看的出来, a, b并不能同时接收数据. 这是queue的方式, 点对点.
那我想点对面, 怎么办?
2. topic测试
浏览器访问页面: http://localhost:8080/pro/publish/topic


a用户完全接收到信息了. 再看看b用户
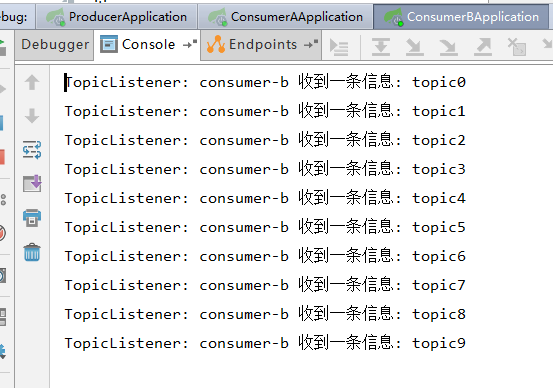
没毛病, 也都接收到数据了.
topic默认情况下, 是不会保存数据的, 也就是说, consumer是接收不到之前未接收到的信息.
而queue却是可以的.
但是, topic并不是不能实现那个功能, 只要配置一下, 还是可以的.
springboot与ActiveMQ整合的更多相关文章
- SpringBoot、ActiveMQ整合阿里大鱼-----短信服务
3.短信微服务 3.1需求分析 构建一个通用的短信发送服务(独立于优乐选的单独工程),接收activeMQ的消息(MAP类型) 消息包括手机号(mobile).短信模板号(template_code ...
- Spring Boot入门 and Spring Boot与ActiveMQ整合
1.Spring Boot入门 1.1什么是Spring Boot Spring 诞生时是 Java 企业版(Java Enterprise Edition,JEE,也称 J2EE)的轻量级代替品.无 ...
- 深入浅出JMS(四)--Spring和ActiveMQ整合的完整实例
第一篇博文深入浅出JMS(一)–JMS基本概念,我们介绍了JMS的两种消息模型:点对点和发布订阅模型,以及消息被消费的两个方式:同步和异步,JMS编程模型的对象,最后说了JMS的优点. 第二篇博文深入 ...
- JMS【四】--Spring和ActiveMQ整合的完整实例
第一篇博文JMS[一]--JMS基本概念,我们介绍了JMS的两种消息模型:点对点和发布订阅模型,以及消息被消费的两个方式:同步和异步,JMS编程模型的对象,最后说了JMS的优点. 第二篇博文JMS[二 ...
- SpringBoot与Mybatis整合方式01(源码分析)
前言:入职新公司,SpringBoot和Mybatis都被封装了一次,光用而不知道原理实在受不了,于是开始恶补源码,由于刚开始比较浅,存属娱乐,大神勿喷. 就如网上的流传的SpringBoot与Myb ...
- Springboot security cas整合方案-实践篇
承接前文Springboot security cas整合方案-原理篇,请在理解原理的情况下再查看实践篇 maven环境 <dependency> <groupId>org.s ...
- Springboot security cas整合方案-原理篇
前言:网络中关于Spring security整合cas的方案有很多例,对于Springboot security整合cas方案则比较少,且有些仿制下来运行也有些错误,所以博主在此篇详细的分析cas原 ...
- SpringBoot JMS(ActiveMQ) 使用实践
ActiveMQ 1. 下载windows办的activeMQ后,在以下目录可以启动: 2. 启动后会有以下提示 3. 所以我们可以通过http://localhost:8161访问管理页面,通过tc ...
- 使用Springboot + Gradle快速整合Mybatis-Plus
使用Springboot + Gradle快速整合Mybatis-Plus 作者:Stanley 罗昊 [转载请注明出处和署名,谢谢!] MyBatis-Plus(简称 MP)是一个 MyBatis ...
随机推荐
- 注入Shellcode并运行攻击
注入Shellcode并运行攻击 一.实验步骤 1.安装execstack并修改设置 安装execstack apt-get install execstack 设置堆栈可执行 execstack - ...
- golang打造基于mail的提醒服务
初识golang 逻辑如下: 程序开启http服务器接收请求,且每隔20秒查询一次表auto_backup中flag为0的值,如果有查到且计划执行时间小于当前时间,则将表to_do的数据抓出来,通过邮 ...
- 安装mysqlclient的时候出现Microsoft Visual C++ 14.0 is required报错
在安装mysqlclient的时候出现了以下报错: 解决办法: 1.到提示网址:https://visualstudio.microsoft.com/download/里面下载对应VC++版本安装后继 ...
- webpack简单教程
1.初始化 安装node后,新建一个目录,比如html5.cmd中切到当前文件夹. npm init -y 这个命令会创建一个默认的package.json.它包含了项目的一些配置参数,通过它可以进行 ...
- 如果解决小程序1024kb渲染之坑
问题: 在小程序开发中如果有那么个场景和操作步骤,获取商品下拉列表商品列表data为goodsList 当从后台获取数据response.data.list,通常我们会setData({goodsLi ...
- python学习笔记-调用接口
requests模块 1.get请求: url = 'http://api.nnzhp.cn/api/user/stu_info' data = {'stu_name':'小黑'} #请求数据 req ...
- Maven和Gradle的区别
转自:http://www.infoq.com/cn/news/2011/04/xxb-maven-6-gradle Maven面临的挑战 软件行业新旧交替的速度之快往往令人咂舌,不用多少时间,你就会 ...
- autium designer smart pdf一个小问题
今天在使用ad的smart pdf时遇到一个小问题 就是 使用的是AD17,生成PDF,PDF没有把芯片的引脚标号显示出来(还有其它的芯片也是一样的,但是奇怪的是:只有在原理图元器件右边的没有显示 ...
- C++ 一些特性
1. 初始化列表std::initializer_list,头文件<initializer_list> C++11提供了模板类template<class T> class ...
- html快速编写
1. 嵌套操作---------- 子操作: > div>ul>li <div> <ul> <li></li> </ul> ...