解决微信小程序登录与发布的一些问题
解决微信小程序的问题
图片在电脑上显示但在手机上却无法显示的问题
要使用的是本地图片,不想把图片上传到网络再通过https的方式解决,解决方法如下:
1.image src中的图片地址对英文字母大小写敏感,必须确认大小写对得上;
2.图片大小问题。本地图片要小于10KB才能顺利在真机上显示。
为什么图片只在本地调试的时候显示,手机预览和发布后 图片都不显示了!
微信小程序中,图片名不能出现中文,图片路径不能出现中文。
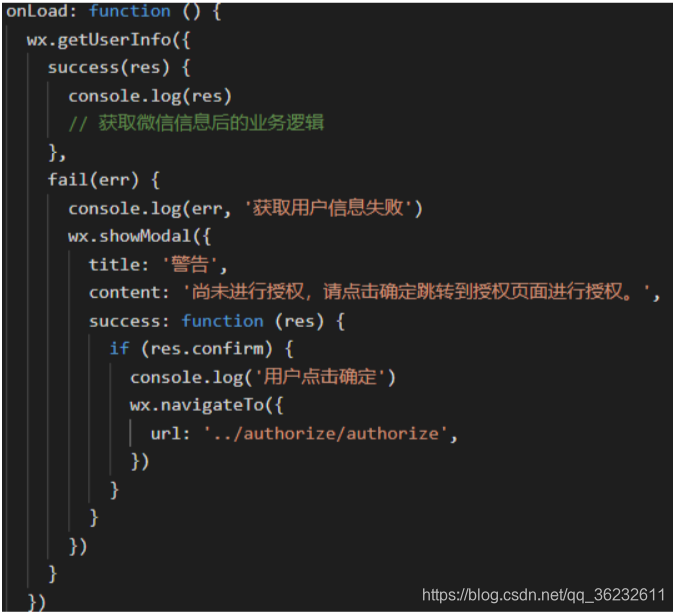
之前用户未授权过时,调用wx.getUserInfo会调出授权框;但现在在用户未授权过时调用该接口,会直接走fail方法。
要使用上述button来请求用户授权。
<button open-type="getUserInfo"></button>
<button wx:if="{{canIUse}}"  open-type="getUserInfo"

    bindgetuserinfo="bindGetUserInfo">授权登录</button>

<view wx:else>请升级微信版本</view>

index.js

Page({

  data: {

     //判断小程序的API,回调,参数,组件等是否在当前版本可用。

    canIUse: wx.canIUse('button.open-type.getUserInfo')

  },

  onLoad: function() {

    // 查看是否授权

    wx.getSetting({

      success: function(res){

        if (res.authSetting['scope.userInfo']) {

          wx.getUserInfo({

            success: function(res) {

              console.log(res.userInfo)

              //用户已经授权过

            }

          })

        }

      }

    })

  },

  bindGetUserInfo: function(e) {

    console.log(e.detail.userInfo)

    if (e.detail.userInfo){

      //用户按了允许授权按钮

    } else {

      //用户按了拒绝按钮

    }

  }

})
官方宣布,如果提审的小程序出现「启动即要求授权」和「强制要求授权」的情况,将会无法通过审核。
button 组件的 open-type 属性赋予了新的有效值 getUserInfo
// 加载微信用户信息

            // wx.getUserInfo({

            //   success: res => {

            //     console.log("wx获取 用户信息", res.userInfo);

            //     wx.setStorageSync("avatarUrl", res.userInfo.avatarUrl);

            //     wx.setStorageSync("nickName", res.userInfo.nickName);

            //   }

            // });
 wx.request({

              url: 'http://',

              method: 'POST',

              header: {

                Authorization: "Basic ",

                'Content-Type': 'application/x-www-form-urlencoded', // 默认值

              },

              data: {

                mobile: 'w@' + res.code,

                grant_type: 'mobile',

              },

              success: function(res) {

                console.log("button 成功", res.data);

                console.log("button token 成功", res.data.access_token);

                wx.setStorageSync("token", res.data.access_token);

                wx.showModal({

                  title: '提示',

                  content: '模态弹窗',

                  success: function(res) {

                    if (res.confirm) {

                      console.log('用户点击确定')

                    } else {

                      console.log('用户点击取消')

                    }

                  }

                })
onLoad: function () {

    var that = this;

    if (app.globalData.userInfo) {

      this.setData({

        userInfo: app.globalData.userInfo

      })

    } else if (this.data.canIUse) {

      // 由于 getUserInfo 是网络请求,可能会在 Page.onLoad 之后才返回

      // 所以此处加入 callback 以防止这种情况

      app.userInfoReadyCallback = res => {

        this.setData({

          userInfo: res.userInfo

        })

      }

    } else {

      // 在没有 open-type=getUserInfo 版本的兼容处理

      wx.getUserInfo({

        success: res => {

          app.globalData.userInfo = res.userInfo

          this.setData({

            userInfo: res.userInfo

          })

          that.checkSettingStatu();

        },

        fail: function () {

          wx.showModal({

            title: '用户未授权',

            content: '如需正常使用该小程序功能,请按确定并在授权管理中选中“用户信息”,然后点按确定。最后再重新进入小程序即可正常使用。',

            showCancel: false,

            success: function (resbtn) {

              if (resbtn.confirm) {

                wx.openSetting({

                  success: function success(resopen) {

                    //  获取用户数据

                    that.checkSettingStatu();

                  }

                });

              }

            }

          })

        }

      })

    }

  }

  // onload里面调用授权
checkSettingStatu: function (cb) {

    var that = this;

    // 判断是否是第一次授权,非第一次授权且授权失败则进行提醒

    wx.getSetting({

      success: function success(res) {

        var authSetting = res.authSetting;

        if (isEmptyObject(authSetting)) {

               //第一次

        } else {

          // 没有授权的提醒

          if (authSetting['scope.userInfo'] === false) {

            wx.showModal({

              title: '用户未授权',

              content: '如需正常使用该小程序功能,请按确定并在授权管理中选中“用户信息”,然后点按确定。最后再重新进入小程序即可正常使用。',

              showCancel: false,

              success: function (res) {

                if (res.confirm) {

                  wx.openSetting({

                    success: function success(res) {

                      console.log()

                    }

                  });

                }

              }

            })

          } else if (authSetting['scope.userInfo'] === true) {

                      //该处用户获取用户的一些授权信息

            if (that.data.userInfo) {

              var nickname = that.data.userInfo.nickName;

              var gender = that.data.userInfo.gender

              //性别 0:未知、1:男、2:女

              if (gender == 1) {

                gender = "True"

              } else if (gender == 2) {

                gender = "False"

              } else {

                gender = "True"

              }

            }

          }

        }

      }

    })

  }

  // 用于检测 当前授权的状态
简单的获取信息用于显示
<open-data type="userNickName"></open-data>

<open-data type="userAvatarUrl"></open-data>
<button open-type="getUserInfo">
获取用户信息
在页面加载后调用wx.getSetting方法可以获取当前用户的设置
wx.showModal({

            title: '提示',

            content: '模态弹窗',

            success: function (res) {

                if (res.confirm) {

                    console.log('用户点击确定')

                }else{

                   console.log('用户点击取消')

                }

            }

        })
新的调整之后 这个wx.getUserInfo()便不再出现授权弹窗了,需要使用button做引导~
<button wx:if="{{canIUse}}" open-type="getUserInfo" bindgetuserinfo="bindGetUserInfo">授权登录</button>

<view wx:else>请升级微信版本</view>
//js
Page({
data: {
canIUse: wx.canIUse('button.open-type.getUserInfo')
},
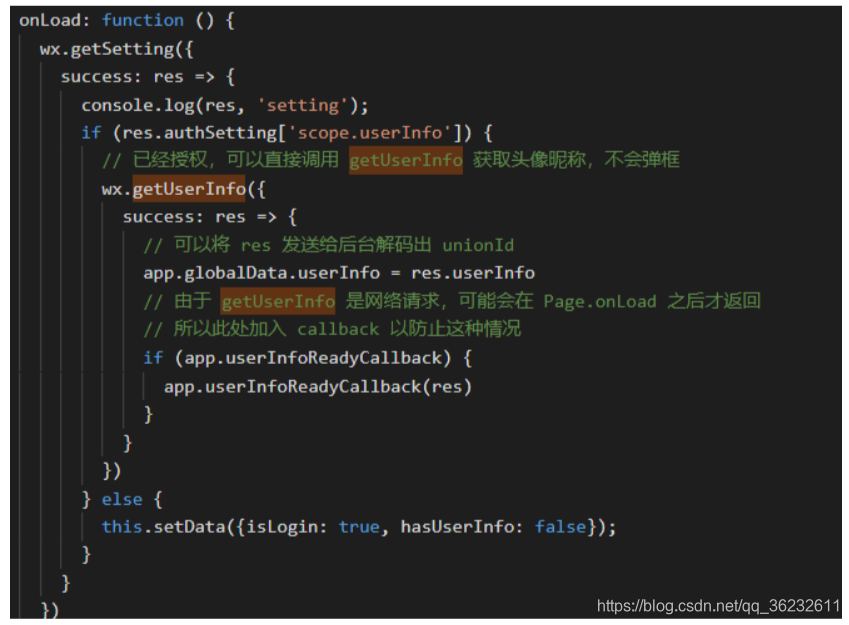
onLoad: function() {
// 查看是否授权
wx.getSetting({
success: function(res){
if (res.authSetting['scope.userInfo']) {
// 已经授权,可以直接调用 getUserInfo 获取头像昵称
wx.getUserInfo({
success: function(res) {
console.log(res.userInfo)
}
})
}
}
})
},
bindGetUserInfo: function(e) {
console.log(e.detail.userInfo)
}
})
<!-- 如果只是展示用户头像昵称,可以使用 <open-data /> 组件 -->

<open-data type="userAvatarUrl"></open-data>

<open-data type="userNickName"></open-data>

//index.js
//获取应用实例
const app = getApp()
Page({
data: {
motto: 'Hello World',
userInfo: {},
hasUserInfo: false,
getUserInfoFail:false,
canIUse: wx.canIUse('button.open-type.getUserInfo')
},
//事件处理函数
bindViewTap: function() {
wx.navigateTo({
url: '../logs/logs'
})
},
onShow:function(){
this.login();
},
onLoad: function () {
if (app.globalData.userInfo) {
console.log(1)
this.setData({
userInfo: app.globalData.userInfo,
hasUserInfo: true
})
} else if (this.data.canIUse){
console.log(2)
// 由于 getUserInfo 是网络请求,可能会在 Page.onLoad 之后才返回
// 所以此处加入 callback 以防止这种情况
app.userInfoReadyCallback = res => {
console.log(12)
app.globalData.userInfo = res.userInfo
this.setData({
userInfo: res.userInfo,
hasUserInfo: true
})
}
} else {
console.log(3)
// 在没有 open-type=getUserInfo 版本的兼容处理
wx.getUserInfo({
success: res => {
app.globalData.userInfo = res.userInfo
this.setData({
userInfo: res.userInfo,
hasUserInfo: true
})
},
fail:res=>{
console.log(4);
this.setData({
getUserInfoFail:true
})
}
})
}
},
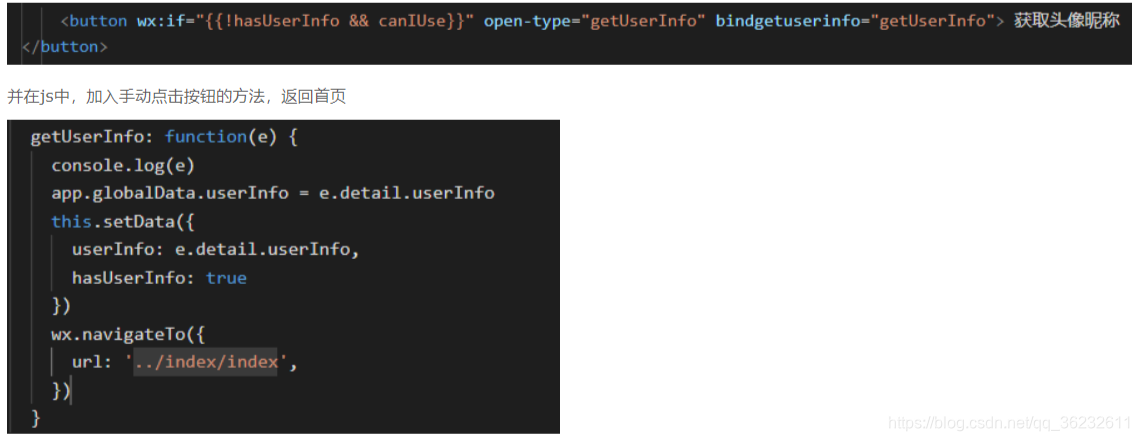
getUserInfo: function(e) {
console.log(5);
console.log(e)
if(e.detail.userInfo){
app.globalData.userInfo = e.detail.userInfo
this.setData({
userInfo: e.detail.userInfo,
hasUserInfo: true
})
}else{
this.openSetting();
}
},
login: function () {
console.log(111)
var that = this
// if (typeof success == "function") {
// console.log(6);
// console.log('success');
// this.data.getUserInfoSuccess = success
// }
wx.login({
success: function (res) {
var code = res.code;
console.log(code);
wx.getUserInfo({
success: function (res) {
console.log(7);
app.globalData.userInfo = res.userInfo
that.setData({
getUserInfoFail: false,
userInfo: res.userInfo,
hasUserInfo: true
})
//平台登录
},
fail: function (res) {
console.log(8);
console.log(res);
that.setData({
getUserInfoFail: true
})
}
})
}
})
},
//跳转设置页面授权
openSetting: function () {
var that = this
if (wx.openSetting) {
wx.openSetting({
success: function (res) {
console.log(9);
//尝试再次登录
that.login()
}
})
} else {
console.log(10);
wx.showModal({
title: '授权提示',
content: '小程序需要您的微信授权才能使用哦~ 错过授权页面的处理方法:删除小程序->重新搜索进入->点击授权按钮'
})
}
}
})
解决微信小程序登录与发布的一些问题的更多相关文章
- 解决微信小程序用 SpringMVC 处理http post时请求报415错误
解决微信小程序用 SpringMVC 处理http post时请求返回415错误 写微信小程序时遇到的问题,这个坑硬是让我整了半天 wx.request请求跟ajax类似处理方法一致 小程序端请求代码 ...
- Spring Security 整合 微信小程序登录的思路探讨
1. 前言 原本打算把Spring Security中OAuth 2.0的机制讲完后,用小程序登录来实战一下,发现小程序登录流程和Spring Security中OAuth 2.0登录的流程有点不一样 ...
- 一招解决微信小程序中的H5缓存问题
一招解决微信小程序中的H5缓存问题1.问题描述开发过程中,为了更新代码方便,往往会在小程序中嵌入H5页面.但问题来了,小程序原生代码更新版本后,简单的从微信中删除或者代码强刷就可以解决缓存问题,但小程 ...
- 如何解决微信小程序界面适配问题-引用-生命周期回调函数-优化机制-样式引入
如何解决微信小程序界面适配问题 .wxss page{ height: 100%; width:750rpx; } this.setData({ imageWidth: wx.getSystemInf ...
- 解决微信小程序使用wxcharts在屏幕不固定问题-开发工具里也显示好了布局,为啥到真机就是乱的
解决微信小程序使用wxcharts在屏幕不固定问题-开发工具里也显示好了布局,为啥到真机就是乱的 .chart{ width: 100%; text-align: center; } .canvas{ ...
- 微信小程序登录方案
微信小程序登录方案 登录程序 app.js 调用wx.login获取code 将code作为参数请求自己业务登录接口获取session_key 存储session_key 如果有回调执行回调 App( ...
- 微信小程序登录,获取code,获取openid,获取session_key
微信小程序登录 wx.login(Object object) 调用接口获取登录凭证(code).通过凭证进而换取用户登录态信息,包括用户的唯一标识(openid)及本次登录的会话密钥(session ...
- 基于Shiro,JWT实现微信小程序登录完整例子
小程序官方流程图如下,官方地址 : https://developers.weixin.qq.com/miniprogram/dev/framework/open-ability/login.html ...
- 微信小程序登录JAVA后台
代码地址如下:http://www.demodashi.com/demo/12736.html 登录流程时序登录流程时序 具体的登录说明查看 小程序官方API 项目的结构图: springboot项目 ...
随机推荐
- nginx学习笔记(二)
nginx变量 Nginx 变量值容器的生命期是与当前正在处理的请求绑定的,而与 location 无关. 通过 set 指令隐式创建的 Nginx 变量.这些变量我们一般称为"用户自定义变 ...
- 基础汇编指令(16bit 32bit 64bit)
(zz from http://blog.luoyuanhang.com/) ##常见寄存器 寄存器 16位 32位 64位 累加寄存器 accumulator AX EAX RAX 基址寄存器 ba ...
- 数据库database
1.创建数据库:create datebase financials create database if not exists financilas 2.查看数据库(所有): show da ...
- odoo8 元素简介
一:模型module: 1. 字段类型 (1)可控字段: fileds.char() fileds.Boolean() fileds.Date() (2)保留字段:(系统自动生成) id (Id) t ...
- linux简单安装方法
一.配置静态IP NAT:模式: 修改网卡eth0 vim /etc/sysconfig/network-scripts/ifcfg-eth0 内容如下: DEVICE=eth0 HWADDR=:0C ...
- HttpWebRequest.AddRange 支持long类型
很久很久以前,在哪个FAT32格式还流行的年代,文件大小普遍还没超过4G的年代,.Net已经出来了. 而那时候.Net实现的HTTP断点续传协议,还没预料到如此普及(我猜的).那时候的HttpWebR ...
- 关于python,完善我计算机知识的一步。
因为身为理科男,所以特别喜欢涉及其他领域的知识.而对我来说,计算机是很有诱惑力的--尤其是程序语言设计,懂得一门“外语”是多么的重要.大一时候接触过包括有计算机的基本知识,c语言,这个新的学期也开始接 ...
- squid 透明代理配置
阿铭在教程中已经介绍过squid的安装和配置,http://study.lishiming.net/chapter22.html 教程中只介绍了初级的正向代理和反向代理,这篇文档将要介绍透明代理如何配 ...
- 《Linux就该这么学》第十二天课程
使用ssh服务管理远程主机 绑定两块网卡 原创地址:https://www.linuxprobe.com/chapter-09.html 第1步:在虚拟机系统中再添加一块网卡设备,请确保两块网卡都处在 ...
- 从React组件划分的纠结到总结
在实际开发项目中,我将所有的React组件划分为容器组件和展示组件,展示组件其实就是一个纯函数组件,没有任何副作用,基本都是PureComponent.但是突然,出现了这么一个问题: 我有一个浮层组件 ...