
10.scrapy入门
Scrapy 框架
Scrapy是用纯Python实现一个为了爬取网站数据、提取结构性数据而编写的应用框架,用途非常广泛。
框架的力量,用户只需要定制开发几个模块就可以轻松的实现一个爬虫,用来抓取网页内容以及各种图片,非常之方便。
Scrapy 使用了 Twisted
['twɪstɪd](其主要对手是Tornado)异步网络框架来处理网络通讯,可以加快我们的下载速度,不用自己去实现异步框架,并且包含了各种中间件接口,可以灵活的完成各种需求。
Scrapy架构图(绿线是数据流向):
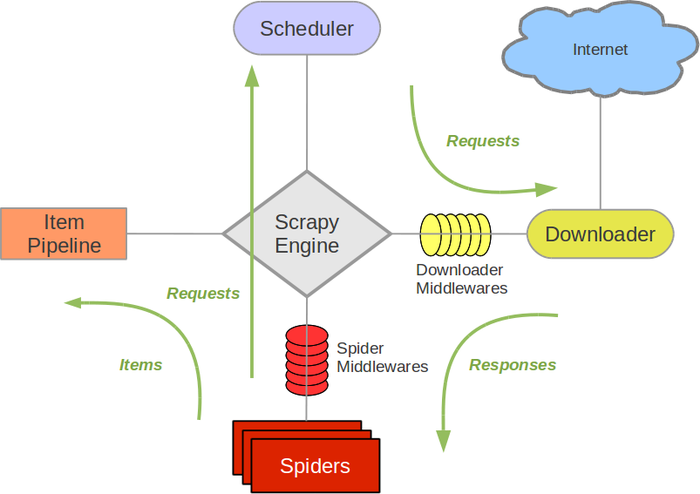
Scrapy Engine(引擎): 负责Spider、ItemPipeline、Downloader、Scheduler中间的通讯,信号、数据传递等。Scheduler(调度器): 它负责接受引擎发送过来的Request请求,并按照一定的方式进行整理排列,入队,当引擎需要时,交还给引擎。Downloader(下载器):负责下载Scrapy Engine(引擎)发送的所有Requests请求,并将其获取到的Responses交还给Scrapy Engine(引擎),由引擎交给Spider来处理,Spider(爬虫):它负责处理所有Responses,从中分析提取数据,获取Item字段需要的数据,并将需要跟进的URL提交给引擎,再次进入Scheduler(调度器),Item Pipeline(管道):它负责处理Spider中获取到的Item,并进行进行后期处理(详细分析、过滤、存储等)的地方.Downloader Middlewares(下载中间件):你可以当作是一个可以自定义扩展下载功能的组件。Spider Middlewares(Spider中间件):你可以理解为是一个可以自定扩展和操作引擎和Spider中间通信的功能组件(比如进入Spider的Responses;和从Spider出去的Requests)
制作 Scrapy 爬虫 一共需要4步:
- 新建项目 (scrapy startproject xxx):新建一个新的爬虫项目
- 明确目标 (编写items.py):明确你想要抓取的目标
- 制作爬虫 (spiders/xxspider.py):制作爬虫开始爬取网页
- 存储内容 (pipelines.py):设计管道存储爬取内容
Scrapy的安装介绍
1.windows下安装
a.pip3 install wheel

b.pip3 install lxml-3.7.-cp35-cp35m-win_amd64.whl

c.pip3 install Twisted-17.1.-cp35-cp35m-win_amd64.whl

d.安装pywin32

e.pip3 install Scrapy
2.ubuntu下安装
a.sudo apt-get install python3 python3-dev python-pip libxml2-dev libxslt1-dev zlib1g-dev libffi-dev libssl-dev

b.安装pip3

sudo apt-get install python3-pip

更新pip3

sudo pip3 --default-timeout= install –upgrade pip

c.安装scrapy

sudo pip3 --default-timeout= install scrapy

验证安装是否成功

scrapy
一. 新建项目(scrapy startproject)
- 在开始爬取之前,必须创建一个新的Scrapy项目。进入自定义的项目目录中,运行下列命令:
scrapy startproject mySpider
制作爬虫 (spiders/itcastSpider.py)
爬虫功能要分两步:
1. 爬数据
- 在当前目录下输入命令,将在
mySpider/spider目录下创建一个名为itcast的爬虫,并指定爬取域的范围:
scrapy genspider itcast "itcast.cn"
要建立一个Spider, 你必须用scrapy.Spider类创建一个子类,并确定了三个强制的属性 和 一个方法。
name = "":这个爬虫的识别名称,必须是唯一的,在不同的爬虫必须定义不同的名字。allow_domains = []是搜索的域名范围,也就是爬虫的约束区域,规定爬虫只爬取这个域名下的网页,不存在的URL会被忽略。start_urls = ():爬取的URL元祖/列表。爬虫从这里开始抓取数据,所以,第一次下载的数据将会从这些urls开始。其他子URL将会从这些起始URL中继承性生成。parse(self, response):解析的方法,每个初始URL完成下载后将被调用,调用的时候传入从每一个URL传回的Response对象来作为唯一参数,主要作用如下:- 负责解析返回的网页数据(response.body),提取结构化数据(生成item)
- 生成需要下一页的URL请求。
然后运行一下看看,在mySpider目录下执行:
scrapy crawl itcast
是的,就是 itcast,看上面代码,它是 ItcastSpider 类的 name 属性,也就是使用 scrapy genspider命令的唯一爬虫名。
代码部分:
pipelines.py
# -*- coding: utf- -*-

import json

class ItcastPipeline(object):

    # __init__方法是可选的,做为类的初始化方法

    def __init__(self):

        # 创建了一个文件

        self.filename=open('myteacher.json','w')

    # process_item方法是必须写的,用来处理item数据

    def process_item(self,item,spider):

        test_content=json.dumps(dict(item),ensure_ascii=False)+"\n"

        self.filename.write(test_content.encode('utf-8'))

    # close_spider方法是可选的,结束时调用这个方法

    def close_spider(self,spider):

        self.filename.close()
items.py
# -*- coding: utf-8 -*-
import scrapy

class ItcastItem(scrapy.Item):

    name=scrapy.Field()

    title=scrapy.Field()

    info=scrapy.Field()
爬虫文件
itcastspider.py
import scrapy

from mySpider.items import ItcastItem

class ItcastSpider(scrapy.Spider):

    name="itcast"

    allowd_domains=["http://www.itcast.cn/"]

    start_urls=[

        "http://www.itcast.cn/channel/teacher.shtml#aandroid",

        "http://www.itcast.cn/channel/teacher.shtml#ac",

        "http://www.itcast.cn/channel/teacher.shtml#acloud",

        "http://www.itcast.cn/channel/teacher.shtml#aios",

        "http://www.itcast.cn/channel/teacher.shtml#ajavaee",

        "http://www.itcast.cn/channel/teacher.shtml#anetmarket",

        "http://www.itcast.cn/channel/teacher.shtml#aphp",

        "http://www.itcast.cn/channel/teacher.shtml#apython",

        "http://www.itcast.cn/channel/teacher.shtml#astack",

        "http://www.itcast.cn/channel/teacher.shtml#aui",

        "http://www.itcast.cn/channel/teacher.shtml#aweb"

    ]

    def parse(self,response):

        items=[]

        teacher_list=response.xpath('//div[@class="li_txt"]')

        for content in teacher_list:

            name=content.xpath('./h3/text()').extract()

            title=content.xpath('./h4/text()').extract()

            info=content.xpath('./p/text()').extract()

            item = ItcastItem()

            item['name']=name[]

            item['title']=title[]

            item['info']=info[]

            # items.append(item)

            yield item

        # return items
保存数据
scrapy保存信息的最简单的方法主要有四种,-o 输出指定格式的文件,,命令如下:
# json格式,默认为Unicode编码

scrapy crawl itcast -o teachers.json

# json lines格式,默认为Unicode编码

scrapy crawl itcast -o teachers.jsonl

# csv 逗号表达式,可用Excel打开

scrapy crawl itcast -o teachers.csv

# xml格式

scrapy crawl itcast -o teachers.xml
爬取腾讯职位:pipelines.py
# -*- coding: utf- -*-

import json

class TencentPipeline(object):

    def __init__(self):

        self.fileName=open('job.json','w')

    def process_item(self, item, spider):

        text=json.dumps(dict(item),ensure_ascii=False)+"\n"

        self.fileName.write(text.encode('utf-8'))

        return item

    def close_spider(self,spider):

        self.fileName.close()
items.py
import scrapy

class TencentItem(scrapy.Item):

    positionName = scrapy.Field()

    positionLink = scrapy.Field()

    positionTpye = scrapy.Field()

    peopleNum = scrapy.Field()

    workLocation = scrapy.Field()

    publishTime = scrapy.Field()
tencentspider.py
# -*- coding: utf- -*-

import scrapy

from tencent.items import TencentItem

class TencentspiderSpider(scrapy.Spider):

    name = 'tencent'

    allowed_domains = ['tencent.com']

    offset=

    url = "http://hr.tencent.com/position.php?&start="

    start_urls = [url+str(offset)]

    def parse(self, response):

        root_list=response.xpath('//tr[@class="even"] | tr[@class="odd"]')

        for content in root_list:

            item=TencentItem()

            item['positionName'] =content.xpath('./td[1]/a/text()').extract()[]

            item['positionLink'] =content.xpath('./td[1]/a/@href').extract()[]

            item['positionTpye'] =content.xpath('./td[2]/text()').extract()[]

            item['peopleNum'] =content.xpath('./td[3]/text()').extract()[]

            item['workLocation'] =content.xpath('./td[4]/text()').extract()[]

            item['publishTime'] =content.xpath('./td[5]/text()').extract()[]

            yield item

        if self.offset<:

            self.offset+=

        yield scrapy.Request(self.url+str(self.offset),callable=self.parse)
爬取斗鱼图片
settings.py
# -*- coding: utf- -*-

ITEM_PIPELINES = {

'douyu.pipelines.ImagesPipeline': ,

}

IMAGES_STORE = "/Users/Power/lesson_python/1103/day04/douyu/Images"
items.py
# -*- coding: utf- -*-

import scrapy

class DouyuItem(scrapy.Item):
nickname = scrapy.Field()
imagelink = scrapy.Field()
imagePath = scrapy.Field()
#pass
pipelines.py
# -*- coding: utf-8 -*-

import scrapy
from scrapy.utils.project import get_project_settings
from scrapy.pipelines.images import ImagesPipeline
import os

class ImagesPipeline(ImagesPipeline):
    #def process_item(self, item, spider):
    #    return item
    # 获取settings文件里设置的变量值
    IMAGES_STORE = get_project_settings().get("IMAGES_STORE")

    def get_media_requests(self, item, info):
        image_url = item["imagelink"]
        yield scrapy.Request(image_url)

    def item_completed(self, result, item, info):
        image_path = [x["path"] for ok, x in result if ok]

        os.rename(self.IMAGES_STORE + "/" + image_path[0], self.IMAGES_STORE + "/" + item["nickname"] + ".jpg")

        item["imagePath"] = self.IMAGES_STORE + "/" + item["nickname"]

        return item
douyumeinv.py
# -*- coding: utf-8 -*-
import scrapy
from douyu.items import DouyuItem
import json

class DouyumeinvSpider(scrapy.Spider):
    name = "douyumeinv"
    allowed_domains = ["capi.douyucdn.cn"]

    offset = 0
    url = "http://capi.douyucdn.cn/api/v1/getVerticalRoom?limit=20&offset="

    start_urls = [url + str(offset)]

    def parse(self, response):
        # 把json格式的数据转换为python格式,data段是列表
        data = json.loads(response.text)["data"]
        for each in data:
            item = DouyuItem()
            item["nickname"] = each["nickname"]
            item["imagelink"] = each["vertical_src"]

            yield item

        self.offset += 20
        yield scrapy.Request(self.url + str(self.offset), callback = self.parse)
10.scrapy入门的更多相关文章
- [转]Scrapy入门教程
关键字:scrapy 入门教程 爬虫 Spider 作者:http://www.cnblogs.com/txw1958/ 出处:http://www.cnblogs.com/txw1958/archi ...
- Scrapy入门教程
关键字:scrapy 入门教程 爬虫 Spider作者:http://www.cnblogs.com/txw1958/出处:http://www.cnblogs.com/txw1958/archive ...
- scrapy入门使用
scrapy入门 创建一个scrapy项目 scrapy startporject mySpider 生产一个爬虫 scrapy genspider itcast "itcast.cn&qu ...
- Scrapy入门教程(转)
关键字:scrapy 入门教程 爬虫 Spider作者:http://www.cnblogs.com/txw1958/出处:http://www.cnblogs.com/txw1958/archive ...
- 小白学 Python 爬虫(34):爬虫框架 Scrapy 入门基础(二)
人生苦短,我用 Python 前文传送门: 小白学 Python 爬虫(1):开篇 小白学 Python 爬虫(2):前置准备(一)基本类库的安装 小白学 Python 爬虫(3):前置准备(二)Li ...
- 小白学 Python 爬虫(35):爬虫框架 Scrapy 入门基础(三) Selector 选择器
人生苦短,我用 Python 前文传送门: 小白学 Python 爬虫(1):开篇 小白学 Python 爬虫(2):前置准备(一)基本类库的安装 小白学 Python 爬虫(3):前置准备(二)Li ...
- 小白学 Python 爬虫(36):爬虫框架 Scrapy 入门基础(四) Downloader Middleware
人生苦短,我用 Python 前文传送门: 小白学 Python 爬虫(1):开篇 小白学 Python 爬虫(2):前置准备(一)基本类库的安装 小白学 Python 爬虫(3):前置准备(二)Li ...
- 小白学 Python 爬虫(37):爬虫框架 Scrapy 入门基础(五) Spider Middleware
人生苦短,我用 Python 前文传送门: 小白学 Python 爬虫(1):开篇 小白学 Python 爬虫(2):前置准备(一)基本类库的安装 小白学 Python 爬虫(3):前置准备(二)Li ...
- 小白学 Python 爬虫(38):爬虫框架 Scrapy 入门基础(六) Item Pipeline
人生苦短,我用 Python 前文传送门: 小白学 Python 爬虫(1):开篇 小白学 Python 爬虫(2):前置准备(一)基本类库的安装 小白学 Python 爬虫(3):前置准备(二)Li ...
随机推荐
- selinux 导致ftp文件夹出错~
关掉selinux #setenforce 0
- ATM作业
关于ATM作业,最近做了很久,才明白,其实看了很久的作业视频讲解,到不如将作业的整个下载下来进行运行,去了解程序本身的结构和运行方式.首先说需求,就感觉是各种懵逼,这才学了函数,和模块之间的简单调用就 ...
- NOIP需要掌握的内容(大致
1.排序算法(快排.选择.冒泡.堆排序.二叉排序树.桶排序)2.DFS/BFS 剪枝 哈希表3.树 ①遍历 ②二叉树 ③二叉排序树(查找.生成.删除) ④堆(二叉堆.左偏树.堆排序) ...
- Codeforces 791B. Bear and Friendship Condition 联通快 完全图
B. Bear and Friendship Condition time limit per test:1 second memory limit per test:256 megabytes in ...
- python——处理xls表格
因为工作需要,现有一个运营商导出的xls固定电话话费账单. 账单比较详细,而我最终需要的数据只有那个号码这个月用了多少话费的统计结果. 当年没有好好学office,以致于无从下手.泪奔/(ㄒoㄒ)/~ ...
- echo 变量不加引号出错
result=`ps aux | grep “×××” |grep -v “×××” start_time=$(echo $result | awk '{print $9}') 问题:发现输出是 s ...
- android 4.0 webview 无法播放视频
Android4.0+webview中不能播放网页视频解决方法: 1.修改AndroidManifest.xml文件 在application中添加如下属性 android:hardwareAccel ...
- 【Linux】开机自动启动脚本
Linux下(以RedHat为范本)添加开机开机自动启动脚本有两种方式; 本例系统:Linux(CentOS 7.2) 方法一 使用 /etc/rc.d/rc.local,自动启动脚本 #!/bin/ ...
- [html]Sublime Text添加插件
今天想在Sublime Text(简称ST)内编写HTML后直接使用浏览器看效果,想添加View in Browser插件,然后遇到奇怪的问题添加插件直接报"找不到有用的插件" 一 ...
- git版本控制工具的使用(1)。
为了使用. 感谢:https://www.liaoxuefeng.com/wiki/0013739516305929606dd18361248578c67b8067c8c017b000 讲解的很清晰, ...