Unity for Windows: II – Publishing Unity games to Windows Store
原地址:http://digitalerr0r.wordpress.com/2013/08/27/unity-for-windows-ii-publishing-to-windows-8/

Windows 8 is a new OS with a Windows Store where you can distribute your apps to millions of users world wide, for both PC, laptops and tablets.
You can sell your apps, use in-app purchases or/and use ads to monetize!
(Publishing to Windows Phone 8 will be covered in part III)
Today we are going to export the game we created in part I of the tutorial as a Windows Store solution that runs on all devices using Windows 8.
Start with opening the game from part I (download here) in Unity and check if it runs like it should (open gameScene and run the game).

You should be able to play and come to the game over screen if an invader gets to the left side of the screen.
Download: Tutorial part II assets
I. Handling the snapped view ( snap view )
To make our game pass the Windows Store certification (so it gets publishes), we need to handle snapped view mode in our unity game – when the player decides to snap the game of the side of the screen.
What games got in common is that it’s hard to play in snap mode (Really just a resolution change).
A common way to handle snap mode is by simply pausing the game! But how do we pause the game? Let’s write a script that sets the game in pause – and that will be invoked from the exported solution we soon will create.
Add a new Script to the Scripts folder
using UnityEngine;
using System.Collections;
public static class Windows8Handler {
public static void PauseGame(bool p)
{
if (p)
{
Time.timeScale = 0.0f;
}
else Time.timeScale = 1.0f;
}
}
This function is a public static function – we can call it from wherever we want and don’t need to create an instance of the class to use it.
Ok! This is all we need from Unity, the next step in handling snap view will be from the exported solution.
II. Getting ready to export the Windows Store App
Create a new folder named Publishing in the Assets folder and add the three logo textures for our game (you can find them in the assets zip for this tutorial):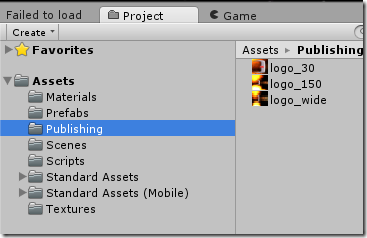
Setting the platform to Windows Store
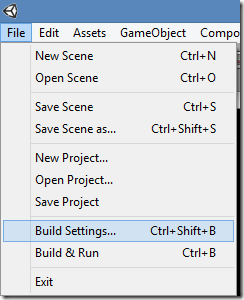
Click File->Build Settings…
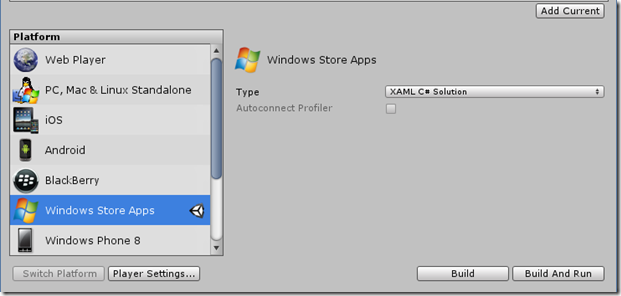
Scroll down on the platform selector and select Windows Store Apps:
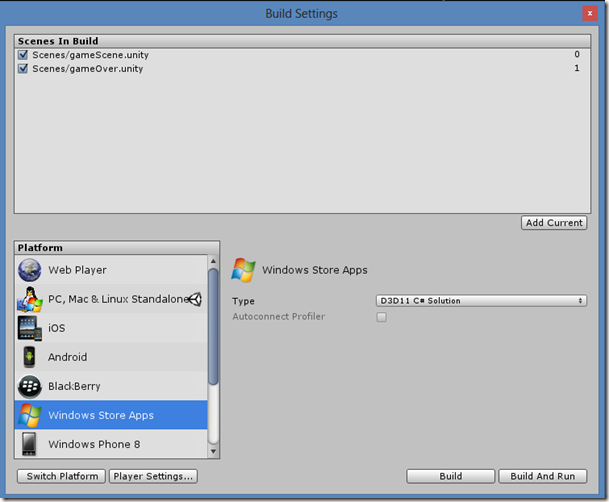
Click the Switch Platform button to make the Windows 8 platform our standard (you can still export to the other platforms).
Now, click the Player Settings… button to view the properties for this platform in this solution.
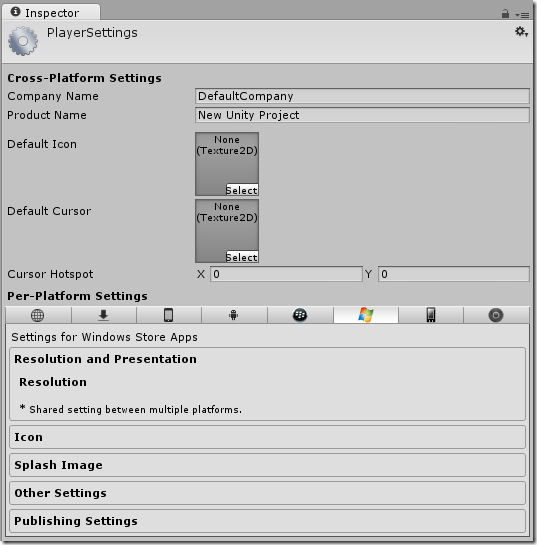
This screen will let you change a lot of properties based on the platform you want to publish to. Clicking the Publishing Settings tab in the bottom will open the spesific settings for the selected platform. Click this now: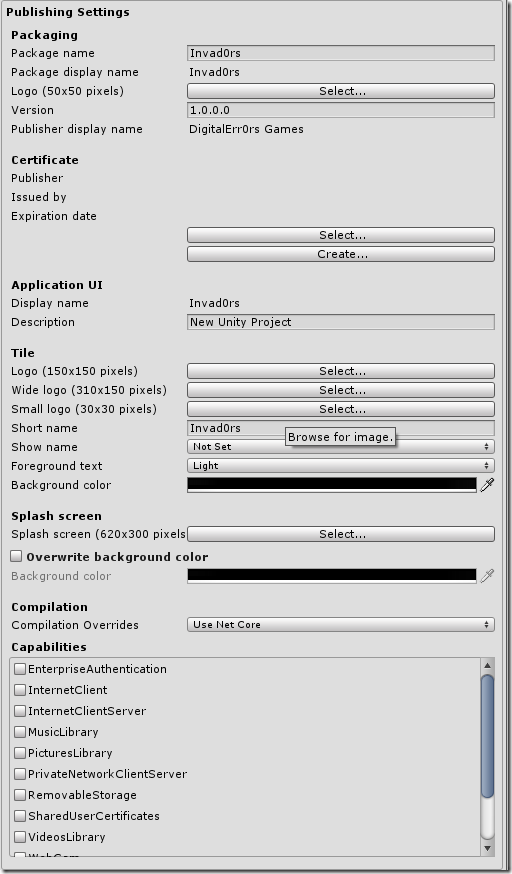
Set the Tile logo properties like this, using the three textures we added to the publishing folder: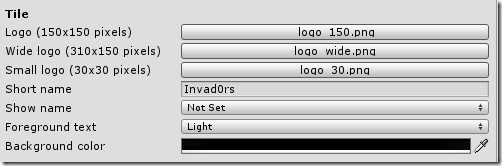
This sets the game tiles for our game (Icons from the start menu).
We also need to set the splash screen for our game. Set it to splash.png from the tutorials assets folder:

III. Exporting the package
To export your game, go the Build Settings (File->Build Settings…) again and click Build:
Save it in a folder of your choice (I created a Windows8 folder in the Unity solution). A Visual Studio solution is now built for the game. It might take a couple of minutes..
A folder where the project is located will be openet and will look something like this: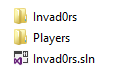
IV. Opening the project in Visual Studio to build the store pacakge
To open this, you will need Visual Studio 2013. If you are a student you might can get a licence from www.dreamspark.com, if not, you can download the express version for free here: http://www.microsoft.com/visualstudio/eng/products/visual-studio-express-for-windows-8
Once this is installed, open the Invad0rs.sln in Visual Studio 2012.
The project is now loaded in Visual Studio 2012: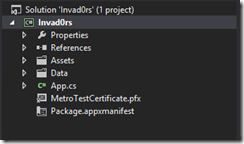
Now change the build arcitecture to the correct one (probably x86):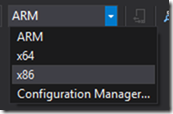
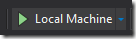
Click Play on Local Machine (Windows 8) to build the Windows Store app package (.appx) and run the game:
The game will now deploy on your Windows 8 device, and run perfectly. You can also see from the start menu that the tiles we created are used:
V. Continue the implementation / support of Snapped View
How we do this depends on what you selected when exporting the project. There was a drop down list in Unitys export tool: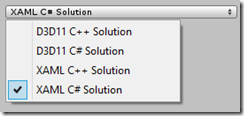
a) XAML C# Solution
Open the App.xaml.cs file: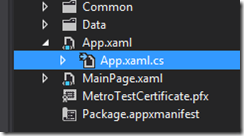
The file will look like this (I will show you the entire code – everything is not very interesting here, I will highlight the important things:
using System;
using System.Collections.Generic;
using System.IO;
using System.Linq;
using Windows.ApplicationModel;
using Windows.ApplicationModel.Activation;
using Windows.Foundation;
using Windows.Foundation.Collections;
using Windows.UI.Core;
using Windows.UI.Xaml;
using Windows.UI.Xaml.Controls;
using Windows.UI.Xaml.Controls.Primitives;
using Windows.UI.Xaml.Data;
using Windows.UI.Xaml.Input;
using Windows.UI.Xaml.Media;
using Windows.UI.Xaml.Navigation;
using UnityPlayer;
using Windows.UI.ViewManagement;
// The Blank Application template is documented at http://go.microsoft.com/fwlink/?LinkId=234227
namespace Template
{
/// <summary>
/// Provides application-specific behavior to supplement the default Application class.
/// </summary>
sealed partial class App : Application
{
private WinRTBridge.WinRTBridge _bridge;
private AppCallbacks appCallbacks;
/// <summary>
/// Initializes the singleton application object. This is the first line of authored code
/// executed, and as such is the logical equivalent of main() or WinMain().
/// </summary>
public App()
{
this.InitializeComponent();
appCallbacks = new AppCallbacks(false);
}
/// <summary>
/// Invoked when the application is launched normally by the end user. Other entry points
/// will be used when the application is launched to open a specific file, to display
/// search results, and so forth.
/// </summary>
/// <param name=”args”>Details about the launch request and process.</param>
protected override void OnLaunched(LaunchActivatedEventArgs args)
{
Frame rootFrame = Window.Current.Content as Frame;
// Do not repeat app initialization when the Window already has content,
// just ensure that the window is active
if (rootFrame == null)
{
var mainPage = new MainPage();
Window.Current.Content = mainPage;
Window.Current.Activate();
// Setup scripting bridge
_bridge = new WinRTBridge.WinRTBridge();
appCallbacks.SetBridge(_bridge);
appCallbacks.SetSwapChainBackgroundPanel(mainPage.GetSwapChainBackgroundPanel());
appCallbacks.SetCoreWindowEvents(Window.Current.CoreWindow);
appCallbacks.InitializeD3DXAML();
}
Window.Current.Activate();
Window.Current.SizeChanged += Current_SizeChanged;
}
void Current_SizeChanged(object sender, WindowSizeChangedEventArgs e)
{
ApplicationViewState myViewState = ApplicationView.Value;
if (myViewState == ApplicationViewState.Snapped)
{
AppCallbacks.Instance.InvokeOnAppThread(new AppCallbackItem(() => {
Windows8Handler.PauseGame(true);
}), false);
} else {
AppCallbacks.Instance.InvokeOnAppThread(new AppCallbackItem(() => {
Windows8Handler.PauseGame(false);
}), false);
}
}
}
}
First of all, we add a using statement for the Windows.UI.ViewManagement, then we add a listener to the SizeChanged event, this is the event the app uses to know how to handle a change in resolution/screen size – what snap view really is.
Now, the body of this function looks a bit strange.
What we do here is to get the new state our app is in, and then check if this state is the snapped state.
What’s next is that we use the AppCallbacks.Instance.InvokeOnAppThread to communicate with “our game” on the same thread, meaning we simply can call Windows8Handler.PauseGame(true); 
If it’s not snapped view, we unpause the game.
Simple? 
b) XAML C++ Solution
Not yet written..
c) D3D11 C# Solution
Not yet written..
d) D3D11 C++ Solution
Not yet written..
VI. Setting some important project properties before we are ready to submit
Now, there is a couple of things we need to do before we can send this to the Windows Store for publishing. Click PROJECT->Invad0rs Properties…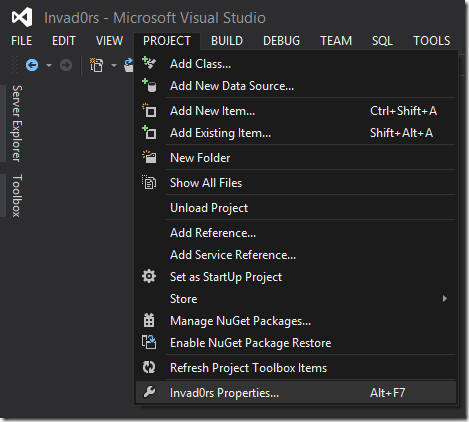
On the Applications tab, click Assembly Information: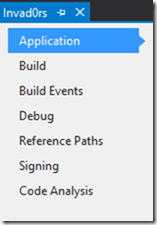
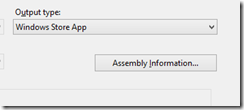
Set the Language to the language of the app: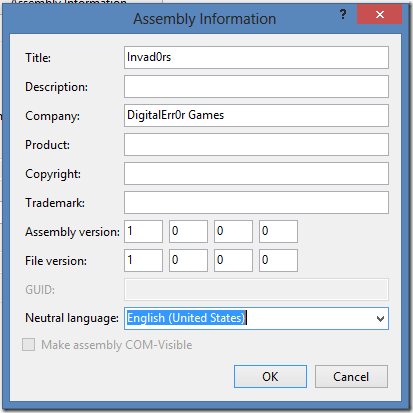
Also, fill out the fields you need, and click OK.
VII. Creating a publishing account on Windows Store and create your app project in the portal
Creating an account and registering as a publisher is quite easy. Just go tohttp://dev.windows.com, register your account and get it verified (might take a few minutes to a couple of days).
Creating a project on Windows Store
Go to dev.windows.com, log in with your account and click “DASHBOARD”: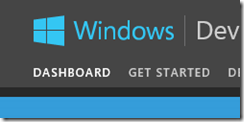
Now click Submit new app (or something similar):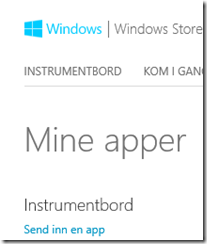
(Screenshot is Norwegian but should be the same)
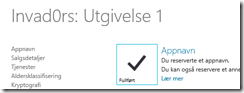
Now, the first thing we want to do is to reserve an app name so nobody else takes it. Do this now (step 1 on the page) and save:
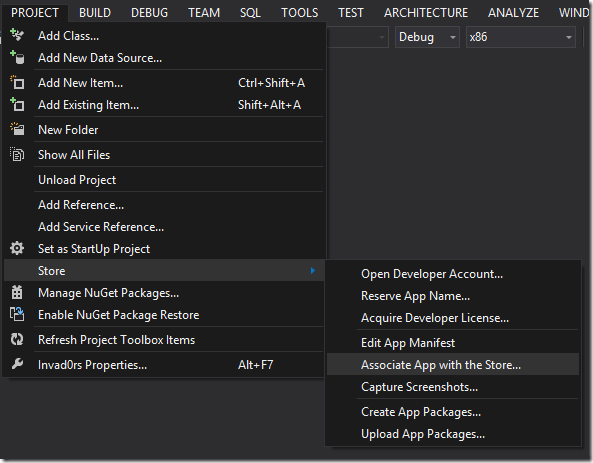
Binding the app in Visual Studio 2012 to the new App name we just created is simple. Go to Visual Studio 2012, make sure the game project is opened and click Project->Associate App with Store…
Sign in with your developer account. A list of your apps in Store will be displayed. Find the one you just reserved for this project: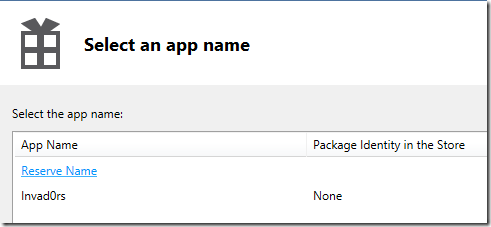
Click the project name, and click next.
Then review that it looks right, and click Associate:
Now we are ready to create the App Package for publishing.
VIII. Building the appx file
Click PROJECT->Store->Create App Packages: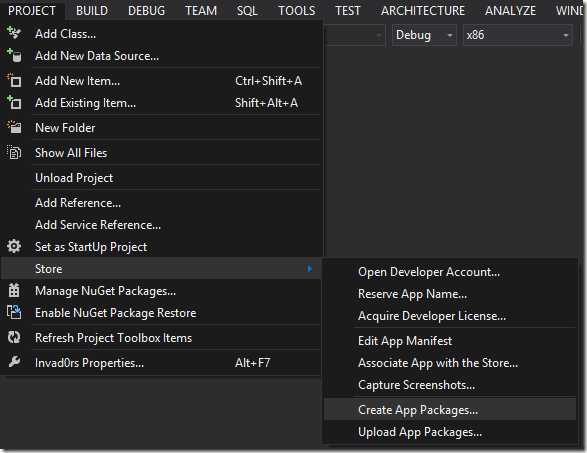
Select Yes that you want to upload the package: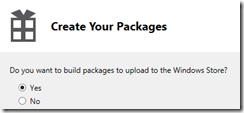
And click Sign in.
Select the app from the list again: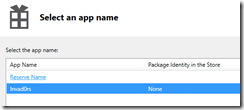
Click next, note the path where the App Package will be generated, and check of the different architectures you want the app on: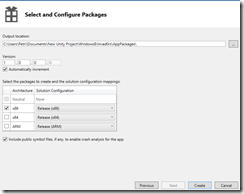
Click Create to generate the package. A few tests will be run on the packages to ensure you meet a lot of store requirements like memory usage, performance, startup time and so on. Just leave it running and let your computer be for the tests.. don’t disturb it!
Once done, the appx file is created.
Now, go back to the Windows Store page where you reserved the name, follow the rest of the steps and upload the appx file. Then submit the app and it will be sent for testing. This can take a few days.
If your app is accepted, it can be found in the Windows Store. If not, fix the errors they found and resumit (just dont give up!).
And.. good luck with your sales!
Download: Tutorial part II assets
Unity for Windows: II – Publishing Unity games to Windows Store的更多相关文章
- Unity for Windows: III–Publishing your unity game to Windows Phone Store
原地址:http://digitalerr0r.wordpress.com/2013/08/27/unity-for-windows-iiipublishing-to-windows-phone-st ...
- Unity教程之再谈Unity中的优化技术
这是从 Unity教程之再谈Unity中的优化技术 这篇文章里提取出来的一部分,这篇文章让我学到了挺多可能我应该知道却还没知道的知识,写的挺好的 优化几何体 这一步主要是为了针对性能瓶颈中的”顶点 ...
- 【Unity】第6章 Unity脚本开发基础
分类:Unity.C#.VS2015 创建日期:2016-04-16 一.简介 游戏吸引人的地方在于它的可交互性.如果游戏没有交互,场景做得再美观和精致,也难以称其为游戏. 在Unity中,游戏交互通 ...
- 【Unity】1.1 安装Unity 5.3.4 开发环境
分类:Unity.C#.VS2015 创建日期:2016-03-23 一.简介 Unity分个人版(Personal)和专业版(Pro).个人版是免费的(部分高级功能受限,但初学者也用不到它),Pro ...
- DEPLOYING NATIVE UWP (UNIVERSAL WINDOWS PLATFORM) APPS FOR JAVA DEVELOPERS & PUBLISHING THEM TO THE MICROSOFT STORE
原文: DEPLOYING NATIVE UWP (UNIVERSAL WINDOWS PLATFORM) APPS FOR JAVA DEVELOPERS & PUBLISHING THEM ...
- Windows学习总结(12)——Windows 10系统开始运行-cmd命令大全
gpedit.msc-----组策略 sndrec32-------录音机 Nslookup-------IP地址侦测器 explorer-------打开资源管理器 logoff---------注 ...
- SQLSERVER误删除了Windows登录用户验证方式使用Windows身份验证的解决方法
SQLSERVER误删Windows登录用户验证方式使用Windows身份验证的解决方法 今天看到这篇文章:没有了SA密码,无法Windows集成身份登录,DBA怎么办? 想起来之前着急哥问我的一个问 ...
- What's new in Windows 10 Enterprise with Microsoft Edge.(Windows 10 新功能)
What's new in Windows 10 Enterprise with Microsoft Edge --带有Edge浏览器的Windows 10 企业版的新功能 本文摘录自公司群发邮件, ...
- 玩转Windows服务系列——无COM接口Windows服务启动失败原因及解决方案
将VS创建的Windows服务项目编译生成的程序,通过命令行 “服务.exe -Service”注册为Windows服务后,就可以通过服务管理器进行管理了. 问题 通过服务管理器进行启动的时候,发现服 ...
随机推荐
- hdu 4819 二维线段树模板
/* HDU 4819 Mosaic 题意:查询某个矩形内的最大最小值, 修改矩形内某点的值为该矩形(Mi+MA)/2; 二维线段树模板: 区间最值,单点更新. */ #include<bits ...
- 2017-2018-1 JAVA实验站 冲刺 day02
2017-2018-1 JAVA实验站 冲刺 day02 各个成员今日完成的任务 小组成员 今日工作 完成进度 张韵琪 写博客.进行工作总结 100% 齐力锋 找背景音乐.开始界面图片.按钮图片.按钮 ...
- Java并发(十):读写锁ReentrantReadWriteLock
先做总结: 1.为什么用读写锁 ReentrantReadWriteLock? 重入锁ReentrantLock是排他锁,在同一时刻仅有一个线程可以进行访问,但是在大多数场景下,大部分时间都是提供读服 ...
- 快速幂 cojs 1130. 取余运算
cojs 1130. 取余运算 ★ 输入文件:dmod.in 输出文件:dmod.out 简单对比时间限制:10 s 内存限制:128 MB [题目描述] 输入b,p,k的值,求b^p ...
- PHP 登录DEMO
logintest.php 页面 <!DOCTYPE html PUBLIC "-//W3C//DTD XHTML 1.0 Transitional//EN" "h ...
- Educational Codeforces Round 10 C. Foe Pairs 水题
C. Foe Pairs 题目连接: http://www.codeforces.com/contest/652/problem/C Description You are given a permu ...
- maven构建jar包
1.执行可执行的class,代码内需要有入口main方法 2.通过mvn package来构建jar包 3.使用java -jar test.jar来执行jar包 https://www.cnblog ...
- mp4网页播放代码,有声音无图像的解决办法~
mp4网页播放代码,有声音无图像的解决办法~ 关于网页播放mp4格式的视频,找了一些插件,这里推荐一下video.js 官方网址:http://www.videojs.com/ github ...
- Fiddler2 抓取手机APP数据包
原文:http://blog.goyiyo.com/archives/2044 下载安装运行后,查出运行机器的IP,手机连接同一网域内的WIFI,手机WIFI连接设置里的高级里,代理设置填写上Fidd ...
- js+Ajax,Get和Post在使用上的区别
get和post方法最大的不同在于: 1.get方法传值参数在url里面,而post参数放send里面 2.post方法必须加上 xmlHttp.setRequestHeader("Cont ...