[Android]开源中国源码分析之二---DrawerLayout
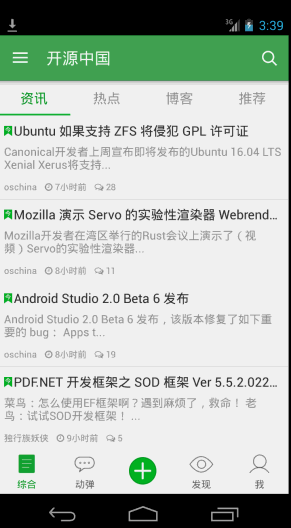
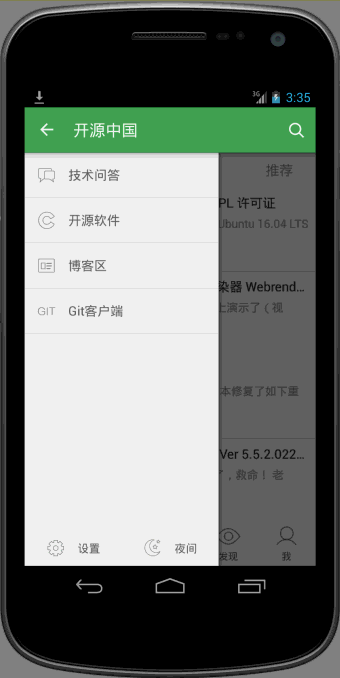
从启动界面到主界面之后的效果如图所示,采用的是v4包下的DrawerLayout, activity_main.xml文件如下:
<!-- A DrawerLayout is intended to be used as the top-level content view using match_parent for both width and height to consume the full space available. --><android.support.v4.widget.DrawerLayoutandroid:id="@+id/drawer_layout"xmlns:android="http://schemas.android.com/apk/res/android"xmlns:tools="http://schemas.android.com/tools"android:layout_width="match_parent"android:layout_height="match_parent"tools:context="net.oschina.app.ui.MainActivity"><LinearLayoutandroid:layout_width="match_parent"android:layout_height="match_parent"android:orientation="vertical"><FrameLayoutandroid:id="@+id/realtabcontent"android:layout_width="match_parent"android:layout_height="0dip"android:layout_weight="1"/><FrameLayoutandroid:layout_width="match_parent"android:layout_height="wrap_content"android:background="?attr/windows_bg"><RelativeLayoutandroid:layout_width="match_parent"android:layout_height="wrap_content"android:layout_marginBottom="4dip"><net.oschina.app.widget.MyFragmentTabHostandroid:id="@android:id/tabhost"android:layout_width="match_parent"android:layout_height="wrap_content"android:layout_marginTop="4dip"/><Viewandroid:layout_width="match_parent"android:layout_height="1px"android:background="?attr/lineColor"/></RelativeLayout><!-- 快速操作按钮 --><ImageViewandroid:id="@+id/quick_option_iv"android:layout_width="wrap_content"android:layout_height="wrap_content"android:layout_gravity="center"android:contentDescription="@null"android:src="@drawable/btn_quickoption_selector"/></FrameLayout></LinearLayout><!-- 左侧侧滑菜单 --><fragmentandroid:id="@+id/navigation_drawer"android:name="net.oschina.app.ui.NavigationDrawerFragment"android:layout_width="@dimen/navigation_drawer_width"android:layout_height="match_parent"android:layout_gravity="start"tools:layout="@layout/fragment_navigation_drawer"/></android.support.v4.widget.DrawerLayout>
侧边栏布局fragment_navigation_drawer.xml的定义:
<LinearLayout xmlns:android="http://schemas.android.com/apk/res/android"android:layout_width="match_parent"android:layout_height="match_parent"android:orientation="vertical"android:background="?attr/layout_bg_normal" ><net.oschina.app.widget.CustomerScrollViewandroid:layout_width="match_parent"android:layout_height="0dip"android:layout_weight="1"><include layout="@layout/fragment_navigation_drawer_items"/></net.oschina.app.widget.CustomerScrollView ><include layout="@layout/fragment_navigation_drawer_foot"/></LinearLayout>
fragment_navigation_drawer_items.xml和fragment_navigation_drawer_foot.xml的布局比较简单,不再赘述。
主要介绍自定义控件CustomerScollView,继承了ScrollView:
package net.oschina.app.widget;import android.annotation.SuppressLint;import android.content.Context;import android.graphics.Rect;import android.util.AttributeSet;import android.view.MotionEvent;import android.view.View;import android.view.animation.TranslateAnimation;import android.widget.ScrollView;/*** 可以拖动的ScrollView**/public class CustomerScrollView extends ScrollView {private static final int size = 4;private View inner;private float y;private Rect normal = new Rect();public CustomerScrollView(Context context) {super(context);}public CustomerScrollView(Context context, AttributeSet attrs) {super(context, attrs);}@Overrideprotected void onFinishInflate() {if (getChildCount() > 0) {inner = getChildAt(0);}}@SuppressLint("ClickableViewAccessibility")@Overridepublic boolean onTouchEvent(MotionEvent ev) {if (inner == null) {return super.onTouchEvent(ev);} else {commOnTouchEvent(ev);}return super.onTouchEvent(ev);}public void commOnTouchEvent(MotionEvent ev) {int action = ev.getAction();switch (action) {case MotionEvent.ACTION_DOWN:y = ev.getY();break;case MotionEvent.ACTION_UP:if (isNeedAnimation()) {// Log.v("mlguitar", "will up and animation");animation();}break;case MotionEvent.ACTION_MOVE:final float preY = y;float nowY = ev.getY();/*** size=4 表示 拖动的距离为屏幕的高度的1/4*/int deltaY = (int) (preY - nowY) / size;// 滚动// scrollBy(0, deltaY);y = nowY;if (isNeedMove()) {if (normal.isEmpty()) {normal.set(inner.getLeft(), inner.getTop(),inner.getRight(), inner.getBottom());return;}int yy = inner.getTop() - deltaY;// 移动布局inner.layout(inner.getLeft(), yy, inner.getRight(),inner.getBottom() - deltaY);}break;default:break;}}public void animation() {TranslateAnimation ta = new TranslateAnimation(0, 0, inner.getTop(),normal.top);ta.setDuration(200);inner.startAnimation(ta);inner.layout(normal.left, normal.top, normal.right, normal.bottom);normal.setEmpty();}public boolean isNeedAnimation() {return !normal.isEmpty();}public boolean isNeedMove() {int offset = inner.getMeasuredHeight() - getHeight();int scrollY = getScrollY();if (scrollY == 0 || scrollY == offset) {return true;}return false;}}
再来看看效果:
可以看到向上滑动的时候,会有明显回弹的效果。
oschina客户端滑动菜单的View的布局使用了可以拖拽的ScrollView,类文件为CustomerScrollView。
- 拖拽的目标是ScrollView内的菜单的布局View,所以在CustomerScrollView内的onFinishInflate()函数中首先通过getChildAt(0)来获取菜单布局的View,这就是第一步的目标是获取要拖拽的对象。onFinishInflate()加载完view,这里的View指的就是源码中<include layout="@layout/fragment_navigation_drawer_items"/>加载的布局文件。
- 拖拽的过程实际上是一个“按下-移动-抬起”的过程,因此要重写onTouchEvent(MotionEvent ev),其中移动过程实际上是将菜单view按照移动的方向和距离,怎么实现这个功能呢?源码中最关键的就是这行代码inner.layout(inner.getLeft(), yy, inner.getRight(),inner.getBottom() - deltaY);这个方法四个参数都是inner相对其父控件ScrollView的坐标原点而言的。不是很了解的,可以专门查查坐标的相关知识。
- 当手指抬起也就是MotionEvent.ACTION_UP事件发生时,将拖拽后的view恢复移动到原来位置,移动过程附加了一个动画,由于移动实际上是位置发生了变化,因此用到了TranslateAnimation,因为是上下拖拽,所以X的起始和终止坐标都是0,Y的起始和终止坐标至于为什么那么写,相信看完博客应该就会明白了。那么问题来了,要自动移动回去,那么触发的时机在MotionEvent.ACTION_UP中,原来的位置怎么保存,因为移动时需要左上右下四个参数,因此在CustomerScrollView中我们看到了这样一个变量private Rect normal = new Rect();通过normal.set(inner.getLeft(), inner.getTop(),inner.getRight(), inner.getBottom());方法记录菜单view的初始化位置。
- 经过仔细揣摩发现scrollY == 0这个条件实际上是滚动到了最顶部的时候,而scrollY == offset是滚动到最底部的时候,两个条件满足其中一个都可以实现拖拽的效果。int offset = inner.getMeasuredHeight() - getHeight();相当于本身的身高减去实际能看到的身高就等于没有看到的身高部分。
//是否需要移动public boolean isNeedMove() {int offset = inner.getMeasuredHeight() - getHeight();int scrollY = getScrollY();if (scrollY == 0 || scrollY == offset) {return true;}return false;}
- 为什么源码中需要isNeedAnimation()这个函数呢?因为恢复到原来位置也用到了inner.layout(normal.left, normal.top, normal.right, normal.bottom);,因此normal首先必须要有四个参数值。而这个normal只有满足上面的条件后才有值的。
- 为什么在拖拽发生又恢复到原来位置后,要把这个normal.setEmpty();置空呢?它的意图是什么?仔细想来,发现这个normal的set左上右下四个值时,是在满足2.4两种条件之一就会有具体值的。因此这个normal就会有两种不同的Rect.顶部的时候左上右下四个值分别为(0,0,实际菜单的宽度240dp,菜单的实际测量高度)而滚动到最底部的时候左上右下四个值分别为(0,负的【菜单的实际高度减去屏幕的高度】,实际菜单的宽度240dp,屏幕的高度),因此需要清空。
[Android]开源中国源码分析之二---DrawerLayout的更多相关文章
- [Android]开源中国源码分析之一---启动界面
开源中国android端版本号:2.4 启动界面: 在AndroidManifest.xml中找到程序的入口, <activity android:name=".AppStart&qu ...
- Android开源框架源码分析:Okhttp
一 请求与响应流程 1.1 请求的封装 1.2 请求的发送 1.3 请求的调度 二 拦截器 2.1 RetryAndFollowUpInterceptor 2.2 BridgeInterceptor ...
- Android 开源项目源码解析(第二期)
Android 开源项目源码解析(第二期) 阅读目录 android-Ultra-Pull-To-Refresh 源码解析 DynamicLoadApk 源码解析 NineOldAnimations ...
- 一个普通的 Zepto 源码分析(二) - ajax 模块
一个普通的 Zepto 源码分析(二) - ajax 模块 普通的路人,普通地瞧.分析时使用的是目前最新 1.2.0 版本. Zepto 可以由许多模块组成,默认包含的模块有 zepto 核心模块,以 ...
- Zepto源码分析(二)奇淫技巧总结
Zepto源码分析(一)核心代码分析 Zepto源码分析(二)奇淫技巧总结 目录 * 前言 * 短路操作符 * 参数重载(参数个数重载) * 参数重载(参数类型重载) * CSS操作 * 获取属性值的 ...
- 插件开发之360 DroidPlugin源码分析(二)Hook机制
转载请注明出处:http://blog.csdn.net/hejjunlin/article/details/52124397 前言:新插件的开发,可以说是为插件开发者带来了福音,虽然还很多坑要填补, ...
- DataTable源码分析(二)
DataTable源码分析(二) ===================== DataTable函数分析 ---------------- DataTable作为整个插件的入口,完成了整个表格的数据初 ...
- Koa源码分析(二) -- co的实现
Abstract 本系列是关于Koa框架的文章,目前关注版本是Koa v1.主要分为以下几个方面: Koa源码分析(一) -- generator Koa源码分析(二) -- co的实现 Koa源码分 ...
- Unity时钟定时器插件——Vision Timer源码分析之二
Unity时钟定时器插件——Vision Timer源码分析之二 By D.S.Qiu 尊重他人的劳动,支持原创,转载请注明出处:http.dsqiu.iteye.com 前面的已经介绍了vp_T ...
随机推荐
- Windows下使用Visual Studio 2010 编译ffmpeg全过程
(注意:请务必先阅读:七,后记补充:) ffmpeg是一个开源的多媒体库,使用非常广泛. 在linux下编译ffmpeg非常简单,而在windows下编译就不是那么容易了.一般在windows下使用M ...
- dva解读1
1.首先定义一个app对象实现dva const app = dva({ history: createHistory(), }); // 2. Plugins app.use(createLoadi ...
- 面试十大常见Java String问题
本文介绍Java中关于String最常见的10个问题: 1. 字符串比较,使用 "==" 还是 equals() ?简单来说, "==" 判断两个引用的是不是同 ...
- [Spring Data MongoDB]学习笔记--_id和类型映射
_id字段的映射: MongoDB要求所有的document都要有一个_id的字段. 如果我们在使用中没有传入_id字段,它会自己创建一个ObjectId. { , "accounts&qu ...
- POJ 1408 Fishnet【枚举+线段相交+叉积求面积】
题目: http://poj.org/problem?id=1408 http://acm.hust.edu.cn/vjudge/contest/view.action?cid=22013#probl ...
- Linux三剑客之老二-------sed命令详解
sed命令 文件 编辑 本文索引 [隐藏] sed的选项.命令.替换标记 选项 参数 sed命令 sed替换标记 sed元字符集 sed用法实例 替换操作:s命令 全面替换标记g 定界符 删除操作:d ...
- 0x08 MySQL 超详细-索引原理&慢查询优化【转-多图】(重点)
Content From——Egon's Blog http://www.cnblogs.com/linhaifeng/articles/7274563.html#top 0x01 介绍 为何要有索引 ...
- RecyclerView添加分割线
mRecyclerView = findView(R.id.id_recyclerview); //设置布局管理器 mRecyclerView.setLayoutManager(layout); // ...
- If you ever have a broken heart
If you ever have a broken heart Pablo Neruda Tonight i can write the saddest lines Write ,for exampl ...
- 1.8 使用电脑测试MC20的GPRS功能
需要准备的硬件 MC20开发板 1个 https://item.taobao.com/item.htm?id=562661881042 GSM/GPRS天线 1根 https://item.taoba ...