
linux enc28j60网卡驱动移植(硬件spi和模拟spi)
本来想移植DM9000网卡的驱动,无奈硬件出了点问题,通过杜邦线链接开发板和DM9000网卡模块,系统上电,还没加载网卡驱动就直接崩溃了,找不到原因。。。刚好手上有一个enc28j60的网卡模块,于是就着手移植enc28j60的驱动。
其实移植enc28j60的驱动也十分简单,网上有现成的,只需要分配一些硬件资源即可。
由于我的内核版本老到掉牙,没有自带enc28j60的驱动,只能在网上找一个:
enc28j60.c
http://git.ti.com/ti-linux-kernel/ti-linux-kernel/blobs/7dac6f8df607929e51f4fd598d80bd009c45a9f8/drivers/net/enc28j60.c
enc28j60_hw.h
http://git.ti.com/ti-linux-kernel/ti-linux-kernel/blobs/7dac6f8df607929e51f4fd598d80bd009c45a9f8/drivers/net/enc28j60_hw.h
由于这个驱动是支持较新的内核,移植到2.6.22.6,只要改动3个地方好了。
 ... ...

 static int enc28j60_set_hw_macaddr(struct net_device *ndev)

 {

     ... ...

     if (!priv->hw_enable) {

         if (netif_msg_drv(priv)) {

             /* [cgw]: 屏蔽一下几行 */

             //DECLARE_MAC_BUF(mac);

             //printk(KERN_INFO DRV_NAME

             //    ": %s: Setting MAC address to %s\n",

             //    ndev->name, print_mac(mac, ndev->dev_addr));

         }

     }

     ... ...

 }

 ... ...

 static void dump_packet(const char *msg, int len, const char *data)

 {

     printk(KERN_DEBUG DRV_NAME ": %s - packet len:%d\n", msg, len);

     /* [cgw]: 屏蔽一下几行 */

     //print_hex_dump(KERN_DEBUG, "pk data: ", DUMP_PREFIX_OFFSET, 16, 1,

     //        data, len, true);

 }

 ... ...

 static int enc28j60_net_open(struct net_device *dev)

 {

     ... ...

     if (!is_valid_ether_addr(dev->dev_addr)) {

         if (netif_msg_ifup(priv)) {

             /* [cgw]: 屏蔽一下几行 */

             //DECLARE_MAC_BUF(mac);

             //dev_err(&dev->dev, "invalid MAC address %s\n",

             //    print_mac(mac, dev->dev_addr));

         }

         return -EADDRNOTAVAIL;

     }

     ... ...

 }

 ... ...
都是些打印相关的东西,屏蔽掉就好。
spi的框架可以参考这里:http://www.cnblogs.com/hackfun/p/6082489.html
这里只列出配置spi硬件资源的代码,只需要写一个spi_platform_dev.c文件就行了。模拟spi的模式下,spi_platform_dev.c和http://www.cnblogs.com/hackfun/p/6082489.html这里的spi_platform_dev.c文件相似,只需要增加一个外部中断入口给enc28j60用于接收中断,和更改spi的模式等。
模拟spi的模式下的spi_platform_dev.c
 #include <linux/module.h>

 #include <linux/version.h>

 #include <linux/init.h>

 #include <linux/kernel.h>

 #include <linux/types.h>

 #include <linux/interrupt.h>

 #include <linux/list.h>

 #include <linux/timer.h>

 #include <linux/init.h>

 #include <linux/serial_core.h>

 #include <linux/platform_device.h>

 #include <linux/irq.h>

 #include <asm/gpio.h>

 #include <asm/io.h>

 #include <asm/arch/regs-gpio.h>

 #include <linux/spi/spi.h>

 #include <linux/spi/spi_bitbang.h>

 #include <asm/arch/regs-spi.h>

 #include <asm/arch/spi.h>

 #include <asm/arch/spi-gpio.h>

 static struct spi_board_info board_info[] = {

     {

     .modalias = "enc28j60",    /* [cgw]: spi设备名,和设备驱动名对应 */

     .bus_num = ,                 /* [cgw]: spi总线号,即spi0 */

     .chip_select = ,             /* [cgw]: spi总线上的设备号,即spi0.2 */

     .max_speed_hz    = ,     /* [cgw]: spi时钟 */

     .mode = SPI_MODE_0,           /* [cgw]: spi数据模式 */

     .irq = IRQ_EINT2,

     },

 };

 static void enc28j60_chip_select(struct s3c2410_spigpio_info *spi, int cs)

 {

     /* [cgw]: 选中设备号为2的spi设备 */

     if (spi->board_info->chip_select == ) {

         s3c2410_gpio_cfgpin(S3C2410_GPG2, S3C2410_GPIO_OUTPUT);

         /* [cgw]: 选中设备 */

         if (BITBANG_CS_ACTIVE == cs) {

             s3c2410_gpio_setpin(S3C2410_GPG2, );

         /* [cgw]: 释放设备 */

         } else if (BITBANG_CS_INACTIVE == cs) {

             s3c2410_gpio_setpin(S3C2410_GPG2, );

         }

     }

 }

 /* [cgw]:  */

 static struct s3c2410_spigpio_info spi_dev = {

     .pin_clk = S3C2410_GPG7,

     .pin_mosi = S3C2410_GPG6,

     .pin_miso = S3C2410_GPG5,

     .board_size = ,                    /* [cgw]: 设置板上spi接口数量为1 */

     .board_info = &board_info[],

     .chip_select = enc28j60_chip_select

 };

 static void spi_dev_release(struct device * dev)

 {

     printk("spi_dev_release! \n");

 }

 /* [cgw]: 分配一个平台设备 */

 static struct platform_device spi_platform_dev = {

     .name         = "s3c24xx-spi-gpio",        /* [cgw]: 设置平台设备名,和平台驱动名对应 */

     .id           = -,

     .dev = {

         .release = spi_dev_release,

         .platform_data = (void *)&spi_dev,      /* [cgw]: 通过platform_data传递spi_dev给平台驱动

                                                 * 平台驱动可以访问spi_dev

                                                 */

     },

 };

 static int spi_dev_init(void)

 {

     s3c2410_gpio_cfgpin(S3C2410_GPF2, S3C2410_GPF2_EINT2);

     /* [cgw]: 注册spi_platform_dev平台设备 */

     platform_device_register(&spi_platform_dev);

     return ;

 }

 static void spi_dev_exit(void)

 {

     /* [cgw]: 注销spi_platform_dev平台设备 */

     platform_device_unregister(&spi_platform_dev);

 }

 module_init(spi_dev_init);

 module_exit(spi_dev_exit);

 MODULE_LICENSE("GPL");
makefile:
KERN_DIR = /work/system/linux-2.6.22.6

all:

    make -C $(KERN_DIR) M=`pwd` modules

clean:

    make -C $(KERN_DIR) M=`pwd` modules clean

    rm -rf modules.order

obj-m    += spi_platform_dev.o

obj-m    += spi_s3c24xx_gpio.o

obj-m    += spi_bitbang.o

obj-m    += enc28j60.o
硬件spi的模式下的spi_platform_dev.c
 #include <linux/module.h>

 #include <linux/version.h>

 #include <linux/init.h>

 #include <linux/kernel.h>

 #include <linux/types.h>

 #include <linux/interrupt.h>

 #include <linux/list.h>

 #include <linux/timer.h>

 #include <linux/init.h>

 #include <linux/serial_core.h>

 #include <linux/platform_device.h>

 #include <linux/irq.h>

 #include <asm/gpio.h>

 #include <asm/io.h>

 #include <asm/arch/regs-gpio.h>

 #include <linux/spi/spi.h>

 #include <linux/spi/spi_bitbang.h>

 #include <asm/arch/regs-spi.h>

 #include <asm/arch/spi.h>

 #include <asm/arch/spi-gpio.h>

 /* SPI (1) */

 static struct resource s3c_spi1_resource[] = {

     [] = {

         .start = S3C2410_PA_SPI + S3C2410_SPI1,

         .end   = S3C2410_PA_SPI + S3C2410_SPI1 + 0x1f,

         .flags = IORESOURCE_MEM,

     },

     [] = {

         .start = IRQ_SPI1,

         .end   = IRQ_SPI1,

         .flags = IORESOURCE_IRQ,

     }

 };

 static struct spi_board_info board_info[] = {

     {

     .modalias = "enc28j60",    /* [cgw]: spi设备名,和设备驱动名对应 */

     .bus_num = ,                 /* [cgw]: spi总线号,即spi0 */

     .chip_select = ,             /* [cgw]: spi总线上的设备号,即spi0.2 */

     .max_speed_hz    = ,     /* [cgw]: spi时钟 */

     .mode = SPI_MODE_0,           /* [cgw]: spi数据模式 */

     .irq = IRQ_EINT2,

     },

 };

 static struct s3c2410_spi_info spi_info = {

     .pin_cs = S3C2410_GPG2,    /* simple gpio cs */

     .board_size = ARRAY_SIZE(board_info),

     .board_info = &board_info[],

     .set_cs = NULL

 };

 static void spi_dev_release(struct device * dev)

 {

     printk("spi_dev_release! \n");

 }

 /* [cgw]: 分配一个平台设备 */

 static struct platform_device spi_platform_dev = {

     .name         = "s3c2410-spi",        /* [cgw]: 设置平台设备名,和平台驱动名对应 */

     .id           = ,

     .num_resources      = ARRAY_SIZE(s3c_spi1_resource),

     .resource      = s3c_spi1_resource,

     .dev = {

         .release = spi_dev_release,

         .platform_data = &spi_info,

         //.dma_mask = &s3c_device_spi1_dmamask,

         //.coherent_dma_mask = 0xffffffffUL

     },

 };

 static int spi_dev_init(void)

 {

     /* [cgw]: 注册spi_platform_dev平台设备 */

     platform_device_register(&spi_platform_dev);

     return ;

 }

 static void spi_dev_exit(void)

 {

     /* [cgw]: 注销spi_platform_dev平台设备 */

     platform_device_unregister(&spi_platform_dev);

 }

 module_init(spi_dev_init);

 module_exit(spi_dev_exit);

 MODULE_LICENSE("GPL");
makefile:
KERN_DIR = /work/system/linux-2.6.22.6

all:

    make -C $(KERN_DIR) M=`pwd` modules

clean:

    make -C $(KERN_DIR) M=`pwd` modules clean

    rm -rf modules.order

obj-m    += spi_platform_dev.o

obj-m    += spi_s3c24xx.o

obj-m    += spi_bitbang.o

obj-m    += enc28j60.o
加载spi平台设备时(platform_device),应注意模拟spi时应加载spi_s3c24xx_gpio.c,硬件spi时应加载spi_s3c24xx.c
如:
模拟spi:
 # insmod spi_bitbang.ko

 # insmod spi_platform_dev.ko

 # insmod spi_s3c24xx_gpio.ko

 # insmod enc28j60.ko
硬件spi:
 # insmod spi_bitbang.ko

 # insmod spi_platform_dev.ko

 # insmod spi_s3c24xx.ko

 # insmod enc28j60.ko
其中spi_bitbang.c , spi_s3c24xx_gpio.c , spi_s3c24xx.c为内核原生源文件,不需要改动。
硬件spi时,加载驱动的实例:
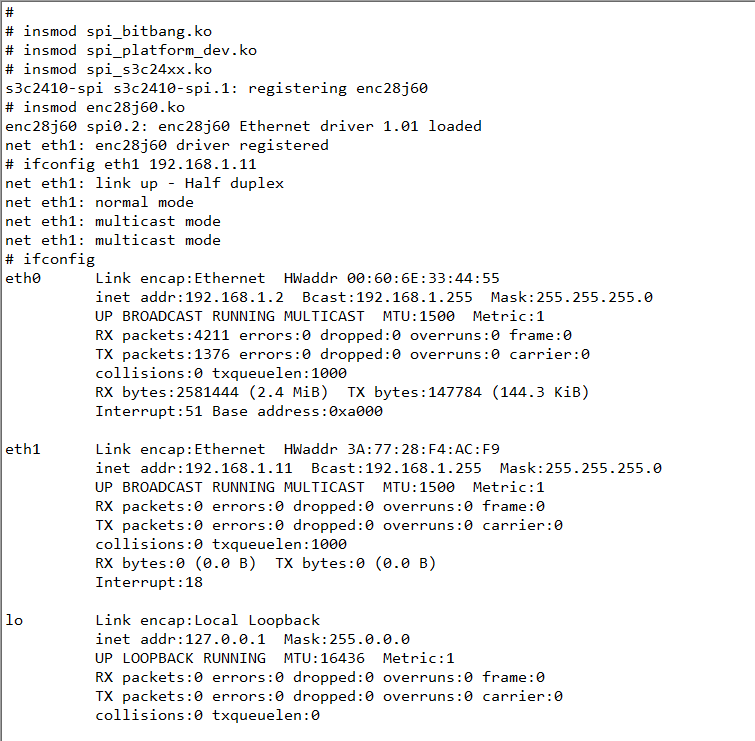
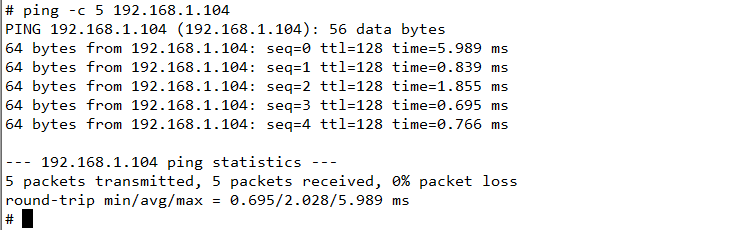
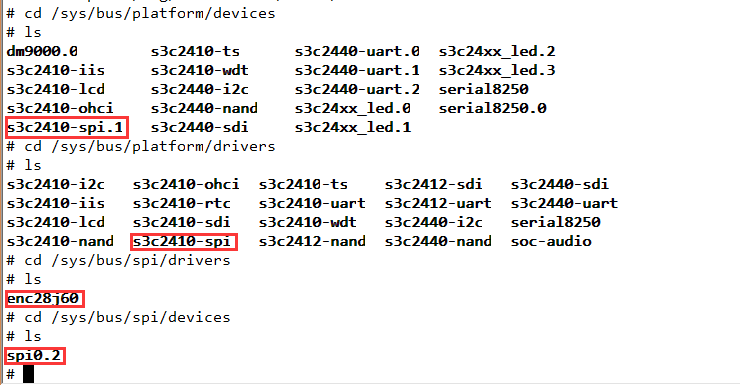
谢谢!
linux enc28j60网卡驱动移植(硬件spi和模拟spi)的更多相关文章
- linux网卡驱动移植
这里重要的是物理层PHY receiver,MAC(media access control)层,这里与软件中的协议栈不同,在硬件上MAC是PHY的下一层.DM9000A将MAC和PHY做到一起,也可 ...
- 【Linux驱动】TQ2440 DM9000E网卡驱动移植(Linux-2.6.30.4)
花了一天的时间研究了一下Linux-2.6.30.4版本号内核下关于TQ2440 DM9000E的网卡驱动移植.总结一下自己的收获. 事实上.在Linux-2.6.30.4版本号内核下有关于网卡驱动, ...
- Linux网卡驱动移植--Dm9000网卡驱动分析
1. Linux网络体系结构由以下5部分组成 ① 系统调用接口: 位于Linux网络子系统的顶部,为应用程序提供访问内核网络子系统的方法,主要指socket系统调用. ② 协议无关接口: 实现一组基于 ...
- AM335x(TQ335x)学习笔记——Nand&&网卡驱动移植
移植完成声卡驱动之后本想再接再励,移植网卡驱动,但没想到的是TI维护的内核太健壮,移植网卡驱动跟之前移植按键驱动一样简单,Nand驱动也是如此,于是,本人将Nand和网卡放在同一篇文章中介绍.介绍之前 ...
- AM335x(TQ335x)学习笔记——Nand&&网卡驱动移植
移植完毕声卡驱动之后本想再接再励,移植网卡驱动,但没想到的是TI维护的内核太健壮,移植网卡驱动跟之前移植按键驱动一样简单,Nand驱动也是如此,于是,本人将Nand和网卡放在同一篇文章中介绍.介绍之前 ...
- Linux Charger IC 驱动移植总结
Linux Charger IC 驱动移植总结 文章目录 Linux Charger IC 驱动移植总结 1 设备树的基本知识 设备树的概念 设备树的基本结构 compatible属性 举个栗子 2 ...
- linux4.1内核配置以及编译及千兆网卡dp83867网卡驱动移植
一 内核配置编译 1首先解压内核 tar jxvf linux-at91-4.1.tar.bz2: 2下载编译链 在ubuntu命令行中输入sudo apt-get install gcc-arm- ...
- u-boot 移植 --->5、友善之臂Tiny210底板王网卡驱动移植
网卡芯片的工作原理 DM9000AE具有以下主要性能: ①48管脚的LQFP封装,管脚少体积小: ②支持8/16位数据总线: ③适用于10Base-T和100Base-T,10/100M自适应,适应不 ...
- mini2440移植uboot-2008.10 (二) DM9000网卡驱动移植
还是利用 mini2440移植uboot-2008.10 (一) 修改好的代码 通过观察可以发现,mini2400使用的网卡芯片是DM9000,在uboot-2008.10源码中已经支持该芯片的驱动 ...
随机推荐
- 百度Java研发面经100题 总结
1. 单例模式常见的应用场景分析. 在23种设计模式中,单例模式排行老大.虽然理解简单,但是对于应用场景.你真正的熟悉么?使用单例,是由于没必要每个请求都新建一个对象,这样既浪费CPU又浪费内存:之所 ...
- Scalaz(31)- Free :自由数据结构-算式和算法的关注分离
我们可以通过自由数据结构(Free Structure)实现对程序的算式和算法分离关注(separation of concern).算式(Abstract Syntax Tree, AST)即运算表 ...
- PHP与MySQL的交互(mysqli)
近期在学习PHP,这里总结一下PHP与MySQL的交互. 这里我们使用mysqli进行连接. mysqli扩展允许我们访问MySQL 4.1及以上版本提供的功能. 想深入了解mysqli的信息可以访问 ...
- UVA 10090 Marbles 扩展欧几里得
来源:http://www.cnblogs.com/zxhl/p/5106678.html 大致题意:给你n个球,给你两种盒子.第一种盒子每个盒子c1美元,可以恰好装n1个球:第二种盒子每个盒子c2元 ...
- 【FFmpeg】Windows下FFmpeg调试
为了深入了解ffmpeg的工作原理,需要阅读源代码,调试源代码.在Windows下调试ffmpeg源码,一种方法是在MinGW+Msys环境下,利用GDB进行调试:另一种是借助Eclipse进调试,其 ...
- 关于jQuery里面的选择器
一.JQuery选择器的概述 选择器是JQuery的根基,在JQuery中,对事件处理.遍历DOM和Ajax操作都依赖于选择器. 二.选择器的优势 1.简洁的语法 2.支持CSS1.0到CSS3.0选 ...
- IKONS – 赞!264 款手工打造的免费矢量图标
IKONS 是一套免费的矢量图标集,包含264款手工精心制作的可伸缩的矢量图标,分享给网页设计人员和开发人员.这些图标提供了 SVG.AI.ESP.PSD.CSH 和 PNG 格式.所有的图标都可以免 ...
- java 中 return 的两种常见的用法
一:return语句总是用在方法中,有两个作用: 一个是返回方法指定类型的值(这个值总是确定的), 一个是结束方法的执行(仅仅一个return语句). 二:实例1 -- 返回一个String priv ...
- Android项目实战(十九):Android Studio 优秀插件: Parcelable Code Generator
Android Studio 优秀插件系列: Android Studio 优秀插件(一):GsonFormat Android Studio 优秀插件(二): Parcelable Code Gen ...
- Canvas drawText实现中英文居中
@Override protected void onDraw(Canvas canvas) { super.onDraw(canvas); Paint mTextPaint = new Paint( ...