《机器学习_01_线性模型_线性回归_正则化(Lasso,Ridge,ElasticNet)》
一.过拟合
建模的目的是让模型学习到数据的一般性规律,但有时候可能会学过头,学到一些噪声数据的特性,虽然模型可以在训练集上取得好的表现,但在测试集上结果往往会变差,这时称模型陷入了过拟合,接下来造一些伪数据进行演示:
import os

os.chdir('../')

from ml_models.linear_model import *

import numpy as np

import matplotlib.pyplot as plt

%matplotlib inline
#造伪样本

X=np.linspace(0,100,100)

X=np.c_[X,np.ones(100)]

w=np.asarray([3,2])

Y=X.dot(w)

X=X.astype('float')

Y=Y.astype('float')

X[:,0]+=np.random.normal(size=(X[:,0].shape))*3#添加噪声

Y=Y.reshape(100,1)
#拟合数据并可视化

lr=LinearRegression()

lr.fit(X[:,:-1],Y)

lr.plot_fit_boundary(X[:,:-1],Y)
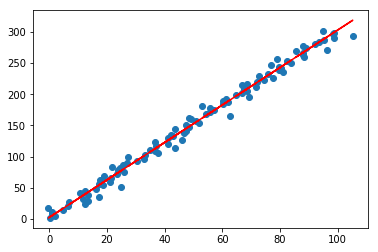
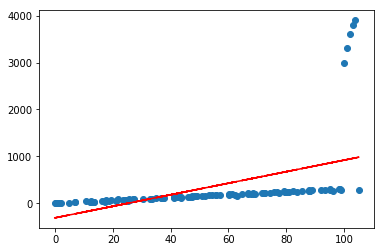
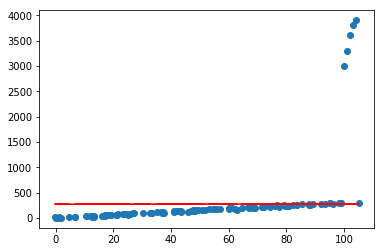
目前看起来效果还是可以的,但如果加入几个异常点,再看看效果呢
X=np.concatenate([X,np.asanyarray([[100,1],[101,1],[102,1],[103,1],[104,1]])])

Y=np.concatenate([Y,np.asanyarray([[3000],[3300],[3600],[3800],[3900]])])

lr=LinearRegression()

lr.fit(X[:,:-1],Y)

lr.plot_fit_boundary(X[:,:-1],Y)
二.正则化
可以看到,仅仅加入了几个很离谱的异常点,就会对预测产生很大的影响,且偏离很远,这在实际情况中是很常见的;通常可以通过对模型参数添加正则化约束来避免这种情况,使其不会太“飘”,做法是在loss函数中为权重\(w\)添加\(L_1\)或者\(L_2\)约束,借用上一节的公式推导,直接推出loss部分:
1.线性回归中添加\(L_1\)约束称为Lasso回归,其损失函数如下:
\]
2.线性回归中添加\(L_2\)约束称为Ridge回归,其损失函数如下:
\]
3.如果不太确定用\(L_1\)好,还是\(L_2\)好,可以用它们的组合,称作ElasticNet,损失函数如下:
\]
可以发现通过调整超参,可以控制\(w\)的大小,如果\(\lambda\)或\(\alpha\)设置很大,\(w\)会被约束的很小,而如果\(\alpha\)或\(\lambda\)设置为0,等价于原始的不带正则项的线性回归;通常可以通过交叉验证,根据验证集上的表现来设置一个合适的超参;接下来在上一节线性回归代码的基础上实现Lasso,Ridge,ElasticNet模型,另外设置两个参数l1_ratio以及l2_ratio,分别用来控制\(L_1\)和\(L_2\)的loss部分的权重
三.代码实现
class LinearRegression(object):

    def __init__(self, fit_intercept=True, solver='sgd', if_standard=True, epochs=10, eta=1e-2, batch_size=1,

                 l1_ratio=None, l2_ratio=None):

        """

        :param fit_intercept: 是否训练bias

        :param solver:

        :param if_standard:

        """

        self.w = None

        self.fit_intercept = fit_intercept

        self.solver = solver

        self.if_standard = if_standard

        if if_standard:

            self.feature_mean = None

            self.feature_std = None

        self.epochs = epochs

        self.eta = eta

        self.batch_size = batch_size

        self.l1_ratio = l1_ratio

        self.l2_ratio = l2_ratio

        # 注册sign函数

        self.sign_func = np.vectorize(utils.sign)

    def init_params(self, n_features):

        """

        初始化参数

        :return:

        """

        self.w = np.random.random(size=(n_features, 1))

    def _fit_closed_form_solution(self, x, y):

        """

        直接求闭式解

        :param x:

        :param y:

        :return:

        """

        if self.l1_ratio is None and self.l2_ratio is None:

            self.w = np.linalg.pinv(x).dot(y)

        elif self.l1_ratio is None and self.l2_ratio is not None:

            self.w = np.linalg.inv(x.T.dot(x) + self.l2_ratio * np.eye(x.shape[1])).dot(x.T).dot(y)

        else:

            self._fit_sgd(x, y)

    def _fit_sgd(self, x, y):

        """

        随机梯度下降求解

        :param x:

        :param y:

        :param epochs:

        :param eta:

        :param batch_size:

        :return:

        """

        x_y = np.c_[x, y]

        # 按batch_size更新w,b

        for _ in range(self.epochs):

            np.random.shuffle(x_y)

            for index in range(x_y.shape[0] // self.batch_size):

                batch_x_y = x_y[self.batch_size * index:self.batch_size * (index + 1)]

                batch_x = batch_x_y[:, :-1]

                batch_y = batch_x_y[:, -1:]

                dw = -2 * batch_x.T.dot(batch_y - batch_x.dot(self.w)) / self.batch_size

                # 添加l1和l2的部分

                dw_reg = np.zeros(shape=(x.shape[1] - 1, 1))

                if self.l1_ratio is not None:

                    dw_reg += self.l1_ratio * self.sign_func(self.w[:-1]) / self.batch_size

                if self.l2_ratio is not None:

                    dw_reg += 2 * self.l2_ratio * self.w[:-1] / self.batch_size

                dw_reg = np.concatenate([dw_reg, np.asarray([[0]])], axis=0)

                dw += dw_reg

                self.w = self.w - self.eta * dw

    def fit(self, x, y):

        # 是否归一化feature

        if self.if_standard:

            self.feature_mean = np.mean(x, axis=0)

            self.feature_std = np.std(x, axis=0) + 1e-8

            x = (x - self.feature_mean) / self.feature_std

        # 是否训练bias

        if self.fit_intercept:

            x = np.c_[x, np.ones_like(y)]

        # 初始化参数

        self.init_params(x.shape[1])

        # 训练模型

        if self.solver == 'closed_form':

            self._fit_closed_form_solution(x, y)

        elif self.solver == 'sgd':

            self._fit_sgd(x, y)

    def get_params(self):

        """

        输出原始的系数

        :return: w,b

        """

        if self.fit_intercept:

            w = self.w[:-1]

            b = self.w[-1]

        else:

            w = self.w

            b = 0

        if self.if_standard:

            w = w / self.feature_std.reshape(-1, 1)

            b = b - w.T.dot(self.feature_mean.reshape(-1, 1))

        return w.reshape(-1), b

    def predict(self, x):

        """

        :param x:ndarray格式数据: m x n

        :return: m x 1

        """

        if self.if_standard:

            x = (x - self.feature_mean) / self.feature_std

        if self.fit_intercept:

            x = np.c_[x, np.ones(shape=x.shape[0])]

        return x.dot(self.w)

    def plot_fit_boundary(self, x, y):

        """

        绘制拟合结果

        :param x:

        :param y:

        :return:

        """

        plt.scatter(x[:, 0], y)

        plt.plot(x[:, 0], self.predict(x), 'r')
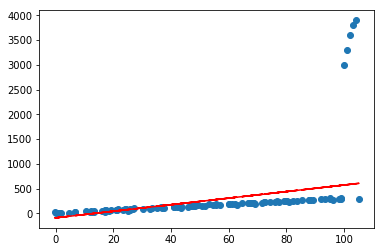
Lasso
lasso=LinearRegression(l1_ratio=100)

lasso.fit(X[:,:-1],Y)

lasso.plot_fit_boundary(X[:,:-1],Y)
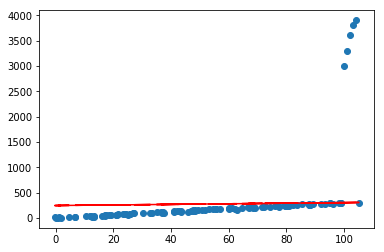
Ridge
ridge=LinearRegression(l2_ratio=10)

ridge.fit(X[:,:-1],Y)

ridge.plot_fit_boundary(X[:,:-1],Y)
ElasticNet
elastic=LinearRegression(l1_ratio=100,l2_ratio=10)

elastic.fit(X[:,:-1],Y)

elastic.plot_fit_boundary(X[:,:-1],Y)
将sign函数整理到ml_models.utils中
《机器学习_01_线性模型_线性回归_正则化(Lasso,Ridge,ElasticNet)》的更多相关文章
- 简单物联网:外网访问内网路由器下树莓派Flask服务器
最近做一个小东西,大概过程就是想在教室,宿舍控制实验室的一些设备. 已经在树莓上搭了一个轻量的flask服务器,在实验室的路由器下,任何设备都是可以访问的:但是有一些限制条件,比如我想在宿舍控制我种花 ...
- 利用ssh反向代理以及autossh实现从外网连接内网服务器
前言 最近遇到这样一个问题,我在实验室架设了一台服务器,给师弟或者小伙伴练习Linux用,然后平时在实验室这边直接连接是没有问题的,都是内网嘛.但是回到宿舍问题出来了,使用校园网的童鞋还是能连接上,使 ...
- 外网访问内网Docker容器
外网访问内网Docker容器 本地安装了Docker容器,只能在局域网内访问,怎样从外网也能访问本地Docker容器? 本文将介绍具体的实现步骤. 1. 准备工作 1.1 安装并启动Docker容器 ...
- 外网访问内网SpringBoot
外网访问内网SpringBoot 本地安装了SpringBoot,只能在局域网内访问,怎样从外网也能访问本地SpringBoot? 本文将介绍具体的实现步骤. 1. 准备工作 1.1 安装Java 1 ...
- 外网访问内网Elasticsearch WEB
外网访问内网Elasticsearch WEB 本地安装了Elasticsearch,只能在局域网内访问其WEB,怎样从外网也能访问本地Elasticsearch? 本文将介绍具体的实现步骤. 1. ...
- 怎样从外网访问内网Rails
外网访问内网Rails 本地安装了Rails,只能在局域网内访问,怎样从外网也能访问本地Rails? 本文将介绍具体的实现步骤. 1. 准备工作 1.1 安装并启动Rails 默认安装的Rails端口 ...
- 怎样从外网访问内网Memcached数据库
外网访问内网Memcached数据库 本地安装了Memcached数据库,只能在局域网内访问,怎样从外网也能访问本地Memcached数据库? 本文将介绍具体的实现步骤. 1. 准备工作 1.1 安装 ...
- 怎样从外网访问内网CouchDB数据库
外网访问内网CouchDB数据库 本地安装了CouchDB数据库,只能在局域网内访问,怎样从外网也能访问本地CouchDB数据库? 本文将介绍具体的实现步骤. 1. 准备工作 1.1 安装并启动Cou ...
- 怎样从外网访问内网DB2数据库
外网访问内网DB2数据库 本地安装了DB2数据库,只能在局域网内访问,怎样从外网也能访问本地DB2数据库? 本文将介绍具体的实现步骤. 1. 准备工作 1.1 安装并启动DB2数据库 默认安装的DB2 ...
- 怎样从外网访问内网OpenLDAP数据库
外网访问内网OpenLDAP数据库 本地安装了OpenLDAP数据库,只能在局域网内访问,怎样从外网也能访问本地OpenLDAP数据库? 本文将介绍具体的实现步骤. 1. 准备工作 1.1 安装并启动 ...
随机推荐
- 数值计算方法实验之按照按三弯矩方程及追赶法的三次样条插值 (MATLAB 代码)
一.实验目的 在已知f(x),x∈[a,b]的表达式,但函数值不便计算,或不知f(x),x∈[a,b]而又需要给出其在[a,b]上的值时,按插值原则f(xi)= yi(i= 0,1…….,n)求出简单 ...
- ES6中的let关键字,有什么用呢?
来吧,开始本节的学习! ES6 给开发者带来很多令人激动的特性,其中let关键字就是其中之一. 那么,let关键字是什么东西? let 的用途 我们回想一下,我们平时在写代码的时候,用var来声明一个 ...
- 浅谈 PHP 与手机 APP 开发
来源:http://www.thinkphp.cn/topic/5023.html 一.先简单回答两个问题: 1.PHP 可以开发客户端?答:不可以,因为PHP是脚本语言,是负责完成 B/S架构 或 ...
- css中的宽和高
width width表示宽 height height表示高 max-width.min-width max-width表示最大宽度 min-width表示最小宽度 max-height.min-h ...
- 任意文件下载(pikachu)
任意文件下载漏洞 很多网站都会提供文件下载功能,即用户可以通过点击下载链接,下载到链接所对应的文件. 但是,如果文件下载功能设计不当,则可能导致攻击者可以通过构造文件路径,从而获取到后台服务器上的其他 ...
- java之 惰性初始化
class Soap { private String s; Soap(){ System.out.println("Soap()"); s="Constructed&q ...
- 【高并发】又一个朋友面试栽在了Thread类的stop()方法和interrupt()方法上!
写在前面 新一轮的面试已经过去,可能是疫情的原因吧,很多童鞋纷纷留言说今年的面试题难度又提高了,尤其是对并发编程的知识.我细想了下,也许有那么点疫情的原因吧,但无论面试的套路怎么变,只要掌握了核心知识 ...
- 【Linux常见命令】pwd命令
pwd - print name of current/working directory pwd命令用于显示工作目录. 执行pwd指令可立刻得知您目前所在的工作目录的绝对路径名称. 语法:pwd [ ...
- Linux指令面试题01-进程查看与终止
查看某一进程是否运行:ps -ef|grep 程序名 终止程序: kill pid 转载于:https://www.cnblogs.com/feihujiushiwo/p/10896636.html
- 数学--数论--Alice and Bob (CodeForces - 346A )推导
It is so boring in the summer holiday, isn't it? So Alice and Bob have invented a new game to play. ...