spring-第八篇之容器中的bean的生命周期
1、容器中的bean的生命周期
spring容器可以管理singleton作用域的bean的生命周期,包括bean何时被创建、何时初始化完成、何时被销毁。客户端代码不能控制该类型bean的销毁。spring容器可以管理该类型bean在实例化结束之后和销毁之前的行为。
prototype作用域类型的bean则完全交由客户端代码管理,spring容器仅仅是负责创建bean。spring容器无法管理该类型的bean。
管理bean的生命周期行为的主要时机有以下两个:
1》注入依赖关系之后
2》即将销毁bean之前
2、依赖关系注入之后的行为
spring提供两种方式在bean全部属性设置成功后执行特定的行为:
1》使用init-method属性,指定某方法在在bean全部属性(即包括依赖)设置成功后执行特定行为。
2》实现InitializingBean接口,并实现该接口的void afterPropertiesSet() throws Exception方法。
举个例子:
Chinese.java
package com.lfy.bean;

import org.springframework.beans.BeansException;

import org.springframework.beans.factory.BeanNameAware;

import org.springframework.beans.factory.InitializingBean;

import org.springframework.context.ApplicationContext;

import org.springframework.context.ApplicationContextAware;

public class Chinese implements InitializingBean,BeanNameAware,ApplicationContextAware {

    private ApplicationContext ctx;

    private String beanName;

    private String personName;

    public Chinese() {

        System.out.println("=========调用无参构造器Chinese()=========");

    }

    @Override

    public void setBeanName(String beanName) {

        this.beanName=beanName;

        System.out.println("=========setBeanName()=========");

    }

    @Override

    public void setApplicationContext(ApplicationContext arg0) throws BeansException {

        this.ctx=arg0;

        System.out.println("=========setApplicationContext()=========");

    }

    /**

     * 生命周期方法

     */

    @Override

    public void afterPropertiesSet() throws Exception {

        System.out.println("=========初始化bean方法afterPropertiesSet()=========");

    }

    /**

     * 将被设为生命周期方法

     */

    public void init() {

        System.out.println("=========初始化bean方法init()=========");

    }

    public void setPersonName(String name) {

        this.personName=name;

        System.out.println("=========setPersonName()执行setter方法注入personName========="+personName);

    }

    public void info() {

        System.out.println("Chinese实现类"+",部署该bean时指定的id为:"+beanName);

    }

}
beans.xml
<?xml version="1.0" encoding="UTF-8"?>

<!-- spring配置文件的根元素,使用spring-beans-4.0.xsd语义约束 -->

<beans xmlns:xsi="http://www.w3.org/2001/XMLSchema-instance"

       xmlns="http://www.springframework.org/schema/beans"

       xsi:schemaLocation="http://www.springframework.org/schema/beans

       http://www.springframework.org/schema/beans/spring-beans-4.0.xsd">

      <bean id="chinese" class="com.lfy.bean.Chinese" init-method="init">

         <property name="personName" value="至尊宝"/>

      </bean>

</beans>
SpringTest.java
package com.lfy.main;

import org.springframework.context.ApplicationContext;

import org.springframework.context.support.ClassPathXmlApplicationContext;

import com.lfy.bean.Chinese;

/**

 * 获得bean本身的id

 * @author lfy

 *

 */

public class SpringTest {

    public static void main(String[] args) {

        ApplicationContext ctx=new ClassPathXmlApplicationContext("beans.xml");

        Chinese chin=ctx.getBean("chinese", Chinese.class);

    }

}
运行结果:
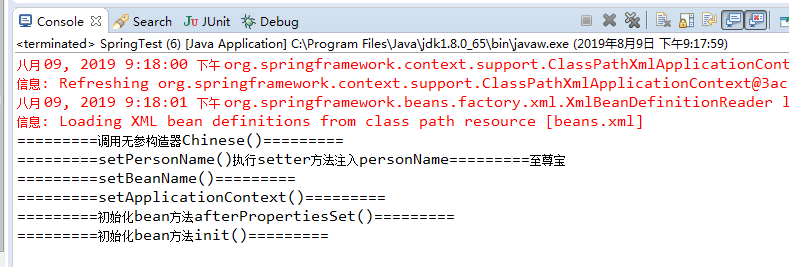
总结:上面的例子,两种方式都同时实现了,注意它们执行的顺序。afterPropertiesSet()方法先于init()方法得到执行。
3、bean销毁之前的行为
spring提供两种方式在bean实例销毁之前执行特定的行为:
1》使用destroy-method属性,指定某方法在在bean实例销毁之前执行特定行为。
2》实现DisposableBean接口,并实现该接口的void destroy() throws Exception方法。
举个例子:对前面的例子做一些修改
Chinese.java
package com.lfy.bean;

import org.springframework.beans.BeansException;

import org.springframework.beans.factory.BeanNameAware;

import org.springframework.beans.factory.DisposableBean;

import org.springframework.beans.factory.InitializingBean;

import org.springframework.context.ApplicationContext;

import org.springframework.context.ApplicationContextAware;

public class Chinese implements InitializingBean,DisposableBean,BeanNameAware,ApplicationContextAware {

    private ApplicationContext ctx;

    private String beanName;

    private String personName;

    public Chinese() {

        System.out.println("=========调用无参构造器Chinese()=========");

    }

    @Override

    public void setBeanName(String beanName) {

        this.beanName=beanName;

        System.out.println("=========setBeanName()=========");

    }

    @Override

    public void setApplicationContext(ApplicationContext arg0) throws BeansException {

        this.ctx=arg0;

        System.out.println("=========setApplicationContext()=========");

    }

    /**

     * 生命周期方法

     */

    @Override

    public void afterPropertiesSet() throws Exception {

        System.out.println("=========初始化bean方法afterPropertiesSet()=========");

    }

    /**

     * 将被设为生命周期方法

     */

    public void init() {

        System.out.println("=========初始化bean方法init()=========");

    }

    /**

     * 生命周期方法

     */

    @Override

    public void destroy() throws Exception {

        System.out.println("=========结束bean前执行方法destroy()=========");

    }

    /**

     * 将被设为生命周期方法

     */

    public void close() {

        System.out.println("=========结束bean前执行方法close()=========");

    }

    public void setPersonName(String name) {

        this.personName=name;

        System.out.println("=========setPersonName()执行setter方法注入personName========="+personName);

    }

    public void info() {

        System.out.println("Chinese实现类"+",部署该bean时指定的id为:"+beanName);

    }

}
beans.xml
<?xml version="1.0" encoding="UTF-8"?>

<!-- spring配置文件的根元素,使用spring-beans-4.0.xsd语义约束 -->

<beans xmlns:xsi="http://www.w3.org/2001/XMLSchema-instance"

       xmlns="http://www.springframework.org/schema/beans"

       xsi:schemaLocation="http://www.springframework.org/schema/beans

       http://www.springframework.org/schema/beans/spring-beans-4.0.xsd">

      <!-- 遇到了个问题,偶尔出现destory-method="close"不能出现在<bean.../>,暂未明白原因  -->

      <bean id="chinese" class="com.lfy.bean.Chinese" init-method="init" destory-method="close">

         <property name="personName" value="至尊宝"/>

      </bean>

</beans>
SpringTest.java
package com.lfy.main;

import org.springframework.context.support.AbstractApplicationContext;

import org.springframework.context.support.ClassPathXmlApplicationContext;

import com.lfy.bean.Chinese;

/**

 * 获得bean本身的id

 * @author lfy

 *

 */

public class SpringTest {

    public static void main(String[] args) {

        AbstractApplicationContext ctx=new ClassPathXmlApplicationContext("beans.xml");

        Chinese chin=ctx.getBean("chinese", Chinese.class);

        ctx.registerShutdownHook();

    }

}
运行结果:

总结:由于xml解析发生了些问题未能找到原因,一开始destory-method方法没能演示效果。后来突然又好了,可能是eclipse的问题。在非Web应用上,使用registerShutdownHook()能够正确的关闭spring容器。并且注意destory()方法先于close()方法执行。
4、此外协调作用域不同步的bean:
singleton作用域的bean依赖于prototype作用域的bean,但singleton bean只有一次初始化的机会,在初始化单例bean的时候,会先创建prototype作用域的bean,然后再初始化单例bean。这将导致以后无论什么时候通过单例bean访问prototype bean都会是同一个bean,相当于单例bean变相的将prototype bean单例化了。
为了解决这种生命周期与预期不同步的问题,有两种解决思路:
1》 放弃依赖注入:单例bean每次需要prototype bean时,主动向容器请求新的bean实例。
2》利用方法注入:通常使用lookup方法注入。使用lookup方法注入可以让spring容器重写容器中bean的抽象或者具体方法,返回查找容器中其他bean的结果。spring通过使用JDK动态代理或cglib库修改客户端的二进制代码,从而实现上述需求。
使用lookup方法注入,大致的步骤有:
1》将调用者bean的实现类定义为抽象类,并定义一个抽象方法来获取被依赖的bean。
2》在<bean.../>元素中添加<lookup-method.../>子元素让spring为调用者bean的实现类实现指定的抽象方法。
3》使用<lookup-method.../>元素需要指定如下两个元素:
name:指定需要让spring实现的方法。
bean:指定spring实现该方法的返回值。
举个例子:
Dog.java
package com.lfy.bean;

public interface Dog {

    public String run();

}
GunDog.java
package com.lfy.impl;

import com.lfy.bean.Dog;

public class GunDog implements Dog {

    private String name;

    public void setName(String name) {

        this.name=name;

    }

    @Override

    public String run() {

        return "我是一只叫"+this.name+"的猎犬,奔跑迅速...";

    }

}
Chinese.java
package com.lfy.bean;

public abstract class Chinese {

    //private Dog dog;留作动态注入一个Dog的实例

    // 定义抽象方法,该方法用于获取被依赖的bean

    public abstract Dog getDog();

    public void hunt() {

        System.out.println("我带着:"+getDog()+"出去打猎");

        System.out.println(getDog().run());

    }

}
beans.xml
<?xml version="1.0" encoding="UTF-8"?>

<!-- spring配置文件的根元素,使用spring-beans-4.0.xsd语义约束 -->

<beans xmlns:xsi="http://www.w3.org/2001/XMLSchema-instance"

       xmlns="http://www.springframework.org/schema/beans"

       xsi:schemaLocation="http://www.springframework.org/schema/beans

       http://www.springframework.org/schema/beans/spring-beans-4.0.xsd">

      <!-- chinese依赖于gunDog,并且为单例bean依赖prototype实例。

           spring检测到lookup-method元素,会自动为该元素的name属性

                                 指定的方法提供实现体

       -->

      <bean id="chinese" class="com.lfy.bean.Chinese">

         <lookup-method name="getDog" bean="gunDog"/>

      </bean>

      <!-- 指定bean的作用域为prototype,希望每次都是新的bean -->

      <bean id="gunDog" class="com.lfy.impl.GunDog" scope="prototype">

         <property name="name" value="旺财"/>

      </bean>

</beans>
SpringTest.java
package com.lfy.main;

import org.springframework.context.ApplicationContext;

import org.springframework.context.support.AbstractApplicationContext;

import org.springframework.context.support.ClassPathXmlApplicationContext;

import com.lfy.bean.Chinese;

/**

 * 获得bean本身的id

 * @author lfy

 *

 */

public class SpringTest {

    public static void main(String[] args) {

        ApplicationContext ctx=new ClassPathXmlApplicationContext("beans.xml");

        Chinese p1=ctx.getBean("chinese", Chinese.class);

        Chinese p2=ctx.getBean("chinese", Chinese.class);

        System.out.println("是否还是同一个Chinese猎人:"+(p1 == p2));

        p1.hunt();

        p2.hunt();

    }

}
运行结果:
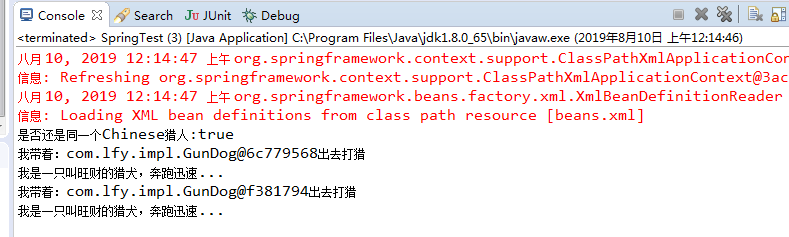
总结:我们的Chinese类是一个抽象类,它不能实例化。我们通过给它添加<lookup-method.../>元素,告诉spring需要实现哪个抽象方法spring容器为抽象方法提供实体后,抽象方法变成类的具体方法,这个类也就变成了具体类,接下来spring就可以创建该bean的实例了。
spring会采用运行时动态增强的方式来实现<lookup-method.../>元素所指定的抽象方法:如果目标抽象类实现过接口,spring会采用JDK动态代理来实现该抽象类,并为之实现抽象方法;如果目标抽象类没有实现过接口,spring会采用cglib实现该抽象类,并为之实现抽象方法。spring-4.0.4已经在核心包中集成了cglib类库,无需额外添加cglib的jar包。
spring-第八篇之容器中的bean的生命周期的更多相关文章
- SpringBean容器启动流程+Bean的生命周期【附源码】
如果对SpringIoc与Aop的源码感兴趣,可以访问参考:https://javadoop.com/,十分详细. 目录 Spring容器的启动全流程 Spring容器关闭流程 Bean 的生命周期 ...
- Spring扩展:替换IOC容器中的Bean组件 -- @Replace注解
1.背景: 工作中是否有这样的场景?一个软件系统会同时有多个不同版本部署,比如我现在做的IM系统,同时又作为公司的技术输出给其他银行,不同的银行有自己的业务实现(比如登陆验证.用户信息查询等) ...
- spring中的bean的生命周期
bean的生命周期:bean的创建 —— 初始化 ——销毁的过程 容器管理bean的生命周期,我们可以自定义初始化和销毁方法,容器在bean进行到当前生命周期就会调用我们的方法 在xml配置文件中是在 ...
- Spring重点—— IOC 容器中 Bean 的生命周期
一.理解 Bean 的生命周期,对学习 Spring 的整个运行流程有极大的帮助. 二.在 IOC 容器中,Bean 的生命周期由 Spring IOC 容器进行管理. 三.在没有添加后置处理器的情况 ...
- Spring Bean的生命周期,《Spring 实战》书中的官方说法
连着两天的面试 ,都问到了 Spring 的Bean的生命周期,其中还包括 昨晚一波阿里的电话面试.这里找到了Spring 实战中的官方说法.希望各位要面试的小伙伴记住,以后有可能,或者是有时间 去看 ...
- 简:Spring中Bean的生命周期及代码示例
(重要:spring bean的生命周期. spring的bean周期,装配.看过spring 源码吗?(把容器启动过程说了一遍,xml解析,bean装载,bean缓存等)) 完整的生命周期概述(牢记 ...
- 【Spring】Spring中的Bean - 4、Bean的生命周期
Bean的生命周期 简单记录-Java EE企业级应用开发教程(Spring+Spring MVC+MyBatis)-Spring中的Bean 了解Spring中Bean的生命周期有何意义? 了解Sp ...
- Spring基础14——Bean的生命周期
1.IOC容器中的Bean的生命周期方法 SpringIOC容器可以管理Bean的生命周期,Spring允许在Bean生命周期的特定点执行定制的任务.SpringIOC容器对Bean的生命周期进行管理 ...
- Spring学习-- IOC 容器中 bean 的生命周期
Spring IOC 容器可以管理 bean 的生命周期 , Spring 允许在 bean 声明周期的特定点执行定制的任务. Spring IOC 容器对 bean 的生命周期进行管理的过程: 通过 ...
随机推荐
- win32 socket编程(二)——TCP/IP
一.大端.小端法定义 1.1小端法(Little-Endian)就是低位字节排放在内存的低地址端即该值的起始地址,高位字节排放在内存的高地址端. (主机字节顺序) 1.2 大端法(Big-Endian ...
- 372-基于XC7VX690T的高速模拟信号、万兆光纤综合计算平台
基于XC7VX690T的高速模拟信号.万兆光纤综合计算平台 一.板卡概述 基于V7的高性能PCIe信号处理板,板卡选用Xilinx 公司Virtex7系列FPGA XC7VX690T-2FFG1761 ...
- 洛谷P2606 [ZJOI2010]排列计数 组合数学+DP
题意:称一个1,2,...,N的排列P1,P2...,Pn是Magic的,当且仅当2<=i<=N时,Pi>Pi/2. 计算1,2,...N的排列中有多少是Magic的,答案可能很大, ...
- java并发学习--第四章 JDK提供的线程原子性操作工具类
在了解JDK提供的线程原子性操作工具类之前,我们应该先知道什么是原子性:在多线程并发的条件下,对于变量的操作是线程安全的,不会受到其他线程的干扰.接下来我们就学习JDK中线程的原子性操作. 一.CAS ...
- Qt 鼠标悬浮按钮上出现浮窗效果
操作: 鼠标hover于Btn(or other widget),在指定位置显示想要的widget(或其他控件窗口) 方法:重载以下几个api void paintEvent(QPaintEvent ...
- SpringBoot---异步消息
1.概述 1.1.SpringBoot 对 JMS 的自动配置 位于 org.springframework.boot.autoconfigure.jms下: 1.2.SpringBoot 支 ...
- django 的保护机制
- [洛谷P1095]NOIP2007 普及组T3 守望者的逃离
问题描述 恶魔猎手尤迪安野心勃勃,他背叛了暗夜精灵,率领深藏在海底的娜迦族企图叛变.守望者在与尤迪安的交锋中遭遇了围杀,被困在一个荒芜的大岛上.为了杀死守望者,尤迪安开始对这个荒岛施咒,这座岛很快就会 ...
- hdu 6134: Battlestation Operational (2017 多校第八场 1002)【莫比乌斯】
题目链接 比赛时没抓住重点,对那个受限制的“分数求和”太过关心了..其实如果先利用莫比乌斯函数的一个性质把后面那个[gcd(i,j)=1]去掉,那么问题就可以简化很多.公式如下 这和之前做过的一道题很 ...
- Oracle分组函数之Grouping Sets
功能介绍: 自定义分组的字段 创建表: 插入测试数据: Grouping Sets(null,t.classid,(t.classid,t.studentname)),类似于ROLLUP Select ...