consul++ansible+shell批量下发注册node_exporter
--日期:2020年7月21日
--作者:飞翔的小胖猪
文档功能说明:
文档通过ansible+shell+consul的方式实现批量下发安装Linux操作系统监控的node_exporter软件,自动加载node_exporter软件到系统开机启动中并通过consul注册的功能。为部署prometheus系统做好前期准备。
适用范围:
文档试用于centos、redhat系列操作系统。由于文档使用了ansible对主机操作,被管理端linux需要有python2.6以上的环境才能使用,对于centos和redhat系统默认只能控制6及以上的系统,6以下的操作系统需要单独的升级python版本。所有被管主机上请提前安装好wget工具。
注:
对于已有业务承载的6以下操作系统不建议升级python包来实现,该部分机器请手动下发软件及脚本。
环境准备:
ansible服务器一台 批量操作控制主机节点
httpd服务器一台 存放soft文件和脚本文件
consul服务器一台 实现自动注册node_exporter到资源中
ansible和consul可以部署到一台设备上,也可以分开部署。文档中不涉及到ansible及consul服务的安装部署操作,如有需求请查看作者其他部署笔记或自己百度。

步骤:
1.在ansible中添加被管控节点列表
2.编写脚本下发软件及脚本至服务器
3.实现node_exporter注册到consul中
4.检查查看consul注册情况
step1:配置ansible服务及ansible控制清单
文章不对ansible安装进行介绍,在ansible安装完成的前提下进行配置。进行配置前需要保证环境中以完成ansible软件安装。
配置配置首次通过ssh协议登录被控主机时不用敲yes。
修改/etc/ansible/ansible.cfg文件中的host_key_checking = False
# vim /etc/ansible/ansible.cfg
# additional paths to search for roles in, colon separated

#roles_path    = /etc/ansible/roles

# uncomment this to disable SSH key host checking

host_key_checking = False

# change the default callback, you can only have one 'stdout' type  enabled at a time.
修改/etc/ssh/ssh_config中StrictHostKeyChecking ask选项为StrictHostKeyChecking no
# vim /etc/ssh/ssh_config
#   CheckHostIP yes

#   AddressFamily any

#   ConnectTimeout 0

StrictHostKeyChecking no

#   IdentityFile ~/.ssh/id_rsa

#   IdentityFile ~/.ssh/id_dsa
编辑/etc/ansible/hosts文件添加需要控制的主机清单,文档使用明文密码添加内容。
# vim /etc/ansible/hosts
[node_exporter_group]

node_1   ansible_ssh_host=192.168.111.12   ansible_ssh_user=root    ansible_ssh_pass=yinwan

node_2   ansible_ssh_host=192.168.111.124   ansible_ssh_user=root    ansible_ssh_pass=yinwan
配置说明:
ansible_ssh_host: 被控主机ip地址或域名
ansible_ssh_user: 被控主机可访问用户
ansible_ssh_pass: 对应ansible_ssh_user用户的密码
验证ansible服务配置成功,使用ansible调用命令查看被控主机主机名,如果正常能够显示出主机名。
查看ansible中一共有多少个被控主机
# ansible all --list

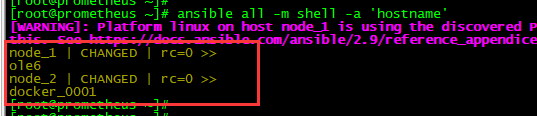
查看被控主机的主机名,能够正常查看主机名表示主机能够被ansible服务控制,配置添加成功。
# ansible all -m shell -a 'hostname'
step2:编写脚本下发软件及脚本至服务器
实验使用http放置node_exporter软件和各种脚本,客户主机通过wget可从http服务器获取到资源。在进行软件及脚本下发前需要读者自定搭建一个http服务,作者直接使用yum命令安装了一个httpd服务,把软件及脚本放置/var/www/html/soft/文件夹中。
脚本说明:
存放地址:/var/www/html/soft/
# ls -l /var/www/html/soft/

get_soft.sh:客户端主机下载node_exporter软件、node_exporter启动脚本。并且完成node_exporter安装。
auto_start_node_exporter.sh:客户端启动node_exporter脚本
auto_consul_zc.sh:使用/etc/ansible/hosts列表生成注册consul命令
auto_prometh_server.sh:启动prometheus+consul+alertmanager脚本
# vim get_soft.sh


#!/bin/bash

    if uname -a | grep -i _64 &> /dev/null ;then

        echo "64位处理方式"

        if [ -f /root/node_exporter-1.0..linux-amd64.tar.gz ];then

            echo ' node_exporter-1.0.0.linux-amd64.tar.gz file exist'

        else

            if timeout   wget -P /root  http://192.168.111.83/soft/node_exporter-1.0.0.linux-amd64.tar.gz;then

                if [ -f  /usr/local/node_exporter/node_exporter ];then

                    echo "node_exporter file exist , not exec command. "

                else

                    if [ -f /root/auto_start_node_exporter.sh ];then

                        echo 'auto_start_node_exporter.sh  exist '

                    else

                        if timeout   wget -P /root  http://192.168.111.83/soft/auto_start_node_exporter.sh;then

                            if cat /etc/rc.d/rc.local | grep -i auto_start_node_exporter &> /dev/null ;then

                                echo "file in auto startup  low"

                            else

                                echo '/root/auto_start_node_exporter.sh'  >> /etc/rc.d/rc.local

                                chmod a+x /etc/rc.d/rc.local

                            fi

                        else

                            echo 'auto_start_node_exporter.sh  copy faile !! '

                        fi

                    fi

                    mkdir /scripts/soft/   -p

                    tar -zxvf /root/node_exporter-1.0..linux-amd64.tar.gz  -C /scripts/soft/   && mv /scripts/soft/node_exporter-1.0..linux-amd64/ /usr/local/node_exporter

                    chmod a+x /root/auto_start_node_exporter.sh

                fi

            else

                echo "node_exporter soft_file copy faile !!"

            fi

        fi

    else

        echo "32位处理方式"

        if [ -f /root/node_exporter-1.0..linux-amd64.tar.gz ];then

            echo ' node_exporter-1.0.0.linux-amd64.tar.gz file exist'

        else

            if timeout   wget -P /root  http://192.168.111.83/soft/node_exporter-1.0.0.linux-386.tar.gz;then

                if [ -f  /usr/local/node_exporter/node_exporter ];then

                    echo "node_exporter file exist , not exec command. "

                else

                    if [ -f /root/auto_start_node_exporter.sh ];then

                        echo 'auto_start_node_exporter.sh  exist '

                    else

                        if timeout   wget -P /root  http://192.168.111.83/soft/auto_start_node_exporter.sh;then

                            if cat /etc/rc.d/rc.local | grep -i auto_start_node_exporter &> /dev/null ;then

                                echo "file in auto startup  low"

                            else

                                echo '/root/auto_start_node_exporter.sh'  >> /etc/rc.d/rc.local

                                chmod a+x /etc/rc.d/rc.local

                            fi

                        else

                            echo 'auto_start_node_exporter.sh  copy faile !! '

                        fi

                    fi

                    mkdir /scripts/soft/   -p

                    tar -zxvf /root/node_exporter-1.0..linux-.tar.gz  -C /scripts/soft/   && mv /scripts/soft/node_exporter-1.0..linux-/ /usr/local/node_exporter

                    chmod a+x /root/auto_start_node_exporter.sh

                fi

            else

                echo "node_exporter soft_file copy faile !!"

            fi

        fi

    fi
# vim auto_start_node_exporter.sh
#!/bin/bash

if  which netstat &> /dev/null;then

        if netstat -alntup | grep -i  &> /dev/null;then

                echo "9100 port exist  netstat !"

        else

              /usr/local/node_exporter/node_exporter  &> /dev/null &

        fi

elif  which ss &> /dev/null ;then

        if  ss -alntup | grep -i  &> /dev/null;then

                echo "9100 port exist ss ! "

        else

              /usr/local/node_exporter/node_exporter  &> /dev/null &

        fi

else

        echo "未知错误,不启动程序"

fi
# vim auto_consul_zc.sh
#!/bin/bash

cat /etc/ansible/hosts  | grep -v '\[' | grep -v ^$  | sed 's/=/ /'  | awk '{print $1,$3}' > /prometheus/tmp_consul_list.txt

sleep

cat /prometheus/tmp_consul_list.txt  | while read  host_name    host_addr

do

    echo " curl -X PUT -d ' {\"id\": \"${host_name}\",\"name\": \"${host_name}\",\"address\": \"${host_addr}\",\"port\": 9100,\"tags\": [\"test\",\"node\",\"linux\"],\"checks\":  [{\"http\": \"http://${host_addr}:9100/metrics\", \"interval\": \"5s\"}]}' http://192.168.111.83:8500/v1/agent/service/register "

done
# vim auto_prometh_server.sh
#!/bin/bash

sleep

prometheus --config.file="/usr/local/prometheus/prometheus.yml" --storage.tsdb.retention.time=90d &> /dev/null &

consul agent -server -bootstrap-expect  -data-dir=/usr/local/consul_data/data -ui -bind 192.168.111.83 -client 0.0.0.0  &> /dev/null &

alertmanager --config.file=/usr/local/alertmanager/alertmanager.yml --cluster.advertise-address=0.0.0.0: &> /dev/null &
执行ansible批量下发node_exporter和启动脚本并在主机端自动安装node_exporter软件加入启动脚本到开机启动。
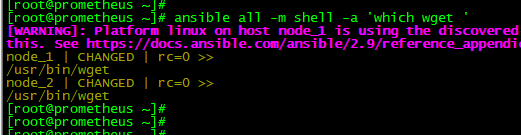
在下发之前需要确认被控主机节点有wget命令,如果没有wget命令则需要先完成wget安装。
# ansible all -m shell -a 'which wget '
使用ansible的script模块执行脚本/var/www/html/soft/get_soft.sh
# ansible all -m script -a '/var/www/html/soft/get_soft.sh'
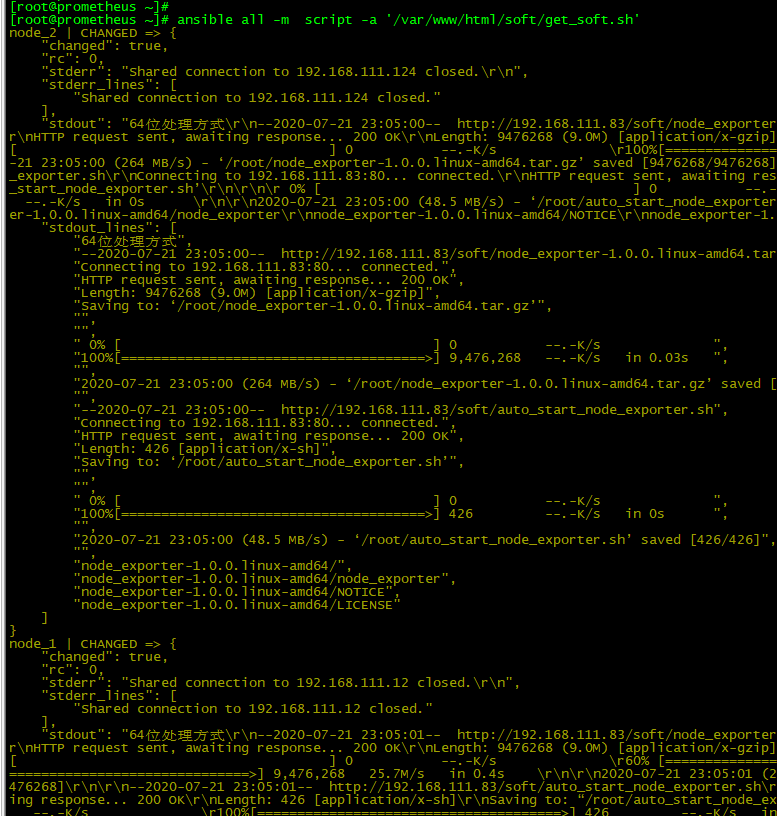
确认客户端上是否存在node_exporter软件,如果存在/usr/local/node_exporter/node_exporter文件表示软件安装成功。
# ansible all -m shell -a ' ls -l /usr/local/node_exporter/node_exporter '

rc=0表示命令有返回值,则表示文件存在,软件安装成功。
确认客户端上是否存在auto_start_node_exporter.sh启动脚本,如果存在/root/auto_start_node_exporter.sh则启动脚本获取成功。
# ansible all -m shell -a ' ls -l /root/auto_start_node_exporter.sh '

rc=0表示命令有返回值,则表示启动脚本存在。
确认客户端上是否成功添加启动脚本到开机启动,如果/etc/rc.d/rc.local中有/root/auto_start_node_exporter.sh行则开机启动添加成功。
# ansible all -m shell -a ' cat /etc/rc.d/rc.local | grep -i auto_start_node_exporter '

rc=0表示命令有返回值,则表示/etc/rc.d/rc.local文件中有/root/auto_start_node_exporter.sh行,表示脚本开机启动配置完成。
通过命令启动客户端的node_exporter软件,启动后查看客户主机上9100端口是否处于监听状态。
# ansible all -m shell -a 'nohup /root/auto_start_node_exporter.sh '
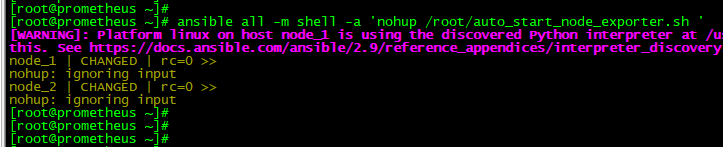
调用客户端脚本启动node_exporter软件。
确认客户端9100端口有node_exporter软件监听。
# ansible all -m shell -a 'ss -alntup | grep -i 9100 '

9100端口启动表示node_exporter软件安装完成。能够正常为prometheus提供数据。
step3:注册客户端node_exporter到consul
使用shell脚本从/etc/ansible/hosts中提取被控主机信息,自动生成注册consul命令。
在进行该步骤前需要提前完成consul软件的安装与配置。
# source /var/www/html/soft/auto_consul_zc.sh

注:
auto_consul_zc.sh脚本中http://192.168.111.83:8500/v1/agent/service/register中的ip地址是写死的,读者请根据自己的consul服务器地址修改。
复制脚本生成的命令并执行。
curl -X PUT -d '{"id": "node_1","name": "node_1","address": "192.168.111.12","port": 9100,"tags": ["test","node","linux"],"checks": [{"http": "http://192.168.111.12:9100/metrics", "interval": "5s"}]}'  http://192.168.111.83:8500/v1/agent/service/register

curl -X PUT -d '{"id": "node_2","name": "node_2","address": "192.168.111.124","port": 9100,"tags": ["test","node","linux"],"checks": [{"http": "http://192.168.111.124:9100/metrics", "interval": "5s"}]}'  http://192.168.111.83:8500/v1/agent/service/register

step4:确认consul注册信息
使用网页浏览器打开输入consul服务器的地址端口查看界面中是否有新注册服务器,如果有则表示注册成功。

能够在web界面查看到节点表示节点注册成功,此时可以在prometheus中添加consul资源实现对数据的收集工作。
consul++ansible+shell批量下发注册node_exporter的更多相关文章
- Ansible实现批量无密码登录
如果机器多,假如有一百台服务器,每台服务器登录前都得先输入yes,使用交互式的方式下发公钥的话就很麻烦(ssh-copy-id). 第一次操作需要通过密码来操作服务器,所以配置文件需要把密码配置好 a ...
- Linux 运维工作中的经典应用ansible(批量管理)Docker容器技术(环境的快速搭建)
一 Ansible自动化运维工具 Python 在运维工作中的经典应用 ansible(批量管理操作) .安装ansible(需要bese epel 2种源) wget -O /etc/yum.rep ...
- Ansible playbook 批量修改服务器密码 先普通后root用户
fsckzy Ansible playbook 批量修改服务器密码 客户的需求:修改所有服务器密码,密码规则为Rfv5%+主机名后3位 背景:服务器有CentOS6.7,SuSE9.10.11,r ...
- 烂泥:学习tomcat之通过shell批量管理多个tomcat
本文由ilanniweb提供友情赞助,首发于烂泥行天下 想要获得更多的文章,可以关注我的微信ilanniweb 公司的业务是使用tomcat做web容器,为了更有效的利用服务器的性能,我们一般部署多个 ...
- shell 批量压缩指定文件夹及子文件夹内图片
shell 批量压缩指定文件夹及子文件夹内图片 用户上传的图片,一般都没有经过压缩,造成空间浪费.因此须要编写一个程序,查找文件夹及子文件夹的图片文件(jpg,gif,png),将大于某值的图片进行压 ...
- ssh免密验证,shell批量设置
ssh免密验证,shell批量设置 #ssh免密验证,shell自动设置 echo '#!/bin/sh . /etc/init.d/functions [[ -f /usr/bin/expect ] ...
- 使用Consul 实现 MagicOnion(GRpc) 服务注册和发现
1.下载打开Consul 笔者是windows下面开发的(也可以使用Docker). 官网下载windows的Consul https://www.consul.io/ 使用cmd窗口打开,输入con ...
- 基于CentOS的MySQL学习补充三--使用Shell批量创建数据库表
本文出处:http://blog.csdn.net/u012377333/article/details/47006087 接上篇介绍<基于CentOS的Mysql学习补充二--使用Shell创 ...
- .net core Ocelot Consul 实现API网关 服务注册 服务发现 负载均衡
大神张善友 分享过一篇 <.NET Core 在腾讯财付通的企业级应用开发实践>里面就是用.net core 和 Ocelot搭建的可扩展的高性能Api网关. Ocelot(http:// ...
随机推荐
- eclipse .project文件 .classpath文件的作用
.classpath文件的作用 可以参考.classpath文件的作用 .project文件的作用 确保你自己的eclipse能创建Java项目,并且正确编译运行helloworld,给eclipse ...
- 解决React Native安装应用到真机(红米3S)报Execution failed for task ':app:installDebug'的错误
报错信息如下: :app:installDebug Installing APK 'app-debug.apk' on 'Redmi 3S - 6.0.1'Unable to install D:\R ...
- python用pandas遍历csv文件
import pandas as pd df = pd.read_csv('a.csv') for index, row in df.iterrows(): x, y = row['X'], row[ ...
- python+opencv实现检测物体聚集区域
内容涉及:二值图像转换 / 检测连通区域面积 / 在原图上画框等 import cv2 import numpy as np for n in open('list.txt'): # list.txt ...
- HTML重构与网页常用工具
下面这张思维导图,是我对全书大体内容的一个概括性总结: 工具 本书推荐的工具主要包含的是自动化测试,但是我觉得现行的开发环节当中实际用到的会比较少.这里就推荐一下其他方面的优秀工具: 1. YSlow ...
- python设计模式之模版方法设计模式
我们在使用python的flask框架时,可能会经常用到生命周期函数如:before_request, before_first_request,或者信号等,刚开始学的时候就想只要写一个函数,然后加上 ...
- hive中left semi join 与join 的区别
LEFT SEMI JOIN:左半开连接会返回左边表的记录,前提是其记录对于右边表满足ON语句中的判定条件.对于常见的内连接(INNER JOIN),这是一个特殊的,优化了的情况.大多数的SQL方言会 ...
- centos7设置系统时间与网络时间同步
Linux的时间分为System Clock(系统时间)和Real Time Clock (硬件时间,简称RTC). 系统时间:指当前Linux Kernel中的时间. 硬件时间:主板上有电池供电的时 ...
- For setting NODE_ENV you can use any of these methods.
method 1: set NODE_ENV for all node apps Windows: set NODE_ENV=production Linux or other Unix based ...
- python使用selenium和requests.session登录抓取
# Author:song from selenium import webdriver from selenium.webdriver.common.keys import Keys from re ...