.net core使用ocelot---第二篇 身份验证
简介原文链接
接上文,我将继续介绍使用asp.net core 创建API网关,主要介绍身份验证(authentication )相关内容。
API服务是需要保护的资源,我们应该尽可能的保证他们的安全。
通常,我们会使用aspnet security 来保证我们项目的安全,aspnet security代码库是为asp.net core 设计的安全和授权中间件。已经让事情变得简单。
那么我们在项目中引入API网关会不会导致巨大的改变?答案是,不会。我们的修改微乎其微,但是却让安全和授权变得简单。
先看下面的截图。
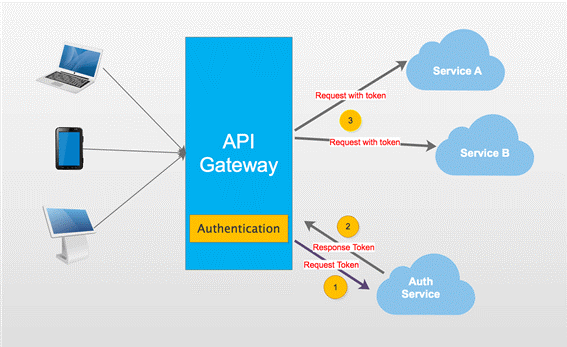
截图显示,当我们访问我们的服务,API网关会让我们首先访问其授权模块。我们必须访问授权服务获得访问令牌(access token),然后用访问令牌访问受保护的服务。
可能你倾向将授权服务独立,这意味客户端得先访问授权服务获得访问令牌。然后携带令牌访问API网关。毫无疑问这样做没问题,但是我建议将授权服务和其他服务放在一起。
APIGateway是我们所有服务的入口,对于身份未验证的客户端仅可以访问授权服务。
OK,开始我们的表演。
我会使用上一个demo的部分内容,便于理解。
Step1
|
项目名称 |
项目类型 |
描述 |
|
APIGateway |
ASP.NET Core Empty |
示例的入口 |
|
CustomersAPIServices |
ASP.NET Core Web API |
API 服务处理消费者的操作 |
|
AuthServer |
ASP.NET Core Web API |
API 服务处理授权操作 |
|
ClientApp |
Console App |
控制台程序模拟客户端 |
APIGateway和CustomerAPIServices和上篇文章的例子一样,你可以在APIGatewayBasicDemo获得。
Step2
创建AuthServer,AuthServer主要是为request请求生成访问令牌(access token),我们需要添加一个方法处理。
[HttpGet]

public IActionResult Get(string name, string pwd)

{

    //just hard code here.

    if (name == "catcher" && pwd == "")

    {

        var now = DateTime.UtcNow;

        var claims = new Claim[]

        {

            new Claim(JwtRegisteredClaimNames.Sub, name),

            new Claim(JwtRegisteredClaimNames.Jti, Guid.NewGuid().ToString()),

            new Claim(JwtRegisteredClaimNames.Iat, now.ToUniversalTime().ToString(), ClaimValueTypes.Integer64)

        };

        var signingKey = new SymmetricSecurityKey(Encoding.ASCII.GetBytes(_settings.Value.Secret));

        var tokenValidationParameters = new TokenValidationParameters

        {

            ValidateIssuerSigningKey = true,

            IssuerSigningKey = signingKey,

            ValidateIssuer = true,

            ValidIssuer = _settings.Value.Iss,

            ValidateAudience = true,

            ValidAudience = _settings.Value.Aud,

            ValidateLifetime = true,

            ClockSkew = TimeSpan.Zero,

            RequireExpirationTime = true,

        };

        var jwt = new JwtSecurityToken(

            issuer: _settings.Value.Iss,

            audience: _settings.Value.Aud,

            claims: claims,

            notBefore: now,

            expires: now.Add(TimeSpan.FromMinutes()),

            signingCredentials: new SigningCredentials(signingKey, SecurityAlgorithms.HmacSha256)

        );

        var encodedJwt = new JwtSecurityTokenHandler().WriteToken(jwt);

        var responseJson = new

        {

            access_token = encodedJwt,

            expires_in = (int)TimeSpan.FromMinutes().TotalSeconds

        };

        return Json(responseJson);

    }

    else

    {

        return Json("");

    }

}
在验证用户时。我使用硬编码将用户名写死,因为对于本文这个不是那么重要。
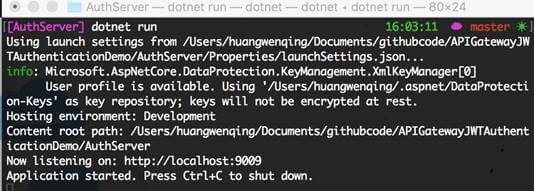
这样我们就完成了授权服务,现在跑起来。
Step3
回到CustomersAPIServices项目,我们应该保护这个服务。
修改Startup,我们可以使用授权。在这我用JwtBearer进行授权,我会给TestKey设置默认的授权方案。TestKey我将在下面提到。
public void ConfigureServices(IServiceCollection services)

{

    var audienceConfig = Configuration.GetSection("Audience");

    var signingKey = new SymmetricSecurityKey(Encoding.ASCII.GetBytes(audienceConfig["Secret"]));

    var tokenValidationParameters = new TokenValidationParameters

    {

        ValidateIssuerSigningKey = true,

        IssuerSigningKey = signingKey,

        ValidateIssuer = true,

        ValidIssuer = audienceConfig["Iss"],

        ValidateAudience = true,

        ValidAudience = audienceConfig["Aud"],

        ValidateLifetime = true,

        ClockSkew = TimeSpan.Zero,

        RequireExpirationTime = true,

    };

    services.AddAuthentication()

            .AddJwtBearer("TestKey", x =>

             {

                 x.RequireHttpsMetadata = false;

                 x.TokenValidationParameters = tokenValidationParameters;

             });

    services.AddMvc();

}

public void Configure(IApplicationBuilder app)

{

    app.UseAuthentication();

    app.UseMvc();

}
接下来,对需要保护的方法,添加Authorize。
[Authorize]

[HttpGet]

public IEnumerable<string> Get()

{

    return new string[] { "Catcher Wong", "James Li" };

}
注意
该项目基于asp.net core 2.0. 如果你的项目是1.X,可能有些不同,建议用迁移迁移到2.0.以上。接下来就是见证奇迹的时候了。

Step4
最重要的步骤来了,在APIGateway中配置授权。
public void ConfigureServices(IServiceCollection services)

{

    var audienceConfig = Configuration.GetSection("Audience");

    var signingKey = new SymmetricSecurityKey(Encoding.ASCII.GetBytes(audienceConfig["Secret"]));

    var tokenValidationParameters = new TokenValidationParameters

    {

        ValidateIssuerSigningKey = true,

        IssuerSigningKey = signingKey,

        ValidateIssuer = true,

        ValidIssuer = audienceConfig["Iss"],

        ValidateAudience = true,

        ValidAudience = audienceConfig["Aud"],

        ValidateLifetime = true,

        ClockSkew = TimeSpan.Zero,

        RequireExpirationTime = true,

    };

    services.AddAuthentication()

            .AddJwtBearer("TestKey", x =>

             {

                 x.RequireHttpsMetadata = false;

                 x.TokenValidationParameters = tokenValidationParameters;

             });

    services.AddOcelot(Configuration);

}
这个配置的大部分代码和Customer Service一样。
当Ocelot启动,它会查看ReRoutes 》AuthenticationOptions 》AuthenticationProviderKey 的值,
检查该值是否被授权服务注册,如果没有,Ocelot不会启动,如果有,Ocelot在执行时使用授权服务。
所以,我们得修改configuration.json,我们需要添加新的节点,并将其值赋为在Startup 类中定义的一样。
{

    "DownstreamPathTemplate": "/api/customers",

    "DownstreamScheme": "http",

    "DownstreamHost": "localhost",

    "DownstreamPort": ,

    "UpstreamPathTemplate": "/customers",

    "UpstreamHttpMethod": [ "Get" ],

    "AuthenticationOptions": {

        "AuthenticationProviderKey": "TestKey",

        "AllowedScopes": []

    }

}
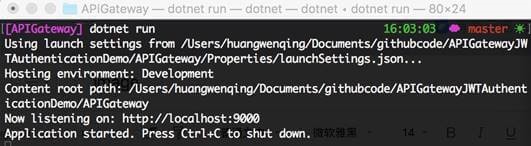
启动服务。
注意
当你启动项目时遇到下面的错误,你应该检查你的代码,查看AddJwtBearer 方法是否指明授权方案。
Unhandled Exception: System.InvalidOperationException: Scheme already exists: Bearer
Step5
我们已经准备完毕,我们用我们的客户端模拟APIGateway的某些请求。
我们先添加获得访问令牌的方法。
private static string GetJwt()

{

    HttpClient client = new HttpClient();

    client.BaseAddress = new Uri( "http://localhost:9000");

    client.DefaultRequestHeaders.Clear();

    var res2 = client.GetAsync("/api/auth?name=catcher&pwd=123").Result;

    dynamic jwt = JsonConvert.DeserializeObject(res2.Content.ReadAsStringAsync().Result);

    return jwt.access_token;

}
接下来,编写通过APIGateway访问Customer Service方法的代码。
static void Main(string[] args)

{

    HttpClient client = new HttpClient();

    client.DefaultRequestHeaders.Clear();

    client.BaseAddress = new Uri("http://localhost:9000");

    // 1. without access_token will not access the service

    //    and return 401 .

    var resWithoutToken = client.GetAsync("/customers").Result;

    //print something here

    //2. with access_token will access the service

    //   and return result.

    client.DefaultRequestHeaders.Clear();

    var jwt = GetJwt();

    client.DefaultRequestHeaders.Add("Authorization", $"Bearer {jwt}");

    var resWithToken = client.GetAsync("/customers").Result;

    //print something here

    //3. visit no auth service

    client.DefaultRequestHeaders.Clear();

    var res = client.GetAsync("/customers/1").Result;

    //print something here

    Console.Read();

}
运行结果。

完工。
源码在此。
总结
没啥。
.net core使用ocelot---第二篇 身份验证的更多相关文章
- 【asp.net core 系列】13 Identity 身份验证入门
0. 前言 通过前两篇我们实现了如何在Service层如何访问数据,以及如何运用简单的加密算法对数据加密.这一篇我们将探索如何实现asp.net core的身份验证. 1. 身份验证 asp.net ...
- 第二章 身份验证——《跟我学Shiro》
转发:https://www.iteye.com/blog/jinnianshilongnian-2019547 目录贴:跟我学Shiro目录贴 身份验证,即在应用中谁能证明他就是他本人.一般提供如他 ...
- ASP.NET Core 学习笔记 第二篇 依赖注入
前言 ASP.NET Core 应用在启动过程中会依赖各种组件提供服务,而这些组件会以接口的形式标准化,这些组件这就是我们所说的服务,ASP.NET Core框架建立在一个底层的依赖注入框架之上,它使 ...
- .net core使用ocelot---第五篇 服务质量
简介 .net core使用ocelot---第一篇 简单使用 .net core使用ocelot---第二篇 身份验证使用 .net core使用ocelot---第三篇 日志记录 .net c ...
- .net core使用ocelot---第八篇 Consul
简介 .net core使用ocelot---第一篇 简单使用 .net core使用ocelot---第二篇 身份验证使用 .net core使用ocelot---第三篇 日志记录 .net ...
- .net core使用ocelot---第七篇 服务发现
简介 .net core使用ocelot---第一篇 简单使用 .net core使用ocelot---第二篇 身份验证使用 .net core使用ocelot---第三篇 日志记录 .net ...
- .net core使用ocelot---第六篇 负载均衡
简介 .net core使用ocelot---第一篇 简单使用 .net core使用ocelot---第二篇 身份验证 .net core使用ocelot---第三篇 日志记录 .net core ...
- .net core使用ocelot---第四篇 限流熔断
简介 .net core使用ocelot---第一篇 简单使用 .net core使用ocelot---第二篇 身份验证 .net core使用ocelot---第三篇 日志记录 前几篇文章我们陆续介 ...
- .net core使用ocelot---第三篇 日志记录
简介 .net core使用ocelot---第一篇 简单使用 .net core使用ocelot---第二篇 身份验证使用 上篇介绍使用asp.net core 创建API网关.本文将介绍Ocelo ...
随机推荐
- 配置管理-git研究(版本管理)
1. 安装git2.7 git2.7具体安装步骤如下: [root@host1 ~]# yum install curl-devel expat-devel gettext-devel openssl ...
- nbu虚拟机恢复样例(之后补图)
9.2.1进入Backup,Archive,and Restore管理器 9.2.2选择客户端和策略类型 9.2.3选择恢复的虚拟机 9.2.4恢复虚拟机到不同目录 9.2.5更改虚拟机名称和存储 因 ...
- pymysql 增删改 查 索引
pymysql 模块的使用 pip install pymysql username = input ("请输入用户") pwd = input ("请输入密码" ...
- opencv 程序
IplImage结构中的一个元素:struct _IplROI *roi; //图像感兴趣区域,当该值非空时,只对该区域进行处理 . ROI :Region of Interest,表示感兴趣的区 ...
- 机器取代人类成为现实,Linux shell才可被取代?
机器取代人类成为现实,Linux shell才可被取代? 新睿云 新睿云 新睿云-让云服务触手可及 本次笔者用通俗易懂的语言介绍一下Linux shell,由于笔者能力有限,如有有描述不准确的地方还请 ...
- python 数据库小测试
1.整理博客 2.详细解释下列mysql执行语句的每个参数与参数值的含义 mysql -hlocalhost -P3306 -uroot -proot # mysql (连接数据库) # hloc ...
- woocommerce分类页产品数量修改
我们用woocommerce建商城,不同的模板分类页产品数量不同,如果想要显示更多或更少的数量要如何修改呢?很简单,一行代码就能搞定!打开当前主题的function.php文件,加入如下代码,把18改 ...
- 重新学习Spring注解——扩展原理
39.扩展原理-BeanFactoryPostProcessor 40.扩展原理-BeanDefinitionRegistryPostProcessor 41.扩展原理-ApplicationList ...
- JS 中的 new 操作符
按照javascript语言精粹中所说,如果在一个函数前面带上new来调用该函数,那么将创建一个隐藏连接到该函数的prototype成员的新对象,同时this将被绑定到那个新对象上.这个话很抽象,我想 ...
- Comet OJ - Contest #2题解
传送门 既然没参加过就没有什么小裙子不小裙子的了-- 顺便全是概率期望真是劲啊-- 因自过去而至的残响起舞 \(k\)增长非常快,大力模拟一下就行了 int main(){ scanf("% ...