
SpringBoot2.x搭建SpringBootAdmin2.x
1 说明
- 全部配置基于
1.8.0_111 - 当前SpringBoot使用
2.0.5 - SpringBootAdmin基于Eureka进行Client发现,Eureka搭建参见SpringBoot2.x搭建Eureka
- SpringBootAdmin项目文档参见SpringBootAdmin参考文档
2 创建项目
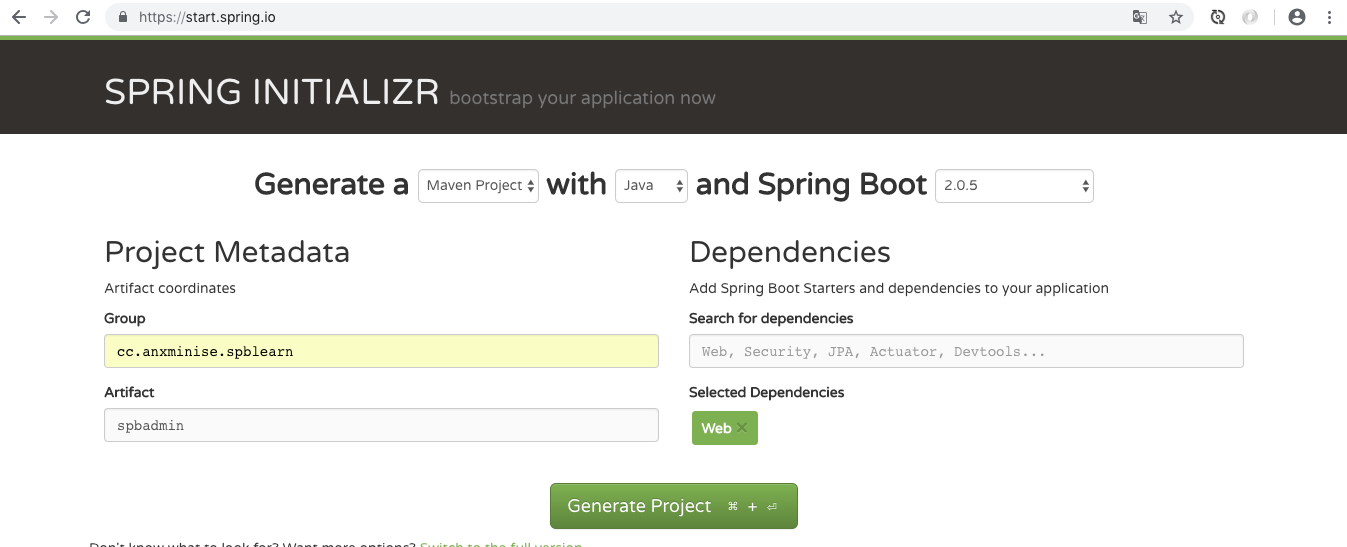
在SpringBoot项目生成器中,输入Group和Artifact,如下配置:
3 编辑pom.xml文件
pom.xml中新添加如下内容:
 <properties>

        <spring-cloud.version>Finchley.RELEASE</spring-cloud.version>

 </properties>

<dependencyManagement>

        <dependencies>

            <dependency>

                <groupId>org.springframework.cloud</groupId>

                <artifactId>spring-cloud-dependencies</artifactId>

                <version>${spring-cloud.version}</version>

                <type>pom</type>

                <scope>import</scope>

            </dependency>

        </dependencies>

</dependencyManagement>

<dependencies>

        <dependency>

            <groupId>de.codecentric</groupId>

            <artifactId>spring-boot-admin-starter-server</artifactId>

            <version>2.0.3</version>

        </dependency>

        <dependency>

            <groupId>org.springframework.boot</groupId>

            <artifactId>spring-boot-starter-security</artifactId>

        </dependency>

        <dependency>

            <groupId>org.springframework.cloud</groupId>

            <artifactId>spring-cloud-starter-netflix-eureka-client</artifactId>

        </dependency>

</dependencies>
4 修改application.properties为application.yml文件
编辑application.properties为application.yml文件,添加以下内容:
server:

  port: 8099

spring:

  application:

    name: SpringBootAdmin

  security:

    user:

      name: anxminise

      password: 123456

  boot:

    admin:

      ui:

        title: 忧臣解读

management:

  endpoints:

    web:

      exposure:

        include: "*"

  endpoint:

    health:

      show-details: ALWAYS

eureka:

  instance:

    metadata-map:

      user.name: anxminise

      user.password: 123456

    easeRenewalIntervalInSeconds: 10

    health-check-url-path: /actuator/health

    ip-address: 127.0.0.1

    prefer-ip-address: true

    instance-id: ${eureka.instance.ip-address}:${server.port}

  client:

    registryFetchIntervalSeconds: 5

    serviceUrl:

      defaultZone: http://anxminise:123456@127.0.0.1:8888/eureka/
配置参数解释:
| 参数 | 说明 |
|---|---|
| security.user.name | SpringBootAdmin登录时的用户名 |
| security.user.password | SpringBootAdmin登录时的密码 |
| eureka.instance.metadata-map.user.name | SpringBootAdmin本身作为一个Eureka客户端被发现,这里由于SpringBootAdmin需要进行登录,因此,此处配置SpringBootAdmin登录时使用的用户名 |
| eureka.instance.metadata-map.user.password | 同上,配置SpringBootAdmin登录使用的密码 |
5 编辑SpbadminApplication.java文件
最后编辑SpbadminApplication.java文件,修改为:
@EnableDiscoveryClient

@EnableAdminServer

@SpringBootApplication

public class SpbadminApplication {

    public static void main(String[] args) {

        SpringApplication.run(SpbadminApplication.class, args);

    }

    @Configuration

    public static class SecuritySecureConfig extends WebSecurityConfigurerAdapter {

        private final String adminContextPath;

        public SecuritySecureConfig(AdminServerProperties adminServerProperties) {

            this.adminContextPath = adminServerProperties.getContextPath();

        }

        @Override

        protected void configure(HttpSecurity http) throws Exception {

            SavedRequestAwareAuthenticationSuccessHandler successHandler = new SavedRequestAwareAuthenticationSuccessHandler();

            successHandler.setTargetUrlParameter("redirectTo");

            successHandler.setDefaultTargetUrl(adminContextPath + "/");

            http.authorizeRequests()

                    .antMatchers(adminContextPath + "/assets/**").permitAll()

                    .antMatchers(adminContextPath + "/login").permitAll()

                    .anyRequest().authenticated()

                    .and()

                    .formLogin().loginPage(adminContextPath + "/login").successHandler(successHandler).and()

                    .logout().logoutUrl(adminContextPath + "/logout").and()

                    .httpBasic().and()

                    .csrf()

                    .csrfTokenRepository(CookieCsrfTokenRepository.withHttpOnlyFalse())

                    .ignoringAntMatchers(

                            adminContextPath + "/instances",

                            adminContextPath + "/actuator/**"

                    );

        }

    }

}
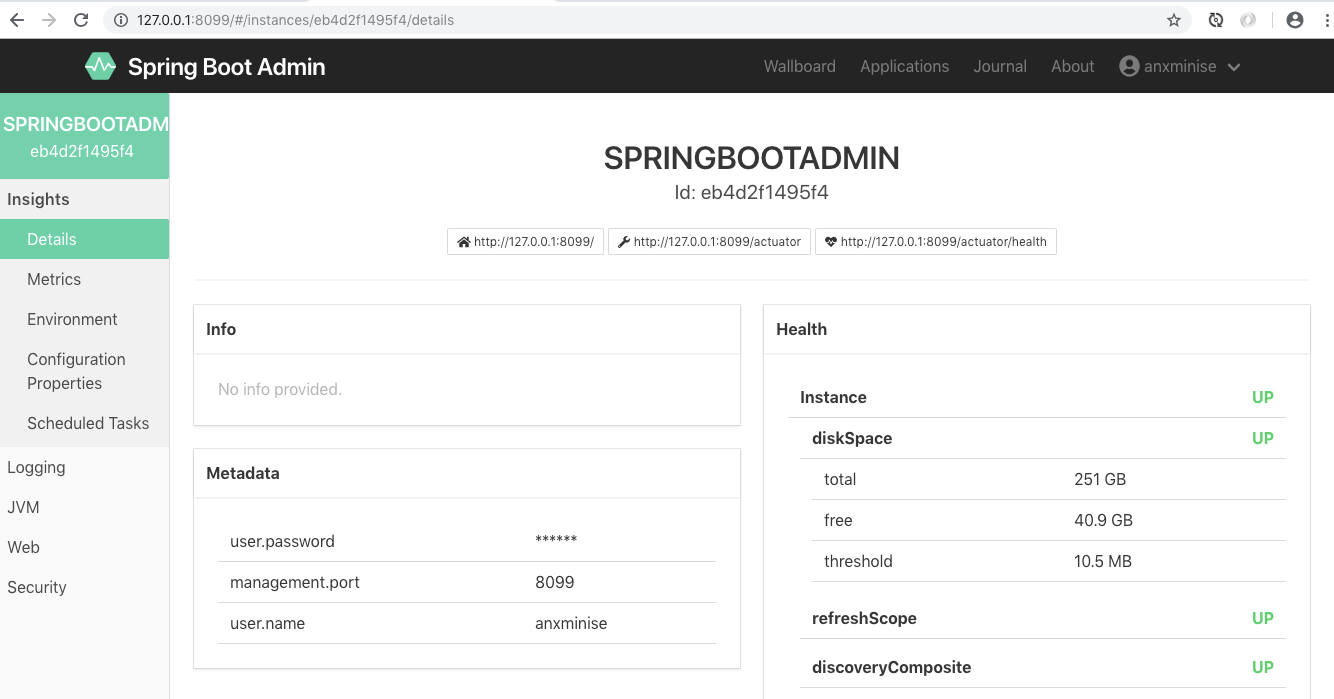
6 编译并启动运行
注:本次SpringBootAdmin是基于Eureka搭建的,需要先启动Eureka
./mvnw clean package -DskipTests #编辑应用

java -jar target/spbadmin-0.0.1-SNAPSHOT.jar #启动应用,注:jar包的名称应换成自己的


7 Eureka客户端监控
SpringBootAdmin的作用是:监控Eureka中的微服务,这里的微服务,我们使用SpringBoot2.x进行开发,对于SpringBoot2.x的SpringBoot项目,只需在application.yml中新加入以下内容:
logging:

  path: logs/log

management:

  endpoints:

    web:

      exposure:

        include: "*"

  endpoint:

    health:

      show-details: ALWAYS
参数解释说明
| 参数 | 说明 |
|---|---|
| logging.path | 配置日志的存放路径,此处用于SpringBootAdmin的日志监控 |
| management.* | 配置SpringBoot的全部监控点,此处注意:当前配置未对endpoint进行访问保护,勿对外网开放,后续我们加入对其的访问保护 |
SpringBoot2.x搭建SpringBootAdmin2.x的更多相关文章
- SpringBoot2.x搭建Eureka
1 说明 全部配置基于1.8.0_111 当前SpringBoot使用2.0.5 2 创建项目 在SpringBoot项目生成器中,输入Group和Artifact,如下配置: 3 pom.xml配置 ...
- Spring Boot 2.X 如何添加拦截器?
最近使用SpringBoot2.X搭建了一个项目,大部分接口都需要做登录校验,所以打算使用注解+拦截器来实现,在此记录下实现过程. 一.实现原理 1. 自定义一个注解@NeedLogin,如果接口需要 ...
- WebFlux03 SpringBoot WebFlux实现CRUD
1 准备 基于SpringBoot2.0搭建WebFlux项目,详情请参见三少另外一篇博文 2 工程结构 <?xml version="1.0" encoding=" ...
- 使用JWT来实现单点登录功能
出处: https://www.cnblogs.com/zexin/p/10389541.html 我们平时自己开发项目,分布式的结构时,访问量不大,但是又不想搭建redis服务器,这时我觉得jwt不 ...
- 如何使用JWT来实现单点登录功能
我们平时自己开发项目,分布式的结构时,访问量不大,但是又不想搭建redis服务器,这时我觉得jwt不错. 个人理解,jwt就是类似于一把锁和钥匙,客户来租房(登录),我们需要给他进来(第一次登录)登记 ...
- SpringBoot2.0基础案例(01):环境搭建和RestFul风格接口
一.SpringBoot 框架的特点 1.SpringBoot2.0 特点 1)SpringBoot继承了Spring优秀的基因,上手难度小 2)简化配置,提供各种默认配置来简化项目配置 3)内嵌式容 ...
- SpringBoot2整合activiti6环境搭建
SpringBoot2整合activiti6环境搭建 依赖 <dependencies> <dependency> <groupId>org.springframe ...
- SpringBoot2 整合Nacos组件,环境搭建和入门案例详解
本文源码:GitHub·点这里 || GitEE·点这里 一.Nacos基础简介 1.概念简介 Nacos 是构建以"服务"为中心的现代应用架构,如微服务范式.云原生范式等服务基础 ...
- SpringBoot2.x【一】从零开始环境搭建
SpringBoot2.x[一]从零开始环境搭建 对于之前的Spring框架的使用,各种配置文件XML.properties一旦出错之后错误难寻,这也是为什么SpringBoot被推上主流的原因,Sp ...
随机推荐
- django @login_required登录限制
参考文章:https://www.cnblogs.com/wodekaifalog/p/10817275.html 我们在网站开发过程中,经常会遇到这样的需求: 用户登陆系统才可以访问某些页面 如果用 ...
- NodeJS模块和ES6模块系统语法及注意点
社区模块规范: 1.CommonJS规范 规范实现者: NodeJS 服务端 Browserify 浏览器 2.AMD规范 全称 异步模块定义 规范实现者: RequireJS 浏览器 3.CMD规范 ...
- 【luoguP1533】可怜的狗狗
题目链接 发现区间按左端点排序后右端点也是单调的,所以扫一遍就行了,用权值线段树维护第\(k\)大 #include<algorithm> #include<iostream> ...
- typora的使用技巧
目录 Typora 的 markdown 语法 标题: 插入图片: 链接: 字体变化: 删除: 文字高亮: 角标: 文本方位: :-:| :- | -: 制作表格: 常用快捷键(补充): 下划线: T ...
- Linux终端图形库编程
/* *drawWin.c */ #include<stdio.h> #include<stdlib.h> #include<string.h> #include& ...
- TensorFlow常用激活函数及其特点和用法(6种)详解
http://c.biancheng.net/view/1911.html 每个神经元都必须有激活函数.它们为神经元提供了模拟复杂非线性数据集所必需的非线性特性.该函数取所有输入的加权和,进而生成一个 ...
- code 1716
# import_company def test_import_company(self): headers=self.headers headers["Content-Type" ...
- HttpClient代理IP及设置连接读取超时
1.不废话,上代码: public static void main(String[] args) throws Exception { CloseableHttpClient httpClient ...
- sql的插入或者修改
<select id="insertOrUpdateTenantDetail" parameterType="tenantDetailDO"> IN ...
- 如何减少 webpack 构建 vue 项目的编译时间
背景 我司前端项目框架主要是 vue,多个项目聚集在同一个仓库下,共用公共组件.页面.工具函数等.基于以上前提,我们需要对不同的项目分别进行打包,并解决单页应用强制刷新引起的问题,所以没有使用 vue ...