讲解Flume
4个demo看懂Flume
1、netcat数据展示到console
## 定义 sources、channels 以及 sinks

agent1.sources = netcatSrc

agent1.channels = me moryChannel

agent1.sinks = loggerSink

## netcatSrc 的配置

agent1.sources.netcatSrc.type = netcat

agent1.sources.netcatSrc.bind = localhost

agent1.sources.netcatSrc.port = 44445

## loggerSink 的配置

agent1.sinks.loggerSink.type = logger

## memoryChannel 的配置

agent1.channels.memoryChannel.type = memory

agent1.channels.memoryChannel.capacity = 100

## 通过 memoryChannel 连接 netcatSrc 和 loggerSink

agent1.sources.netcatSrc.channels = memoryChannel

agent1.sinks.loggerSink.channel = memoryChannel
2、netcat数据保存到HDFS,分别使用memory和file channal
## 定义 sources、channels 以及 sinks

agent1.sources = netcatSrc

agent1.channels = memoryChannel

agent1.sinks = hdfsSink

## netcatSrc 的配置

agent1.sources.netcatSrc.type = netcat

agent1.sources.netcatSrc.bind = localhost

agent1.sources.netcatSrc.port = 44445

## hdfsSink 的配置

agent1.sinks.hdfsSink.type = hdfs

agent1.sinks.hdfsSink.hdfs.path = hdfs://master:9999/user/hadoop-twq/spark-course/steaming/flume/%y-%m-%d

agent1.sinks.hdfsSink.hdfs.batchSize = 5

agent1.sinks.hdfsSink.hdfs.useLocalTimeStamp = true

## memoryChannel 的配置

agent1.channels.memoryChannel.type = memory

agent1.channels.memoryChannel.capacity = 100

## 通过 memoryChannel 连接 netcatSrc 和 hdfsSink

agent1.sources.netcatSrc.channels = memoryChannel

agent1.sinks.hdfsSink.channel = memoryChannel
3、日志文件数据保存到HDFS
## 定义 sources、channels 以及 sinks

agent1.sources = logSrc

agent1.channels = fileChannel

agent1.sinks = hdfsSink

## logSrc 的配置

agent1.sources.logSrc.type = exec

agent1.sources.logSrc.command = tail -F /home/hadoop-twq/spark-course/steaming/flume-course/demo3/logs/webserver.log

## hdfsSink 的配置

agent1.sinks.hdfsSink.type = hdfs

agent1.sinks.hdfsSink.hdfs.path = hdfs://master:9999/user/hadoop-twq/spark-course/steaming/flume/%y-%m-%d

agent1.sinks.hdfsSink.hdfs.batchSize = 5

agent1.sinks.hdfsSink.hdfs.useLocalTimeStamp = true

## fileChannel 的配置

agent1.channels.fileChannel.type = file

agent1.channels.fileChannel.checkpointDir = /home/hadoop-twq/spark-course/steaming/flume-course/demo2-2/checkpoint

agent1.channels.fileChannel.dataDirs = /home/hadoop-twq/spark-course/steaming/flume-course/demo2-2/data

## 通过 fileChannel 连接 logSrc 和 hdfsSink

agent1.sources.logSrc.channels = fileChannel

agent1.sinks.hdfsSink.channel = fileChannel
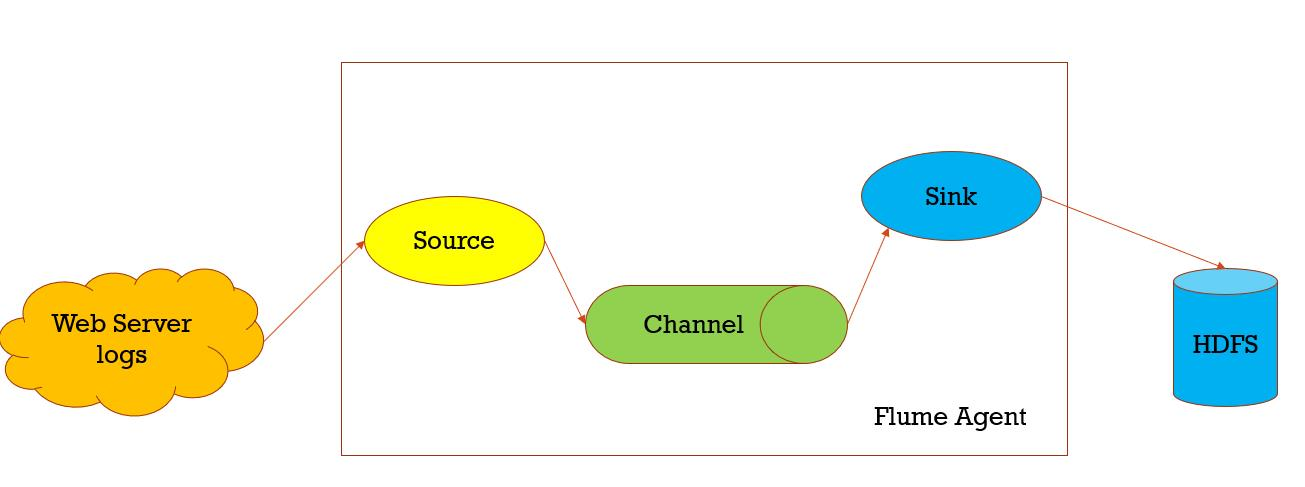
数据收集,从一个数据源经过channels,Sink到存储结构上,以event的方式发送

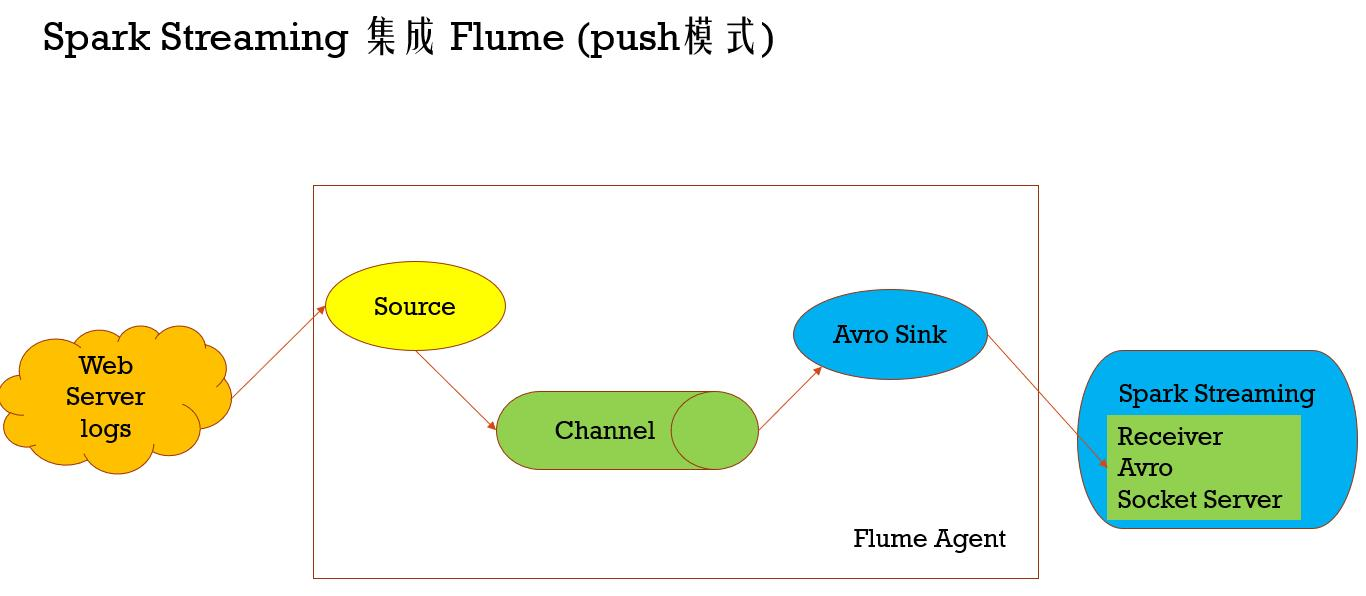
Spark Streaming 集成 Flume (push模式)
import org.apache.spark.SparkConf

import org.apache.spark.storage.StorageLevel

import org.apache.spark.streaming._

import org.apache.spark.streaming.dstream.DStream

import org.apache.spark.streaming.flume._

import org.apache.spark.util.IntParam

/**

 *  Produces a count of events received from Flume.

 *

 *  This should be used in conjunction with an AvroSink in Flume. It will start

 *  an Avro server on at the request host:port address and listen for requests.

 *  Your Flume AvroSink should be pointed to this address.

 *

  * Flume-style Push-based Approach(Spark Streaming作为一个agent存在)

  *

  * 1、在slave1(必须要有spark的worker进程在)上启动一个flume agent

  * bin/flume-ng agent -n agent1 -c conf -f conf/flume-conf.properties

  *

  * 2、启动Spark Streaming应用

 spark-submit --class com.twq.streaming.flume.FlumeEventCountPushBased \

 --master spark://master:7077 \

 --deploy-mode client \

 --driver-memory 512m \

 --executor-memory 512m \

 --total-executor-cores 4 \

 --executor-cores 2 \

 /home/hadoop-twq/spark-course/streaming/spark-streaming-datasource-1.0-SNAPSHOT-jar-with-dependencies.jar \

 172.26.232.97 44446

 3、在slave1上 telnet slave1 44445 发送消息

 */

object FlumeEventCountPushBased {

  def main(args: Array[String]) {

    if (args.length < 2) {

      System.err.println(

        "Usage: FlumeEventCount <host> <port>")

      System.exit(1)

    }

    val Array(host, port) = args

    val batchInterval = Milliseconds(2000)

    // Create the context and set the batch size

    val sparkConf = new SparkConf().setAppName("FlumeEventCount")

    val ssc = new StreamingContext(sparkConf, batchInterval)

    // Create a flume stream

    val stream: DStream[SparkFlumeEvent] = FlumeUtils.createStream(ssc, host, port.toInt, StorageLevel.MEMORY_ONLY_SER_2)

    // Print out the count of events received from this server in each batch

    stream.count().map(cnt => "Received " + cnt + " flume events." ).print()

    ssc.start()

    ssc.awaitTermination()

  }

}
import org.apache.spark.SparkConf

import org.apache.spark.streaming._

import org.apache.spark.streaming.flume._

import org.apache.spark.util.IntParam

/**

 *  Produces a count of events received from Flume.

 *

 *  This should be used in conjunction with the Spark Sink running in a Flume agent. See

 *  the Spark Streaming programming guide for more details.

 *

  * Pull-based Approach using a Custom Sink(Spark Streaming作为一个Sink存在)

  *

  * 1、将jar包scala-library_2.11.8.jar(这里一定要注意flume的classpath下是否还有其他版本的scala,要是有的话,则删掉,用这个,一般会有,因为flume依赖kafka,kafka依赖scala)、

  * commons-lang3-3.5.jar、spark-streaming-flume-sink_2.11-2.2.0.jar

  * 放置在master上的/home/hadoop-twq/spark-course/streaming/spark-streaming-flume/apache-flume-1.8.0-bin/lib下

  *

  * 2、配置/home/hadoop-twq/spark-course/streaming/spark-streaming-flume/apache-flume-1.8.0-bin/conf/flume-conf.properties

  *

  * 3、启动flume的agent

  * bin/flume-ng agent -n agent1 -c conf -f conf/flume-conf.properties

  *

  * 4、启动Spark Streaming应用

 spark-submit --class com.twq.streaming.flume.FlumeEventCountPullBased \

 --master spark://master:7077 \

 --deploy-mode client \

 --driver-memory 512m \

 --executor-memory 512m \

 --total-executor-cores 4 \

 --executor-cores 2 \

 /home/hadoop-twq/spark-course/streaming/spark-streaming-datasource-1.0-SNAPSHOT-jar-with-dependencies.jar \

 master 44446

 3、在master上 telnet localhost 44445 发送消息

 */

object FlumeEventCountPullBased {

  def main(args: Array[String]) {

    if (args.length < 2) {

      System.err.println(

        "Usage: FlumePollingEventCount <host> <port>")

      System.exit(1)

    }

    val Array(host, port) = args

    val batchInterval = Milliseconds(2000)

    // Create the context and set the batch size

    val sparkConf = new SparkConf().setAppName("FlumePollingEventCount")

    val ssc = new StreamingContext(sparkConf, batchInterval)

    // Create a flume stream that polls the Spark Sink running in a Flume agent

    val stream = FlumeUtils.createPollingStream(ssc, host, port.toInt)

    // Print out the count of events received from this server in each batch

    stream.count().map(cnt => "Received " + cnt + " flume events." ).print()

    ssc.start()

    ssc.awaitTermination()

  }

}
讲解Flume的更多相关文章
- 海量日志收集利器 —— Flume
Flume 是什么? Flume是一个分布式.可靠.和高可用的海量日志聚合的系统,支持在系统中定制各类数据发送方,用于收集数据:同时,Flume提供对数据进行简单处理,并写到各种数据接受方(可定制)的 ...
- (升级版)Spark从入门到精通(Scala编程、案例实战、高级特性、Spark内核源码剖析、Hadoop高端)
本课程主要讲解目前大数据领域最热门.最火爆.最有前景的技术——Spark.在本课程中,会从浅入深,基于大量案例实战,深度剖析和讲解Spark,并且会包含完全从企业真实复杂业务需求中抽取出的案例实战.课 ...
- flume http source示例讲解
一.介绍 flume自带的Http Source可以通过Http Post接收事件. 场景:对于有些应用程序环境,它可能不能部署Flume SDK及其依赖项,或客户端代码倾向于通过HTTP而不是Flu ...
- Flume1 初识Flume和虚拟机搭建Flume环境
前言: 工作中需要同步日志到hdfs,以前是找运维用rsync做同步,现在一般是用flume同步数据到hdfs.以前为了工作简单看个flume的一些东西,今天下午有时间自己利用虚拟机搭建了 ...
- 高可用Hadoop平台-Flume NG实战图解篇
1.概述 今天补充一篇关于Flume的博客,前面在讲解高可用的Hadoop平台的时候遗漏了这篇,本篇博客为大家讲述以下内容: Flume NG简述 单点Flume NG搭建.运行 高可用Flume N ...
- 用通俗易懂的大白话讲解Map/Reduce原理
Hadoop简介 Hadoop就是一个实现了Google云计算系统的开源系统,包括并行计算模型Map/Reduce,分布式文件系统HDFS,以及分布式数据库Hbase,同时Hadoop的相关项目也很丰 ...
- Flume协作框架
1.概述 ->flume的三大功能 collecting, aggregating, and moving 收集 聚合 移动 2.框图 3.架构特点 ->on streaming data ...
- Flume NG之Interceptor简介
转载地址:http://www.cnblogs.com/lxf20061900/p/3658172.html 有的时候希望通过Flume将读取的文件再细分存储,比如讲source的数据按照业务类型分开 ...
- 基于Flume的美团日志收集系统(一)架构和设计
美团的日志收集系统负责美团的所有业务日志的收集,并分别给Hadoop平台提供离线数据和Storm平台提供实时数据流.美团的日志收集系统基于Flume设计和搭建而成. <基于Flume的美团日志收 ...
随机推荐
- dedecms原理及使用
dedecms原理 简单使用 现在老板要求你做一个文章管理系统,栏目(类别)包括(武侠.爱情.音乐...) ,每个栏目(类别)有对应的文章,文章已经给你准备好了,请你在30分钟搞定该网站,怎么样? 步 ...
- JVM Server与Client运行模式
JVM Server模式与client模式启动,最主要的差别在于:-Server模式启动时,速度较慢,但是一旦运行起来后,性能将会有很大的提升.原因是: 当虚拟机运行在-client模式的时候,使用的 ...
- redis学习(一)
Redis学习内容: 1. 概念 2. 下载安装R 3. 命令操作 1. 数据结构 4. 持久化操作 5. 使用Java客户端操作redis 1. 概念: redis是一款高性能的NOSQL系列的非关 ...
- SonarQube安装教程与简单使用(基于Centos7,JDK1.8)
SonarQube 若要转载本文,请务必声明出处:https://www.cnblogs.com/zhongyuanzhao000/p/11686522.html 概念: SonarQube是一种自动 ...
- 基于vue的分页插件
相信大家用过很多jquery的分页插件,那这次就用一用基于vue的分页插件. 这里的环境用的是springboot 首先要引入pagehelper的jar文件,版本是1.2.3,配置文件也需要配置一下 ...
- 【leetcode-78 dfs+回溯】 子集
子集 给定一组不含重复元素的整数数组 nums,返回该数组所有可能的子集(幂集). 说明:解集不能包含重复的子集. 示例: 输入: nums = [1,2,3] 输出: [ [3], [1], ...
- java之mybatis之查询及分页
1.mybatis中查询方式有3种 //查询单个值 @Test public void testFindOne()throws IOException{ SqlSession session = My ...
- 【转载】使用宝塔对Linux系统进行界面化管理操作
腾讯云服务器和阿里云服务器的Centos系统都是没有Linux系统的一个版本,Centos系统的操作都是在没有类似Windows图形化操作界面的黑框框命令窗口进行操作的,需要使用到很多Linux操作命 ...
- chrome浏览页面常用快捷键
1.chrome浏览页面常用快捷键 Ctrl+N 打开新窗口. Ctrl+T 打开新标签页. Ctrl+W关闭当前标签 Ctrl + F4 关闭chrome浏览器 Ctrl+Tab 或 Ctrl+Pg ...
- Java 之 Session 包含验证码登录案例
需求: 1. 访问带有验证码的登录页面login.jsp 2. 用户输入用户名,密码以及验证码. 如果用户名和密码输入有误,跳转登录页面,提示:用户名或密码错误 如果验证码输入有误,跳转登录页面, ...