【swagger】1.swagger提供开发者文档--简单集成到spring boot中【spring mvc】【spring boot】
swagger提供开发者文档
========================================================
作用:想使用swagger的同学,一定是想用它来做前后台分离,后台开发为前台提供API,以供前台的同学调用和调试。
那么swagger的作用就是上面这句话。
具体swagger包含了哪些,swagger官网展示的很齐全
本篇只表达swagger2+spring boot怎么用,也是给想用swagger但是无从下手的同学们带带路!!!!
========================================================
本篇需要准备的东西:
InterllJ Idea/JDK1.8/spring boot 项目一个
========================================================
在这开始之前,你要自己去搭建一个spring boot项目,至于使用maven管理架包或者gradle管理架包,看你自己。
参考地址:
http://www.cnblogs.com/sxdcgaq8080/p/7712874.html. maven+spring boot
http://www.cnblogs.com/sxdcgaq8080/p/8717914.html gradle+spring boot
1.添加依赖
gradle添加依赖
// https://mvnrepository.com/artifact/io.springfox/springfox-swagger-ui

    compile group: 'io.springfox', name: 'springfox-swagger-ui', version: '2.8.0'

    // https://mvnrepository.com/artifact/io.springfox/springfox-swagger2

    compile group: 'io.springfox', name: 'springfox-swagger2', version: '2.8.0'
maven添加依赖
<dependency>

    <groupId>io.springfox</groupId>

    <artifactId>springfox-swagger2</artifactId>

    <version>2.8.0</version>

</dependency>

<dependency>

    <groupId>io.springfox</groupId>

    <artifactId>springfox-swagger-ui</artifactId>

    <version>2.8.0</version>

</dependency>
2.swagger配置类
其实这个配置类,只要了解具体能配置哪些东西就好了,毕竟这个东西配置一次之后就不用再动了。
【注意1】:特别要注意的是里面配置了api文件也就是controller包的路径,你要生成API接口文档的controller文件都是放在这个包路径下的,不然生成的文档扫描不到接口。
【注意2】:这个swagger配置类,是要放在你Application类同级,也就是Springboot项目的启动类的同级
package com.sxd.sweeping;

import org.springframework.context.annotation.Bean;

import org.springframework.context.annotation.Configuration;

import springfox.documentation.builders.ApiInfoBuilder;

import springfox.documentation.builders.PathSelectors;

import springfox.documentation.builders.RequestHandlerSelectors;

import springfox.documentation.service.ApiInfo;

import springfox.documentation.spi.DocumentationType;

import springfox.documentation.spring.web.plugins.Docket;

import springfox.documentation.swagger2.annotations.EnableSwagger2;

@Configuration

@EnableSwagger2

public class Swagger2 {

    @Bean

    public Docket createRestApi() {

        return new Docket(DocumentationType.SWAGGER_2)

                .apiInfo(apiInfo())

                .select()

                .apis(RequestHandlerSelectors.basePackage("com.sxd.sweeping.controller"))

                .paths(PathSelectors.any())

                .build();

    }

    private ApiInfo apiInfo() {

        return new ApiInfoBuilder()

                .title("Spring Boot中使用Swagger2构建RESTful APIs")

                .description("更多精彩博客请关注:http://www.cnblogs.com/sxdcgaq8080/")

                .termsOfServiceUrl("http://www.cnblogs.com/sxdcgaq8080/")

                .contact("Angel挤一挤")

                .version("1.0")

                .build();

    }

}
3.然后 就是最简单的controller的swagger的表达了
【注意1】:@ApiImplicitParam 和 @ApiParam 方式均能指定参数规则。
【注意2】:使用@ApiImplicitParam的时候,需要指定paramType。
package com.sxd.sweeping.controller; import com.sxd.sweeping.entity.User;
import com.sxd.sweeping.repository.UserRepository;
import com.sxd.sweeping.response.GenericResponse;
import io.swagger.annotations.Api;
import io.swagger.annotations.ApiImplicitParam;
import io.swagger.annotations.ApiImplicitParams;
import io.swagger.annotations.ApiOperation;
import org.springframework.beans.factory.annotation.Autowired;
import org.springframework.web.bind.annotation.*; import java.sql.Date;
import java.util.UUID; @Api(value = "userController",description = "用户相关操作",tags = {"用户"})
@RestController
@RequestMapping("users")
public class UserController { @Autowired
private UserRepository userRepository; @ApiOperation(value = "获取用户详细信息", notes = "根据url的id来获取用户的详细信息")
@ApiImplicitParam(name = "id", value = "用户ID", required = true,dataType = "Long",paramType = "path")
// @RequestMapping(value = "/{id}",method = RequestMethod.GET)
@GetMapping(value = "/{id}")
public GenericResponse<User> get(@PathVariable Long id){
User user = userRepository.findUserById(id);
GenericResponse<User> genericResponse = new GenericResponse<>();
genericResponse.setItems(user);
genericResponse.setCode(200);
if(user != null){
genericResponse.setMessage("查询成功");
}else{
genericResponse.setMessage("暂无此人");
}
return genericResponse;
} @ApiOperation(value = "增加用户", notes = "根据user对象创建用户")
@ApiImplicitParam(name = "user", value = "用户详细信息User", required = true,dataType = "User")
// @RequestMapping(method = RequestMethod.POST)
@PostMapping()
public GenericResponse<User> add(@RequestBody User user){
String password = UUID.randomUUID().toString();
user.setPassword(password);
user = userRepository.save(user); GenericResponse<User> genericResponse = new GenericResponse<>();
genericResponse.setItems(user);
genericResponse.setCode(200);
if(user != null){
genericResponse.setMessage("新增成功");
}else{
genericResponse.setMessage("新增失败");
}
return genericResponse;
} @ApiOperation(value = "删除用户", notes = "根据url的id来删除用户")
@ApiImplicitParam(name = "id", value = "用户ID", required = true,dataType = "Long",paramType = "path")
// @RequestMapping(value = "/{id}",method = RequestMethod.DELETE)
@DeleteMapping(value = "/{id}")
@ResponseBody
public GenericResponse<User> delete(@PathVariable Long id){
userRepository.deleteById(id);
GenericResponse<User> genericResponse = new GenericResponse<>();
genericResponse.setCode(200);
genericResponse.setMessage("删除成功"); return genericResponse;
} @ApiOperation(value = "更新用户", notes = "根据url的id来更新用户信息")
@ApiImplicitParams({
@ApiImplicitParam(name = "id", value = "用户ID", required = true, dataType = "Long", paramType = "path"),
@ApiImplicitParam(name = "user", value = "用户实体user", required = true,dataType = "User")
})
// @RequestMapping(value = "/{id}",method = RequestMethod.PUT)
@PutMapping(value = "/{id}")
public GenericResponse<User> update(@PathVariable Long id, @RequestBody User user){
User user1 = userRepository.findUserById(id);
user1.setGender(user.getGender());
user1.setMobile(user.getMobile());
user1.setRealname(user.getRealname());
user1.setUpdateAt(new Date(System.currentTimeMillis())); GenericResponse<User> genericResponse = new GenericResponse<>();
genericResponse.setCode(200);
genericResponse.setMessage("更新成功");
genericResponse.setItems(userRepository.saveAndFlush(user1)); return genericResponse;
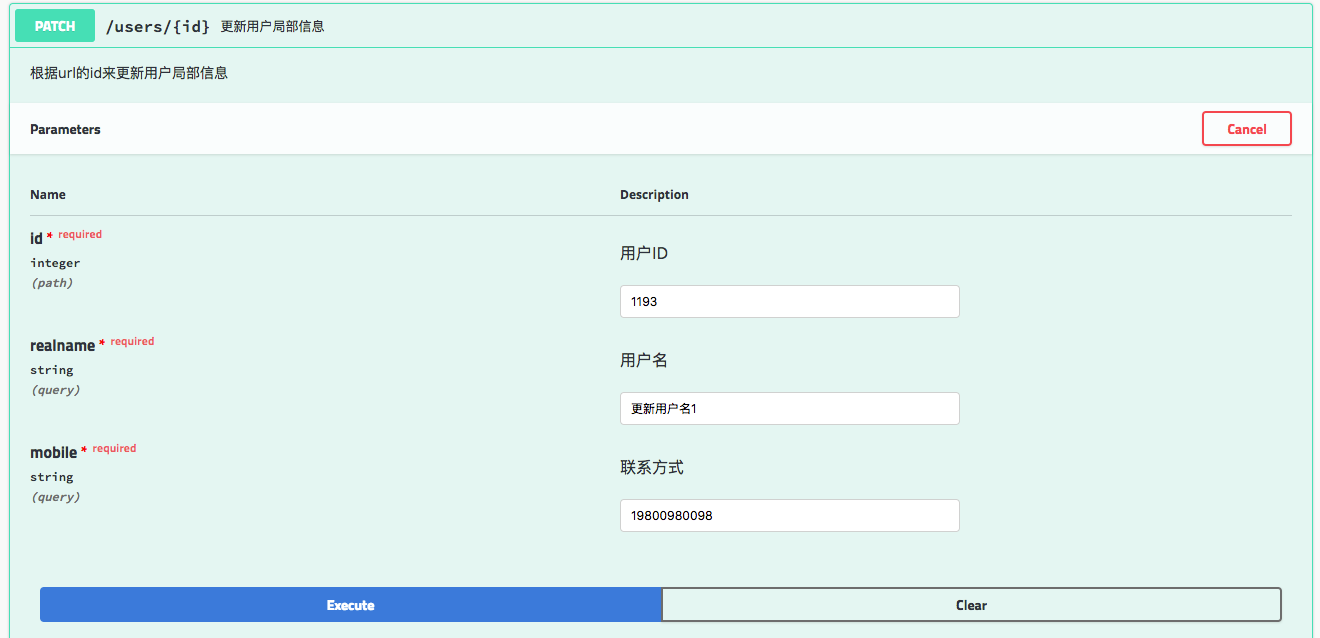
} @ApiOperation(value = "更新用户局部信息", notes = "根据url的id来更新用户局部信息")
@ApiImplicitParams({
@ApiImplicitParam(name = "id", value = "用户ID", required = true, dataType = "Long", paramType = "path"),
@ApiImplicitParam(name = "realname", value = "用户名", required = true,dataType = "String"),
@ApiImplicitParam(name = "mobile", value = "联系方式", required = true,dataType = "String")
})
// @RequestMapping(value = "/{id}",method = RequestMethod.PATCH)
@PatchMapping(value = "/{id}")
public GenericResponse<User> patch(@PathVariable Long id, String realname, String mobile){
User user = userRepository.findUserById(id);
user.setRealname(realname);
user.setMobile(mobile); GenericResponse<User> genericResponse = new GenericResponse<>();
genericResponse.setCode(200);
genericResponse.setMessage("更新成功");
genericResponse.setItems(userRepository.saveAndFlush(user)); return genericResponse;
} }
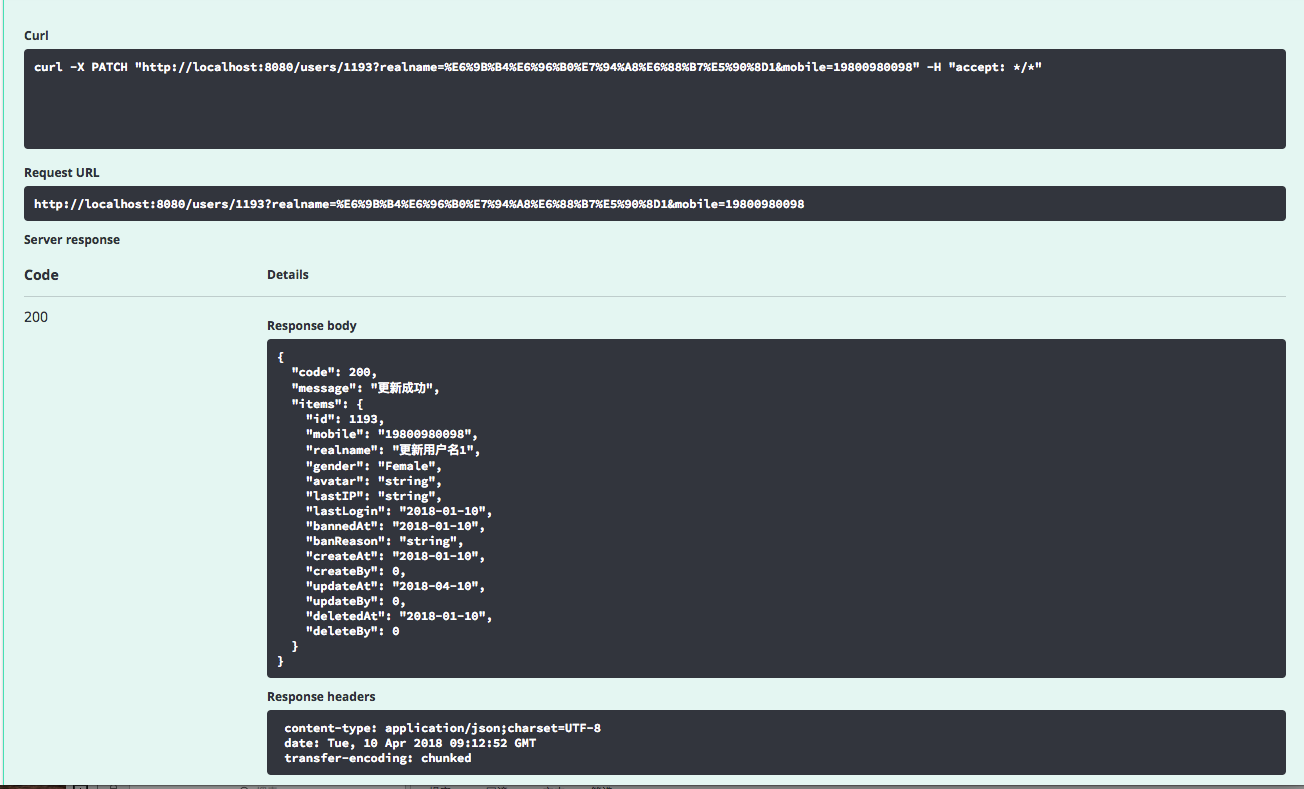
4.项目启动后,就可以访问地址:
http://localhost:8080/swagger-ui.html#
访问你的api接口了。
展示API页面如下:

==============================================================================
常用注解详情:
swagger通过注解表明该接口会生成文档,包括接口名、请求方法、参数、返回信息的等等。

@Api:作用在controller类上,修饰整个类,描述Controller的作用

@ApiOperation:作用在controller类的方法上,描述一个类的一个方法,或者说一个接口的功能

@ApiParam:单个参数描述

@ApiModel:用在返回对象类上,用对象来接收参数
@ApiModelProperty:用在参数对象的字段上

@ApiProperty:用对象接收参数时,描述对象的一个字段

@ApiResponse:用在@ApiResponses里面,HTTP响应其中1个描述

@ApiResponses:用在controller方法上,HTTP响应整体描述

@ApiIgnore:使用该注解忽略这个API

@ApiError :发生错误返回的信息

@ApiImplicitParam:用在@ApiImplicitParams中,一个请求参数

@ApiImplicitParams:用在controller方法上,多个请求参数
各个注解中属性值的解析:
@ApiImplicitParam:用在 @ApiImplicitParams 注解中,指定一个请求参数的各个方面

paramType:参数放在哪个地方
· header --> 请求参数的获取:@RequestHeader
· query -->请求参数的获取:@RequestParam
· path(用于restful接口)--> 请求参数的获取:@PathVariable
· body(不常用)
· form(不常用)
name:参数名
dataType:参数类型
required:参数是否必须传
value:参数的意思
defaultValue:参数的默认值
@Api:作用在controller类上,修饰整个类,描述Controller的作用

属性名称    备注

value    url的路径值

tags    如果设置这个值、value的值会被覆盖

description    对api资源的描述

basePath    基本路径可以不配置

position    如果配置多个Api 想改变显示的顺序位置

produces    For example, "application/json, application/xml"

consumes    For example, "application/json, application/xml"

protocols    Possible values: http, https, ws, wss.

authorizations    高级特性认证时配置

hidden    配置为true 将在文档中隐藏
@ApiOperation:作用在controller类的方法上,描述一个类的一个方法,或者说一个接口的功能

属性名称    备注

value    url的路径值

tags    如果设置这个值、value的值会被覆盖

description    对api资源的描述

basePath    基本路径可以不配置

position    如果配置多个Api 想改变显示的顺序位置

produces    For example, "application/json, application/xml"

consumes    For example, "application/json, application/xml"

protocols    Possible values: http, https, ws, wss.

authorizations    高级特性认证时配置

hidden    配置为true 将在文档中隐藏

response    返回的对象

responseContainer    这些对象是有效的 "List", "Set" or "Map".,其他无效

httpMethod    "GET", "HEAD", "POST", "PUT", "DELETE", "OPTIONS" and "PATCH"

code    http的状态码 默认

extensions    扩展属性
@ApiParam:单个参数描述

示例:

public UniVerResponse<HuaYangArea> huayang(@ApiParam(value = "create a entity  HuaYangArea") @RequestBody HuaYangArea huaYangArea)

属性名称    备注

name    属性名称

value    属性值

defaultValue    默认属性值

allowableValues    可以不配置

required    是否属性必填

access    不过多描述

allowMultiple    默认为false

hidden    隐藏该属性

example    举例子
@ApiResponse:用在@ApiResponses里面,HTTP响应其中1个描述

示例:

@ApiOperation(value = "保存HUAYANG信息",notes = "传入HUAYANG实体,保存HUAYANG信息")

    @PostMapping()

    @ApiResponses({

            @ApiResponse(code = ,message = "success"),

            @ApiResponse(code = ,message = "参数错误"),

            @ApiResponse(code = ,message = "业务错误"),

            @ApiResponse(code = ,message = "系统异常")})

    public UniVerResponse<HuaYangArea> huayang(@ApiParam(value = "create a entity  HuaYangArea") @RequestBody HuaYangArea huaYangArea){

属性名称    备注

code    http的状态码

message    描述

response    默认响应类 Void

reference    参考ApiOperation中配置

responseHeaders    参考 ResponseHeader 属性配置说明

responseContainer    参考ApiOperation中配置
==========================================================================
Get等价:
@RequestMapping(value = "/{id}",method = RequestMethod.GET)

等价于:@GetMapping(value = "/{id}")
Post等价:【创建资源】
@RequestMapping(method = RequestMethod.POST)

等价于:@PostMapping()
Delete等价:
@RequestMapping(value = "/{id}",method = RequestMethod.DELETE)

等价于:@DeleteMapping(value = "/{id}")
Put等价:【更新已存在的资源,完全替换,所以接收到的是id和完整的对象,在处理上如果对象中有未给值的字段,则更新数据库中字段值替换为空】
@RequestMapping(value = "/{id}",method = RequestMethod.PUT)

等价于:@PutMapping(value = "/{id}")
Patch等价:【更新已经存在资源的部分字段,局部更新,仅提供id和要更新的字段,在处理上仅更新要更新的字段,其他字段不变】
@RequestMapping(value = "/{id}",method = RequestMethod.PATCH)

等价于:@PatchMapping(value = "/{id}")
===========================================================================
【注意】:
因为返回的都是统一处理响应格式,所以每个API接口上都要加上@ResponseBody注解。
所以,可以选择在Controller上加上@RestController=@Controller+@ResponseBody
===========================================================================
下一篇地址:
http://www.cnblogs.com/sxdcgaq8080/p/8797318.html
【swagger】1.swagger提供开发者文档--简单集成到spring boot中【spring mvc】【spring boot】的更多相关文章
- 【swagger】2.swagger提供开发者文档--返回统一格式篇【spring mvc】【spring boot】
接着上一篇来说, 不管正常返回结果还是后台出现异常,应该返回给前台统一的响应格式. 所以这一篇就为了应对解决这个问题. ======================================== ...
- WebApi(五)-Swagger接口文档①简单集成
1,通过NuGet引用Swashbuckle 2,打开项目属性-->生成,勾选XML文档文件,保存 3,找到项目App_Start文件夹下WebApiConfig查找GetXmlComments ...
- Core Web API上使用Swagger提供API文档
在ASP.NET Core Web API上使用Swagger提供API文档 我在开发自己的博客系统(http://daxnet.me)时,给自己的RESTful服务增加了基于Swagger的AP ...
- Swagger 生成 PHP API 接口文档
Swagger 生成 PHP API 接口文档 Lumen微服务生成Swagger文档 1.概况 有同学反馈写几十个接口文档需要两天的工作量, 随着多部门之间的协作越来越频繁, 维护成本越来越高, 文 ...
- 数据库界的Swagger:一键生成数据库文档!
对于开发的API文档,我们可以通过Swagger等工具来自动生成了.但是对于数据库表结构的文档呢,在实际开发中在开发前我们一般会先设计好表结构,大家讨论一下, 这个时候就很需要有个数据库表结构的文档, ...
- 使用Swagger实现webapi接口自动化文档生成
这里是实现自动化api稳当的生成,在网上看了很多swagger的文档,可能都是在为实现接口时直接使用的swagger,其实步骤差不多,但是更加详细的我还没看到,又或者说,我看着文档来的时候还是出错啦, ...
- layuiAdmin pro v1.x 【单页版】开发者文档
layuiAdmin std v1.x [iframe版]开发者文档 题外 该文档适用于 layuiAdmin 专业版(单页面),阅读之前请务必确认是否与你使用的版本对应. 熟练掌握 layuiAdm ...
- layuiAdmin std v1.x 【iframe版】开发者文档
layuiAdmin pro v1.x [单页版]开发者文档 layuiAdmin.std(iframe 版) 是完全基于 layui 架构而成的通用型后台管理模板系统,采用传统的 iframe 多页 ...
- Typora+PicGo+cos图床打造开发者文档神器
一.Typora简介 markdown简单.高效的语法,被每一个开发者所喜爱.Typora又是一款简约.强悍的实时渲染markdown编辑器.本文将介绍Typora搭配PicGo与腾讯cos对象存储( ...
随机推荐
- (23)zabbix单位符号Unit symbols
概述 在zabbix里面,我们不需要使用大数字来,例如我们可以不使用86400来表示一天,这个数字又不容易理解也容易出错.用什么办法来解决大数字问题呢?我们可以使用单位来简化,例如简化zabbix触发 ...
- python--MySQL 库,表的详细操作
一 库操作 数据库命名规则 可以由数字,字母,下划线,@, #, $ 区分大小写 唯一性 不能使用关键字如 create select 不能单独使用数字 最长128位 # 这些是对上次的补充. 二 ...
- 我的Python分析成长之路5
一.装饰器: 本质是函数,装饰其他函数,为其他函数添加附加功能. 原则: 1.不能修改被装饰函数的源代码. 2.不能修改被装饰函数的调用方式. 装饰器用到的知识: 1.函数即变量 (把函数体赋值给 ...
- Cypress EZ-USB FX3 DMA模式下的串口通讯
由于公司设备升级后出了问题,需要对USB驱动进行修改,原本使用的是寄存器模式进行UART传输,但是由于FX3寄存器模式会出现长时间延时等待的问题,不得不对其传输模式进行修改.虽然赛普拉斯的EZ-USB ...
- Spring,Mybatis,Springmvc框架整合项目(第三部分)
一.静态资源不拦截 第二部分最后显示的几个页面其实都加载了css和js等文件,要不然不会显示的那么好看(假装好看吧),前面已经说了,我们在web.xml中配置了url的拦截形式是/,那么Dispatc ...
- 【转】js里的时间函数集
$(function(){ var mydate = new Date(); var t=mydate.toLocaleString(); $("#time").text(t); ...
- SQL Server on Ubuntu
本文从零开始一步一步介绍如何在Ubuntu上搭建SQL Server 2017,包括安装系统.安装SQL等相关步骤和方法(仅供测试学习之用,基础篇). 一. 创建Ubuntu系统(Create U ...
- How To Configure VMware fencing using fence
本文主要简单介绍一下如何在RHEL 7 Pacemaker中配置一个fence_vmware_soap类型的STONITH设备(仅供测试学习). STONITH是Shoot-The-Other-Nod ...
- Windows 通过 SecureCRT 8.x 上传文件到Linux服务器
1.SecureCRT 连接 Linux 服务器,这一步操作简单: 2.连接并登录成功后,直接在连接成功的页签上 右键 -> Connect SFTP Session 打开SFTP窗口: 3. ...
- 长沙理工大学第十二届ACM大赛-重现赛
年轮广场 时间限制:1秒 空间限制:131072K 题目描述 在云塘校区,有一个很适合晒太阳的地方————年轮广场 年轮广场可以看成n个位置顺时针围成一个环. 这天,天气非常好,Mathon带着他的小 ...