vue的搭建项目
请求的封装,先在src下面创建一个utils的文件夹,文件夹里面有ajax.js loading.js index.js to
1 请求的封装 ajax文件 需要引入的文件在后面
/*

 * [page ajax]

 */

import qs from 'qs'

import axios from 'axios'

import { host } from '../config'

import $load from './loading'

import $toast from './toast'

const service = axios.create({

    baseURL: host,

    timeout: 6e4,

    validateStatus: x => x === 200

})

/**

 * 統一樣式的狀態碼處理

 * @param {any} h 囘調

 * @returns {null} 無

 */

const done = function(h){

    return this.then(h).catch(({ code, msg }) => {

        console.error('請求出錯啦 =>', code, msg)

    })

}

/**

 * 請求發送前處理

 * @param {any} o 配置前

 * @returns {object} 配置後

 */

const onsend = o => {

    // const token = $store.state.userInfo.Data.Token

	// this.$vux.loading.show({

	// 	text: '加载中'

	// });

    //$load.loadIn()

    if (typeof o.data === 'string'){

        o.headers[o.method]['Content-Type'] = 'application/json'

    }

    else if (Array.isArray(o.data)){

        const form = new FormData()

        Object.entries(o.data[0]).forEach(([ k, v ]) => {

            if (Array.isArray(v)){

                v.forEach(x => form.append(k, x))

            }

            else {

                form.append(k, v)

            }

        })

        o.data = form

    }

    else {

        o.data = qs.stringify(o.data)

    }

    // if (token){

    //     // o.headers.common.Authorization = token

    // }

    return o

}

/**

 * 請求成功囘調

 * @param {object} o 請求對象

 * @returns {object} 響應

 */

const onsuccess = o => {

    console.log('請求結果 =>', o.data)

    $load.loadOut()

    if (o.status !== 200){

        throw o.status

    }

    // 此處數據有後臺api數據格式決定

    const { success, message, data } = o.data

    if (success === true){

        return data

    }

    else if(success == false){

        return $toast(message)

    }

    throw {

        success,

        Message

    }

}

/**

 * 請求失敗囘調

 * @param {any} e 錯誤信息

 * @returns {any} 無

 */

const onerror = e => {

    $load.loadOut()

    const info = e.toString()

    const err = {

        Code: -1,

        Message: '请求失败'

    }

    if (info.includes('Network Error')){

        err.Message = '网络错误'

    }

    else if (info.includes('timeout of')){

        err.Message = '请求超时'

    }

    // console.log('error =>', e)

    $toast(err.Message)

    throw err

}

Promise.prototype.done = done

window.Promise.prototype.done = done

service.interceptors.request.use(onsend)

service.interceptors.response.use(onsuccess, onerror)

export default {

    $get: (url, params) => service.get(url, { params }),

    $pop: (url, params) => service.delete(url, { params }),

    $put: (url, o) => service.put(url, o),

    $post: (url, o) => service.post(url, o),

    $patch: (url, o) => service.patch(url, o),

    $form: (url, o) => service.post(url, [o]),

    $auth: url => service.get(url, { responseType: 'blob' }).then(o => ({

        key: o.headers.key,

        data: o.data

    }))

}
index
// import filter from './filter'

import ajax from './ajax'

// import {elem} from './elem'

// import $bridge from './bridge.js'

import $toast from './toast.js'

import $load from './loading'

const $pick = (o = {}, b) => {

    if (!(o instanceof Object)){

        throw 'The parameter only can be an object'

    }

    return Object.entries(o).reduce((p, [ k, v ]) => {

        if (b && typeof v === 'boolean' || v){

            p[k] = v

        }

        return p

    }, {})

}

export default {

    /* 注册插件 */

    install(Vue, { store, router }) {

        /* 路由设置 */

        router.beforeEach((to, from, next) => {

            next()

        })

        router.afterEach(() => {

            window.scrollTo(0, 0)

        })

        /* 添加过滤器 */

        //  Object.entries (filter).forEach(f => Vue.filter(...f))

        /* 添加UI组件 */

        //  Object.entries(elem).forEach(r => Vue.component(...r))

        /* 添加自定义属性/方法 */

        Object.assign(Vue.prototype, {

            ...ajax,

            // $bridge,

            $pick,

            $toast,

            $load

        })

    }

}
loading.js文件
 /* eslint-disable */

 /*

 * @Author: nooldey

 * @Author-Email: <nooldey@gmail.com>

 * @Date: 2018-03-18 16:50:34

 * @Last Modified by: Matt

 * @Last Modified time: 2018-07-12 11:11:44

 * @Description: 加载中提示

 */

/**

 * 打開加載動畫

 * @param {string} [text='正在加载...'] 提示文字

 * @returns {Null} 無

 */

const loadIn = (text = '') => {

    if (window.spin){

        return

    }

    window.spin = document.createElement('div')

    window.spin.className = 'ui-spin'

    window.spin.innerHTML = `<div class="spin"><i></i><span>${ text }</span></div>`

    document.body.appendChild(window.spin)

}

/**

 * 關閉加載動畫

 * @returns {Null} 無

 */

const loadOut = () => {

    if (!window.spin){

        return

    }

    window.spin.classList.add('fade-out')

    setTimeout(() => {

        try {

            document.body.removeChild(window.spin)

        }

        catch(e){}

        finally {

            if (window.spin){

                delete window.spin

            }

        }

    }, 250)

}

export default {

	loadIn,

    loadOut

}
toast文件
/**

 *

 *

 * @param {String} t 提示文字

 * @param {Function} fn 回调函数

 * @returns {null} 无

 */

const toast = (t, fn) => {

    if (window.toast){

        return

    }

    const tip = document.createElement('div')

    tip.className = 'ui-toast'

    tip.innerHTML = `<p>${ t }</p>`

    document.body.appendChild(tip)

    setTimeout(() => tip.classList.add('active'), 0)

    window.toast = tip

    setTimeout(() => {

        // if (!window.toast){

        //     return

        // }

        tip.classList.remove('active')

        setTimeout(() => {

            try {

                document.body.removeChild(tip)

            }

            catch(e){}

            finally {

                window.toast = null

            }

            fn && fn()

        }, 300)

    }, 1500)

}

export default toast
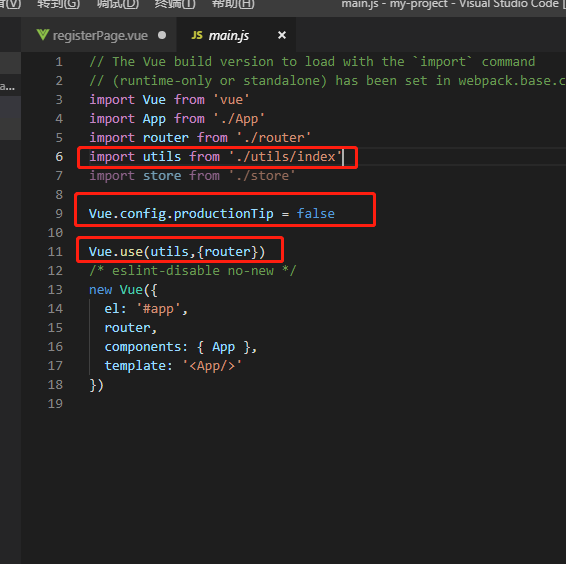
最后在main.js里面使用他
前端获取Token,后台需要配置
Access-Control-Expose-Headers : 'Authorization'

response.setHeader("Cache-Control","no-store");
vue的搭建项目的更多相关文章
- 1.vue脚手架搭建项目
前言: 在使用Vue-cli脚手架搭建项目之前,需要安装node.js和npm以及vue-cli. 开始搭建项目: 1.打开cmd win+R 2.转到要搭建的项目路径: g: cd Webapp/v ...
- Vue环境搭建-项目的创建-启动生命周期-组件的封装及应用
vue项目环境的搭建 """ node >>> python:node是用c++编写用来运行js代码的 npm(cnpm) >>> p ...
- Vue脚手架搭建项目
全局安装vue脚手架 $ npm install -g vue-cli 卸载方法 $ npm uninstall -g vue-cli 查看vue版本(注意:大写的V) $ vue -V 创建项目 $ ...
- 使用vue脚手架搭建项目并将px自动转化为rem
一.安装node.js环境 二.node.js安装完成后使用npm安装vue脚手架vue-cli和安装webpack,我这里用cnpm cnpm i @vue/cli -g //全局安装脚手架3.0 ...
- vue cli搭建项目及文件引入
cli搭建方法:需安装nodejs先 1.npm install -g cnpm --registry=https://registry.npm.taobao.org //安装cnpm,用cnpm下载 ...
- nodejs使用vue从搭建项目到发布部署
都说是使用vue 脚手架自然用的是vue-cli npm install vue-cli -g 建立项目 vue init webpack demo //vue初始化 使用webpack 项目名称 这 ...
- 【vue】vue +element 搭建项目,mock模拟数据(纯干货)
1.安装mockjs依赖 (c)npm install mockjs --save-dev 2.安装axios(Ajax) (c)npm install --save axios 3.项目目录 4.设 ...
- 使用VUE框架搭建项目基本步骤
ps:初入Vue坑的小伙伴们,对于独立做一个项目可能不清楚需要使用哪些资源,这篇随笔希望对大家有所帮助. 第一步:参照vue的官方文档,建立一个vue的项目 # 全局安装 vue-cli $ npm ...
- vue+webpack搭建项目
1.全局安装node.js 2.安装vue-cli 可以在项目目录安装 npm install -g vue-cli 使用vue-list命令选择webpack模板 vue init webpack ...
- VUE神速搭建项目
1.npm install -g vue-cli 全局安装vue-cli脚手架 2.vue init webpack vueTest 初始化一个基于webpack的项目 3.cd vueTest 进入 ...
随机推荐
- Unity的Write Defaults->从一个例子谈起
Write Defaults是什么? 在Unity的Animator中点击任何一个手动创建的State,我们就会在Inspector面板中看到下图的WriteDefaults选项 (图1,Animat ...
- 微信小程序是怎么运行的?
微信客户端在打开小程序之前,会把整个小程序的代码包下载到本地. 紧接着通过 app.json 的 pages 字段就可以知道你当前小程序的所有页面路径 而写在 pages 字段的第一个页面就是这个小程 ...
- lvm再次学习
目录 LVM构架 分区 pvcreat vgcreat lvcreat 格式化文件系统 挂载至目录 已经学过很多很多遍LVM了,每次都觉得自己学会了,每次都是得查询才能搞定,这次给LVM做个专题,在有 ...
- 打包时,node内存溢出问题解决方法
在使用npm run build打包时,遇到node内存溢出问题. 网上查找到的决绝方案.解决方案一: 安装increase-memory-limit插件,扩大node的内存限制 但是,这个解决方案在 ...
- sql优化使用技巧
1.LIMIT 语句分页查询是最常用的场景之一,但也通常也是最容易出问题的地方.比如对于下面简单的语句,一般 DBA 想到的办法是在 type, name, create_time 字段上加组合索引. ...
- SQL server 2008(Linux安装)
今天应公司的要求,需要在阿里云上安装sql server 在本地使用,由于自己原来没有涉及过这样的安装所以走了很多的弯路.现在将我的安装过程与大家分享,希望能够帮到想要学习这个方面的人.以下是我用Ce ...
- 对象的API
entries keys values is assign create toSting ProetydefineProperty(obj,key,propety) Object.entries(), ...
- 国内最全的Spring Boot系列之二
历史文章 <国内最全的Spring Boot系列之一> 视频&交流平台 SpringBoot视频:http://t.cn/R3QepWG Spring Cloud视频:http:/ ...
- 2018-2019-2 20165205《网络对抗技术》Exp4 恶意代码分析
2018-2019-2 20165205<网络对抗技术>Exp4 恶意代码分析 实验要求 监控你自己系统的运行状态,看有没有可疑的程序在运行. 分析一个恶意软件,就分析Exp2或Exp3中 ...
- Docker最简教程
本文旨在让你用最短的时间弄懂Docker命令操作,什么虚拟化都太泛泛了,不讲大道理,实践出真知,让你从此的日常开发和工作中在面对Docker时不再茫然失措而是得心应手.本文也不谈安装,我实在认为作为程 ...