
神经网络可视化《Grad-CAM:Visual Explanations from Deep Networks via Gradient-based Localization》
神经网络已经在很多场景下表现出了很好的识别能力,但是缺乏解释性一直所为人诟病。《Grad-CAM:Visual Explanations from Deep Networks via Gradient-based Localization》这篇论文基于梯度为其可解释性做了一些工作,它可以显著描述哪块图片区域对识别起了至关重要的作用,以热度图的方式可视化神经网络的注意力。本博客主要是基于pytorch的简单工程复现。原文见这里,本代码基于这里。
  1 import torch

  2 import torchvision

  3 from torchvision import models

  4 from torchvision import transforms

  5 from PIL import Image

  6 import pylab as plt

  7 import numpy as np

  8 import cv2

  9

 10

 11 class Extractor():

 12     """

 13     pytorch在设计时,中间层的梯度完成回传后就释放了

 14     这里用hook工具在保存中间参数的梯度

 15     """

 16     def __init__(self, model, target_layer):

 17         self.model = model

 18         self.target_layer = target_layer

 19         self.gradient = None

 20

 21     def save_gradient(self, grad):

 22         self.gradient=grad

 23

 24     def __call__(self, x):

 25         outputs = []

 26         self.gradients = []

 27         for name,module in self.model.features._modules.items():

 28             x = module(x)

 29             if name == self.target_layer:

 30                 x.register_hook(self.save_gradient)

 31                 target_activation=x

 32         x=x.view(1,-1)

 33         for name,module in self.model.classifier._modules.items():

 34             x = module(x)

 35         # 维度为(1,c, h, w) , (1,class_num)

 36         return target_activation, x

 37

 38

 39 def preprocess_image(path):

 40     means=[0.485, 0.456, 0.406]

 41     stds=[0.229, 0.224, 0.225]

 42     m_transform=transforms.Compose([transforms.ToTensor(),transforms.Normalize(means,stds)])

 43     img=Image.open(path)

 44     return m_transform(img).reshape(1,3,224,224)

 45

 46

 47 class GradCam():

 48     def __init__(self, model, target_layer_name, use_cuda):

 49         self.model = model

 50         self.model.eval()

 51         self.cuda = use_cuda

 52         if self.cuda:

 53             self.model = model.cuda()

 54

 55         self.extractor = Extractor(self.model, target_layer_name)

 56

 57

 58     def __call__(self, input, index = None):

 59         if self.cuda:

 60             target_activation, output = self.extractor(input.cuda())

 61         else:

 62             target_activation, output = self.extractor(input)

 63

 64         # index是想要查看的类别,未指定时选择网络做出的预测类

 65         if index == None:

 66             index = np.argmax(output.cpu().data.numpy())

 67

 68         # batch维为1(我们默认输入的是单张图)

 69         one_hot = np.zeros((1, output.size()[-1]), dtype = np.float32)

 70         one_hot[0][index] = 1.0

 71         one_hot = torch.tensor(one_hot)

 72         if self.cuda:

 73             one_hot = torch.sum(one_hot.cuda() * output)

 74         else:

 75             one_hot = torch.sum(one_hot * output)

 76

 77         self.model.zero_grad()

 78         one_hot.backward(retain_graph=True)

 79

 80         grads_val = self.extractor.gradient.cpu().data.numpy()

 81          # 维度为(c, h, w)

 82         target = target_activation.cpu().data.numpy()[0]

 83         # 维度为(c,)

 84         weights = np.mean(grads_val, axis = (2, 3))[0, :]

 85         # cam要与target一样大

 86         cam = np.zeros(target.shape[1 : ], dtype = np.float32)

 87         for i, w in enumerate(weights):

 88             cam += w * target[i, :, :]

 89

 90         # 每个位置选择c个通道上最大的最为输出

 91         cam = np.maximum(cam, 0)

 92         cam = cv2.resize(cam, (224, 224))

 93         cam = cam - np.min(cam)

 94         cam = cam / np.max(cam)

 95         return cam

 96

 97

 98 def show_cam_on_image(img, mask):

 99     heatmap = cv2.applyColorMap(np.uint8(255*mask), cv2.COLORMAP_JET)

100     heatmap = np.float32(heatmap) / 255

101     cam = heatmap + np.float32(img)

102     cam = cam / np.max(cam)

103     cv2.imwrite("cam2.jpg", np.uint8(255 * cam))

104

105

106 #target_layer 越靠近分类层效果越好

107 grad_cam = GradCam(model = models.vgg19(pretrained=True), target_layer_name = "35", use_cuda=True)

108 input = preprocess_image("both.png")

109 mask = grad_cam(input, None)

110 img = cv2.imread("both.png", 1)

111 #热度图是直接resize加到输入图上的

112 img = np.float32(cv2.resize(img, (224, 224))) / 255

113 show_cam_on_image(img, mask)
原图:
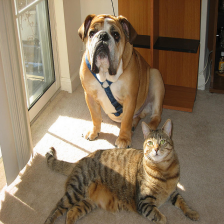
可视化图:

神经网络可视化《Grad-CAM:Visual Explanations from Deep Networks via Gradient-based Localization》的更多相关文章
- Grad-CAM:Visual Explanations from Deep Networks via Gradient-based Localization
目录 Grad-CAM:Visual Explanations from Deep Networks via Gradient-based Localization 1.Abstract 2.Intr ...
- 【论文简读】 Deep web data extraction based on visual
<Deep web data extraction based on visual information processing>作者 J Liu 上海海事大学 2017 AIHC会议登载 ...
- 深度卷积神经网络用于图像缩放Image Scaling using Deep Convolutional Neural Networks
This past summer I interned at Flipboard in Palo Alto, California. I worked on machine learning base ...
- 论文笔记:SiamRPN++: Evolution of Siamese Visual Tracking with Very Deep Networks
SiamRPN++: Evolution of Siamese Visual Tracking with Very Deep Networks 2019-04-02 12:44:36 Paper:ht ...
- 论文笔记之:Action-Decision Networks for Visual Tracking with Deep Reinforcement Learning
论文笔记之:Action-Decision Networks for Visual Tracking with Deep Reinforcement Learning 2017-06-06 21: ...
- Distill详述「可微图像参数化」:神经网络可视化和风格迁移利器!
近日,期刊平台 Distill 发布了谷歌研究人员的一篇文章,介绍一个适用于神经网络可视化和风格迁移的强大工具:可微图像参数化.这篇文章从多个方面介绍了该工具. 图像分类神经网络拥有卓越的图像生成能力 ...
- WPF中的可视化对象(Visual)
原文:WPF中的可视化对象(Visual) 这是MSDN对Visual的解释:Visual class:Provides rendering support in WPF, which include ...
- TensorSpace:超酷炫3D神经网络可视化框架
TensorSpace:超酷炫3D神经网络可视化框架 TensorSpace - 一款 3D 模型可视化框架,支持多种模型,帮助你可视化层间输出,更直观地展示模型的输入输出,帮助理解模型结构和输出方法 ...
- Deep Learning 8_深度学习UFLDL教程:Stacked Autocoders and Implement deep networks for digit classification_Exercise(斯坦福大学深度学习教程)
前言 1.理论知识:UFLDL教程.Deep learning:十六(deep networks) 2.实验环境:win7, matlab2015b,16G内存,2T硬盘 3.实验内容:Exercis ...
随机推荐
- WebSocket 协议详解
一.WebSocket 协议背景 早期,在网站上推送消息给用户,只能通过轮询的方式或 Comet 技术.轮询就是浏览器每隔几秒钟向服务端发送 HTTP 请求,然后服务端返回消息给客户端. 轮询技术一般 ...
- 移动端屏幕适配(rem+js)
什么是移动端适配 在制作webapp时,一个很关键的问题就是适配各种机型不同屏幕的大小,让每种机型上的布局看起来都尽量一样. 也就是说用同一套代码在不同分辨率的手机上跑时,页面元素间的间距.留白,以及 ...
- JVM调优篇
点赞再看,养成习惯,微信搜索「小大白日志」关注这个搬砖人. 文章不定期同步公众号,还有各种一线大厂面试原题.我的学习系列笔记. 基础概念 一般JVM调优,重点在于调整JVM堆大小.调整垃圾回收器 jv ...
- Linux中几个正则表达式的用法
开源Linux 长按二维码加关注~ 上一篇:盘点提高国内访问Github的速度的9种方案 正则表达式就是用于匹配每行输入的一种模式,模式是指一串字符序列.拥有强大的字符搜索功能.也非常方便的搜索过滤出 ...
- Linux-I/O模型详解
I/O介绍 I/O通常有内存IO.网络I/O.磁盘I/O等,但我们通常说的是网络I/O以及磁盘I/O.网络I/O:本质是socket读取 每次I/O请求,都会有两个阶段组成: 第一步:等待数据,即数据 ...
- Java 16 新特性:instanceof增强
instanceof这个关键词,主要用来判断某个对象是不是某个类的实例. 比如,有时候我们要处理一个类似这样的数据集: Map<String, Object> data = new Has ...
- ThinkPHP信息泄露
昨天遇到了一个ThinkPHP日志泄露,然后我就写了个脚本利用shodan搜索批量的来找一下漏洞,估计已经被人撸完了,不过还有一些网站有着此漏洞.ip收集和漏洞验证脚本工具我会放在最下面,需要的直接复 ...
- p2p-tunnel 打洞内网穿透系列(三)TCP转发访问内网web服务
系列文章 p2p-tunnel 打洞内网穿透系列(一)客户端配置及打洞 p2p-tunnel 打洞内网穿透系列(二)TCP转发访问远程共享文件夹 p2p-tunnel 打洞内网穿透系列(三)TCP转发 ...
- tomcat 1.2 负载均衡
实验效果:访问同一个ip或域名,轮询显示两个不同的tomcat界面, nginx服务器ip:192.168.213.4 tomcat服务器ip:192.168.213.3 实验环境:两台服 ...
- Node.js躬行记(20)——KOA源码分析(下)
在上一篇中,主要分析了package.json和application.js文件,本文会分析剩下的几个文件. 一.context.js 在context.js中,会处理错误,cookie,JSON格式 ...