
巧用Nginx配置解决跨域问题
页面nginx配置
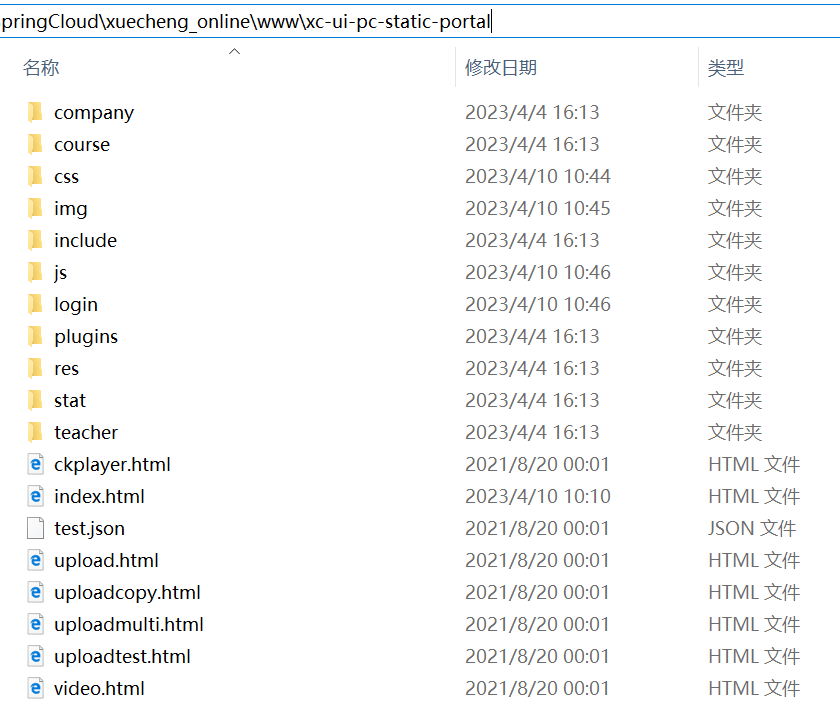
1,前端页面放在域名根目录,比如,http://www.xuecheng.com/ ,对应的nginx配置:
#门户

        location / {

            alias  D:/Z_lhy/SpringCloud/xuecheng_online/www/xc-ui-pc-static-portal/;

            index  index.html;

        }
页面目录:
接口nginx配置
2,前端请求接口路径,在域名后面加一个目录
url : "http://www.xuecheng.com/api/auth/oauth/token",//发送请求的地址
function login(){

        var uname = $("#username").val();

        var pwd = $("#password").val();

         $.ajax({

            url : "http://www.xuecheng.com/api/auth/oauth/token",//发送请求的地址

            type: "post",

            dataType: "json",

            data : "username="+uname+"&password="+pwd+"&grant_type=password",

            beforeSend:function (request) {

                 // 如果后台没有跨域处理,这个自定义

                 request.setRequestHeader("Authorization","Basic RG9jV2ViQXBwOjEyMzQ1Ng==");

                 // 禁用按钮,防止重复提交

                 $("#submit").attr({ disabled: "disabled" });

            },

            error : function() {

                alert("error occured!!!");//请求失败时弹出的信息

            },

            success : function(data) {//返回的信息展示出来

                alert(JSON.stringify(data))

            }

        });

    };
nginx 对api接口配置
location /api/ {

            add_header 'Access-Control-Allow-Origin' $http_origin;

            add_header 'Access-Control-Allow-Credentials' 'true';

            add_header 'Access-Control-Allow-Methods' 'GET, POST, OPTIONS';

            add_header 'Access-Control-Allow-Headers' 'DNT,Authorization,Accept,Origin,Keep-Alive,User-Agent,X-Mx-ReqToken,X-Data-Type,X-Auth-Token,X-Requested-With,If-Modified-Since,Cache-Control,Content-Type,Range';

            add_header 'Access-Control-Expose-Headers' 'Content-Length,Content-Range';

            if ($request_method = 'OPTIONS') {

                add_header 'Access-Control-Max-Age' 1728000;

                add_header 'Content-Type' 'text/plain; charset=utf-8';

                add_header 'Content-Length' 0;

                return 204;

            }

           proxy_pass http://apiserver/;

           proxy_set_header Host $host;

           proxy_set_header X-Real-IP $remote_addr;

           proxy_set_header X-Forwarded-For $proxy_add_x_forwarded_for;

           proxy_set_header X-Forwarded-Proto $scheme;

           proxy_connect_timeout 5;

        }
其中的
$http_origin
$http_origin并不是nginx的内置参数,nginx支持取自定义的参数值,$http_XXX这个格式是nginx取请求中header的XXX的值的。这里取的是origin,而一般跨域请求都会将请求的来源放在origin中(浏览器会往跨域请求的header上面加origin这个header)。
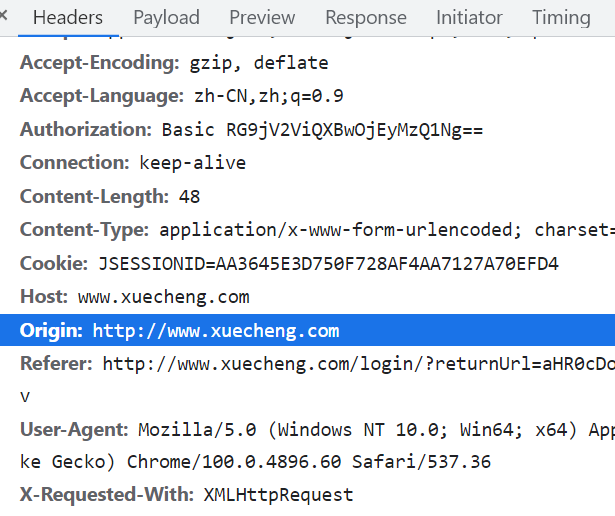
这样配置的话,前端页面在域名下:www.xuecheng.com,而访问的接口则是www.xuecheng.com/api/xxx ,这样就不存在跨域问题了,
其实nginx不配置 Access-Control-Allow-Origin也没事,因为前后端在一个域下了。
注意事项
如果你前后端访问存在跨域问题,而且你需要使用cookie,后端要想获取到前端携带过来的cookie,前后端都要做配置:
前端:
var xhr = new XMLHttpRequest()

xhr.withCredentials = true

xhr.open('GET', 'http://localhost:8888/', true)

xhr.send(null)
后端:
Access-Control-Allow-Origin: http://www.abc.com(这里必须域名不能是*)

Access-Control-Allow-Credentials: true
完整nginx配置
#user  nobody;

worker_processes  1;

#error_log  logs/error.log;

#error_log  logs/error.log  notice;

#error_log  logs/error.log  info;

#pid        logs/nginx.pid;

events {

    worker_connections  1024;

}

http {

    include       mime.types;

    default_type  application/octet-stream;

    #log_format  main  '$remote_addr - $remote_user [$time_local] "$request" '

    #                  '$status $body_bytes_sent "$http_referer" '

    #                  '"$http_user_agent" "$http_x_forwarded_for"';

    #access_log  logs/access.log  main;

    sendfile        on;

    #tcp_nopush     on;

    #keepalive_timeout  0;

    keepalive_timeout  65;

    #gzip  on;

    #微服务网关

    upstream apiserver{

        server 127.0.0.1:50101;

    }


    server {

        listen       80;

        server_name  www.xuecheng.com;

        ssi on;

        ssi_silent_errors on;

        #charset koi8-r;

        #access_log  logs/host.access.log  main;

        #门户

        location / {

            alias  D:/Z_lhy/SpringCloud/xuecheng_online/www/xc-ui-pc-static-portal/;

            index  index.html;

        }

        #location  / {

        #   root /neworiental/www/jiaofu;

        #   index index.html;

        #   try_files $uri /index.html;

        #}

        # proxy_pass末尾有/,请求地址:http://localhost/api/test,转发地址:http://127.0.0.1:8000/test

        location /api/ {

            add_header 'Access-Control-Allow-Origin' $http_origin;

            add_header 'Access-Control-Allow-Credentials' 'true';

            add_header 'Access-Control-Allow-Methods' 'GET, POST, OPTIONS';

            add_header 'Access-Control-Allow-Headers' 'DNT,Authorization,Accept,Origin,Keep-Alive,User-Agent,X-Mx-ReqToken,X-Data-Type,X-Auth-Token,X-Requested-With,If-Modified-Since,Cache-Control,Content-Type,Range';

            add_header 'Access-Control-Expose-Headers' 'Content-Length,Content-Range';

            if ($request_method = 'OPTIONS') {

                add_header 'Access-Control-Max-Age' 1728000;

                add_header 'Content-Type' 'text/plain; charset=utf-8';

                add_header 'Content-Length' 0;

                return 204;

            }

           proxy_pass http://apiserver/;

           proxy_set_header Host $host;

           proxy_set_header X-Real-IP $remote_addr;

           proxy_set_header X-Forwarded-For $proxy_add_x_forwarded_for;

           proxy_set_header X-Forwarded-Proto $scheme;

           proxy_connect_timeout 5;

        }

        location ^~ /openapi/auth/ {

             proxy_pass http://apiserver/auth/;

        }

        #error_page  404              /404.html;

        # redirect server error pages to the static page /50x.html

        #

        error_page   500 502 503 504  /50x.html;

        location = /50x.html {

            root   html;

        }

        # proxy the PHP scripts to Apache listening on 127.0.0.1:80

        #

        #location ~ \.php$ {

        #    proxy_pass   http://127.0.0.1;

        #}

        # pass the PHP scripts to FastCGI server listening on 127.0.0.1:9000

        #

        #location ~ \.php$ {

        #    root           html;

        #    fastcgi_pass   127.0.0.1:9000;

        #    fastcgi_index  index.php;

        #    fastcgi_param  SCRIPT_FILENAME  /scripts$fastcgi_script_name;

        #    include        fastcgi_params;

        #}

        # deny access to .htaccess files, if Apache's document root

        # concurs with nginx's one

        #

        #location ~ /\.ht {

        #    deny  all;

        #}

    }

    # another virtual host using mix of IP-, name-, and port-based configuration

    #

    #server {

    #    listen       8000;

    #    listen       somename:8080;

    #    server_name  somename  alias  another.alias;

    #    location / {

    #        root   html;

    #        index  index.html index.htm;

    #    }

    #}

    # HTTPS server

    #

    #server {

    #    listen       443 ssl;

    #    server_name  localhost;

    #    ssl_certificate      cert.pem;

    #    ssl_certificate_key  cert.key;

    #    ssl_session_cache    shared:SSL:1m;

    #    ssl_session_timeout  5m;

    #    ssl_ciphers  HIGH:!aNULL:!MD5;

    #    ssl_prefer_server_ciphers  on;

    #    location / {

    #        root   html;

    #        index  index.html index.htm;

    #    }

    #}

}
参考:
正确的Nginx跨域配置:https://blog.csdn.net/envon123/article/details/83270277
跨域资源共享(CORS)安全性:https://blog.csdn.net/weixin_43964148/article/details/109352413
巧用Nginx配置解决跨域问题的更多相关文章
- 使用Nginx来解决跨域的问题
使用Nginx来解决跨域的问题 nginx的版本:(查看nginx命令: /usr/local/nginx/sbin/nginx -v) nginx/1.4.3 问题是:前端项目域名是 a.xxxx. ...
- 【Nginx】使用Nginx如何解决跨域问题?看完这篇原来很简单!!
写在前面 当今互联网行业,大部分Web项目基本都是采用的前后端分离模式.前端为H5项目,后端为Java.PHP.Python等项目.而且大部分后端服务并不会只部署一套服务,而是会采用Nginx对后端服 ...
- 一篇文章让你搞懂如何通过Nginx来解决跨域问题
Nginx跨域实现 首先大家要搞清楚什么是跨域,为什么会有跨域情况的出现.哪些情况属于跨域? 跨域:由于浏览器的同源策略,即属于不同域的页面之间不能相互访问各自的页面内容 注:同源策略,单说来就是 ...
- vue webpack配置解决跨域问题
现在基本项目都是实行前后端分离的原则,不管是ng 或者是vue 在开发中都无法避免跨域的这个问题 本人刚上手第一个vue项目,在调用api的时候出现了跨域的这个问题 这是封装好一个简单的post 请求 ...
- vue项目开发,用webpack配置解决跨域问题
今天在本地开发时候碰到了跨域的问题,突然觉着跨域问题在所难免啊,之前没有没有碰到总觉着解决跨域很高大上的样纸,其实就是受限于网络的同源策略,跨域前后端都可以进行处理. 1,后端更改header hea ...
- nginx 配置ajax跨域访问php接口
在nginx.conf里面,找到server项,并在里面添加如下配置 location ~ \.php?($|/) { #try_files $uri =; #handel cosr by mao a ...
- 服务端 Cros 配置解决跨域
<system.webServer> <httpProtocol> <customHeaders> <remove name="Access-Con ...
- Nginx配置解决NetCore的跨域
使用Nginx配置解决NetCore的跨域 废话不多说,直接上Nginx配置 server { listen 80; server_name 你的Id或域名; location / { add_hea ...
- 【手摸手,带你搭建前后端分离商城系统】02 VUE-CLI 脚手架生成基本项目,axios配置请求、解决跨域问题
[手摸手,带你搭建前后端分离商城系统]02 VUE-CLI 脚手架生成基本项目,axios配置请求.解决跨域问题. 回顾一下上一节我们学习到的内容.已经将一个 usm_admin 后台用户 表的基本增 ...
- Vue使用Axios实现http请求以及解决跨域问题
Axios 是一个基于 promise 的 HTTP 库,可以用在浏览器和 node.js 中.Axios的中文文档以及github地址如下: 中文:https://www.kancloud.cn/y ...
随机推荐
- ZXing 生成二维码和条形码(添加NuGet包)
- 关于IllegalMonitorStateException异常的解释之一
注意 在同步控制方法或同步控制块里调用wait(),notify()和notifyAll().如果在非同步控制方法里调用这些方法,程序能通过编译,但运行的时候,将得到IllegalMonitorSta ...
- 转型.netCore开发 记录日常问题
1.页面问题 asp-for date字段页面显示时间为"yyyy-MM-dd"类型通过@{}来处理,定义常量,将处理后的值赋值给常量,再通过@常量正常赋值例:@{ var beg ...
- nodejs中router的使用
一.划分文件使用Router 创建一个routes目录,专门用于放置路由文件,通过module.exports导出供外部使用. // 引入类 const Koa =require('koa'); // ...
- day28_常用模块——hashlib,logging模块
hashlib(摘要算法) Python的hashlib提供了常见的摘要算法,如MD5,SHA1等等. 什么是摘要算法呢?摘要算法又称哈希算法.散列算法.它通过一个函数,把任意长度的数据转换为一个长度 ...
- 每日一道算法题——斐波那契数列Fibonacci
题目: 大家都知道斐波那契数列,现在要求输入一个整数n,请你输出斐波那契数列的第n项(从0开始,第0项为0,第1项是1),n≤39: 示例1 输入: 4 返回值: 3 代码: 方法一:递归 publi ...
- mitmproxy截取流量和抓包
mitmproxy介绍https://blog.csdn.net/enemy_sprites/article/details/104052506 mitmproxy处理请求及乱码https://blo ...
- 【Airtest相关】收集一些Airtest的介绍
1.项目简介 ui自动化一直是个让人头疼的事,主要是因为系统兼容性难度较大和开发维护成本比较高, 以前使用过appium,通用性比较差,并且开发有一定的基础才行,更难以忍受的是后期的维护成本:然后接触 ...
- TProtocolException: Required field 'type' is unset! Struct:TPrimitiveTypeEntry(type:null)
org.apache.thrift.protocol.TProtocolException: Required field 'type' is unset! Struct:TPrimitiveType ...
- iframe.contentWindows使用
一.在使用iframe的页面,要操作这个iframe里面的DOM元素可以用: contentWindow.contentDocument(测试的时候chrome浏览器,要在服务器环境下) 1.先获取i ...