
手把手教你使用LabVIEW OpenCV dnn实现图像分类(含源码)
@
前言
上一篇和大家一起分享了如何使用LabVIEW OpenCV dnn实现手写数字识别,今天我们一起来看一下如何使用LabVIEW OpenCV dnn实现图像分类。
一、什么是图像分类?
1、图像分类的概念
图像分类,核心是从给定的分类集合中给图像分配一个标签的任务。实际上,这意味着我们的任务是分析一个输入图像并返回一个将图像分类的标签。标签总是来自预定义的可能类别集。
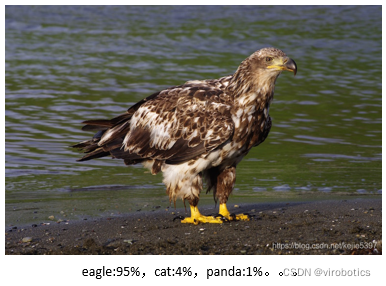
示例:我们假定一个可能的类别集categories = {dog, cat, eagle},之后我们提供一张图片(下图)给分类系统。这里的目标是根据输入图像,从类别集中分配一个类别,这里为eagle,我们的分类系统也可以根据概率给图像分配多个标签,如eagle:95%,cat:4%,panda:1%
2、MobileNet简介
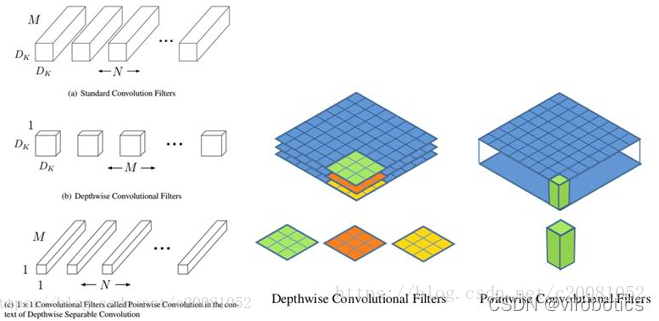
MobileNet:基本单元是深度级可分离卷积(depthwise separable convolution),其实这种结构之前已经被使用在Inception模型中。深度级可分离卷积其实是一种可分解卷积操作(factorized convolutions),其可以分解为两个更小的操作:depthwise convolution和pointwise convolution,如图1所示。Depthwise convolution和标准卷积不同,对于标准卷积其卷积核是用在所有的输入通道上(input channels),而depthwise convolution针对每个输入通道采用不同的卷积核,就是说一个卷积核对应一个输入通道,所以说depthwise convolution是depth级别的操作。而pointwise convolution其实就是普通的卷积,只不过其采用1x1的卷积核。图2中更清晰地展示了两种操作。对于depthwise separable convolution,其首先是采用depthwise convolution对不同输入通道分别进行卷积,然后采用pointwise convolution将上面的输出再进行结合,这样其实整体效果和一个标准卷积是差不多的,但是会大大减少计算量和模型参数量。
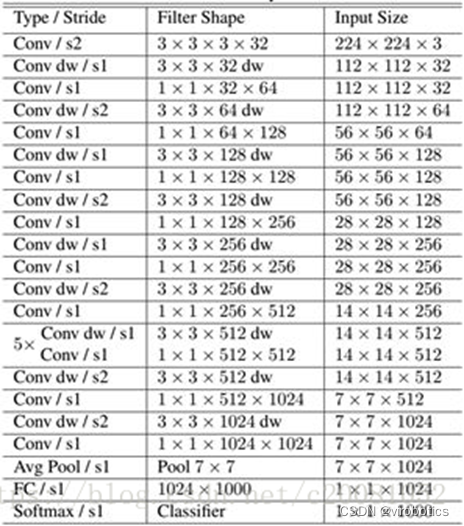
MobileNet的网络结构如表所示。首先是一个3x3的标准卷积,然后后面就是堆积depthwise separable convolution,并且可以看到其中的部分depthwise convolution会通过strides=2进行down sampling。然后采用average pooling将feature变成1x1,根据预测类别大小加上全连接层,最后是一个softmax层。如果单独计算depthwise convolution和pointwise convolution,整个网络有28层(这里Avg Pool和Softmax不计算在内)。
二、使用python实现图像分类(py_to_py_ssd_mobilenet.py)
1、获取预训练模型
- 使用tensorflow.keras.applications获取模型(以mobilenet为例);
from tensorflow.keras.applications import MobileNet

    original_tf_model = MobileNet(

        include_top=True,

        weights="imagenet"

    )
- 把original_tf_model打包成pb
def get_tf_model_proto(tf_model):

    # define the directory for .pb model

    pb_model_path = "models"

    # define the name of .pb model

    pb_model_name = "mobilenet.pb"

    # create directory for further converted model

    os.makedirs(pb_model_path, exist_ok=True)

    # get model TF graph

    tf_model_graph = tf.function(lambda x: tf_model(x))

    # get concrete function

    tf_model_graph = tf_model_graph.get_concrete_function(

        tf.TensorSpec(tf_model.inputs[0].shape, tf_model.inputs[0].dtype))

    # obtain frozen concrete function

    frozen_tf_func = convert_variables_to_constants_v2(tf_model_graph)

    # get frozen graph

    frozen_tf_func.graph.as_graph_def()

    # save full tf model

    tf.io.write_graph(graph_or_graph_def=frozen_tf_func.graph,

                      logdir=pb_model_path,

                      name=pb_model_name,

                      as_text=False)

    return os.path.join(pb_model_path, pb_model_name)
2、使用opencv_dnn进行推理
- 图像预处理(blob)
def get_preprocessed_img(img_path):

    # read the image

    input_img = cv2.imread(img_path, cv2.IMREAD_COLOR)

    input_img = input_img.astype(np.float32)

    # define preprocess parameters

    mean = np.array([1.0, 1.0, 1.0]) * 127.5

    scale = 1 / 127.5

    # prepare input blob to fit the model input:

    # 1. subtract mean

    # 2. scale to set pixel values from 0 to 1

    input_blob = cv2.dnn.blobFromImage(

        image=input_img,

        scalefactor=scale,

        size=(224, 224),  # img target size

        mean=mean,

        swapRB=True,  # BGR -> RGB

        crop=True  # center crop

    )

    print("Input blob shape: {}\n".format(input_blob.shape))

    return input_blob
- 调用pb模型进行推理
def get_tf_dnn_prediction(original_net, preproc_img, imagenet_labels):

    # inference

    preproc_img = preproc_img.transpose(0, 2, 3, 1)

    print("TF input blob shape: {}\n".format(preproc_img.shape))

    out = original_net(preproc_img)

    print("\nTensorFlow model prediction: \n")

    print("* shape: ", out.shape)

    # get the predicted class ID

    imagenet_class_id = np.argmax(out)

    print("* class ID: {}, label: {}".format(imagenet_class_id, imagenet_labels[imagenet_class_id]))

    # get confidence

    confidence = out[0][imagenet_class_id]

    print("* confidence: {:.4f}".format(confidence))
3、实现图像分类 (代码汇总)
import os

import cv2

import numpy as np

import tensorflow as tf

from tensorflow.keras.applications import MobileNet

from tensorflow.python.framework.convert_to_constants import convert_variables_to_constants_v2

def get_tf_model_proto(tf_model):

    # define the directory for .pb model

    pb_model_path = "models"

    # define the name of .pb model

    pb_model_name = "mobilenet.pb"

    # create directory for further converted model

    os.makedirs(pb_model_path, exist_ok=True)

    # get model TF graph

    tf_model_graph = tf.function(lambda x: tf_model(x))

    # get concrete function

    tf_model_graph = tf_model_graph.get_concrete_function(

        tf.TensorSpec(tf_model.inputs[0].shape, tf_model.inputs[0].dtype))

    # obtain frozen concrete function

    frozen_tf_func = convert_variables_to_constants_v2(tf_model_graph)

    # get frozen graph

    frozen_tf_func.graph.as_graph_def()

    # save full tf model

    tf.io.write_graph(graph_or_graph_def=frozen_tf_func.graph,

                      logdir=pb_model_path,

                      name=pb_model_name,

                      as_text=False)

    return os.path.join(pb_model_path, pb_model_name)

def get_preprocessed_img(img_path):

    # read the image

    input_img = cv2.imread(img_path, cv2.IMREAD_COLOR)

    input_img = input_img.astype(np.float32)

    # define preprocess parameters

    mean = np.array([1.0, 1.0, 1.0]) * 127.5

    scale = 1 / 127.5

    # prepare input blob to fit the model input:

    # 1. subtract mean

    # 2. scale to set pixel values from 0 to 1

    input_blob = cv2.dnn.blobFromImage(

        image=input_img,

        scalefactor=scale,

        size=(224, 224),  # img target size

        mean=mean,

        swapRB=True,  # BGR -> RGB

        crop=True  # center crop

    )

    print("Input blob shape: {}\n".format(input_blob.shape))

    return input_blob

def get_imagenet_labels(labels_path):

    with open(labels_path) as f:

        imagenet_labels = [line.strip() for line in f.readlines()]

    return imagenet_labels

def get_opencv_dnn_prediction(opencv_net, preproc_img, imagenet_labels):

    # set OpenCV DNN input

    opencv_net.setInput(preproc_img)

    # OpenCV DNN inference

    out = opencv_net.forward()

    print("OpenCV DNN prediction: \n")

    print("* shape: ", out.shape)

    # get the predicted class ID

    imagenet_class_id = np.argmax(out)

    # get confidence

    confidence = out[0][imagenet_class_id]

    print("* class ID: {}, label: {}".format(imagenet_class_id, imagenet_labels[imagenet_class_id]))

    print("* confidence: {:.4f}\n".format(confidence))

def get_tf_dnn_prediction(original_net, preproc_img, imagenet_labels):

    # inference

    preproc_img = preproc_img.transpose(0, 2, 3, 1)

    print("TF input blob shape: {}\n".format(preproc_img.shape))

    out = original_net(preproc_img)

    print("\nTensorFlow model prediction: \n")

    print("* shape: ", out.shape)

    # get the predicted class ID

    imagenet_class_id = np.argmax(out)

    print("* class ID: {}, label: {}".format(imagenet_class_id, imagenet_labels[imagenet_class_id]))

    # get confidence

    confidence = out[0][imagenet_class_id]

    print("* confidence: {:.4f}".format(confidence))

def main():

    # configure TF launching

    #set_tf_env()

    # initialize TF MobileNet model

    original_tf_model = MobileNet(

        include_top=True,

        weights="imagenet"

    )

    # get TF frozen graph path

    full_pb_path = get_tf_model_proto(original_tf_model)

    print(full_pb_path)

    # read frozen graph with OpenCV API

    opencv_net = cv2.dnn.readNetFromTensorflow(full_pb_path)

    print("OpenCV model was successfully read. Model layers: \n", opencv_net.getLayerNames())

    # get preprocessed image

    input_img = get_preprocessed_img("yaopin.png")

    # get ImageNet labels

    imagenet_labels = get_imagenet_labels("classification_classes.txt")

    # obtain OpenCV DNN predictions

    get_opencv_dnn_prediction(opencv_net, input_img, imagenet_labels)

    # obtain TF model predictions

    get_tf_dnn_prediction(original_tf_model, input_img, imagenet_labels)

if __name__ == "__main__":

    main()
三、使用LabVIEW dnn实现图像分类(callpb_photo.vi)
本博客中所用实例基于LabVIEW2018版本,调用mobilenet pb模型
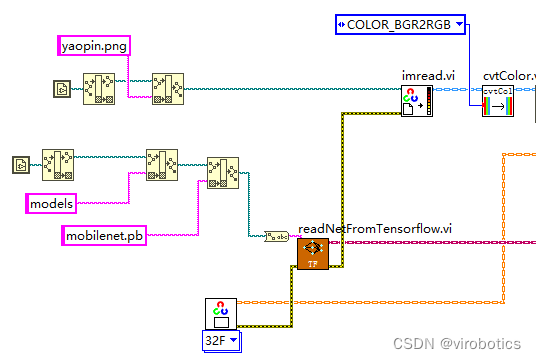
1、读取待分类的图片和pb模型
2、将待分类的图片进行预处理
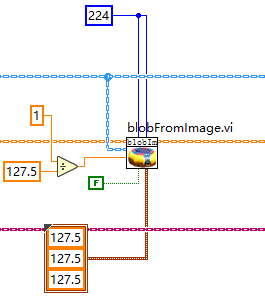
3、将图像输入至神经网络中并进行推理
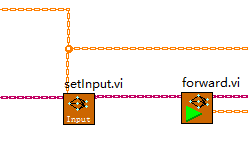
4、实现图像分类

5、总体程序源码:
按照如下图所示程序进行编码,实现图像分类,本范例中使用了一分类,分类出置信度最高的物体。
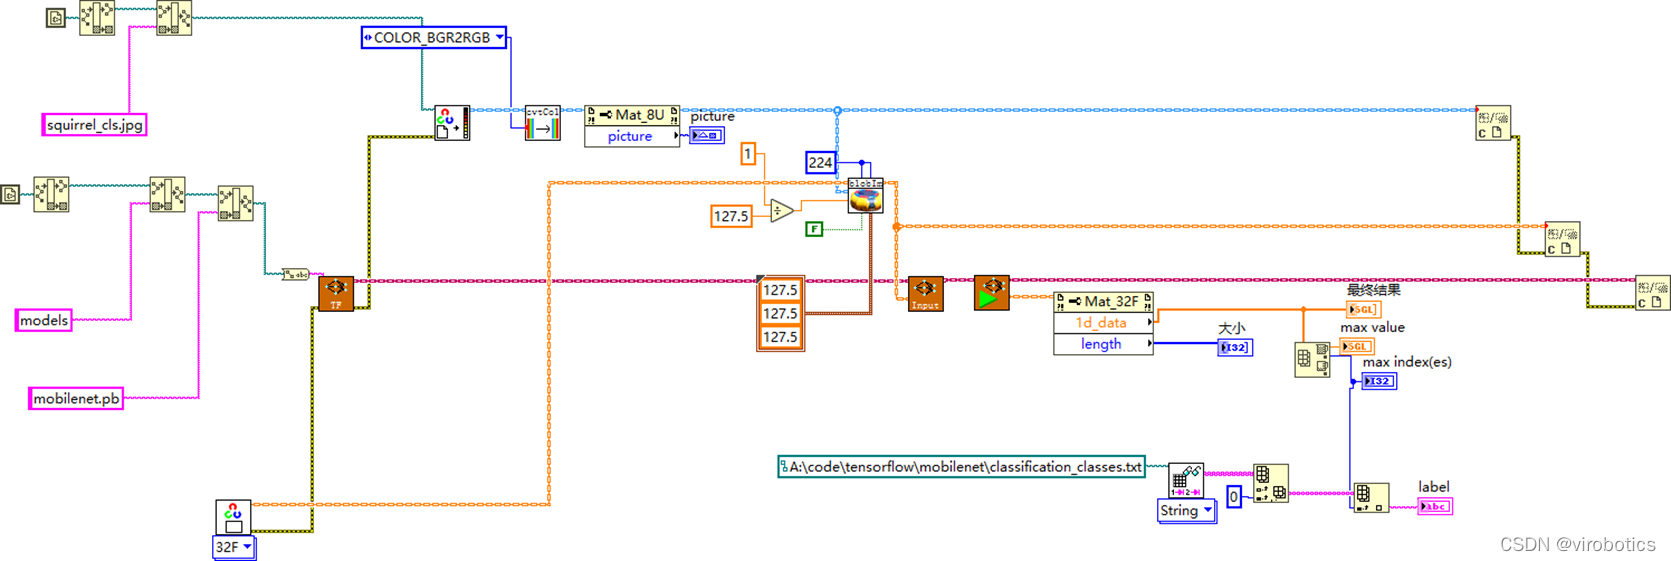
如下图所示为加载药瓶图片得到的分类结果,在前面板可以看到图片和label:
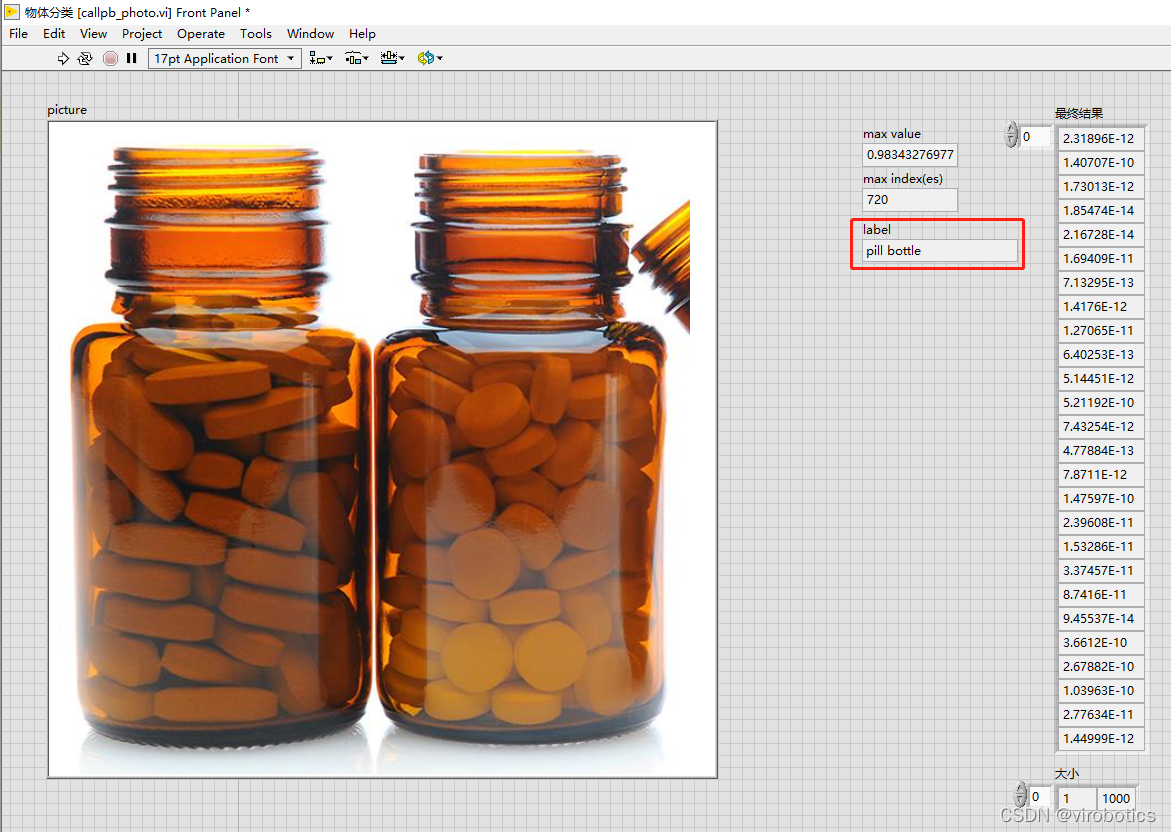
四、源码下载
链接:https://pan.baidu.com/s/10yO72ewfGjxAg_f07wjx0A?pwd=8888
提取码:8888
总结
更多关于LabVIEW与人工智能技术,可添加技术交流群进一步探讨。qq群号:705637299,请备注暗号:LabVIEW 机器学习
手把手教你使用LabVIEW OpenCV dnn实现图像分类(含源码)的更多相关文章
- 手把手教你使用LabVIEW OpenCV DNN实现手写数字识别(含源码)
@ 目录 前言 一.OpenCV DNN模块 1.OpenCV DNN简介 2.LabVIEW中DNN模块函数 二.TensorFlow pb文件的生成和调用 1.TensorFlow2 Keras模 ...
- 手把手教你使用LabVIEW OpenCV dnn实现物体识别(Object Detection)含源码
前言 今天和大家一起分享如何使用LabVIEW调用pb模型实现物体识别,本博客中使用的智能工具包可到主页置顶博客LabVIEW AI视觉工具包(非NI Vision)下载与安装教程中下载 一.物体识别 ...
- 手把手教你使用LabVIEW人工智能视觉工具包快速实现传统Opencv算子的调用(含源码)
前言 今天我们一起来使用LabVIEW AI视觉工具包快速实现图像的滤波与增强:图像灰度处理:阈值处理与设定:二值化处理:边缘提取与特征提取等基本操作.工具包的安装与下载方法可见之前的博客. 一.图像 ...
- Android应用系列:手把手教你做一个小米通讯录(附图附源码)
前言 最近心血来潮,突然想搞点仿制品玩玩,很不幸小米成为我苦逼的第一个试验品.既然雷布斯的MIUI挺受欢迎的(本人就是其的屌丝用户),所以就拿其中的一些小功能做一些小demo来玩玩.小米的通讯录大家估 ...
- 【YOLOv5】手把手教你使用LabVIEW ONNX Runtime部署 TensorRT加速,实现YOLOv5实时物体识别(含源码)
前言 上一篇博客给大家介绍了LabVIEW开放神经网络交互工具包[ONNX],今天我们就一起来看一下如何使用LabVIEW开放神经网络交互工具包实现TensorRT加速YOLOv5. 以下是YOLOv ...
- 手把手教你使用LabVIEW实现Mask R-CNN图像实例分割
前言 前面给大家介绍了使用LabVIEW工具包实现图像分类,目标检测,今天我们来看一下如何使用LabVIEW实现Mask R-CNN图像实例分割. 一.什么是图像实例分割? 图像实例分割(Instan ...
- 手把手教你使用LabVIEW人工智能视觉工具包快速实现图像读取与采集(含源码)
目录 前言 一.工具包位置 二.图像采集与色彩空间转换 1.文件读写 2.实现图片读取 3.使用算子cvtColor实现颜色空间转换 三.从摄像头采集图像 1.Camera类 2.属性节点 3.实现摄 ...
- 自已开发IM有那么难吗?手把手教你自撸一个Andriod版简易IM (有源码)
本文由作者FreddyChen原创分享,为了更好的体现文章价值,引用时有少许改动,感谢原作者. 1.写在前面 一直想写一篇关于im即时通讯分享的文章,无奈工作太忙,很难抽出时间.今天终于从公司离职了, ...
- 【YOLOv5】LabVIEW+YOLOv5快速实现实时物体识别(Object Detection)含源码
前言 前面我们给大家介绍了基于LabVIEW+YOLOv3/YOLOv4的物体识别(对象检测),今天接着上次的内容再来看看YOLOv5.本次主要是和大家分享使用LabVIEW快速实现yolov5的物体 ...
随机推荐
- 2022-7-13 第五组 pan小堂 java基础
###java基础 1.java语言发展史和概述平台(了解) 詹姆斯·高斯林(James Gosling)1977年获得了加拿大卡尔加里大学计算机科学学士学位,1983年获得了美国卡内基梅隆大学计算机 ...
- Docker搭建STF私有移动测试云平台
一. STF介绍 Smartphone Test Farm(简称STF)是一个web应用程序,主要用于从指定的浏览器中远程调试智能手机.智能手表等,可远程调试超过160多台设备.STF可以便捷的管理移 ...
- ETCD快速入门-01 ETCD概述
1.ETCD概述 1.1 ETCD概述 etcd是一个高可用的分布式的键值对存储系统,常用做配置共享和服务发现.由CoreOS公司发起的一个开源项目,受到ZooKeeper与doozer启发而 ...
- 一文搞懂│XSS攻击、SQL注入、CSRF攻击、DDOS攻击、DNS劫持
目录 XSS 攻击 SQL 注入 CSRF 攻击 DDOS 攻击 DNS 劫持 XSS 攻击 全称跨站脚本攻击 Cross Site Scripting 为了与重叠样式表 CSS 进行区分,所以换了另 ...
- 皮皮调度(1)——从Airflow到DolphinScheduler,以及“皮皮调度”的来历
按照前一篇文章 <GraalVM -- 让Java变得再次强大> 末尾提到的计划,本来这篇文章是想写一下GraalVM的后续<深耕云原生的Java应用框架 -- Quarkus> ...
- pytest-fixture执行顺序
作用域-scope 作用域越大,越先执行,session>package>module>class>function. 是否自动调用fixture 自动调用(autouse=T ...
- 关于virtio_net网卡命名的小问题
最近看了一个小问题,涉及到一致性网络设备命名(Consistent Network Device Naming),在此记录一下. 系统是 4.18.0-240.el8.x86_64,centos 8. ...
- 第五十五篇:Axios的封装
好家伙, 上图 1.为什么需要封装axios? 当我们改变项目的使用环境时候,url也会随之改变,那么我们就需要改很多axios请求中的url配置 现在我们将axios封装,在项目使用环境改变时我们只 ...
- TCP/UDP报文格式
TCP报文格式 源端口:数据发送方的端口号 目的端口:数据接收方的端口号 序号:本数据报文中的第一个字节的序号(在数据流中每个字节都对应一个序号) 确认号:希望收到的下一个数据报文中的第一个字节的序号 ...
- HC32L110(四) HC32L110的startup启动文件和ld连接脚本
目录 HC32L110(一) HC32L110芯片介绍和Win10下的烧录 HC32L110(二) HC32L110在Ubuntu下的烧录 HC32L110(三) HC32L110的GCC工具链和VS ...