
转载 springboot 配置读取
前言:了解过spring-Boot这个技术的,应该知道Spring-Boot的核心配置文件application.properties,当然也可以通过注解自定义配置文件**.properties的信息。
一.读取核心配置文件信息application.properties的内容
核心配置文件是指在resources根目录下的application.properties或application.yml配置文件,读取这两个配置文件的方法有两种,都比较简单。
(1)核心配置文件application.properties内容如下:
- test.msg=Hello World SpringBoot
(1)方式一:使用@Value方式(常用)
- package Solin.controller;
- import org.springframework.beans.factory.annotation.Value;
- import org.springframework.web.bind.annotation.RequestMapping;
- import org.springframework.web.bind.annotation.RestController;
- @RestController
- public class WebController {
- @Value("${test.msg}")
- private String msg;
- @RequestMapping("/index1")
- public String index1(){
- return "方式一:"+msg;
- }
- }
注意:在@Value的${}中包含的是核心配置文件中的键名。在Controller类上加@RestController表示将此类中的所有视图都以JSON方式显示,类似于在视图方法上加@ResponseBody。
访问:http://localhost:8088/index1时得到:"方式一:Hello World SpringBoot"
(2)方式二:使用Environment方式
- package Solin.controller;
- import org.springframework.beans.factory.annotation.Autowired;
- import org.springframework.beans.factory.annotation.Value;
- import org.springframework.core.env.Environment;
- import org.springframework.web.bind.annotation.RequestMapping;
- import org.springframework.web.bind.annotation.RestController;
- @RestController
- public class WebController {
- @Autowired
- private Environment env;
- @RequestMapping("/index2")
- public String index2(){
- return "方式二:"+env.getProperty("test.msg");
- }
- }
注意:这种方式是依赖注入Evnironment来完成,在创建的成员变量private Environment env上加上@Autowired注解即可完成依赖注入,然后使用env.getProperty("键名")即可读取出对应的值。
访问:http://localhost:8088/index2时得到:"方式二:Hello World SpringBoot"
(2)核心配置文件application-dev.yml内容如下:
- # --**银行配置文件路径 start
czb:
configPath: /usr/local/czbConfig/config.properties
# --浙商银行相关配置文件路径 end
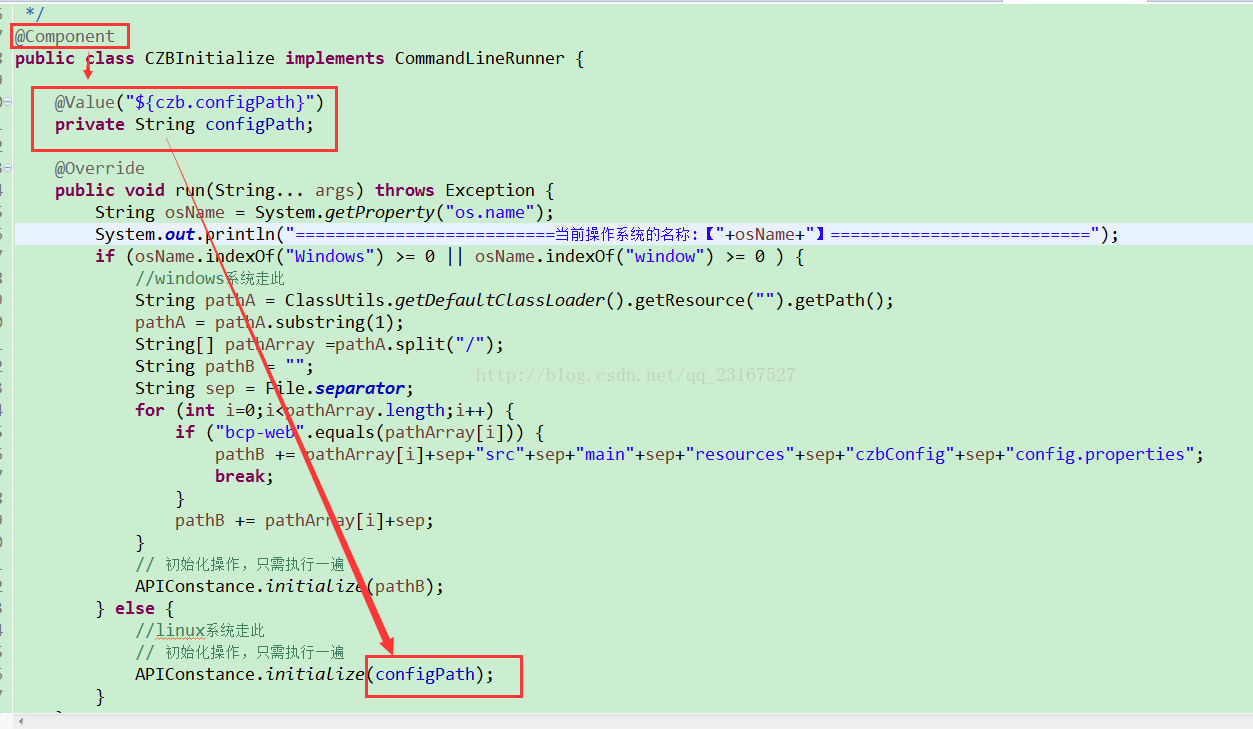
application*.yml核心配置文件,也是用上面两种方式读取其内容。例如:如下图使用方式一来读取:
二.读取自定义配置文件信息,例如:author.properties
为了不破坏核心文件的原生态,但又需要有自定义的配置信息存在,一般情况下会选择自定义配置文件来放这些自定义信息,这里在resources目录下创建配置文件authorA.properties
resources/author/authorA.properties内容如下:
- auth.name=Solin
- auth.age=22
创建管理配置的实体类:
- package Solin.controller;
- import org.springframework.boot.context.properties.ConfigurationProperties;
- import org.springframework.context.annotation.Configuration;
- import org.springframework.stereotype.Component;
- //加上注释@Component,可以直接其他地方使用@Autowired来创建其实例对象
- @Component
- //springboot1.5之前的版本这么用,1.5版本之后取消了locations属性,替代方案看最下面。
- @ConfigurationProperties(prefix = "auth",locations = "classpath:/author/authorA.properties")
- //在启动类上增加@EnableConfigurationProperties注解,激活自定义的配置类(重要)
- public class MyWebConfig{
- private String name;
- private int age;
- public String getName() {
- return name;
- }
- public void setName(String name) {
- this.name = name;
- }
- public int getAge() {
- return age;
- }
- public void setAge(int age) {
- this.age = age;
- }
- }
注意:
在@ConfigurationProperties注释中有两个属性:
locations:指定配置文件的所在位置
prefix:指定配置文件中键名称的前缀(我这里配置文件中所有键名都是以auth.开头)
使用@Component是让该类能够在其他地方被依赖使用,即使用@Autowired注释来创建实例。
创建测试Controller
- package Solin.controller;
- import org.springframework.beans.factory.annotation.Autowired;
- import org.springframework.stereotype.Controller;
- import org.springframework.web.bind.annotation.RequestMapping;
- import org.springframework.web.bind.annotation.ResponseBody;
- @Controller
- public class ConfigController {
- @Autowired
- private MyWebConfig conf;
- @RequestMapping("/test")
- public @ResponseBody String test() {
- return "Name:"+conf.getName()+"---"+"Age:"+conf.getAge();
- }
- }
注意:由于在Conf类上加了注释@Component,所以可以直接在这里使用@Autowired来创建其实例对象。
访问:http://localhost:8088/test时得到:"Name:Solin---Age:22"
备注:spring boot1.5以上版本@ConfigurationProperties取消locations注解后的替代方案,只是下面注解变了,别的都一样。
创建管理配置的实体类:
- package Solin.controller;
- import org.springframework.boot.context.properties.ConfigurationProperties;
- import org.springframework.context.annotation.Configuration;
- import org.springframework.stereotype.Component;
- @Component
- @ConfigurationProperties(prefix ="auth")
- @PropertySource("classpath:/author/authorA.properties")//
@PropertySource来指定自定义的资源目录 - //在启动类上取消掉@EnableConfigurationProperties注解,springboot1.5版本之后不需要@EnableConfigurationProperties注解了。
- public class MyWebConfig{
- private String name;
- private int age;
- public String getName() {
- return name;
- }
- public void setName(String name) {
- this.name = name;
- }
- public int getAge() {
- return age;
- }
- public void setAge(int age) {
- this.age = age;
- }
- }
- test.msg=Hello World SpringBoot
转载 springboot 配置读取的更多相关文章
- Java后端精选技术:SpringBoot配置读取
在早前的博客中曾经写过 Spring 程序通过 Bean 映射实现配置信息的读取. 在SpringBoot 框架中读取配置的方式变得非常多样,这导致读者在搜寻资料时反而容易迷糊. 到底,SpringB ...
- springboot用@Autowired和@PostConstruct注解把config配置读取到bean变成静态方法
springboot用@Autowired和@PostConstruct注解把config配置读取到bean变成静态方法 @SpringBootApplication public class Sen ...
- SpringBoot配置属性转载地址
SpringBoot配置属性系列 SpringBoot配置属性之MVC SpringBoot配置属性之Server SpringBoot配置属性之DataSource SpringBoot配置属性之N ...
- SpringBoot基础系列-SpringBoot配置
原创作品,可以转载,但是请标注出处地址:https://www.cnblogs.com/V1haoge/p/9990680.html SpringBoot基础系列-SpringBoot配置 概述 属性 ...
- springboot配置详解
springboot配置详解 Author:SimpleWu properteis文件属性参考大全 springboot默认加载配置 SpringBoot使用两种全局的配置文件,全局配置文件可以对一些 ...
- springboot配置server相关配置&整合模板引擎Freemarker、thymeleaf&thymeleaf基本用法&thymeleaf 获取项目路径 contextPath 与取session中信息
1.Springboot配置server相关配置(包括默认tomcat的相关配置) 下面的配置也都是模板,需要的时候在application.properties配置即可 ############## ...
- SpringBoot配置(1) 配置文件application&yml
SpringBoot配置(1) 配置文件application&yml 一.配置文件 1.1 配置文件 SpringBoot使用一个全局的配置文件,配置文件名是固定的. application ...
- SpringBoot配置属性之Migration
SpringBoot配置属性系列 SpringBoot配置属性之MVC SpringBoot配置属性之Server SpringBoot配置属性之DataSource SpringBoot配置属性之N ...
- spring boot 学习(十)SpringBoot配置发送Email
SpringBoot配置发送Email 引入依赖 在 pom.xml 文件中引入邮件配置: <dependency> <groupId>org.springframework. ...
随机推荐
- 深度学习RNN实现股票预测实战(附数据、代码)
背景知识 最近再看一些量化交易相关的材料,偶然在网上看到了一个关于用RNN实现股票预测的文章,出于好奇心把文章中介绍的代码在本地跑了一遍,发现可以work.于是就花了两个晚上的时间学习了下代码,顺便把 ...
- MySQL数据库索引(中)
上一篇回顾: 1.一个索引对应一颗B+树,所有的真实记录都是存在叶子节点里面的,所有的项目录都存在内节点或者说根节点上. 2.innodb会为我们的表格主键添加一个聚簇索引,如果没有主键的话数据库是会 ...
- jquery knob旋钮插件
<!DOCTYPE html> <html> <head> <title>jQuery Knob 尝试</title> <script ...
- node.js入门基础
内容: 1.node.js介绍 2.node.js内置常用模块 3.node.js数据交互 一.node.js介绍 (1)node.js特点 与其他语言相比,有以下优点: 对象.语法和JavaScri ...
- 关于json 转换BigDecimal精度丢失问题
今天在转换一个关于金额字段发现一个关于json转换的bug 目前尚未深入观察 问题: 如果金钱为bigdecimal json转换后不会丢失精度 但是通过@responsebody 返回到前端后发现 ...
- 外星人完事了,开始python的matplotlib玩转
外星人完事了,开始python的matplotlib玩转 看书上的例子,在win下安装比较麻烦 今天用pip尝试了一下 pip install matplotlib 然后等待即可 安装完毕后 在pyt ...
- three添加和移除对象
创建场景在第一章的地方就讲过怎么样创建一个最基本的场景,这里不重复了html:部分 <!doctype html><html lang="en"><h ...
- Linux下类似windows下_beginthread和_endthread 的多线程开发
在 windows下头文件中包含 #include<process.h> 就可以使用_beginthread进行线程创建.个人感觉挺方便的. 在linux下类似于_beginthread ...
- UI5-文档-4.1-Hello World!
如你所知,SAPUI5是关于HTML5的.让我们开始构建第一个仅使用HTML的“Hello World”. Preview 浏览器显示文本“Hello World” Coding 你可以在此查看和下载 ...
- Qt使用MSVC编译器不能正确显示中文的解决方案
用VisualStudio做为IDE,使用Qt框架,显示中文,会出现乱码的情况. 原因:MSVC编译器虽然可以正常编译带BOM的UTF-8编译的源文件,但是生成的可执行文件的编码是Windows本地字 ...