How to Install and Configure Bind 9 (DNS Server) on Ubuntu / Debian System
by Pradeep Kumar · Published November 19, 2017 · Updated November 19, 2017
DNS or Domain Name System, as we know is an internet service that is used to translate the user friendly domain into computer friendly IP addresses. Not only can we translate domain names to IP addresses, we can also perform reverse translation i.e. from IP addresses to domain name translations. In this tutorial, we are going to learn to setup a private DNS server by implementing BIND9 on Ubuntu/Debian system.
BIND or BIND 9 is an open source implementation of DNS, available for almost all Linux distributions. BIND stands Berkeley Internet Name Domain & it allows us to publish DNS information on internet as well as allows us to resolve DNS queries for the users. BIND is by far the most used DNS software on Internet. In this tutorial i will be using followings:
- Bind Server IP (Ubuntu / Debian) = 192.168.0.40
- Domain Name = linuxtechi.local
- Private Network = 192.168.0.0/24
So let’s start the tutorial with the installation on packages for BIND 9….
Installation of Bind 9 on Debian / Ubuntu System:
We need to install ‘bind9 bind9utils bind9-doc dnsutils’ to install BIND 9 & related tools. Open your terminal & execute the following command,
linuxtechi@bind-server:~$ sudo apt-get install bind9 bind9utils bind9-doc dnsutils
Configuration of bind 9 on Debian / Ubuntu System:
Once all the packages have been installed, we will move into the configuration part. All configuration files for BIND are located in folder ‘/etc/bind’.
One of the important configuration file for bind is “/etc/bind/named.conf.options“, from this file we can set the followings parameters:
- Allow Query to your dns from your private network (As the name suggests only the systems from your private network can query dns sever for name to ip translation and vice-versa)
- Allow recursive query
- Specify the DNS port ( 53)
- Forwarders (DNS query will be forwarded to the forwarders when your local DNS server is unable to resolve query)
As per my private network settings, I have specified the following parameters:
linuxtechi@bind-server:~$ sudo vi /etc/bind/named.conf.options

options {         directory "/var/cache/bind";         auth-nxdomain no;    # conform to RFC1035      // listen-on-v6 { any; };         listen-on port 53 { localhost; 192.168.0.0/24; };         allow-query { localhost; 192.168.0.0/24; };         forwarders { 8.8.8.8; };         recursion yes;         };
Next Important Configuration file is “/etc/bind/named.conf.local“, in this file we will define the zone files for our domain, edit the file add the following entries:
linuxtechi@bind-server:~$ cd /etc/bind

linuxtechi@bind-server:~$ sudo vi named.conf.local

zone    "linuxtechi.local"   {         type master;         file    "/etc/bind/forward.linuxtechi.local";  };

zone   "0.168.192.in-addr.arpa"        {        type master;        file    "/etc/bind/reverse.linuxtechi.local";  };
Save the file & exit. Here we have mentioned locations for our forward lookup zone file & reverse lookup zone files. Next we will create the mentioned forward & reverse zone files.
Firstly create the forward lookup zone file, Sample zone files (db.local) are already there in ‘/etc/bind folder‘, we can use and copy sample zone file,
linuxtechi@bind-server:/etc/bind$ sudo cp db.local forward.linuxtechi.local

linuxtechi@bind-server:/etc/bind$ sudo vi forward.linuxtechi.local

$TTL    604800

@       IN      SOA     primary.linuxtechi.local. root.primary.linuxtechi.local. (                               6         ; Serial                          604820         ; Refresh                           86600         ; Retry                         2419600         ; Expire                          604600 )       ; Negative Cache TTL

;Name Server Information

@       IN      NS      primary.linuxtechi.local.

;IP address of Your Domain Name Server(DNS)

primary IN       A      192.168.0.40

;Mail Server MX (Mail exchanger) Record

linuxtechi.local. IN  MX  10  mail.linuxtechi.local.

;A Record for Host names

www     IN       A       192.168.0.50

mail    IN       A       192.168.0.60

;CNAME Record

ftp     IN      CNAME    www.linuxtechi.local.
Your forward lookup file should look like something below:
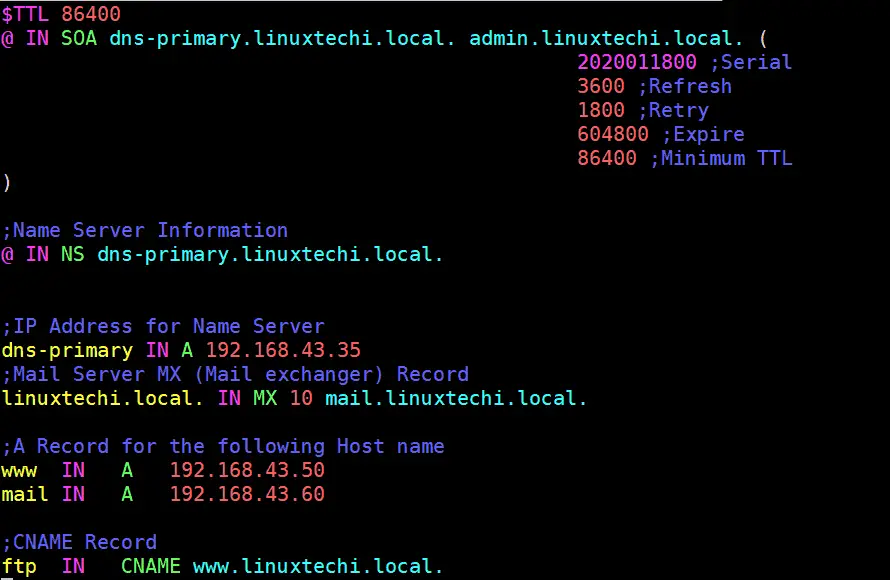
Here, we have added information regarding our DNS server & have also added A records for couple of servers, also added record for a mail server & CNAME record for ftp server. Make sure you edit this file to suit your network.
Next we will create a reverse lookup zone file at the same location,sample reverse lookup zone file is present at ‘/etc/bind‘ folder.
linuxtechi@bind-server:/etc/bind$ sudo cp db.127 reverse.linuxtechi.local

linuxtechi@bind-server:~$ sudo vi /etc/bind/reverse.linuxtechi.local

$TTL    604800

@       IN      SOA     linuxtechi.local. root.linuxtechi.local. (                              21         ; Serial                          604820         ; Refresh                           864500        ; Retry                         2419270         ; Expire                          604880 )       ; Negative Cache TTL

;Your Name Server Info

@       IN      NS      primary.linuxtechi.local.

primary IN      A       192.168.0.40

;Reverse Lookup for Your DNS Server

40      IN      PTR     primary.linuxtechi.local.

;PTR Record IP address to HostName

50      IN      PTR     www.linuxtechi.local.

60      IN      PTR     mail.linuxtechi.local.
Your Reverse Zone Lookup file should look like below:

Save file & exit. Now all we have to do is to restart the BIND service to implement the changes made,
linuxtechi@bind-server:~$ sudo systemctl restart bind9

linuxtechi@bind-server:~$ sudo systemctl enable bind9
Note:- In case OS firewall is running on your bind server then execute the below command to allow 53 port
linuxtechi@bind-server:~$ sudo ufw allow 53

Rule added

Rule added (v6)

linuxtechi@bind-server:~$
Validating Syntax of bind9 configuration and Zone files
If you want to cross verify the syntax of your bind 9 configuration file (named.conf.local). Use the command “named-checkconf“, example is shown below:
linuxtechi@bind-server:~$ sudo named-checkconf /etc/bind/named.conf.local

linuxtechi@bind-server:~$
If there is no syntax error in your bind configuration file, then it should return to shell without showing any errors.
To cross verify the syntax your forward and reverse lookup zone files , use the command “named-checkzone“, example is shown below:
linuxtechi@bind-server:~$ sudo named-checkzone linuxtechi.local /etc/bind/forward.linuxtechi.local

zone linuxtechi.local/IN: loaded serial 6

OK

linuxtechi@bind-server:~$

linuxtechi@bind-server:~$ sudo named-checkzone linuxtechi.local /etc/bind/reverse.linuxtechi.local

zone linuxtechi.local/IN: loaded serial 21

OK

linuxtechi@bind-server:~$
Testing the DNS server with dig & nslookup
To test out our BIND 9 DNS server, we will use another Ubuntu machine & will change its DNS to point out our DNS server. To change the DNS server, open ‘/etc/resol.conf‘ & make the following DNS entry,
linuxtechi@nixworld:~$ sudo vi /etc/resolv.conf

search linuxtechi.local

nameserver 192.168.0.40
save the file & exit. We now have our client ready with DNS pointing to our server. We will now use a CLI tool called ‘dig‘ command , which is used to get find out DNS & its related information. Execute the following command from terminal,
linuxtechi@nixworld:~$ dig primary.linuxtechi.local
& we should get the following output from the command,
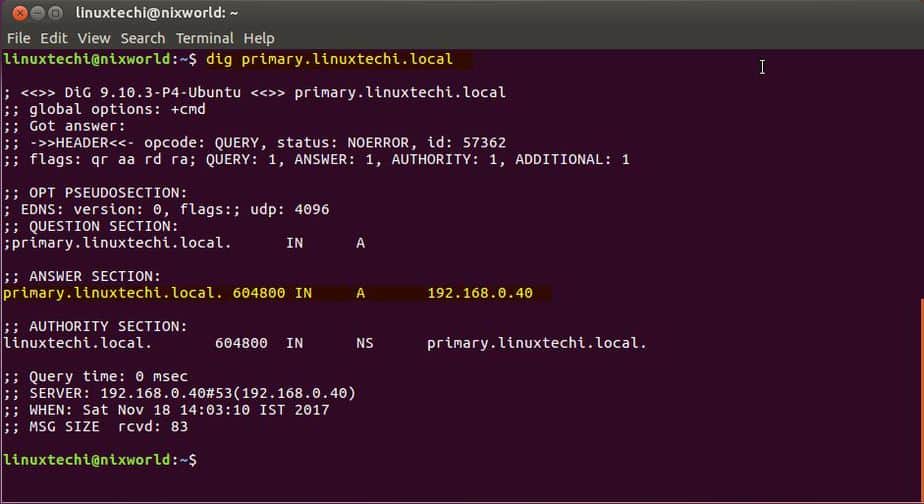
This output shows that our DNS is working fine.
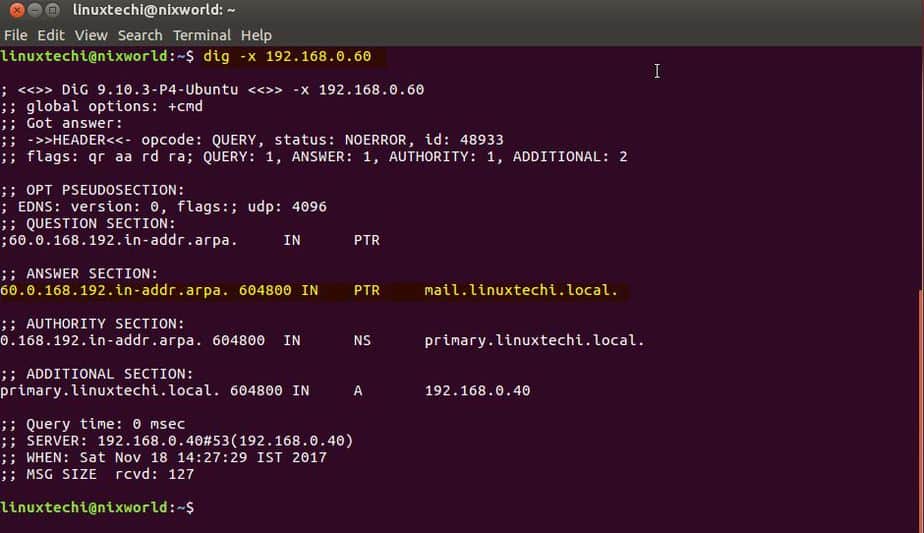
Let’s do reverse lookup query(PTR):
linuxtechi@nixworld:~$ dig -x 192.168.0.40
Output of command should be something like below:
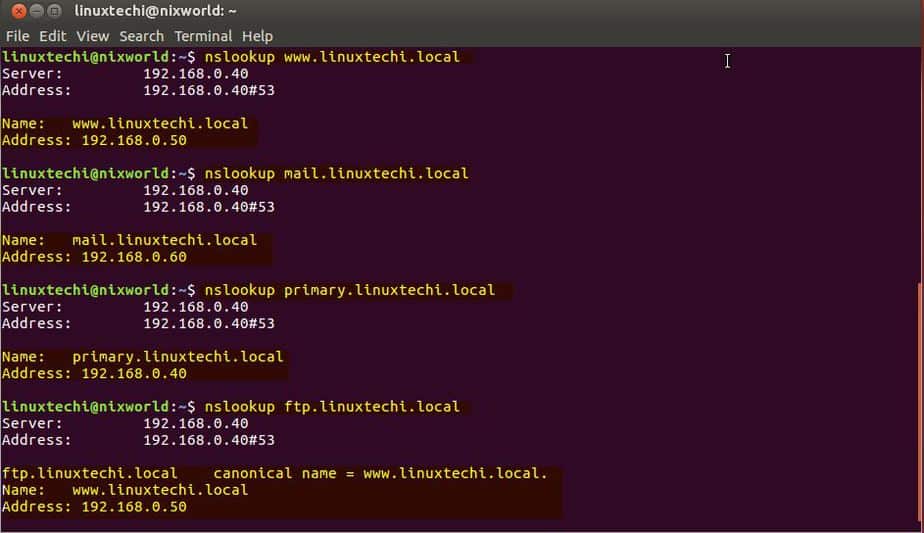
Also we can run ‘nslookup‘ command against our DNS server to confirm the output of dig command,
linuxtechi@nixworld:~$ nslookup primary.linuxtechi.local
& it should produce the following output,
Note:- While running dig command, if you get ‘command not found’ error than we need to install ‘dnsutils’ package as dig command is part of ‘dnsutils’ package,
linuxtechi@nixworld:~$ sudo apt-get install dnsutils -y
Now that our server is working fine, we can add other servers like mail server, ftp server or web servers to DNS server configuration files by creating the appropriate records as per requirement. Also we have only setup a local DNS server in this tutorial, if you need to setup a public DNS than you will require a Public IP address for the same.
With this we end our tutorial on how to install & configure DNS server on Ubuntu/Debian using BIND 9. Please do send your valuable feedback/queries to us, we will be happy to address them all.
How to Install and Configure Bind 9 (DNS Server) on Ubuntu / Debian System的更多相关文章
- install dns server on ubuntu
参考 CSDN/Ubuntu环境下安装和配置DNS服务器 在 Ubuntu 上安裝 DNS server Install BIND 9 on Ubuntu and Configure It for U ...
- Install guide for OpenLDAP and GOsa 2 on Ubuntu & Debian
First we will install OpenLDAP by running the command as root: apt-get install slapd ldap-utils ldap ...
- Install Nagios (Agent) nrpe client and plugins in Ubuntu/Debian
安装apt-get install nagios-nrpe-server nagios-plugins 修改nrpe.cfgvi /etc/nagios/nrpe.cfg修改Allow Host,添加 ...
- Install the high performance Nginx web server on Ubuntu
Look out Apache, there's a web server – Nginx (pronounced Engine X) – that means to dismantle you as ...
- Install and Configure OSSEC on Debian 7&8
Install and Configure OSSEC on Debian 7&8 Contributed by Sunday Ogwu-Chinuwa Updated Friday, Feb ...
- 使用Bind搭建DNS服务
DNS域名解析服务(Domain Name System)是用于解析域名与IP地址对应关系的服务,功能上可以实现正向解析与反向解析: 正向解析:根据主机名(域名)查找对应的IP地址. 反向解析:根据I ...
- centos DNS服务搭建 DNS原理 使用bind搭建DNS服务器 配置DNS转发 配置主从 安装dig工具 DHCP dhclient 各种域名解析记录 mydns DNS动态更新 第三十节课
centos DNS服务搭建 DNS原理 使用bind搭建DNS服务器 配置DNS转发 配置主从 安装dig工具 DHCP dhclient 各种域名解析记录 mydns DNS动态更 ...
- Bind搭建DNS服务
DNS域名解析服务(Domain Name System)是用于解析域名与IP地址对应关系的服务,功能上可以实现正向解析与反向解析: 正向解析:根据主机名(域名)查找对应的IP地址. 反向解析:根据I ...
- DNS解析原理与Bind部署DNS服务
DNS是什么? DNS(Domain Name System,域名系统)是互联网上最核心的带层级的分布式系统,它负责把域名转换为IP地址.反查IP到域名的反向解析以及宣告邮件路由等信息,使得基于域名提 ...
随机推荐
- video元素和audio元素
内容: 1.video元素 2.audio元素 注:这两个元素均是HTML5新增的元素 1.video元素 (1)用途 <video> 标签定义视频,比如电影片段或其他视频流 (2)标签属 ...
- 进度条 --- socket ---socketserver
TCP:可靠的面向连接的协议,传输效率低,全双工通信,流数据传输.运用:web浏览器,电子邮件,文件传输程序 UDP:不可靠的,无连接的服务,传输效率高,面向数据包的传输,只能发短消息.运用:dns ...
- 手机app/h5页面http请求抓包调试
1.抓包机器跟客户端手机连上同一wifi热点,最好是第三者提供的移动wifi,公司内网wifi网络访问有限制. 2.设置手机客户端http代理 三者关系图示:
- UnicodeDecodeError: 'gbk' codec can't decode byte 0xae in position 120: illegal multibyte sequence
UnicodeDecodeError: 'gbk' codec can't decode byte 0xae in position 120: illegal multibyte sequence f ...
- OpenACC 书上的范例代码(Jacobi 迭代),part 3
▶ 使用Jacobi 迭代求泊松方程的数值解 ● 使用 data 构件,强行要求 u0 仅拷入和拷出 GPU 各一次,u1 仅拷入GPU 一次 #include <stdio.h> #in ...
- 去除android手机浏览器中, 按住链接出现border的情况
body{ -moz-user-select:none; -webkit-user-select:none; -webkit-tap-highlight-color:transparent; }
- 返回顶部 fixed oncheck(点击按钮)
<!DOCTYPE html> <html lang="en"> <head> <meta charset="UTF-8&quo ...
- ABAP-长文本处理
- SOA和微服务到底是什么关系
本文原创,原文地址为:http://www.cnblogs.com/fengzheng/p/5847441.html SOA和微服务到底是什么关系? 说实话,我确实不明白SOA和微服务到底有什么本质上 ...
- mongodb基础学习6-用户管理
下面来说一下用户管理,前面对mongodb进行操作都无需用户名密码进行登陆,可以设置用户进行数据库的访问 添加用户:三个参数:用户名,密码,是否只读 开启权限验证 进行验证 修改密码 删除用户 用户角 ...