小细节--Extjs中,renderTo 和applyTo的区别
说到web前端框架,extjs绝对算是非常优秀的一个。
extjs中,两个方法很像,renderTo和applyTo,我在网上也搜了很多相关的内容,在这里举例为大家进行区分,欢迎大家交流指正。
主要区分内容:比较renderTo和applyTo在显示和渲染生成代码上的异同。
使用方法:使用嵌套的div层,分别用renderTo和applyTo方法进行渲染。
js代码:
<script type="text/javascript">

        Ext.onReady(function () {

            var button1 = new Ext.Button({

                renderTo: 'top',

                text: 'top'

            });

            var button2 = new Ext.Button({

                applyTo: 'center',

                text: 'center'

            });

            var button3 = new Ext.Button({

                applyTo: 'bottom1',

                text: 'bottom1'

            });

        })

    </script>
HTML代码:
<body>

    <div id="top" style=" background-color:red; width:100px;height:100px; ">top</div>

    <div id="center" style=" background-color:Blue; width:100px;height:100px; ">center</div>

    <div id="bottom" style=" background-color:Green; width:100px;height:100px; " >bottom

        <div id="bottom1" style="background-color:Yellow; width:60px;height:20px;">bottom1</div>

        <div id="bottom2" style="background-color:Orange;width:60px;height:20px;">bottom2</div>

    </div>

</body>
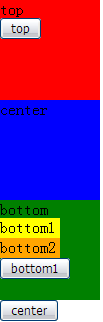
网页效果:
简单总结:
由生成的效果我们可以看出:
1.renderTo生成的控件,是在指定的节点下生成,并且顺序排列在此节点内所有的元素之后。
2.applyTo生成的控件,是在指定的节点的父节点下生成,并且顺序排列在此节点的父节点所有元素之后。
代码验证:
生成的页面代码:
<body class=" ext-safari" id="ext-gen13">
<div id="top" style=" background-color:red; width:100px;height:100px; ">top
<table border="0" cellpadding="0" cellspacing="0" class="x-btn-wrap x-btn" id="ext-comp-1001" style="width: auto;">
<tbody>
<tr>
<td class="x-btn-left"><i> </i></td><td class="x-btn-center">
<em unselectable="on"><button class="x-btn-text" type="button" id="ext-gen7">top</button></em>
</td><td class="x-btn-right"><i> </i></td>
</tr>
</tbody>
</table> </div> <div id="center" style=" background-color:Blue; width:100px;height:100px; ">center</div>
<div id="bottom" style=" background-color:Green; width:100px;height:100px; ">bottom
<div id="bottom1" style="background-color:Yellow; width:60px;height:20px;">bottom1</div>
<div id="bottom2" style="background-color:Orange;width:60px;height:20px;">bottom2</div>
<table border="0" cellpadding="0" cellspacing="0" class="x-btn-wrap x-btn" id="ext-comp-1003" style="width: auto;">
<tbody>
<tr>
<td class="x-btn-left"><i> </i></td><td class="x-btn-center">
<em unselectable="on"><button class="x-btn-text" type="button" id="ext-gen22">bottom1</button></em>
</td><td class="x-btn-right"><i> </i></td>
</tr>
</tbody>
</table>
</div> <table border="0" cellpadding="0" cellspacing="0" class="x-btn-wrap x-btn" id="ext-comp-1002" style="width: auto;">
<tbody>
<tr>
<td class="x-btn-left"><i> </i></td><td class="x-btn-center">
<em unselectable="on"><button class="x-btn-text" type="button" id="ext-gen15">center</button></em>
</td><td class="x-btn-right"><i> </i></td>
</tr>
</tbody>
</table>
</body>
小细节--Extjs中,renderTo 和applyTo的区别的更多相关文章
- Android Studio ---------------- 软件使用小细节(更新中。。。。。。)
###鼠标放到相关类或方法等上,没有提示. *解决方法:File----Setting-----Editor-----General------Show quik documentation on m ...
- ExtJs4学习(四):Extjs 中id与itemId的区别
为了方便表示或是指定一个组件的名称,我们通常会使用id或者itemId进行标识命名.(推荐尽量使用itemId,这样可以减少页面唯一标识而产生的冲突) id: id是作为整个页面的Compo ...
- 【转载】Extjs 中id与itemId的区别
为了方便表示或是指定一个组件的名称,我们通常会使用id或者itemId进行标识命名.(推荐尽量使用itemId,这样可以减少页面唯一标识而产生的冲突) id: id是作为整个页面的Com ...
- 17.EXTJs 中icon 与iconCls的区别及用法!
转自:https://blog.csdn.net/u013890437/article/details/38315717?utm_source=blogxgwz7
- ASP.NET MVC 自定义路由中几个需要注意的小细节
本文主要记录在ASP.NET MVC自定义路由时,一个需要注意的参数设置小细节. 举例来说,就是在访问 http://localhost/Home/About/arg1/arg2/arg3 这样的自定 ...
- C++在使用Qt中SLOT宏须要注意的一个小细节
大家都知道C++虚函数的机制,对于基类定义为虚函数的地方,子类假设覆写,在基类指针或者引用来指向子类的时候会实现动态绑定. 但假设指针去调用非虚函数,这个时候会调用C++的静态绑定,去推断当前的指针是 ...
- C++在使用Qt中SLOT宏需要注意的一个小细节
大家都知道C++虚函数的机制,对于基类定义为虚函数的地方,子类如果覆写,在基类指针或者引用来指向子类的时候会实现动态绑定. 但如果指针去调用非虚函数,这个时候会调用C++的静态绑定,去判断当前的指针是 ...
- ArrayList中的一些小细节@JDK8
ArrayList中的一些小细节@JDK8 protected transient int modCount = 0; 该变量用于记录ArrayList的版本号,不可被序列化,每次对ArrayList ...
- Extjs中Store小总结
http://blog.csdn.net/without0815/article/details/7798170 1.什么是store? Store类似于一个本地仓库(即数据存储器),包括有 Arra ...
随机推荐
- POJ-1003&1004
这两题比较简单,就不做分析了,描述下题目,就上代码吧. [题目描述] 1003,其实就是求这个方程的最小n:1/2 + 1/3 + 1/4 + ... + 1/(n + 1) >= c: 100 ...
- 服务器端开发(Python/C++)-今日头条-拉勾网-最专业的互联网招聘平台
服务器端开发(Python/C++)-今日头条-拉勾网-最专业的互联网招聘平台 服务器端开发(Python/C++)
- ckeditor3.4.2是否升级为4.2.1的问题
ckeditor官网访问地址: http://ckeditor.com/demo 目前公司项目中用到富文本编辑器基本都是cheditor3.4.2, 在不修改其源码的情况下,不兼容于IE10,具体见& ...
- 第二种:NSObject
- (void)viewDidLoad { [super viewDidLoad]; /** * 开启子线程的方式之一:NSObject */ // 第一个参数:selector // 第二个参数:方 ...
- Runtime.getRuntime().exec中命令含有括号问题
在写批量运行bat工具的时候.想起了之前写的定时小工具里面的运行方法. 使用Runtime.getRuntime().exec方法. Runtime.getRuntime().exec("c ...
- iOS中正确的截屏姿势
昨天写了个用到截屏功能的插件,结果问题不断,今天终于解决好了,把debug过程中所有尝试过的截屏方法都贴出来吧- 第一种 这是iOS 3时代开始就被使用的方法,它被废止于iOS 7.iOS的私有方法, ...
- STL之stack
一.stack(栈) 栈:LIFO 后进先出: 首先要指出的是,stack并非和STL的其他类模板是独立的容器,stack是自适应容器(容器适配器) stack<int, deque<in ...
- linux添加、修改环境变量
比如要把/etc/apache/bin目录添加到PATH中,方法有三: 1.In shell: setenv <path_to_append>: $ENVNAME setenv PATH ...
- list,map的疑问
代码: package com.wyl; import java.util.ArrayList; import java.util.HashMap; import java.util.Iterator ...
- Python 第十一篇:开发堡垒机
一:SqlAlchemy ORM ORM:Object Relational Mapping 对象关系映射是一种程序技术,用于实现面向对象编程语言里不同类型系统的数据之间的转换 SQLAlchemy是 ...