
Junit 学习
一. 断言核心方法
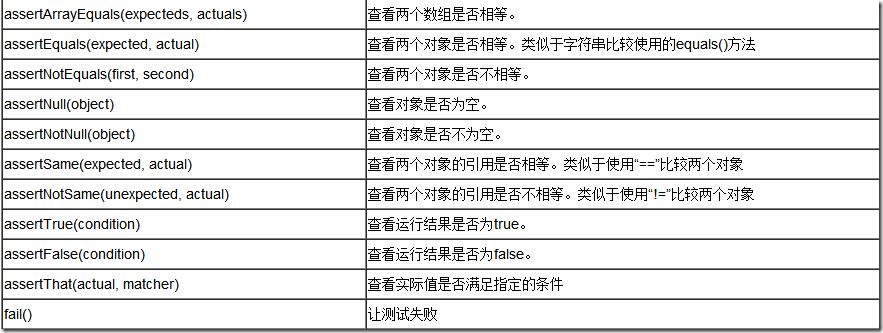
示例代码:
package com.test;

import org.junit.Assert;

import org.junit.Test;

/**

* @Title: testAssert.java

* @Package com.test

* @Description: junit中常见的断言

* @author lky

* @date 2015年10月17日 上午9:15:59

* @version V1.0

 */

public class testAssert {

    /**

    * @Title: testAssertByteArrayEqual

    * @Description: 判断字节数组是否相等

     */

    @Test

    public void testAssertByteArrayEqual(){

        Assert.assertArrayEquals("byteArray fail to equal ", "lky".getBytes(),"lky".getBytes());

    }

    /**

    * @Title: testAssertEqual

    * @Description: 判断两个对象是否相等,只比较值,不比较它们的地址,类似于java中的equal的比较

     */

    @Test

    public void testAssertEqual(){

        Assert.assertEquals("fail to equql", 50,50);

    }

    @Test

    public void testAssertNotEqual(){

        Assert.assertNotEquals("should be not equal",50,49);

    }

    /**

    * @Title: testAssertNotNull

    * @Description: 判断一个对象是否为空

     */

    @Test

    public void testAssertNotNull(){

        Assert.assertNotNull("should be not null", new Object());

    }

    @Test

    public void testAssertNull(){

        Assert.assertNull("should be null", null);

    }

    /**

    * @Title: testAssertSame

    * @Description: 判断两个对象是否相等,包括值和地址,类似于java中的=

     */

    @Test

    public void testAssertSame(){

        Integer number=Integer.valueOf(10);

        Assert.assertSame("should be same",number ,number);

    }

    @Test

    public void testAssertNotSame(){

        Assert.assertNotSame("should be not same", new Object(), new Object());

    }

}
二.注解核心方法
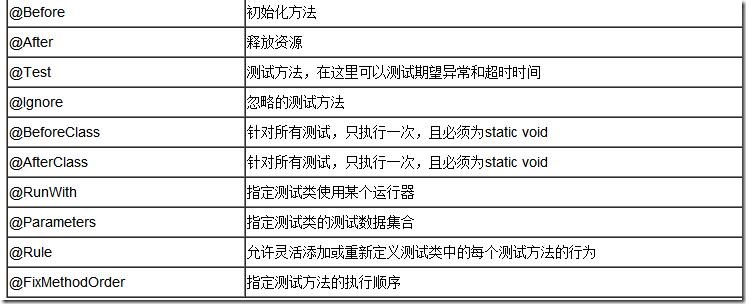
- 执行顺序
一个测试类单元测试的执行顺序为:
@BeforeClass –> @Before –> @Test –> @After –> @AfterClass
- 每一个测试方法的调用顺序为:
@Before –> @Test –> @After
示例代码:
package com.test;

import org.junit.After;

import org.junit.AfterClass;

import org.junit.Assert;

import org.junit.Before;

import org.junit.BeforeClass;

import org.junit.Ignore;

import org.junit.Test;

/**

* @Title: testAnnotation.java

* @Package com.test

* @Description: junit测试中注解测试

* @author lky

* @date 2015年10月17日 上午9:36:39

* @version V1.0

 */

public class testAnnotation {

    private static Demo demo=null;

    /**

    * @Title: testBeforeClass

    * @Description: 在该类加载时运行,有且仅仅执行一次

     */

    @BeforeClass

    public static void testBeforeClass(){

        demo=new Demo();

        System.out.println("Test --------->testBeforeClass");

    }

    /**

    * @Title: testBefore

    * @Description: 在每一个测试执行前,自动被调用

     */

    @Before

    public void testBefore(){

        System.out.println("Test---------->testBefore");

    }

    /**

    * @Title: testAdd

    * @Description: 真正去做测试的代码

     */

    @Test

    public void testAdd(){

        Assert.assertEquals(5, demo.add(2, 3));

    }

    /**

    * @Title: testAdd1

    * @Description: ignore表示忽略该测试

     */

    @Ignore

    @Test

    public void testAdd1(){

         Assert.assertEquals(4, demo.add(2, 2));

    }

    /**

    * @Title: testAfter

    * @Description: 每一个测试执行结束后会被调用

     */

    @After

    public void testAfter(){

        System.out.println("Test----------->testAfter");

    }

    /**

    * @Title: testAfterClass

    * @Description: 所有测试执行结束以后,执行(有且执行一次)

     */

    @AfterClass

    public static void testAfterClass(){

        System.out.println("Test------------>testAfterClass");

    }

}
三.参数化测试
有时一个测试方法,不同的参数值会产生不同的结果,那么我们为了测试全面,会把多个参数值都写出来并一一断言测试,这样有时难免费时费力,这是我们便可以采用参数化测试来解决这个问题。参数化测试就好比把一个“输入值,期望值”的集合传入给测试方法,达到一次性测试的目的。
示例代码:
package com.test;

public class Demo {

    public int add(int a,int b){

        return a+b;

    }

}
package com.test;

import java.util.Arrays;

import java.util.Collection;

import org.junit.Assert;

import org.junit.BeforeClass;

import org.junit.Test;

import org.junit.runner.RunWith;

import org.junit.runners.Parameterized;

import org.junit.runners.Parameterized.Parameters;

/**

* @Title: testParam.java

* @Package com.test

* @Description: 多组数据的单元测试(参数化测试)

* @author lky

* @date 2015年10月17日 上午9:20:54

* @version V1.0

 */

//不使用junit默认的运行器,指定特定的运行器

@RunWith(Parameterized.class)

public class testParam {

    private int expected;

    private int input1;

    private int input2;

    private static  Demo demo;

    public testParam(int expected,int input1,int input2) {

        this.expected=expected;

        this.input1=input1;

        this.input2=input2;

    }

    /**

    * @Title: initData

    * @Description: 测试数据初始化

    * @param @return    设定文件

    * @return Collection<? extends Object>    返回类型

    * @throws

     */

    @Parameters(name="第 {index} 组:-------> {1} + {2} = {0}")

    public static Collection<?extends Object> initData(){

        return Arrays.asList(new Object [][]{{3,2,1},{5,-1,6},{-7,-3,-4},{7,3,4}});

    }

    @BeforeClass

    public static void loadUp(){

        demo=new Demo();

    }

    @Test

    public void testAdd(){

        Assert.assertEquals("should be equal", this.expected, demo.add(this.input1, this.input2));

    }

}
四.异常测试
示例代码:
package com.test;

import java.util.ArrayList;

import java.util.List;

import org.junit.Assert;

import org.junit.Rule;

import org.junit.Test;

import org.junit.rules.ExpectedException;

/**

 *

* @Title: testException.java

* @Package com.test

* @Description: 异常测试(两种方法)

* @author lky

* @date 2015年10月17日 上午10:00:32

* @version V1.0

 */

public class testException {

    @Test(expected=IndexOutOfBoundsException.class)

    public void empty(){

        new ArrayList<Object>().get(0);

    }

    @Rule

    public ExpectedException thrown=ExpectedException.none();

    @Test

    public void shouldTestExceptionMessage() throws IndexOutOfBoundsException {

        List<?extends Object> list=new ArrayList<Object>();

        thrown.expectMessage("Index: 0, Size: 0");

        thrown.expect(IndexOutOfBoundsException.class);

        list.get(0);

        Assert.assertEquals(1, list.get(0));

    }

}
五.超时测试
有时为了防止出现死循环或者方法执行过长(或检查方法效率),而需要使用到限时测试。顾名思义,就是超出设定时间即视为测试失败。共有两种写法
示例代码:
package com.test;

import org.junit.Rule;

import org.junit.Test;

import org.junit.rules.Timeout;

/**

* @Title: testTimeOut.java

* @Package com.test

* @Description: 超时测试

* @author lky

* @date 2015年10月17日 上午9:58:18

* @version V1.0

 */

public class testTimeOut {

    //定义被测试方法的时间参数,

    @Rule

    public Timeout timeout=new Timeout(10000);

    @Test

    public void test(){

    }

    @Test(timeout=10000)

    public void test1(){

    }

}
六.打包测试
如果一个项目中有很多个测试用例,如果一个个测试也很麻烦,因此打包测试就是一次性测试完成包中含有的所有测试用例。
示例代码:
package com.test;

import org.junit.runner.RunWith;

import org.junit.runners.Suite;

import org.junit.runners.Suite.SuiteClasses;

/**

* @Title: testSuite.java

* @Package com.test

* @Description: 打包测试

* @author lky

* @date 2015年10月17日 上午10:05:25

* @version V1.0

 */

@RunWith(Suite.class)

@SuiteClasses({testAnnotation.class,testAssert.class,testParam.class,testException.class,testTimeOut.class})

public class testSuite {

}
七.Spring框架中的使用
Junit 学习的更多相关文章
- 积极主动敲代码,使用Junit学习Java程序设计
积极主动敲代码,使用JUnit学习Java 早起看到周筠老师在知乎的回答软件专业成绩很好但是实际能力很差怎么办?,很有感触. 从读大学算起,我敲过不下100本程序设计图书的代码,我的学习经验带来我的程 ...
- JUnit学习
很早以前就知道JUnit也知道它用来做单元测试.今天突然又想到还是要学一下这个JUnit,不然说出去不知道怎么用JUnit做单元测试……作为一个程序员怪丢人的.第一篇JUnit不算是一个总结性的文章, ...
- JUnit 学习资料
JUnit 学习资料 网址 JUnit 入门教程(极客学院) http://wiki.jikexueyuan.com/project/junit/ 官方网站 https://junit.org/jun ...
- Junit 学习笔记
目录 Junit 学习笔记 1. 编写测试用例时需要注意 2. 出现结果分析 3. Junit 运行流程 4. Junit 常用注解 5. Junit 测试套件的使用 6. Junit 参数化设置 J ...
- Junit 学习1 junit的简单使用
package junit; import java.sql.Connection; import java.sql.SQLException; import org.junit.Test; impo ...
- junit学习笔记
junit编程规范 测试方法上必须使用@Test进行修饰 测试方法必须使用public void 进行修饰,不能带任何的参数 新建一个源代码目录 测试类的包应该和被测试类保持一致 测试单元中的每个方法 ...
- junit学习(3.x)
自动化测试 测试所有测试类 import junit.framework.TestCase; import junit.framework.Assert; /** *测试类必须要继承TestCase类 ...
- JUnit学习总结
Junit简介: Junit最初是由Erich Gamma 和 Kent Beck 编写的一个回归测试框架(regression testing framework),为单元测试(Unit Test) ...
- junit学习笔记(二):hamcrest和TestSuit
1. hamcrest hamcrest可以有效增加junit的测试能力,用一些对通俗语言来进行测试. Hamcrest 是一个测试的框架,它提供了一套通用的匹配符 Matcher,灵活使用这些匹配符 ...
随机推荐
- jQuery 對table的基本操作
一.鼠标移动到行更换背景色: css样式: .hover{ background-color: #cccc00; } Js脚本: $(document).ready(function () { //鼠 ...
- 子查询in和表连接效率
在数据查询时,尽量减少in子查询而使用表连接的方式进行,效率更高.
- ssh链接云主机的一些笔记
在window下 试了好几个ssh软件后用了putty,因为它免费而且中文不乱码 1.实现自动登陆功能 用快捷方式实现自动登陆 首先创建putty.exe的快捷方式到桌面:然后运行putty,输入ho ...
- csv操作帮助类
功能描述: 集合转换为csv数据 DataSe转换为csv数据 using System; using System.Collections.Generic; using System.Data; u ...
- 配置PPTP服务器
1.验证内核是否加载了MPPE模块: modprobe ppp-compress-18 && echo MPPE is ok 2.安装所需的软件包: yum -y install pp ...
- C# Html网页生成图片解决方案1
1.使用System.Windows.Forms命名空间下的WebBrowser控件加载网页并生成图片 GiHub参考地址: https://github.com/tianma3798/FileOpa ...
- [转]MySQL数据库的热备份
一.系统环境描述: 1.两台数据库服务器,A和B: 2.当前A正在使用,将作为主服务器,B为准备用来做备用数据库服务器: 3.要进行热备份的数据库中含有类型为MyISAM ...
- timestamp 正常日期转换成时间戳格式
select cast(sysdate as timestamp) "DATE" from dual select to_timestamp(to_date(sysdate, 'y ...
- nginx+tomcat+memcached搭建服务器集群及负载均衡
在实际项目中,由于用户的访问量很大的原因,往往需要同时开启多个服务器才能满足实际需求.但是同时开启多个服务又该怎么管理他们呢?怎样实现session共享呢?下面就来讲一讲如何使用tomcat+ngin ...
- Oracle数据库名、实例名、数据库域名、全局数据库名、服务名之间的区别
数据库名.实例名.数据库域名.全局数据库名.服务名 这是几个令很多初学者容易混淆的概念.相信很多初学者都与我一样被标题上这些个概念搞得一头雾水.我们现在就来把它们弄个明白. 一.数据库名 什么是数据库 ...