Spring boot 多模块项目 + Swagger 让你的API可视化
Spring boot 多模块项目 + Swagger 让你的API可视化
前言
手写 Api 文档的几个痛点:
- 文档需要更新的时候,需要再次发送一份给前端,也就是文档更新交流不及时。
- 接口返回结果不明确
- 不能直接在线测试接口,通常需要使用工具,比如postman
- 接口文档太多,不好管理
为了前后台更好的对接,为了以后交接方便,为了不再长篇大论的手写 api 文档,那么就来用Swagger吧(不是打广告,确实强),它可以轻松的整合到 Spring 中,它既可以减少我们手写 api 文档的时间,同时又将说明文档整合到我们的代码中,这样前台看着也方便,后台工作也舒坦。
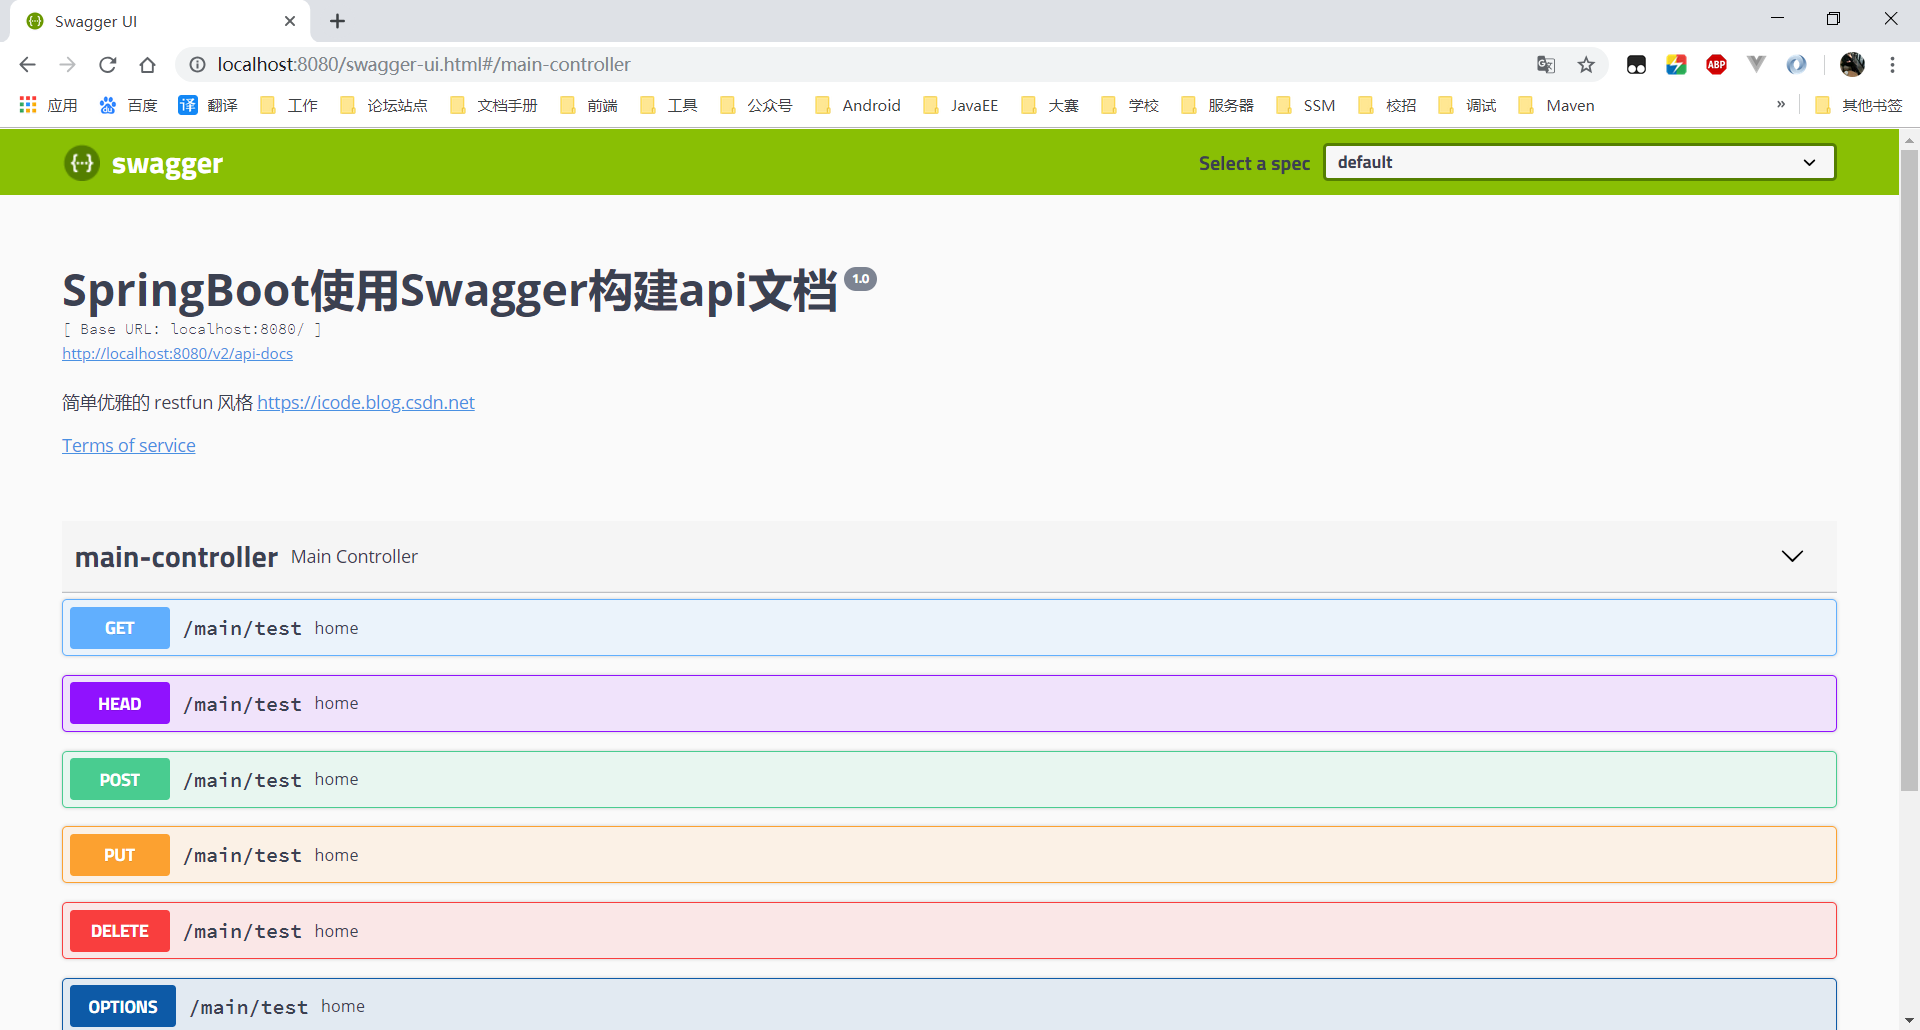
Swagger 是一个规范和完整的框架,用于生成、描述、调用和可视化 RESTful 风格的 Web 服务。总体目标是使客户端和文件系统作为服务器以同样的速度来更新。文件的方法,参数和模型紧密集成到服务器端的代码,允许API来始终保持同步。Swagger 让部署管理和使用功能强大的API从未如此简单(其他好处网上自己搜在这里就不再多说了)。
官网地址: https://swagger.io/
本篇内容:
(1)构建多模块项目(可选单模块步骤)
(2)pom.xml 配置加载依赖
(3)Swagger 配置类(Bean)
(4)启动类配置
(5)创建工具类
(6)User 实例类
(7)定义 restful 接口(Controller 层)
为帮助快速入门上手使用,提供了简单的增删改查,使用的参数配置示例
本篇测试环境:
- SpringBoot 2.0.5.RELEASE
- Swagger 2.9.2
- JDK 1.8.191
成功截图:
第一步:构建多模块项目(可选步骤)
如果想使用多模块,请先构建项目(建议):
如果不想使用多模块(下面模块请根据自己项目修改)
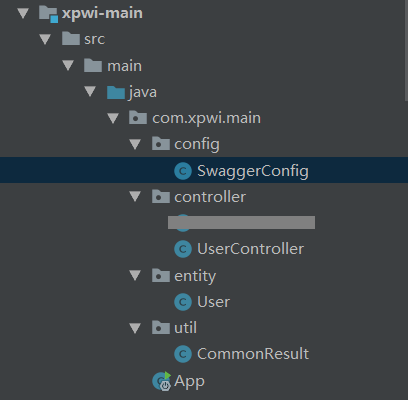
所有涉及到的文件结构:
第二步:pom.xml 配置加载依赖
Spring boot 项目都会有一些依赖,为了更直观,只贴必要的部分
为你的 Spring Boot 项目再增加下面两个依赖:
pom.xml 配置:
<!--可以去下面地址查看最近版本-->

<!-- https://mvnrepository.com/artifact/io.springfox/springfox-swagger2 -->

<dependency>

  <groupId>io.springfox</groupId>

  <artifactId>springfox-swagger2</artifactId>

  <version>2.9.2</version>

</dependency>

<!-- https://mvnrepository.com/artifact/io.springfox/springfox-swagger-ui -->

<dependency>

  <groupId>io.springfox</groupId>

  <artifactId>springfox-swagger-ui</artifactId>

  <version>2.9.2</version>

</dependency>
第三步:Swagger 配置类(Bean)
注意:
- basePackage 是需要自己配置的,换成自己需要扫描的包,会扫描其所有子包
- 一个就配主模块,多个就配大包,或分开配
用 @Configuration 注解该类,等价于XML中配置beans;
用 @Bean 标注方法等价于XML中配置bean
不是不可以使用 xml,提倡使用注解,是不是想起点什么?
SwaggerConfig.java 源代码:
package com.xpwi.main.config;

import org.springframework.context.annotation.Bean;

import org.springframework.context.annotation.Configuration;

import springfox.documentation.builders.ApiInfoBuilder;

import springfox.documentation.builders.PathSelectors;

import springfox.documentation.builders.RequestHandlerSelectors;

import springfox.documentation.service.ApiInfo;

import springfox.documentation.spi.DocumentationType;

import springfox.documentation.spring.web.plugins.Docket;

/**

 * 描述:Swagger2 Config Bean

 *

 * @author Xiao Pengwei

 * @since 2019-03-27

 */

@Configuration

public class SwaggerConfig {

    @Bean

    public Docket createRestApi() {

        return new Docket(DocumentationType.SWAGGER_2)

                .apiInfo(apiInfo())

                .select()

                .apis(RequestHandlerSelectors.basePackage("com.xpwi"))

                .paths(PathSelectors.any())

                .build();

    }

    private ApiInfo apiInfo() {

        return new ApiInfoBuilder()

                .title("SpringBoot使用Swagger构建api文档")

                .description("简单优雅的 restfun 风格 https://icode.blog.csdn.net")

                .termsOfServiceUrl("https://icode.blog.csdn.net")

                .version("1.0")

                .build();

    }

}
第四步:启动类配置
Application.class 加上注解 @EnableSwagger2 表示开启Swagger
package com.xpwi.main;

import org.springframework.boot.SpringApplication;

import org.springframework.boot.autoconfigure.SpringBootApplication;

import org.springframework.context.annotation.ComponentScan;

import org.springframework.web.bind.annotation.RestController;

import springfox.documentation.swagger2.annotations.EnableSwagger2;

import java.util.Date;

/**

 * 描述:Spring Boot 多模块测试项目

 * @author Xiao Pengwei

 * @since  2019-03-25

 */

@EnableSwagger2

@SpringBootApplication

@RestController

//扫描 main,test 模块中的下的所有包

//在 pom 加载子模块依赖才可以扫包

@ComponentScan({"com.xpwi.main","com.xpwi.test","com.xpwi.login"})

public class App {

    public static void main(String[] args) {

        //启动 Web 容器

        SpringApplication.run(App.class, args);

        System.out.println("[启动成功]"+new Date());

    }

}
第五步:创建工具类
用于返回通用数据格式的工具类
CommonResult.java 源代码:
package com.xpwi.main.util;

/**

 * 描述:通用返回类型

 * @author Xiao Pengwei

 * @since  2019-03-27

 */

public class CommonResult {

    private String status;

    private Object result;

    private Object message;

    public String getStatus() {

        return status;

    }

    public void setStatus(String status) {

        this.status = status;

    }

    public Object getResult() {

        return result;

    }

    public void setResult(Object result) {

        this.result = result;

    }

    public Object getMessage() {

        return message;

    }

    public void setMessage(Object message) {

        this.message = message;

    }

}
第六步:User 实例类
User 模拟对应数据库字段的实体类
User.java 源代码:
package com.xpwi.main.entity;

import java.util.Date;

/**

 * 描述:User 实体类

 * @author Xiao Pengwei

 * @since  2019-03-27

 */

public class User {

    private String id;

    private String username;

    private int age;

    private Date ctm;

    public String getId() {

        return id;

    }

    public void setId(String id) {

        this.id = id;

    }

    public String getUsername() {

        return username;

    }

    public void setUsername(String username) {

        this.username = username;

    }

    public int getAge() {

        return age;

    }

    public void setAge(int age) {

        this.age = age;

    }

    public Date getCtm() {

        return ctm;

    }

    public void setCtm(Date ctm) {

        this.ctm = ctm;

    }

}
第七步:!定义 restful 接口(Controller 层)
最重要的一步,也是开发中最常用的一步
创建 UserController.java 源代码:
package com.xpwi.main.controller;
import com.xpwi.main.entity.User;
import com.xpwi.main.util.CommonResult;
import io.swagger.annotations.Api;
import io.swagger.annotations.ApiImplicitParam;
import io.swagger.annotations.ApiImplicitParams;
import io.swagger.annotations.ApiOperation;
import org.springframework.http.ResponseEntity;
import org.springframework.web.bind.annotation.PathVariable;
import org.springframework.web.bind.annotation.RequestBody;
import org.springframework.web.bind.annotation.RequestMapping;
import org.springframework.web.bind.annotation.RequestMethod;
import org.springframework.web.bind.annotation.RestController;
import springfox.documentation.annotations.ApiIgnore;
import java.util.ArrayList;
import java.util.Collections;
import java.util.HashMap;
import java.util.List;
import java.util.Map;
/**
* 描述:Controller 类
* @author Xiao Pengwei
* @since 2019-03-27
*/
@RestController
@Api(value = "用户测试模块")
public class UserController {
// 创建线程安全的Map
static Map<String, User> users = Collections.synchronizedMap(new HashMap<String, User>());
/**
* 根据ID查询用户
* @param id
* @return
*/
@ApiOperation(value="获取用户详细信息", notes="根据url的id来获取用户详细信息")
@ApiImplicitParam(name = "id", value = "用户ID", required = true, dataType = "String", paramType = "path")
@RequestMapping(value = "user/{id}", method = RequestMethod.GET)
public ResponseEntity<CommonResult> getUserById (@PathVariable(value = "id") String id){
CommonResult commonResult = new CommonResult();
try {
User user = users.get(id);
commonResult.setResult(user);
commonResult.setStatus("ok");
} catch (Exception e) {
commonResult.setResult(e.getClass().getName() + ":" + e.getMessage());
commonResult.setStatus("error");
e.printStackTrace();
}
return ResponseEntity.ok(commonResult);
}
/**
* 查询用户列表
* @return
*/
@ApiOperation(value="获取用户列表", notes="获取用户列表")
@RequestMapping(value = "users", method = RequestMethod.GET)
public ResponseEntity<CommonResult> getUserList (){
CommonResult commonResult = new CommonResult();
try {
List<User> userList = new ArrayList<User>(users.values());
commonResult.setResult(userList);
commonResult.setStatus("ok");
} catch (Exception e) {
commonResult.setResult(e.getClass().getName() + ":" + e.getMessage());
commonResult.setStatus("error");
e.printStackTrace();
}
return ResponseEntity.ok(commonResult);
}
/**
* 添加用户
* @param user
* @return
*/
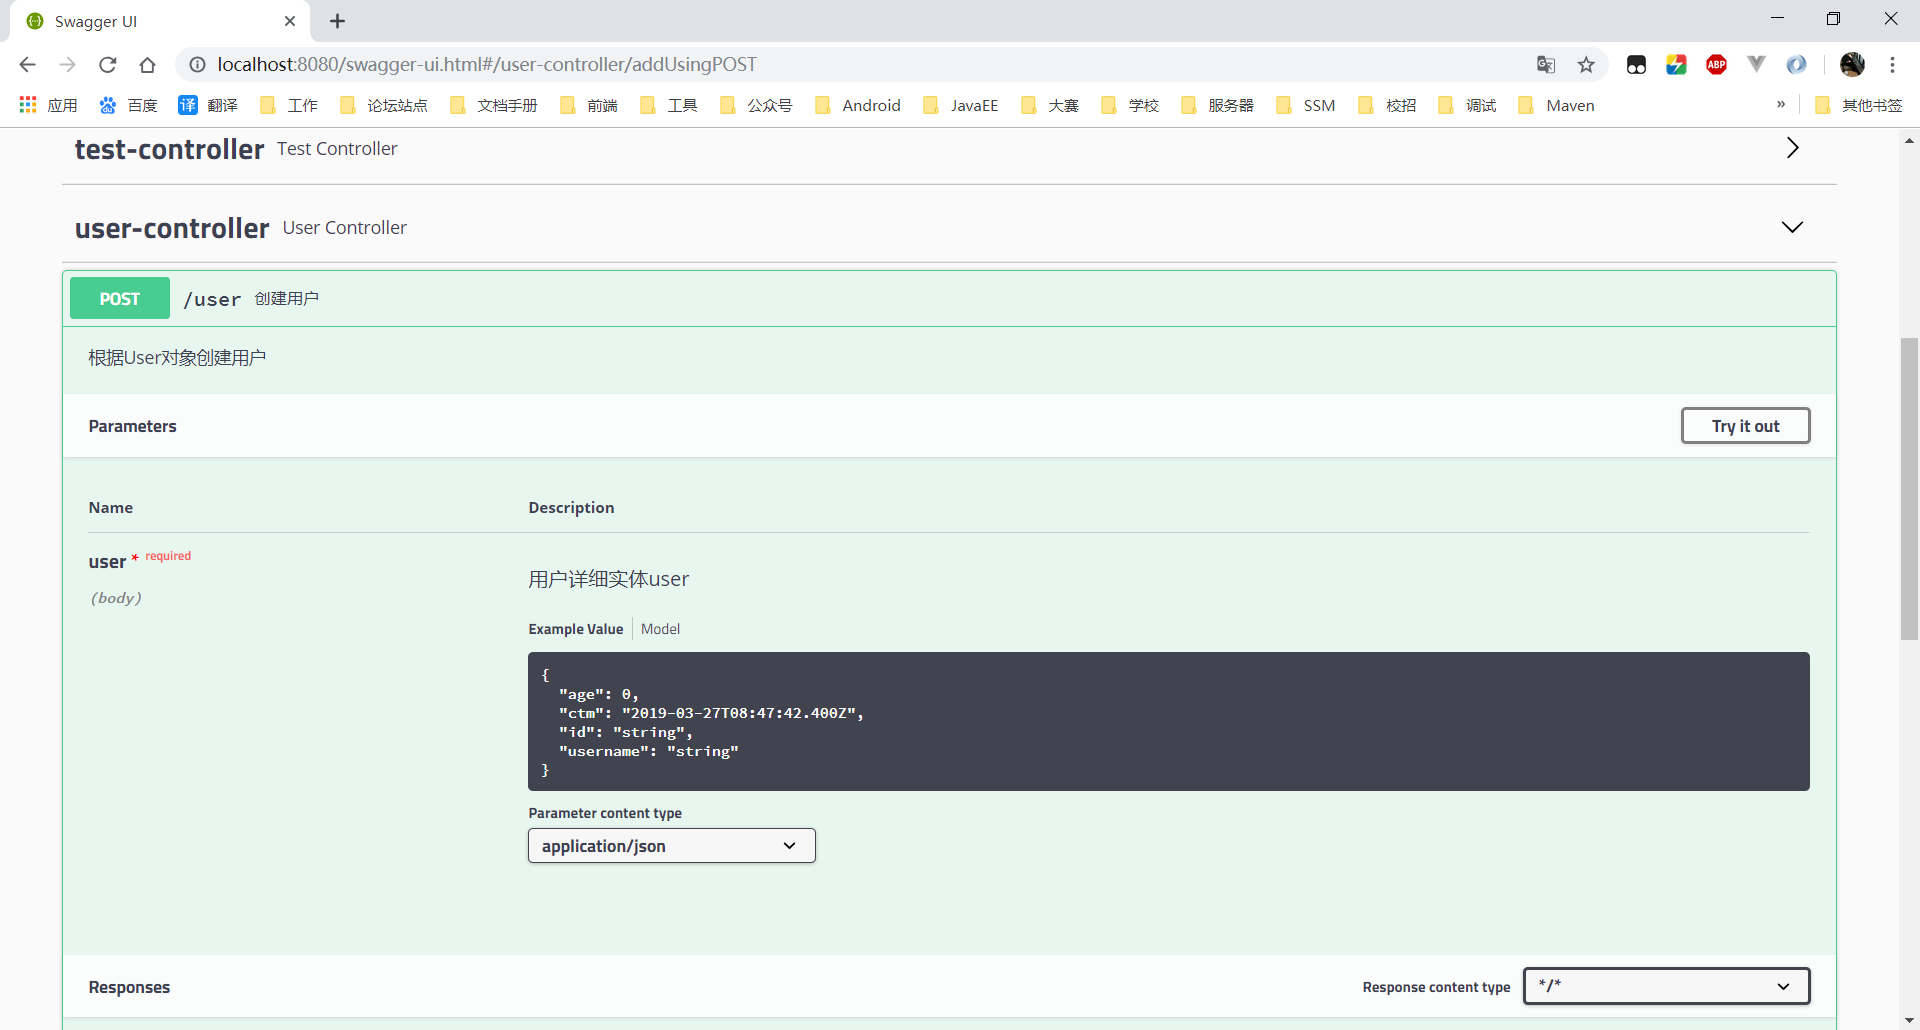
@ApiOperation(value="创建用户", notes="根据User对象创建用户")
@ApiImplicitParam(name = "user", value = "用户详细实体user", required = true, dataType = "User")
@RequestMapping(value = "user", method = RequestMethod.POST)
public ResponseEntity<CommonResult> add (@RequestBody User user){
CommonResult commonResult = new CommonResult();
try {
users.put(user.getId(), user);
commonResult.setResult(user.getId());
commonResult.setStatus("ok");
} catch (Exception e) {
commonResult.setResult(e.getClass().getName() + ":" + e.getMessage());
commonResult.setStatus("error");
e.printStackTrace();
}
return ResponseEntity.ok(commonResult);
}
/**
* 根据id删除用户
* @param id
* @return
*/
@ApiOperation(value="删除用户", notes="根据url的id来指定删除用户")
@ApiImplicitParam(name = "id", value = "用户ID", required = true, dataType = "String", paramType = "path")
@RequestMapping(value = "user/{id}", method = RequestMethod.DELETE)
public ResponseEntity<CommonResult> delete (@PathVariable(value = "id") String id){
CommonResult commonResult = new CommonResult();
try {
users.remove(id);
commonResult.setResult(id);
commonResult.setStatus("ok");
} catch (Exception e) {
commonResult.setResult(e.getClass().getName() + ":" + e.getMessage());
commonResult.setStatus("error");
e.printStackTrace();
}
return ResponseEntity.ok(commonResult);
}
/**
* 根据id修改用户信息
* @param user
* @return
*/
@ApiOperation(value="更新信息", notes="根据url的id来指定更新用户信息")
@ApiImplicitParams({
@ApiImplicitParam(name = "id", value = "用户ID", required = true, dataType = "String",paramType = "path"),
@ApiImplicitParam(name = "user", value = "用户实体user", required = true, dataType = "User")
})
@RequestMapping(value = "user/{id}", method = RequestMethod.PUT)
public ResponseEntity<CommonResult> update (@PathVariable("id") String id, @RequestBody User user){
CommonResult commonResult = new CommonResult();
try {
User user1 = users.get(id);
user1.setUsername(user.getUsername());
user1.setAge(user.getAge());
users.put(id, user1);
commonResult.setResult(user1);
commonResult.setStatus("ok");
} catch (Exception e) {
commonResult.setResult(e.getClass().getName() + ":" + e.getMessage());
commonResult.setStatus("error");
e.printStackTrace();
}
return ResponseEntity.ok(commonResult);
}
@ApiIgnore//使用该注解忽略这个API
@RequestMapping(value = "/hi", method = RequestMethod.GET)
public String jsonTest() {
return " hi you!";
}
}
第八步:启动 Spring Boot,打开浏览器
只需访问:
http://localhost:8080/swagger-ui.html
swagger-ui.html 是默认的,不用担心自己没有创建这个文件,这个就是那个 UI 咯
第九步:常用注解
swagger 提供的常用的注解有:
- @Api:用在类上,说明该类的作用
- @ApiOperation:用在方法上,说明方法的作用,标注在具体请求上,value 和 notes 的作用差不多,都是对请求进行说明;tags 则是对请求进行分类的,比如你有好几个 controller,分别属于不同的功能模块,那这里我们就可以使用 tags 来区分了。
- @ApiImplicitParams:用在方法上包含一组参数说明
- @ApiImplicitParam:用在 @ApiImplicitParams 注解中,指定一个请求参数的各个方面。
- @ApiResponses:用于表示一组响应
- @ApiResponse:用在 @ApiResponses 中,一般用于表达一个错误的响应信息
- @ApiModel:描述一个 Model 的信息(这种一般用在post创建的时候,使用
@RequestBody 这样的场景,请求参数无法使用 @ApiImplicitParam 注解进行描述的时候)表明这是一个被 swagger 框架管理的 model,用于class上 - @ApiModelProperty: 这里顾名思义,描述一个 model 的属性,就是标注在被标注了 @ApiModel 的class的属性上,这里的 value 是对字段的描述,example 是取值例子,注意这里的 example很有用,对于前后端开发工程师理解文档起到了关键的作用,因为会在 api 文档页面上显示出这些取值来;这个注解还有一些字段取值,可以自己研究,举例说一个:position,表明字段在 model 中的顺序。
第十步:使用
一般 swagger 需要一下api的权限,需要在对应的模块进行排除:
http://localhost:8080/swagger-resources/configuration/ui
http://localhost:8080/swagger-resources
http://localhost:8080/api-docs
http://localhost:8080/swagger-ui.html
http://localhost:8080/swagger-resources/configuration/security
如果项目上线并且需要关闭 swagger 接口,可以通过配置权限,或者再 SwaggerConfig 里面
return new Docket 的时候加多一个.enable(false)
技术朋友群
- 一键加群
- QQ群:621657432
Spring boot 多模块项目 + Swagger 让你的API可视化的更多相关文章
- Spring Boot 多模块项目创建与配置 (一) (转)
Spring Boot 多模块项目创建与配置 (一) 最近在负责的是一个比较复杂项目,模块很多,代码中的二级模块就有9个,部分二级模块下面还分了多个模块.代码中的多模块是用maven管理的,每个模块都 ...
- Spring Boot 多模块项目创建与配置 (一)
最近在负责的是一个比较复杂项目,模块很多,代码中的二级模块就有9个,部分二级模块下面还分了多个模块.代码中的多模块是用maven管理的,每个模块都使用spring boot框架.之前有零零散散学过一些 ...
- Maven 搭建spring boot多模块项目(附源码),亲测可以,感谢原创
原创地址:https://segmentfault.com/a/1190000005020589 我的DEMO码云地址,持续添加新功能: https://gitee.com/itbase/Spring ...
- Maven 搭建spring boot多模块项目
Maven 搭建spring boot多模块项目 备注:所有项目都在idea中创建 1.idea创建maven项目 1-1: 删除src,target目录,只保留pom.xml 1-2: 根目录pom ...
- Spring Boot 多模块项目创建与配置 (转)
转载:https://www.cnblogs.com/MaxElephant/p/8205234.html 最近在负责的是一个比较复杂项目,模块很多,代码中的二级模块就有9个,部分二级模块下面还分了多 ...
- IDEA 创建 Spring Boot 多模块项目(Multi Modules)
本准备写点代码实例放到网站,太多的模板,反而每次新建工程的时候很麻烦.于是准备把这个章节的内容提前先讲讲.正好把这个代码也管理起来.话说这个多模块功能还挺爽. 写过 C# 项目用过 Visual St ...
- spring boot:多模块项目生成jar包(spring boot 2.3.3)
一,多模块项目的优点: 1,为什么要使用多模块项目? 相比传统的单体工程,使用Maven的多模块配置, 有如下优点: 帮助项目划分模块,鼓励重用, 防止POM变得过于庞大, 方便某个模块的构建,而不用 ...
- spring boot之使用springfox swagger展示restful的api doc
摘要 springfox swagger展示restful的api doc, swagger is A POWERFUL INTERFACE TO YOUR API. 新增文件: import org ...
- spring boot多模块项目找不到类
项目结构 mapper依赖pojo, service依赖mapper和pojo portal依赖pojo和service. 全都是maven模块 <groupId>com.haitian& ...
随机推荐
- 使用Xutils 3 中遇到的一些问题!!!!
1.当xml页面中有可见的,同时设置id的控件时,如果在Activity中没有使用注解进行反射该控件,app会crash,提示: Caused by: java.lang.NullPointerEx ...
- 杂谈:HTTP1.1 与 HTTP2.0 知多少?
HTTP是应用层协议,是基于TCP底层协议而来. TCP的机制限定,每建立一个连接需要3次握手,断开连接则需要4次挥手. HTTP协议采用"请求-应答"模式,HTTP1.0下,HT ...
- mybatis插入数据库 返回主键
传递参数为对象TaskEntity, 返回主键结果为Integer 与 主键 task_id 的类型一致即可 <insert id="addTask" parameterTy ...
- CentOS 7通过RVM来安装指定版本的Ruby
RVM也就是Ruby Version Manager,Ruby版本管理器 1.安装依赖库: yum install gcc-c++ patch readline readline-devel zlib ...
- docker搭建rabbitmq
Docker部署rabbitmq 1. 准备docker环境: # yum -y install docker # docker ps @如果有输出 CONTAINER ID IMA ...
- 在Java的反射中,Class.forName和ClassLoader的区别
前言 最近在面试过程中有被问到,在Java反射中Class.forName()加载类和使用ClassLoader加载类的区别.当时没有想出来后来自己研究了一下就写下来记录一下. 解释 在java中Cl ...
- HDU 1535 Invitation Cards(逆向思维+邻接表+优先队列的Dijkstra算法)
题目链接: http://acm.hdu.edu.cn/showproblem.php?pid=1535 Problem Description In the age of television, n ...
- zoj 1109 Language of FatMouse(map映照容器的典型应用)
题目连接: acm.zju.edu.cn/onlinejudge/showProblem.do?problemCode=1109 题目描述: We all know that FatMouse doe ...
- windows开机提示文件损坏
今早按部就班的开机,然后准备吃热干面,很多时候事情都是同步进行的... 然后眼前出现这样一个界面 心情果断灰暗下来,按照提示一步步操作,点enter进入高级选项,试过了安全模式启动.最后一次正确配置启 ...
- 使用VS2013 + EF6 连接Mysql数据库
使用VS2013 + EF6 + .NET4.5 连接Mysql数据库 1.安装插件 在使用Visual Studio 2013添加ADO.NET实体数据模型新建连接时,默认是没有Mysql选项的.此 ...