
Spring Security认证配置(三)
学习本章之前,可以先了解下上篇Spring Security认证配置(二)
本篇想要达到这样几个目的:
1、登录成功处理
2、登录失败处理
3、调用方自定义登录后处理类型
具体配置代码如下:
spring-security-browser
登录成功处理:
/**

 * 自定义登录成功后处理

 */

@Slf4j

@Component

public class LoginSuccessHandler implements AuthenticationSuccessHandler {

    @Autowired

    private ObjectMapper objectMapper;

    @Override

    public void onAuthenticationSuccess(HttpServletRequest request, HttpServletResponse response,

            Authentication authentication) throws IOException, ServletException {

        log.info("登录成功...");

        response.setContentType("application/json;charset=UTF-8");

        // 返回authentication 认证信息

        response.getWriter().write(objectMapper.writeValueAsString(authentication));

    }

}
这段配置表示,登录成功后,会向response中塞入authentication对象
代码解析:
点开 AuthenticationSuccessHandler 类,可以看到里面只有一个onAuthenticationSuccess方法,如下:
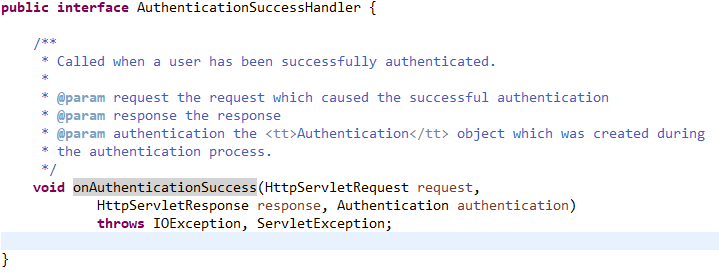
在onAuthenticationSuccess方法中,有个Authentication对象,其用法可参考AuthenticationManager、ProviderManager
登录失败处理:
/**

 * 自定义登录失败后处理

 */

@Slf4j

@Component

public class LoginFailureHandler implements AuthenticationFailureHandler {

    @Autowired

    private ObjectMapper objectMapper;

    @Override

    public void onAuthenticationFailure(HttpServletRequest request, HttpServletResponse response,

            AuthenticationException exception) throws IOException, ServletException {

        log.info("登录失败");

        response.setStatus(HttpStatus.INTERNAL_SERVER_ERROR.value()); // 服务器内部异常500

        response.setContentType("application/json;charset=UTF-8");

        // 返回异常信息

        response.getWriter().write(objectMapper.writeValueAsString(exception));

    }

}
这段配置表示,登录失败后,会向response中塞入AuthenticationException 对象,并返回500状态码
代码解析:
在 AuthenticationFailureHandler 中也只有一个onAuthenticationFailure方法,其入参 AuthenticationException 是认证授权过程中抛出的异常类的基类,
有以下几个子类:
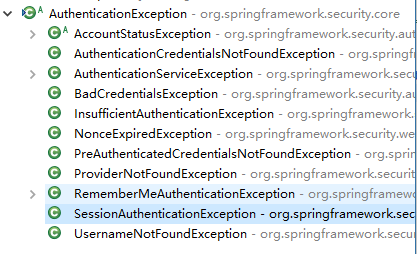
比较常用的是 BadCredentialsException(密码错误)、UsernameNotFoundException(用户名找不到)等等
修改下SecurityConfig类中的配置:
  @Autowired

    private SecurityProperty securityProperty;

    @Autowired

    private LoginSuccessHandler loginSuccessHandler; //登录成功处理

    @Autowired

    private LoginFailureHandler loginFailureHandler; //登录失败处理

    @Override

    protected void configure(HttpSecurity http) throws Exception {

        // formLogin()是默认的登录表单页,如果不配置 loginPage(url),则使用 spring security

        // 默认的登录页,如果配置了 loginPage()则使用自定义的登录页

        http.formLogin() // 表单登录

            .loginPage(SecurityConst.AUTH_REQUIRE)

            .loginProcessingUrl(SecurityConst.AUTH_FORM) // 登录请求拦截的url,也就是form表单提交时指定的action

            .successHandler(loginSuccessHandler)

            .failureHandler(loginFailureHandler)

            .and()

            .authorizeRequests() // 对请求授权

            .antMatchers(SecurityConst.AUTH_REQUIRE, securityProperty.getBrowser().getLoginPage()).permitAll() // 允许所有人访问login.html和自定义的登录页

            .anyRequest() // 任何请求

            .authenticated()// 需要身份认证

            .and()

            .csrf().disable() // 关闭跨站伪造

        ;

    }
启动服务,访问 http://localhost:18081/index.html,跳转到登录页,输入正确的用户名密码(xwj/1234),跳转到如下页面:

查看控制台,可以看到Authentication对象包含的数据:
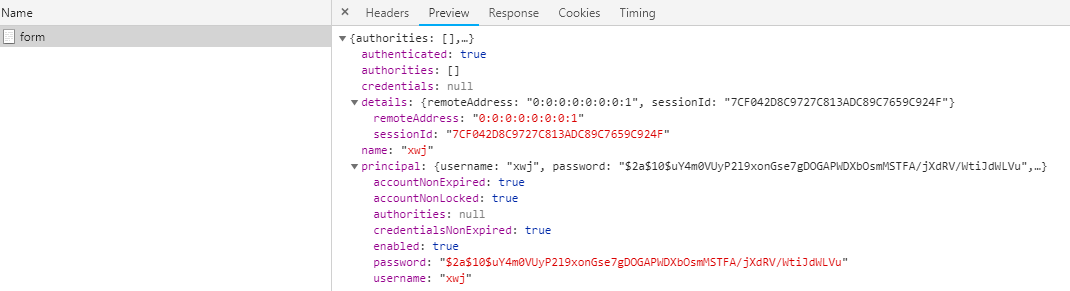
清掉浏览器缓存,然后再输入错误的密码,跳转到如下页面:

查看控制台,可以看到AuthenticationException对象包含的数据:

上面配置了登录成功和失败的处理,但是只能够返回JSON格式的数据。如果希望返回一个页面或者是跳转,那就可以使用Security默认的处理方式
在Security中,默认的成功跟失败处理分别是 SavedRequestAwareAuthenticationSuccessHandler 与 SimpleUrlAuthenticationFailureHandler
通过分析 AbstractAuthenticationProcessingFilter 类,可以看到:
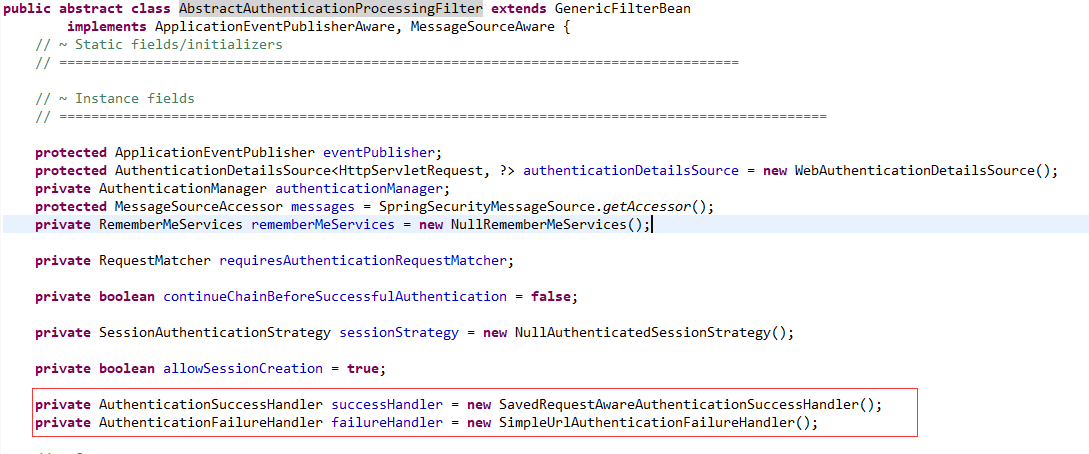
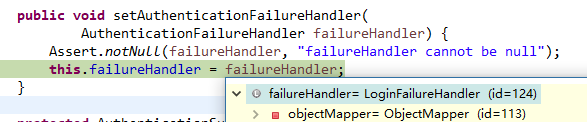
在服务启动时,如果在我们的配置类中,没有配置这AuthenticationSuccessHandler跟AuthenticationFailureHandler,则使用这两个默认的。如果配置了,则使用配置中
定义的登录处理类。打个断点可以看到:

修改下上面的配置代码:
spring-security-browser
为了达到调用方自定义跳转方式,增加配置类,如下:
/**

 * 登录类型枚举

 */

public enum LoginType {

    REDIRECT,

    JSON

}
修改BrowserProperty,增加默认的登录类型(JSON):
@Getter

@Setter

public class BrowserProperty {

    private String loginPage = "/login.html"; // 登录页

    private LoginType loginType = LoginType.JSON; //登录类型

}
接下来修改登录与失败处理类:
/**

 * 自定义登录成功后处理

 * (继承SavedRequestAwareAuthenticationSuccessHandler,这是默认的成功处理器,其带有requestCache)

 */

@Slf4j

@Component

public class LoginSuccessHandler extends SavedRequestAwareAuthenticationSuccessHandler {

    @Autowired

    private ObjectMapper objectMapper;

    @Autowired

    private SecurityProperty securityProperty;

    @Override

    public void onAuthenticationSuccess(HttpServletRequest request, HttpServletResponse response,

            Authentication authentication) throws IOException, ServletException {

        log.info("登录成功...");

        if (LoginType.JSON.equals(securityProperty.getBrowser().getLoginType())) { // json请求(如ajax)

            response.setContentType("application/json;charset=UTF-8");

            // 返回authentication 认证信息

            response.getWriter().write(objectMapper.writeValueAsString(authentication));

        } else { // 跳转

            super.onAuthenticationSuccess(request, response, authentication);

        }

    }

}
/**

 * 自定义登录失败后处理

 * (继承SimpleUrlAuthenticationFailureHandler,这是默认的失败处理器)

 */

@Slf4j

@Component

public class LoginFailureHandler extends SimpleUrlAuthenticationFailureHandler {

    @Autowired

    private ObjectMapper objectMapper;

    @Autowired

    private SecurityProperty securityProperty;

    @Override

    public void onAuthenticationFailure(HttpServletRequest request, HttpServletResponse response,

            AuthenticationException exception) throws IOException, ServletException {

        log.info("登录失败");

        if (LoginType.JSON.equals(securityProperty.getBrowser().getLoginType())) { // json请求(如ajax)

            response.setStatus(HttpStatus.INTERNAL_SERVER_ERROR.value()); // 服务器内部异常500

            response.setContentType("application/json;charset=UTF-8");

            // 返回异常信息

            response.getWriter().write(objectMapper.writeValueAsString(exception));

        } else {

            super.onAuthenticationFailure(request, response, exception);

        }

    }

}
spring-security-demo
在配置文件(application.yml)中,加上:
security:

  browser:

    #loginPage: /plogin.html

    loginType: REDIRECT
重新启动服务,访问 http://localhost:18081/index.html,跳转到登录页,输入正确的用户名密码(xwj/1234),跳转到具体的页面:

清掉浏览器缓存,然后再输入错误的密码,跳转到如下页面:
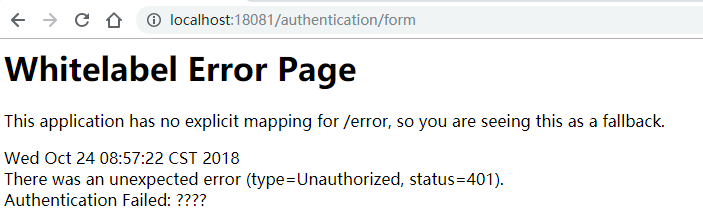
从上面可以看到,返回401状态码,类型为Unauthorized,表示未认证。这里的????其实是认证失败原因,打个断点可以看到:
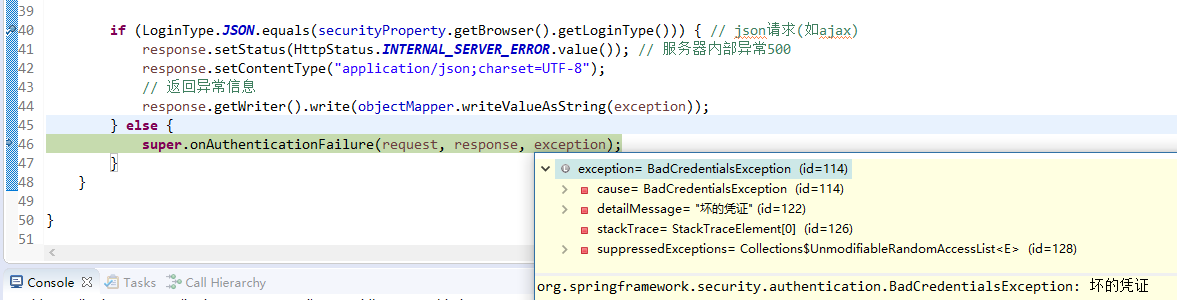
抛出了BadCredentialsException异常,"坏的凭证"表示密码错误
Spring Security认证配置(三)的更多相关文章
- Spring Security认证配置(一)
学习本章之前,可以先了解下上篇 Spring Security基本配置. 本篇主要讲述Spring Security基于表单,自定义用户认证配置(上篇中的配置,本篇将不再阐述).一共分为三步: 1.处 ...
- Spring Security认证配置(二)
学习本章之前,可以先了解下上篇Spring Security基本配置. 本篇想要达到这样几个目的: 1.访问调用者服务时,如果是html请求,则跳转到登录页,否则返回401状态码和错误信息 2.调用方 ...
- spring-security-4 (5)spring security Java配置实现自定义表单认证与授权
前面三篇讲解了spring security的搭建以及简单的表单认证与授权原理.本篇将实现我们自定义的表单登录与认证. 本篇不会再讲项目的搭建过程,因为跟第二节的搭建如出一辙.本篇也不会将项目中所有 ...
- spring security 认证源码跟踪
spring security 认证源码跟踪 在跟踪认证源码之前,我们先根据官网说明一下security的内部原理,主要是依据一系列的filter来实现,大家可以根据https://docs.sp ...
- Spring Security 入门(1-2)Spring Security - 从 配置例子例子 开始我们的学习历程
1.Spring Security 的配置文件 我们需要为 Spring Security 专门建立一个 Spring 的配置文件,该文件就专门用来作为 Spring Security 的配置. &l ...
- SPRING SECURITY JAVA配置:Web Security
在前一篇,我已经介绍了Spring Security Java配置,也概括的介绍了一下这个项目方方面面.在这篇文章中,我们来看一看一个简单的基于web security配置的例子.之后我们再来作更多的 ...
- Spring Security 入门(1-4-1)Spring Security - 认证过程
理解时可结合一下这位老兄的文章:http://www.importnew.com/20612.html 1.Spring Security的认证过程 1.1.登录过程 - 如果用户直接访问登录页面 用 ...
- spring-security-4 (4)spring security 认证和授权原理
在上一节我们讨论了spring security过滤器的创建和注册原理.请记住springSecurityFilterChain(类型为FilterChainProxy)是实际起作用的过滤器链,Del ...
- Spring boot+Spring Security 4配置整合实例
本例所覆盖的内容: 1. 使用Spring Security管理用户身份认证.登录退出 2. 用户密码加密及验证 3. 采用数据库的方式实现Spring Security的remember-me功能 ...
随机推荐
- Nginx 实现端口转发
https://www.cnblogs.com/zhaoyingjie/p/7248678.html Nginx 实现端口转发 什么是端口转发 当我们在服务器上搭建一个图书以及一个电影的应用,其中图书 ...
- Spring Security ——AuthenticationProvider
AuthenticationProvider 目录 1.1 用户信息从数据库获取 1.1.1 使用jdbc-user-service获取 1.1.2 直接使用JdbcDaoImpl ...
- Ubuntu 安装Sqldeveloper
linux下最好用的Oracle开发工具可能就是sqldeveloper了 首先在http://otn.oracle.com/ 上下载最新的Linux - sqldeveloper 我下载的时候版本是 ...
- LinuxC下获取UDP包中的路由目的IP地址和头标识目的地址
在接受到UDP包后,有时候我们需要根据所接收到得UDP包,获取它的路由目的IP地址和头标识目的地址. (一)主要的步骤: 在setsockopt中设置IP_PKTINFO,然后通过recvmsg来获取 ...
- idea创建第一个maven web项目
一.打开idea,File->New->Project.选择Mavne,勾选Create from archtype,选择org.apache.maven.archtypes:maven- ...
- [C#]Dapper学习笔记
1.安装,直接用nuget搜索Dapper就行,不过只支持框架4.5.1 2.数据库测试表 CREATE TABLE [dbo].[Student]( [ID] [bigint] NULL, ) NU ...
- .Net Mvc AutoMapper简单使用
1.安装automapper nuget包. 2.新建一个AutoMapper配置类并实现一个静态配置方法. 方法一. using AutoMapper; using AutoMapperTest.M ...
- C# byte array 跟 string 互转
用 System.Text.Encoding.Default.GetString() 转换时,byte array 中大于 127 的数据转 string 时会出问题. 把这里的 Default 换成 ...
- python互斥锁
互斥锁 进程之间数据隔离, 但是多个进程可以共享同一块数据,比如共享同一套文件系统,所以访问同一个文件,或同一个打印终端,是没有问题的,而共享带来的是竞争,竞争带来的结果就是错乱,如下 from mu ...
- 基于alpine用dockerfile创建的ssh镜像
1.下载alpine镜像 [root@docker43 ~]# docker pull alpine Using default tag: latest Trying to pull reposito ...