EF多租户实例:如何快速实现和同时支持多个DbContext
前言
上一篇随笔我们谈到了多租户模式,通过多租户模式的演化的例子。大致归纳和总结了几种模式的表现形式。
并且顺带提到了读写分离。
通过好几次的代码调整,使得这个库更加通用。今天我们聊聊怎么通过该类库快速接入多租户。
类库地址:
https://github.com/woailibain/kiwiho.EFcore.MultiTenant
实施
这次实例的代码,完全引用上面github地址中的 traditional_and_multiple_context 的例子。
从实例的名称可以知道,我们主要演示典型的多组户模式,并且在同一个系统中同时支持多个 DbContext
为什么一个系统要同时支持多个 DbContext
其实回答这个问题还是要回到你们系统为什么要多租户模式上。无非是系统性能瓶颈、数据安全与隔离问题。
1. 系统性能问题,那系统是经过长时间的洗礼的,就是说多租户是系统结构演化的过程。以前的系统,以单体为主,一个系统一个数据库。
要演化, 肯定需要一个过程,所以将一个数据库按业务类型分割成多个数据库就是顺理成章的事情。
2. 数据安全与隔离问题,其实数据安全和隔离,并不需要全部数据都进行隔离。例如,一些公司可能只对自己客户的资料进行隔离,可能只对敏感数据隔离。
那么我们大可按业务分开好几个模块,将敏感的数据使用数据库分离模式隔离数据,对不敏感数据通过数据表模式进行隔离,节省资源。
项目结构
我们先来看看项目结构。分别有2个项目:一个是Api,另一个DAL。
这里涉及到一个问题,为什么要分开Api和DAL。其实是为了模拟当今项目中主流的项目结构,最起码数据层和逻辑操作层是分开的。
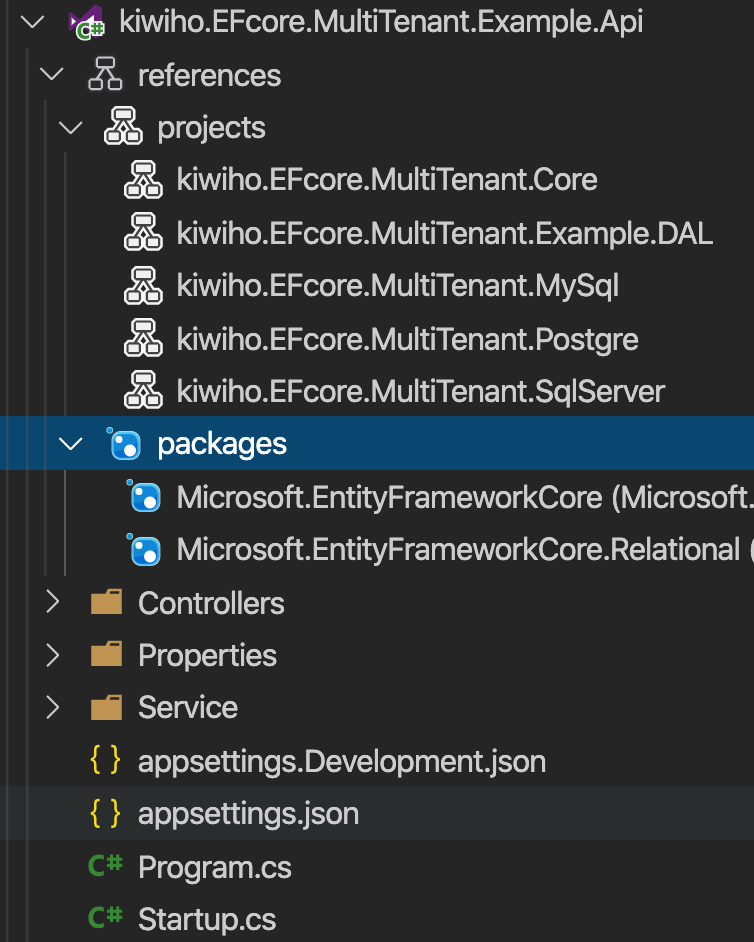
Api的结构和引用,可以看到Api几乎引用了MultiTenant的所有包,并且包含DAL。
其实这里的****.MySql ,***.SqlServer和****.Postgre三个包,只需要引用一个即可,由于这个example是同时使用了3个数据库,才需要同时引用多个。
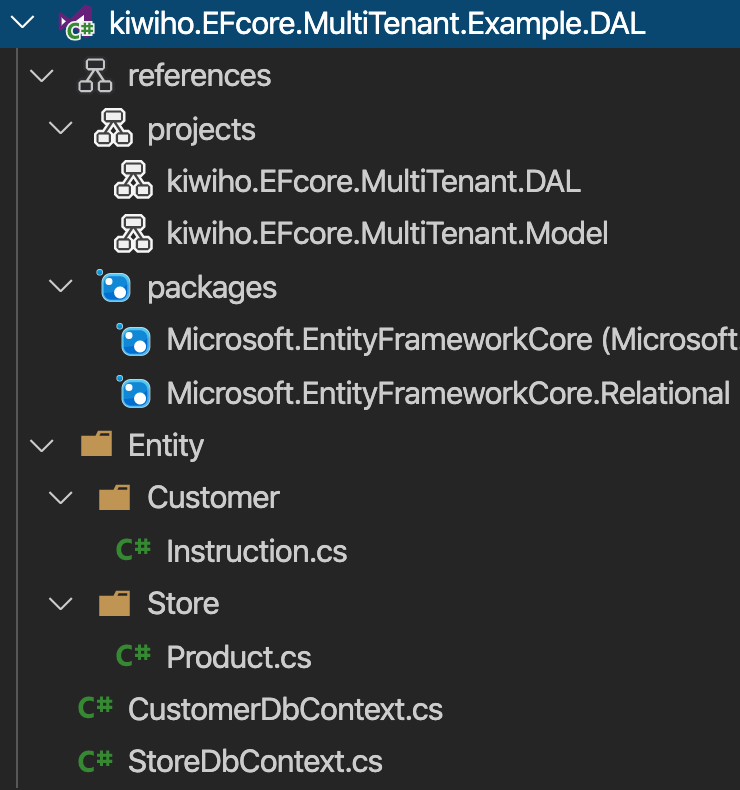
DAL的结构和引用,DAL的引用就相对简单了,只需要引用DAL和Model即可
实施详解
DAL详解
DAL既然是数据层,那么DbContext和Entity是必须的。这里同时有 CustomerDbContext 和 StoreDbContext 。
我们首先看看 StoreDbContext ,它主要包含 Product 产品表。
里面有几个要点:
1. StoreDbContext 必须继承自 TenantBaseDbContext
2. 构造函数中的第一个参数 options ,需要使用泛型 DbContextOptions<> 类型传入。(如果整个系统只有一个DbContext,那么这里可以使用 DbContextOptions 代替)
3. 重写 OnModelCreating 方法。这个并不是必要步骤。但由于大部分 DbContext 都需要通过该方法定义数据库实体结构,所以如果有重写这个方法,必须要显式调用 base.OnModelCreating
4. 公开的属性 Products,代表product表。
     public class StoreDbContext : TenantBaseDbContext

     {

         public DbSet<Product> Products => this.Set<Product>();

         public StoreDbContext(DbContextOptions<StoreDbContext> options, TenantInfo tenant, IServiceProvider serviceProvider)

             : base(options, tenant, serviceProvider)

         {

         }

         protected override void OnModelCreating(ModelBuilder modelBuilder)

         {

             base.OnModelCreating(modelBuilder);

         }

     }
现在看看 CustomerDbContext ,它主要包含 Instruction 订单表
这里使用了精简的DbContext实现方式,只包含了公开的Instructions属性和构造函数
     public class CustomerDbContext : TenantBaseDbContext

     {

         public DbSet<Instruction> Instructions => this.Set<Instruction>();

         public CustomerDbContext(DbContextOptions<CustomerDbContext> options, TenantInfo tenant, IServiceProvider serviceProvider)

             : base(options, tenant, serviceProvider)

         {

         }

     }
剩下的2个类分别是 Product 和 Instruction 。他们没有什么特别的,就是普通Entity
     public class Product

     {

         [Key]

         public int Id { get; set; }

         [StringLength(), Required]

         public string Name { get; set; }

         [StringLength()]

         public string Category { get; set; }

         public double? Price { get; set; }

     }
Product
     public class Instruction

     {

         [Key]

         public int Id { get; set; }

         public DateTime Date { get; set; }

         public double TotalAmount { get; set; }

         [StringLength()]

         public string Remark { get; set; }

     }
Instruction
Api详解
Startup
Startup作为asp.net core的配置入口,我们先看看这里
首先是ConfigureService 方法。这里主要配置需要使用的服务和注册
1. 我们通过 AddMySqlPerConnection 扩展函数,添加对 StoreDbContext 的使用,使用的利用数据库分离租户间数据的模式
里面配置的 ConnectionPerfix,代表配置文件中前缀是 mysql_ 的连接字符串,可以提供给 StoreDbContext 使用。
2. 通过 AddMySqlPerTable 扩展函数,添加对 CustomerDbContext 的使用,使用的是利用表分离租户间数据的模式。
配置的第一个参数是多租户的键值,这里使用的是customer,注意在多个 DbContext 的情况下,其中一个DbContext必须包含键值
配置的第二个参数是链接字符串的键值,由于多个租户同时使用一个数据库,所以这里只需要配置一个链接字符串
这里可以注意到,我们默认可以提供2中方式配置多租户,分别是 委托 和 参数 。
它们2个使用方式有区别,在不同的模式下都同时支持这2种模式
         public void ConfigureServices(IServiceCollection services)

         {

             // MySql

             services.AddMySqlPerConnection<StoreDbContext>(settings=>

             {

                 settings.ConnectionPrefix = "mysql_";

             });

             services.AddMySqlPerTable<CustomerDbContext>("customer","mysql_default_customer");

             services.AddControllers();

         }
其次是 Configure 方法。这里主要是配置asp.net core的请求管道
1. 可以看到使用了好几个asp.net core的中间件,其中 UseRouting 和 UseEndpoint 是必要的。
2. 使用 UserMiddleware 扩展函数引入我们的中间件 TenantInfoMiddleware 。这个中间件是类库提供的默认支持。
         public void Configure(IApplicationBuilder app, IWebHostEnvironment env)

         {

             if (env.IsDevelopment())

             {

                 app.UseDeveloperExceptionPage();

             }

             app.UseMiddleware<TenantInfoMiddleware>();

             app.UseRouting();

             app.UseEndpoints(endpoints =>

             {

                 endpoints.MapControllers();

             });

         }
appsettings
修改appsettings这个文件,主要是为了在里面添加链接字符串
 {

   "Logging": {

     "LogLevel": {

       "Default": "Information",

       "Microsoft": "Warning",

       "Microsoft.Hosting.Lifetime": "Information"

     }

   },

   "AllowedHosts": "*",

   "ConnectionStrings":{

     "mysql_default":"server=127.0.0.1;port=3306;database=multi_tenant_default;uid=root;password=gh001;charset=utf8mb4",

     "mysql_store1":"server=127.0.0.1;port=3306;database=multi_tenant_store1;uid=root;password=gh001;charset=utf8mb4",

     "mysql_store2":"server=127.0.0.1;port=3306;database=multi_tenant_store2;uid=root;password=gh001;charset=utf8mb4",

 "mysql_default_customer":"server=127.0.0.1;port=3306;database=multi_tenant_customer;uid=root;password=gh001;charset=utf8mb4"

   }

 }
ProductController 和 InstructionController
productController 和 InstructionController 非常相似,他们的里面主要包含3个方法,分别是:查询所有、根据Id查询、添加
里面的代码就不一一解释了
 namespace kiwiho.EFcore.MultiTenant.Example.Api.Controllers

 {

     [ApiController]

     [Route("api/[controller]s")]

     public class ProductController : ControllerBase

     {

         private readonly StoreDbContext storeDbContext;

         public ProductController(StoreDbContext storeDbContext)

         {

             this.storeDbContext = storeDbContext;

             this.storeDbContext.Database.EnsureCreated();

             // this.storeDbContext.Database.Migrate();

         }

         [HttpPost("")]

         public async Task<ActionResult<Product>> Create(Product product)

         {

             var rct = await this.storeDbContext.Products.AddAsync(product);

             await this.storeDbContext.SaveChangesAsync();

             return rct?.Entity;

         }

         [HttpGet("{id}")]

         public async Task<ActionResult<Product>> Get([FromRoute] int id)

         {

             var rct = await this.storeDbContext.Products.FindAsync(id);

             return rct;

         }

         [HttpGet("")]

         public async Task<ActionResult<List<Product>>> Search()

         {

             var rct = await this.storeDbContext.Products.ToListAsync();

             return rct;

         }

     }

 }
ProductController
 namespace kiwiho.EFcore.MultiTenant.Example.Api.Controllers

 {

     [ApiController]

     [Route("api/[controller]s")]

     public class InstructionController : ControllerBase

     {

         private readonly CustomerDbContext customerDbContext;

         public InstructionController(CustomerDbContext customerDbContext)

         {

             this.customerDbContext = customerDbContext;

             this.customerDbContext.Database.EnsureCreated();

         }

         [HttpPost("")]

         public async Task<ActionResult<Instruction>> Create(Instruction instruction)

         {

             var rct = await this.customerDbContext.Instructions.AddAsync(instruction);

             await this.customerDbContext.SaveChangesAsync();

             return rct?.Entity;

         }

         [HttpGet("{id}")]

         public async Task<ActionResult<Instruction>> Get([FromRoute] int id)

         {

             var rct = await this.customerDbContext.Instructions.FindAsync(id);

             return rct;

         }

         [HttpGet("")]

         public async Task<ActionResult<List<Instruction>>> Search()

         {

             var rct = await this.customerDbContext.Instructions.ToListAsync();

             return rct;

         }

     }

 }
InstructionController
实施概括
实施过程中我们总共做了4件事:
1. 定义 DbContext 和对应的 Entity . DbContext必须继承 TenantBaseDbContext 。
2. 修改 Startup 类,配置多租户的服务,配置多租户需要使用的中间件。
3. 按照规则添加字符串。
4. 添加 Controller 。
检验结果
检验结果之前,我们需要一些原始数据。可以通过数据库插入或者调用api生成
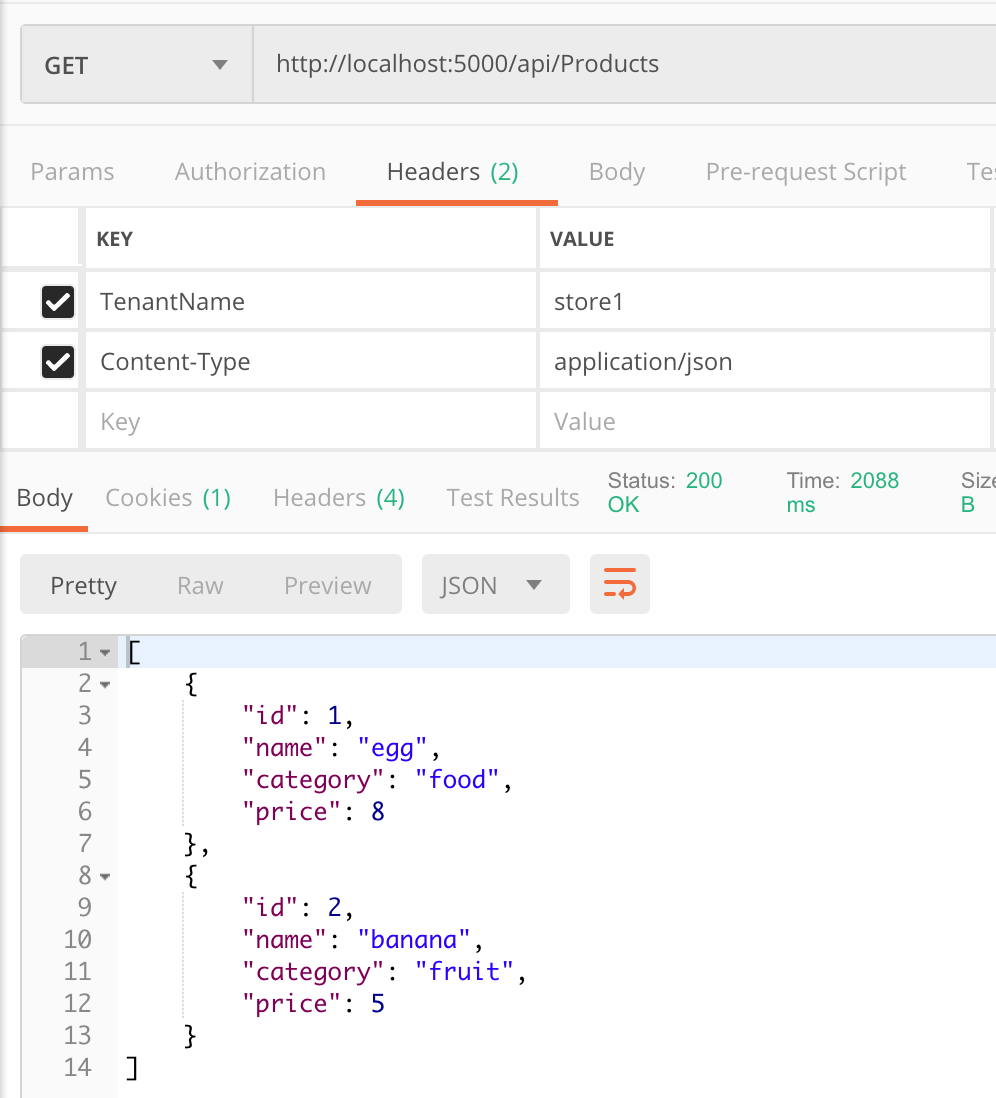
使用 store1 查询 Product 的数据
使用 store2 查询 Product 的数据

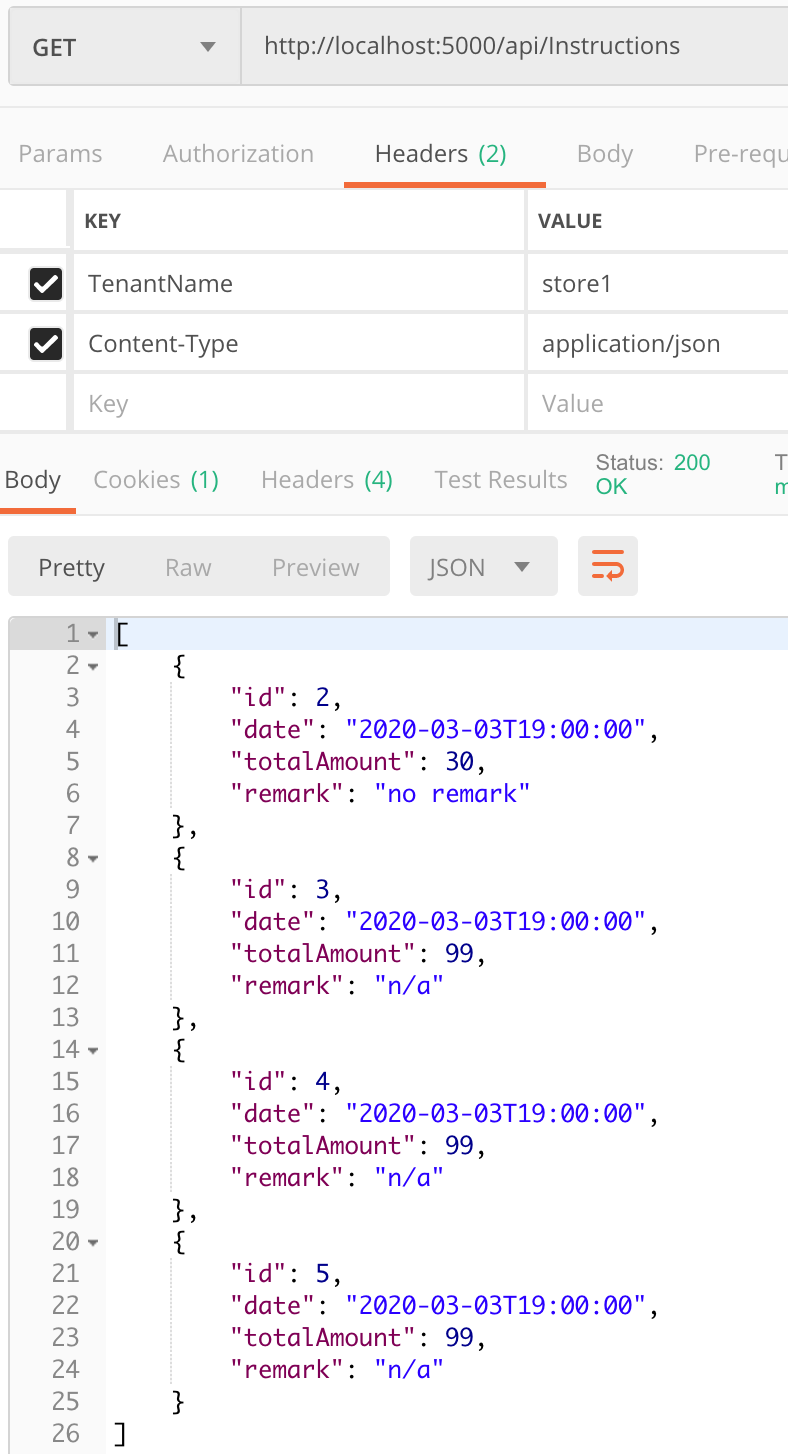
使用 store1 查询 Instruction 的数据
使用 store2 查询 Instruction 的数据

总结
通过上述步骤,已经可以看出我们能通过简单的配置,就实施多租户模式。
这个例子有什么缺陷:
大家应该能发现,实例中Store和Customer都使用了store1和store2来请求数据。但是Customer这个域,很明显是需要用customer1和customers2等等去请求数据的。
本实例主要为了简单明了,将他们混为一谈的。
但是要解决这个事情,是可以达到的。我们将在日后的文章继续。
之后的还会有什么例子:
既然上一篇随笔提到了多租户的演化和读写分离,那么我们将会优先讲到这部分内容。
通过查看github源代码,可能有人疑问,除了MySql,SqlServer和Postgre,是不是就不能支持别的数据库了。
其实并不是的,类库里已经做好一定的扩展性,各位可以通过自行使用UseOracle等扩展方法把Oracle集成进来,代码仅需不到10行。
代码怎么看:
代码已经全部更新到github,其中本文事例代码在example/traditional_and_multiple_context 内
https://github.com/woailibain/kiwiho.EFcore.MultiTenant
EF多租户实例:如何快速实现和同时支持多个DbContext的更多相关文章
- EF多租户实例:快速实现分库分表
前言 来到这篇随笔,我们继续演示如何实现EF多租户. 今天主要是演示多租户下的变形,为下图所示 实施 项目结构 这次我们的示例项目进行了精简,仅有一个API项目,直接包含所有代码. 其中Control ...
- EF多租户实例:演变为读写分离
前言 我又来写关于多租户的内容了,这个系列真够漫长的. 如无意外这篇随笔是最后一篇了.内容是讲关于如何利用我们的多租户库简单实现读写分离. 分析 对于读写分离,其实有很多种实现方式,但是总体可以分以下 ...
- Wcf+EF框架搭建实例
一.最近在使用Wcf创建数据服务,但是在和EF框架搭建数据访问时遇到了许多问题 下面是目前整理的基本框架代码,经供参考使用,源代码地址:http://git.oschina.net/tiama3798 ...
- EF调用存储过程实例
创建实体: public class User { public string UserID { get; set; } public string UserName { get; set; } pu ...
- eureka 服务实例实现快速下线快速感知快速刷新配置解析
Spirng Eureka 默认配置解读 默认的Spring Eureka服务器,服务提供者和服务调用者配置不够灵敏,总是服务提供者在停掉很久之后,服务调用者很长时间并没有感知到变化.或者是服务已经注 ...
- Emmet语法实例(帮助快速开发)
写完命令后按键 tab 就可以生成了. 应用于大多数已经内置或可以安装emmet的编辑器下级元素命令 > <!--div>p--> <div> <p>& ...
- Ef+T4模板实现代码快速生成器
转载请注明地址:http://www.cnblogs.com/cainiaodage/p/4953601.html 效果如图,demo(点击demo可下载案例) 项目结构如图 T4BLL添加BLL.t ...
- python实例:快速找出多个字典中的公共键
1.生成随机字典 # 从abcdefg 中随机取出 3-6个,作为key, 1-4 的随机数作为 value s1 = {x : randint(1, 4) for x in sample('abcd ...
- EF CodeFirst简单实例
运行环境:VS2012,添加的EntityFramework为6.0.2 版本不用太关心,只要知道原理就行了: 基本代码就这几行: namespace ConsoleApplication1 { ...
随机推荐
- s检验|k-S检验|适应性检验|独立性检验|Cintinuity correction |Fisher‘s Exact Test|Likelihood Ratio|Person Chi-Square|φ系数|Cramer’s V|列联系数
应用统计学: s检验是检验否符合正态,而k-S检验是检验否符合一种分布. 已知分布便知道参数,知道参数不知道分布. 适应性检验 多项式分布的情况如下例: 二项分布是多项式分布一种情况,所以就是上式中只 ...
- uname|mv|tar -xzvf|
$ ls CAFE-4.2.1.tar.gz mcl-latest.tar.gz mysql-5.4.3-beta-linux-i686-glibc23.tar.gz.1 orthomclSoftwa ...
- motionbuilder卸载/完美解决安装失败/如何彻底卸载清除干净motionbuilder各种残留注册表和文件的方法
在卸载motionbuilder重装motionbuilder时发现安装失败,提示是已安装motionbuilder或安装失败.这是因为上一次卸载motionbuilder没有清理干净,系统会误认为已 ...
- python3的数据类型转换问题
问题描述:在自我学习的过程中,写了个登陆,在input处,希望能够对数据类型进行判断,但是因为python3的输入的数据会被系统默认为字符串,也就是1,1.2,a.都会被系统默认为字符串,这个心塞啊, ...
- kendoUI 免费部分开发部分经验。
kendo分多个版本,核心UI免费版.NET,JAVA,PHP对应的前后端开发版. 基础免费版开放的UI经多个测试,与收费封装的UI并无区别,收费版提供了后端代码和前端封装语法,使不懂JS前端的也可简 ...
- LVS(注意iptables和selinux的问题)
1.LVS(高负载) LVS(Linux虚拟服务器) Linux Virtual Server LVS集群采用IP负载均和技术和基于内容请求分发技术.调取器具有很好的吞吐率,将请求均衡的转移到不同的服 ...
- ZooKeeper源码阅读——client(二)
原创技术文章,转载请注明:转自http://newliferen.github.io/ 如何连接ZooKeeper集群 要想了解ZooKeeper客户端实现原理,首先需要关注一下客户端的使用方式, ...
- Java Servlet和Java Filter简介
一:简介servlet 1.什么是Servlet? Servlet可以通过多种方式进行描述,具体取决于上下文: (1)Servlet是一种用于创建web应用程序的技术 (2)Servlet是一个API ...
- rpm报错warning: /var/tmp/rpm-tmp.1OZa8q: Header V3 DSA/SHA1 Signature, key ID 5072e1f5: NOKEY的解决
参考链接:http://blog.51cto.com/zymin0823/1546537 报错: 解决:使用如下两个选项
- python自动化测试技术-Allure
文末有源码 大部分人可能做的是爬虫和web,数据分析方面的工作,今天分享个在自动化测试领域python能做什么样的事情,比如下方,是用python+pytest+allure生成的精美自动化测试报告, ...