nginx 反向代理memcached、websocket及nginx文件方面的优化
安装memcached服务,并启动添加数据
yum -y install memcached

systemctl start memcached.service 启动

[root@python ~]# telnet 127.0.0.1 11211

Trying 127.0.0.1...

Connected to 127.0.0.1.

Escape character is '^]'.

set hello 0 0 5

world

STORED

get hello

VALUE hello 0 5

world

END

set gzipkey 2 0 3

chx

STORED

get gzipkey

VALUE gzipkey 2 3

chx

END
nginx默认就支持此功能
配置
server {

	server_name memcached.com;

	default_type text/plain;

	location /get {

		set    $memcached_key "$arg_key";  #?表示?是key

		memcached_gzip_flag 2;  # 识别压缩的内容

		memcached_pass 127.0.0.1:11211;  地址

	}

}
测试
[root@python vhast]# curl memcached.com/get?key=gzipkey -I  #key代giz字眼

HTTP/1.1 200 OK

Server: nginx/1.15.9

Date: Thu, 18 Jul 2019 09:45:51 GMT

Content-Type: text/plain

Content-Length: 3

Connection: keep-alive

Content-Encoding: gzip  识别

Accept-Ranges: bytes

[root@python vhast]# curl memcached.com/get?key=hello -I  #没有

HTTP/1.1 200 OK

Server: nginx/1.15.9

Date: Thu, 18 Jul 2019 09:46:10 GMT

Content-Type: text/plain

Content-Length: 5

Connection: keep-alive

Accept-Ranges: bytes
配置
[root@python vhast]# cat memcached.conf

server {

	server_name memcached.com;

	default_type text/plain;

	location /get {

		set    $memcached_key "$arg_key";

		#memcached_gzip_flag 2;

		memcached_pass 127.0.0.1:11211;

	}

}
测试
[root@python vhast]# curl memcached.com/get?key=gzipkey -I

HTTP/1.1 200 OK

Server: nginx/1.15.9

Date: Thu, 18 Jul 2019 09:48:12 GMT

Content-Type: text/plain

Content-Length: 3

Connection: keep-alive

Accept-Ranges: bytes
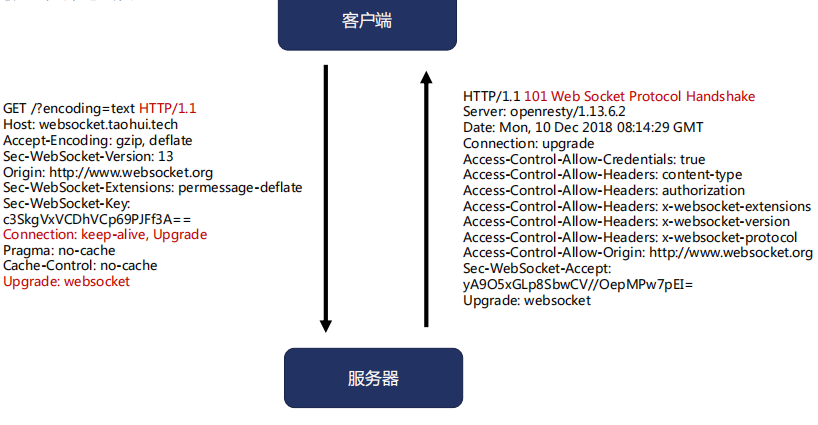
构建websocket反向代理
配置指令
proxy_http_version 1.1;

proxy_set_header Upgrade $http_upgrade;

proxy_set_header Connection "upgrade";
协议升级
借助互联网上的http://echo.websocket.org/echo.html
server {

        server_name cx.websocket.com;

        default_type text/plain;

        access_log logs/ws.log;

        location / {

                proxy_http_version 1.1;

                proxy_set_header Upgrade $http_upgrade;

                proxy_set_header Connection "upgrade";

                proxy_pass http://echo.websocket.org;

        }

}
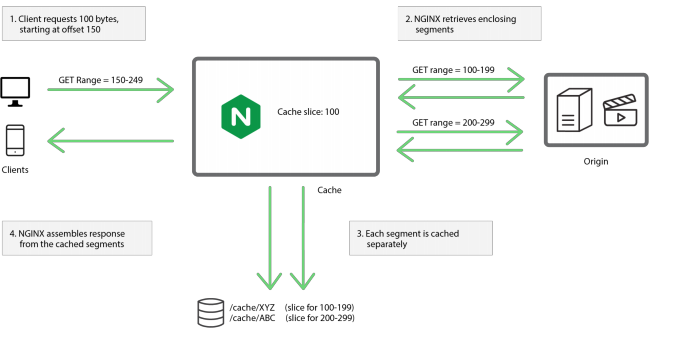
分片提升缓存效率;slice模块默认未编译进去
指令编译进nginx里
cd ~/nginx-1.15.9/

./configure --prefix=/data/web --sbin-path=/usr/bin --user=nginx --group=nginx --with-http_stub_status_module --with-http_auth_request_module --with-http_sub_module --add-module=/root/nginx-http-concat --with-http_addition_module --with-http_secure_link_module --with-http_geoip_module  --with-http_ssl_module  --add-module=/root/ngx_cache_purge  --with-http_slice_module

[root@python nginx-1.15.9]# mv /usr/bin/nginx{,.07.18.18.33}

[root@python nginx-1.15.9]# cp objs/nginx /usr/bin/
工作流程
指令介绍
Syntax: slice size;

Default: slice 0;

Context: http, server, location

功能通过range协议将大文件分解多个小文件,更好的用缓存为客户端的range协议服务
配置
[root@python vhast]# cat cache.conf

proxy_cache_path /data/web/cache levels=2:2 keys_zone=two:10m loader_threshold=300 loader_files=200 max_size=200m inactive=1m;

server {

	server_name cache.com;

	error_log logs/cacgeee.log debug;

	access_log logs/cache.log main;

	root html/;

	location ~/purge(/.*) {

		proxy_cache_purge two $scheme$1;

	}

	location /{

		proxy_cache two;

		slice      1m; #切分没片大小

		proxy_cache_valid 200 206 1m;

		add_header X-Cache-Status $upstream_cache_status;

		proxy_set_header Range $slice_range;  #吧客户端协议发送到上游服务器

		proxy_pass http://127.0.0.1:8012;

		}

}
open_file_cache提升系统性能
指令
Syntax: open_file_cache off;

             open_file_cache max=N [inactive=time]; 最多缓存多少文件,在内存里而非共享内存 跟时间在这个时间内没有访问就移除缓存列表

Default: open_file_cache off;

Context: http, server, location
缓存的内容

其他open_file_cache的指令
Syntax: open_file_cache_errors on | off;  错误的是否缓存

Default: open_file_cache_errors off;

Context: http, server, location

Syntax: open_file_cache_min_uses number;  至少访问多少次才留在缓存中

Default: open_file_cache_min_uses 1;

Context: http, server, location

Syntax: open_file_cache_valid time;  多长时间建成一次缓存内容是否有效

Default: open_file_cache_valid 60s;

Context: http, server, location
上游服务器配置
[root@python ~]# cat /data/web/conf/vhast/open.conf

server {

	listen 8092;

	root html;

	location /{

		#open_file_cache max=10 inactive=60s;

		#open_file_cache_min_uses 1;

		#open_file_cache_valid 60s;

		#open_file_cache_errors on;

	}

}
使用strace追踪
[root@python vhast]# ps -ef | grep nginx

root      10241      1  0 19:16 ?        00:00:00 nginx: master process nginx

nginx     10242  10241  0 19:16 ?        00:00:00 nginx: worker process

nginx     10243  10241  0 19:16 ?        00:00:00 nginx: cache manager process

nginx     10244  10241  0 19:16 ?        00:00:00 nginx: cache loader process

root      10246   7257  0 19:16 pts/2    00:00:00 grep --color=auto nginx

[root@python vhast]# strace -p 10242

strace: Process 10242 attached

epoll_wait(25

[root@python ~]# curl 127.0.0.1:8092

<!DOCTYPE html>

<html>

<head>

<title>Welcome to nginx!</title>

<style>

    body {

        width: 35em;

        margin: 0 auto;

        font-family: Tahoma, Verdana, Arial, sans-serif;

    }

</style>

</head>

<body>

<h1>Welcome to nginx!</h1>

<p>If you see this page, the nginx web server is successfully installed and

working. Further configuration is required.</p>

<p>For online documentation and support please refer to

<a href="http://nginx.org/">nginx.org</a>.<br/>

Commercial support is available at

<a href="http://nginx.com/">nginx.com</a>.</p>

<p><em>Thank you for using nginx.</em></p>

</body>

</html>

[root@python vhast]# strace -p 10242

strace: Process 10242 attached

epoll_wait(25, [{EPOLLIN, {u32=9643568, u64=9643568}}], 512, -1) = 1

accept4(20, {sa_family=AF_INET, sin_port=htons(36974), sin_addr=inet_addr("127.0.0.1")}, [16], SOCK_NONBLOCK) = 28

epoll_ctl(25, EPOLL_CTL_ADD, 28, {EPOLLIN|EPOLLRDHUP|EPOLLET, {u32=9644768, u64=9644768}}) = 0

epoll_wait(25, [{EPOLLIN, {u32=9644768, u64=9644768}}], 512, 60000) = 1

recvfrom(28, "GET / HTTP/1.1\r\nUser-Agent: curl"..., 1024, 0, NULL, NULL) = 78

stat("/data/web/html/index.html", {st_mode=S_IFREG|0644, st_size=612, ...}) = 0

open("/data/web/html/index.html", O_RDONLY|O_NONBLOCK) = 29

fstat(29, {st_mode=S_IFREG|0644, st_size=612, ...}) = 0

writev(28, [{"HTTP/1.1 200 OK\r\nServer: nginx/1"..., 238}], 1) = 238

sendfile(28, 29, [0] => [612], 612)     = 612

write(4, "127.0.0.1 - - [18/Jul/2019:19:17"..., 159) = 159

close(29)                               = 0

setsockopt(28, SOL_TCP, TCP_NODELAY, [1], 4) = 0

epoll_wait(25, [{EPOLLIN|EPOLLRDHUP, {u32=9644768, u64=9644768}}], 512, 65000) = 1

recvfrom(28, "", 1024, 0, NULL, NULL)   = 0

close(28)                               = 0

epoll_wait(25, [{EPOLLIN, {u32=9644528, u64=9644528}}], 512, -1) = 1

recvmsg(24, {msg_name(0)=NULL, msg_iov(1)=[{"\2\0\0\0\0\0\0\0\4(\0\0\0\0\0\0\2\0\0\0\0\0\0\0\377\377\377\377\0\0\0\0", 32}], msg_contr

ollen=0, msg_flags=0}, 0) = 32close(27)                               = 0

recvmsg(24, 0x7ffd793995a0, 0)          = -1 EAGAIN (Resource temporarily unavailable)
修改配置启用open_file_cache
[root@python ~]# cat /data/web/conf/vhast/open.conf

server {

	listen 8092;

	root html;

	location /{

		open_file_cache max=10 inactive=60s;

		open_file_cache_min_uses 1;

		open_file_cache_valid 60s;

		open_file_cache_errors on;
测试
[root@python vhast]# ps -ef | grep nginx

root      10241      1  0 19:16 ?        00:00:00 nginx: master process nginx

nginx     10278  10241  0 19:23 ?        00:00:00 nginx: worker process

nginx     10279  10241  0 19:23 ?        00:00:00 nginx: cache manager process

root      10282   7257  0 19:23 pts/2    00:00:00 grep --color=auto nginx

[root@python vhast]# strace -p 10278

strace: Process 10278 attached

epoll_wait(6, [{EPOLLIN, {u32=10106432, u64=10106432}}], 512, -1) = 1

accept4(20, {sa_family=AF_INET, sin_port=htons(36976), sin_addr=inet_addr("127.0.0.1")}, [16], SOCK_NONBLOCK) = 3

epoll_ctl(6, EPOLL_CTL_ADD, 3, {EPOLLIN|EPOLLRDHUP|EPOLLET, {u32=10107632, u64=10107632}}) = 0

epoll_wait(6, [{EPOLLIN, {u32=10107632, u64=10107632}}], 512, 60000) = 1

recvfrom(3, "GET / HTTP/1.1\r\nUser-Agent: curl"..., 1024, 0, NULL, NULL) = 78

open("/data/web/html/index.html", O_RDONLY|O_NONBLOCK) = 8主意只打一次

fstat(8, {st_mode=S_IFREG|0644, st_size=612, ...}) = 0

writev(3, [{"HTTP/1.1 200 OK\r\nServer: nginx/1"..., 238}], 1) = 238

sendfile(3, 8, [0] => [612], 612)       = 612

write(27, "127.0.0.1 - - [18/Jul/2019:19:25"..., 159) = 159

setsockopt(3, SOL_TCP, TCP_NODELAY, [1], 4) = 0

epoll_wait(6, [{EPOLLIN|EPOLLRDHUP, {u32=10107632, u64=10107632}}], 512, 65000) = 1

recvfrom(3, "", 1024, 0, NULL, NULL)    = 0

close(3)                                = 0

epoll_wait(6, [{EPOLLIN, {u32=10106432, u64=10106432}}], 512, -1) = 1

accept4(20, {sa_family=AF_INET, sin_port=htons(36978), sin_addr=inet_addr("127.0.0.1")}, [16], SOCK_NONBLOCK) = 3

epoll_ctl(6, EPOLL_CTL_ADD, 3, {EPOLLIN|EPOLLRDHUP|EPOLLET, {u32=10107633, u64=10107633}}) = 0

epoll_wait(6, [{EPOLLIN, {u32=10107633, u64=10107633}}], 512, 60000) = 1

recvfrom(3, "GET / HTTP/1.1\r\nUser-Agent: curl"..., 1024, 0, NULL, NULL) = 78

writev(3, [{"HTTP/1.1 200 OK\r\nServer: nginx/1"..., 238}], 1) = 238

sendfile(3, 8, [0] => [612], 612)       = 612

write(27, "127.0.0.1 - - [18/Jul/2019:19:25"..., 159) = 159

setsockopt(3, SOL_TCP, TCP_NODELAY, [1], 4) = 0

epoll_wait(6, [{EPOLLIN|EPOLLRDHUP, {u32=10107633, u64=10107633}}], 512, 65000) = 1

recvfrom(3, "", 1024, 0, NULL, NULL)    = 0

close(3)                                = 0

epoll_wait(6, ^Cstrace: Process 10278 detached

 <detached ...>
nginx 反向代理memcached、websocket及nginx文件方面的优化的更多相关文章
- 【Linux】采用nginx反向代理让websocket 支持 wss
背景:玩swoole 服务 使用Nginx反向代理解决wss问题. 即客户端通过wss协议连接 Nginx 然后 Nginx 通过ws协议和server通讯. 也就是说Nginx负责通讯加解密,Ngi ...
- nginx反向代理 支持WebSocket
WebSocket(简称WS)协议的握手和HTTP是兼容的,通过HTTP/1.1中协议转换机制,客户端可以传递名为“Upgrade” 头部信息将连接从HTTP连接升级到WebSocket连接 那么反向 ...
- nginx 反向代理 proxy_pass 及对比nginx与haproxy反向代理服务器功能、性能的优劣
1.使用 proxy 去请求另一个域名下的资源,如果跨域资源也部署在同一台机器上,我们甚至可以 proxy 到 127.0.0.1,比如: location /api { proxy_pass htt ...
- nginx反向代理https访问502, nginx反向代理, 支持SNI的https回源,SNI源点,nginx反向代理报错
正常nginx配置了SSL是可以通过HTTPS访问后端的,但是对有配置SNI + https后端的支持有点麻烦. 编译安装nginx后,看一下是否支持SNI /usr/local/nginx/sbin ...
- 高级运维(二):搭建Nginx服务器、用户认证、基于域名的虚拟主机、SSL虚拟主机、Nginx反向代理
一.搭建Nginx服务器 目标: 在IP地址为192.168.4.5的主机上安装部署Nginx服务,并可以将Nginx服务器,要求编译时启用如下功能: 1> SSL加密功能 2> 设置Ng ...
- 使用python自动生成docker nginx反向代理配置
由于在测试环境上用docker部署了多个应用,而且他们的端口有的相同,有的又不相同,数量也比较多,在使用jenkins发版本的时候,不好配置,于是想要写一个脚本,能在docker 容器创建.停止的时候 ...
- 十.nginx反向代理负载均衡服务实践部署
期中集群架构-第十章-nginx反向代理负载均衡章节章节====================================================================== 0 ...
- 【netcore基础】CentOS 7.6.1810 搭建.net core 2.1 linux 运行环境 nginx反向代理 supervisor配置自启动
之前写过一篇Ubuntu的环境搭建博客,感觉一些配置大同小异,这里重点记录下 nginx 作为静态 angular 项目文件服务器的配置 参考链接 [netcore基础]ubuntu 16.04 搭建 ...
- EMQ配置通过nginx反向代理wss和ws
参考:https://www.cnblogs.com/succour/p/6305574.html EMQ官方文档:https://docs.emqx.io/broker/v3/cn/ 一,系统环境及 ...
随机推荐
- 第一篇:thinkPHP学习目的
公司找人开发了一套程序,用的是thinkphp,我一直都是做前端的,后端对PHP也有一些了解,能看懂代码,但是不能写,因为公司不想再招人,嘱托我来维护. 翻看了thinkphp的官方文档,也去看了一下 ...
- 洛谷 P1494 [国家集训队]小Z的袜子(莫队)
题目链接:https://www.luogu.com.cn/problem/P1494 一道很经典的莫队模板题,然而每道莫队题的大体轮廓都差不多. 首先莫队是一种基于分块的算法,它的显著特点就是: 能 ...
- 喵星之旅-狂奔的兔子-docker安装和基本使用
一.前提条件 目前,CentOS 仅发行版本中的内核支持 Docker. 位.系统内核版本为 3.10 以上. 位系统.参考喵星之旅-狂奔的兔子-linux安装 二.CentOS 7下安装 Doc ...
- SPOJ Distinct Substrings
给定一个字符串,求不相同子串个数.每个子串一定是某个后缀的前缀,那么原问题等价于求所有后缀之间的不相同子串个数.总数为n*(n-1)/2,再减掉height[i]的和就是答案 #include< ...
- qq音乐解析API
文档:www.tjit.net 开放的接口:api88.net 个人代码: input2(event){ //将字符转化为encodeURL编码,才能进行正确请求,这是这个接口要求的 //js自带的转 ...
- [C/C++] _tprintf() 输出不了汉字
在前面加一个 setlocale(LC_ALL, ""); //必须得有这行 否则不能输出中文 注意得加locale头文件 #include<stdio.h> #inc ...
- 控制反转(IOC)和依赖注入(DI)
控制反转(IOC)和依赖注入(DI)IoC(Inversion of Control,控制反转) 是Spring 中一个非常非常重要的概念,它不是什么技术,而是一种解耦的设计思想.它的主要目的是借助于 ...
- Jenkins+Maven+Github+Springboot实现可持续自动部署(非常详细)
目前公司开发的项目已经部署到服务器上,部署项目的测试环境和生产环境,加上每个项目n个服务,于是我就 , 骚就是骚,但是就是太累了,于是花点时间研究了一下Jenkins. Jenkins的作用和它的lo ...
- 4_2 刽子手游戏(UVa489)<自顶向下逐步求精法>
Hangman Judge是一个猜英文单字的小游戏(在电子字典中常会看到),游戏规则如下:1.答案单字写在纸上(每个字元一张纸),并且被盖起来,玩家每次猜一个英文字元(letter).2.如果这个英文 ...
- 使用阿里的EasyExcel遇到的一些坑(NoSuchMethodError异常)
引入eayexcel依赖的时候已经包含了poi依赖