
如何一步步使用国内yum源一键安装openstack-ocata版本基于centos7
写在前面的话,在网上看了一个国外的一键安装视频,我也照着做,结果出现很多错误,现在把坑解决了,照着做肯定能安装成功的
环境
virtualhost 下的centos7
配置
双网卡 一个10网段,nat通信用 一个192网段 和宿主机通信使用
2c 这个测试部署的话,不是强要求,我部署后CPU也就占20%
5.4G内存 我的宿主机也就8G内存 配到这个数据已经很卡了 再次PS
安装完成要占用约5G左右的内存
部署
由于我的是nat 网络,所以先配置双网卡,否则部署后,不能正常访问openstack的管理网页,因为需要修改到这个参数,这个到后面再说
双网卡配置略过,自己在网上查吧很多的。实在找不到就留言
正式开始
1-设置yum源01_setyum.sh(非常重要,虽然出了openstack 专用的yum源,但那不是咱们能用的),我做成了脚本样子的,直接拷贝拿去用,镜像源用的是清华源,因为阿里源有的包跳转到404的链接还在上面,后面一键安装的时候就会坑哭你,亲测。。都是泪。脚本正文如下
#创建备份路径

mkdir -p /etc/yum.repos.d/bak_tmp/

#移走当前的所有源,为什么?因为一键安装会乱跳,跳到不能用的就报错,然后你就安装失败

mv /etc/yum.repos.d/*.repo /etc/yum.repos.d/bak_tmp/

#创建yum 文件

touch /etc/yum.repos.d/centos-tuna.repo

#导入镜像内容到yum文件中

cat   >>/etc/yum.repos.d/centos-tuna.repo << EOF

#CentOS-Base.repo

#

# The mirror system uses the connecting IP address of the client and the

# update status of each mirror to pick mirrors that are updated to and

# geographically close to the client.  You should use this for CentOS updates

# unless you are manually picking other mirrors.

#

# If the mirrorlist= does not work for you, as a fall back you can try the

# remarked out baseurl= line instead.

#

#

[base]

name=CentOS-\$releasever - Base

baseurl=https://mirrors.tuna.tsinghua.edu.cn/centos/\$releasever/os/\$basearch/

#mirrorlist=http://mirrorlist.centos.org/?release=\$releasever&arch=\$basearch&repo=os

gpgcheck=1

gpgkey=file:///etc/pki/rpm-gpg/RPM-GPG-KEY-CentOS-7

#released updates

[updates]

name=CentOS-\$releasever - Updates

baseurl=https://mirrors.tuna.tsinghua.edu.cn/centos/\$releasever/updates/\$basearch/

#mirrorlist=http://mirrorlist.centos.org/?release=\$releasever&arch=\$basearch&repo=updates

gpgcheck=1

gpgkey=file:///etc/pki/rpm-gpg/RPM-GPG-KEY-CentOS-7

#additional packages that may be useful

[centosplus]

name=CentOS-\$releasever - Plus

baseurl=https://mirrors.tuna.tsinghua.edu.cn/centos/\$releasever/centosplus/\$basearch/

#mirrorlist=http://mirrorlist.centos.org/?release=\$releasever&arch=\$basearch&repo=centosplus

gpgcheck=1

enabled=0

gpgkey=file:///etc/pki/rpm-gpg/RPM-GPG-KEY-CentOS-7

[cloud]

name=CentOS-\$releasever - Cloud

baseurl=https://mirrors.tuna.tsinghua.edu.cn/centos/\$releasever/cloud/\$basearch/openstack-ocata/

enabled=1

gpgcheck=0

[paas]

name=CentOS-\$releasever - paas

baseurl=https://mirrors.tuna.tsinghua.edu.cn/centos/\$releasever/paas/\$basearch/openshift-origin13/

enabled=1

gpgcheck=0

[kvm]

name=CentOS-\$releasever - kvm

baseurl=https://mirrors.tuna.tsinghua.edu.cn/centos/\$releasever/virt/\$basearch/kvm-common/

enabled=1

gpgcheck=0

EOF

#清除yum缓存

yum clean all

#重新做yum 缓存

yum makecache
2-配置环境 02_setenv.sh
cat >/etc/environment <<EOF

LANG=en_US.utf-

LC_ALL=en_US.utf-

EOF

systemctl disable firewalld

systemctl stop firewalld

systemctl disable NetworkManager

systemctl stop NetworkManager

systemctl enable network

systemctl restart network
3-安装一键部署包 03_set_openstack-packstack.sh
yum -y update

yum install -y openstack-packstack

#报错无法安装openstack-selinux 没有相关依赖包,通过增加paas 镜像源解决

yum install -y openstack-selinux

yum -y install wget

#--提示缺少libLibev.so.()(64bit)

wget -O /etc/yum.repos.d/epel.repo http://mirrors.aliyun.com/repo/epel-7.repo

yum -y install libev
#有可能yum源混乱了,所以重新执行yibian

mkdir -p /etc/yum.repos.d/bak_tmp_1

mv /etc/yum.repos.d/*.repo /etc/yum.repo.d/bak_tmp_1/

mv /etc/yum.repos.d/bak_tmp_1/centos-tuna.repo /etc/yum.repos.d/

yum clean all
yum makecache

#解决python-werkzeug 不在cloud源,在virt里面,所以找不到此包

wget -O /root/python-werkzeug-0.9.1-1.el7.noarch.rpm https://mirrors.tuna.tsinghua.edu.cn/centos/7/virt/x86_64/ovirt-4.3/common/python-werkzeug-0.9.1-1.el7.noarch.rpm

rpm -ivh /root/python-werkzeug-0.9.1-1.el7.noarch.rpm
执行到这里才完成一点点,为了保险。重新进入到yum文件夹
cd /etc/yum.repos.d/

ll

#确认当前只有一个centos-tuna.repo
确认完成执行最后一步安装操作,也就是出错最多的操作
#-d 表示debug 日志级别

packstack --allinone -d
安装成功的样例如下
比较长,就不展开了
[root@openstack-allinone yum.repos.d]# packstack --allinone -d

Welcome to the Packstack setup utility

The installation log file is available at: /var/tmp/packstack/--CWIVyN/openstack-setup.log

Installing:

Clean Up                                             [ DONE ]

Discovering ip protocol version                      [ DONE ]

Setting up ssh keys                                  [ DONE ]

Preparing servers                                    [ DONE ]

Pre installing Puppet and discovering hosts' details [ DONE ]

Preparing pre-install entries                        [ DONE ]

Setting up CACERT                                    [ DONE ]

Preparing AMQP entries                               [ DONE ]

Preparing MariaDB entries                            [ DONE ]

Fixing Keystone LDAP config parameters to be undef if empty[ DONE ]

Preparing Keystone entries                           [ DONE ]

Preparing Glance entries                             [ DONE ]

Checking if the Cinder server has a cinder-volumes vg[ DONE ]

Preparing Cinder entries                             [ DONE ]

Preparing Nova API entries                           [ DONE ]

Creating ssh keys for Nova migration                 [ DONE ]

Gathering ssh host keys for Nova migration           [ DONE ]

Preparing Nova Compute entries                       [ DONE ]

Preparing Nova Scheduler entries                     [ DONE ]

Preparing Nova VNC Proxy entries                     [ DONE ]

Preparing OpenStack Network-related Nova entries     [ DONE ]

Preparing Nova Common entries                        [ DONE ]

Preparing Neutron LBaaS Agent entries                [ DONE ]

Preparing Neutron API entries                        [ DONE ]

Preparing Neutron L3 entries                         [ DONE ]

Preparing Neutron L2 Agent entries                   [ DONE ]

Preparing Neutron DHCP Agent entries                 [ DONE ]

Preparing Neutron Metering Agent entries             [ DONE ]

Checking if NetworkManager is enabled and running    [ DONE ]

Preparing OpenStack Client entries                   [ DONE ]

Preparing Horizon entries                            [ DONE ]

Preparing Swift builder entries                      [ DONE ]

Preparing Swift proxy entries                        [ DONE ]

Preparing Swift storage entries                      [ DONE ]

Preparing Gnocchi entries                            [ DONE ]

Preparing MongoDB entries                            [ DONE ]

Preparing Redis entries                              [ DONE ]

Preparing Ceilometer entries                         [ DONE ]

Preparing Aodh entries                               [ DONE ]

Preparing Puppet manifests                           [ DONE ]

Copying Puppet modules and manifests                 [ DONE ]

Applying 10.0..28_controller.pp

10.0..28_controller.pp:                             [ DONE ]

Applying 10.0..28_network.pp

10.0..28_network.pp:                                [ DONE ]

Applying 10.0..28_compute.pp

10.0..28_compute.pp:                                [ DONE ]

Applying Puppet manifests                            [ DONE ]

Finalizing                                           [ DONE ]

 **** Installation completed successfully ******

Additional information:

 * A new answerfile was created in: /root/packstack-answers--.txt

 * Time synchronization installation was skipped. Please note that unsynchronized time on server instances might be problem for some OpenStack components.

 * File /root/keystonerc_admin has been created on OpenStack client host 10.0.2.28. To use the command line tools you need to source the file.

 * To access the OpenStack Dashboard browse to http://10.0.2.28/dashboard .

Please, find your login credentials stored in the keystonerc_admin in your home directory.

 * Because of the kernel update the host 10.0.2.28 requires reboot.

 * The installation log file is available at: /var/tmp/packstack/--CWIVyN/openstack-setup.log

 * The generated manifests are available at: /var/tmp/packstack/--CWIVyN/manifests

 * Note temporary directory /var/tmp/packstack/503a14fac81b4a29937e3fc3f14381f5 on host 10.0.2.28 was not deleted for debugging purposes.

You have new mail in /var/spool/mail/root
失败的案例如下
Preparing Redis entries                              [ DONE ]

Preparing Ceilometer entries                         [ DONE ]

Preparing Aodh entries                               [ DONE ]

Preparing Puppet manifests                           [ DONE ]

Copying Puppet modules and manifests                 [ DONE ]

Applying 10.0..28_controller.pp

10.0..28_controller.pp:                          [ ERROR ]

Applying Puppet manifests                         [ ERROR ]

ERROR : Error appeared during Puppet run: 10.0..28_controller.pp

Error: Execution of '/usr/bin/yum -d 0 -e 0 -y install openstack-aodh-notifier' returned : Error downloading packages:

You will find full trace in log /var/tmp/packstack/--TbxiNW/manifests/10.0..28_controller.pp.log

Please check log file /var/tmp/packstack/--TbxiNW/openstack-setup.log for more information

Additional information:

 * A new answerfile was created in: /root/packstack-answers--.txt

 * Time synchronization installation was skipped. Please note that unsynchronized time on server instances might be problem for some OpenStack components.

 * File /root/keystonerc_admin has been created on OpenStack client host 10.0.2.28. To use the command line tools you need to source the file.

 * To access the OpenStack Dashboard browse to http://10.0.2.28/dashboard .

Please, find your login credentials stored in the keystonerc_admin in your home directory.

 * Note temporary directory /var/tmp/packstack/ff08df80e03e49f49e802dd352ea13e0 on host 10.0.2.28 was not deleted for debugging purposes.

不要慌,检查你的文件夹下的yum 源,全部移除到备份文件夹

yum makecache

重新开始执行
部署成功后验证登陆,ip 为你自己虚拟机的ip,主要看
more /etc/httpd/-hrion*.conf #记不清全拼了,找到这个文件

增加一个serveralias 192.168.x。x #宿主机和虚拟机能正常通信的IP

#重启

systemctl restart httpd
千辛万苦就是要看到这么一个图。爬坑也是花时间的,现在总结在这里。祝你们测试部署成功
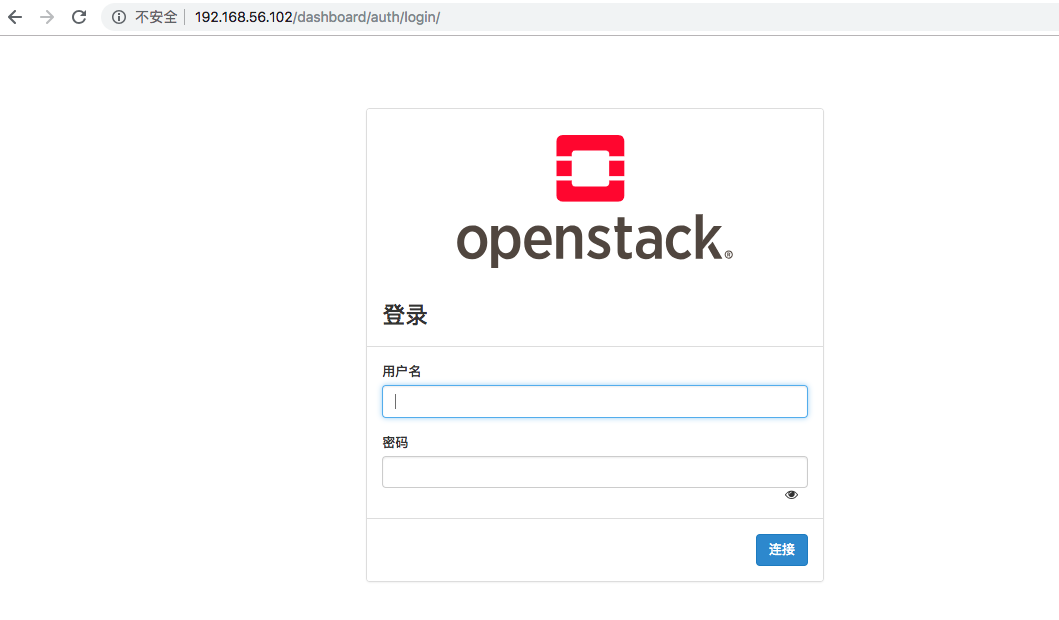
登陆的账号密码在
--密码文件在root用户目录下

cat /root/keystonerc_admin

复制OS_USERNAME=admin

     OS_PASSWORD=XXXX
结束语
这次的部署获益良多,要感谢阿里云yum源的一个功能,就是在页面可以支持搜索包,这样我就知道这个包在哪个文件夹下,也是感谢清华yum源的给力,通过在阿里yum搜索到的包,去清华yum源找到对应的页面 ,一步步配置到第一步设置的yum中。才能正常的安装这个一键安装包。否则在vpn的龟速下是很难正常完成一键部署的安装,这个一键部署的openstack 主要还是用来体会一下openstack是一个怎么样使用的。自己装一次,比看10次文档还印象深刻。
如何一步步使用国内yum源一键安装openstack-ocata版本基于centos7的更多相关文章
- (转)国内yum源的安装(163,阿里云,epel)
国内yum源的安装(163,阿里云,epel) ----阿里云镜像源 1.备份 mv /etc/yum.repos.d/CentOS-Base.repo /etc/yum.repos.d/CentOS ...
- 国内yum源的安装(163,阿里云,epel)
----阿里云镜像源 1.备份 mv /etc/yum.repos.d/CentOS-Base.repo /etc/yum.repos.d/CentOS-Base.repo.backup 2.下载新的 ...
- CentOS7配置更新国内yum源
备份本地yum源文件 cd /etc/yum.repo.d/ mv CentOS-Base.repo CentOS-Base.repo.bakeup 下载国内yum源 阿里云yum源 wget htt ...
- CentOS7修改为国内yum源
备份源yum源 如果是国内下载的CentOS很可能国内YUM源已经设置好了. 备份/etc/yum.repos.d/下的*.repo文件. 在CentOS中配置使用网易和阿里的开源镜像 wget ht ...
- contos 配置国内yum源
contos配置国内yum源 前言 rpm管理软件包的命令,很难用,需要手动解决以来关系,所以最好用 yum 的理念是使用一个中心仓库(repository)管理一部分甚至一个distribution ...
- contos配置国内yum源
contos配置国内yum源 前言 rpm管理软件包的命令,很难用,需要手动解决以来关系,所以最好用 yum 的理念是使用一个中心仓库(repository)管理一部分甚至一个distribution ...
- 替换国内yum源以及pip源
因为一些原因,不论是网络还是啥啥啥的原因,国外的源访问时不时的很慢,这时候我们就可以将国外的源替换为国内源,提高下载速度. yum源替换 环境:centos7(如果你的发行版本不是这个,此方法不保证能 ...
- redhat centos yum源的安装
redhat centos yum源的安装 1.除旧 #cd /etc/yum.repos.d #mv rhel-debuginfo.repo rhel-debuginfo.repo.bak 此处将其 ...
- redhat更改yum源及安装PHP环境
redhat更新yum源 删除同RHEL一同安装的yum源 rpm -qa|grep yum #查看本地yum yum list | wc -l #看个数 yum install pip #看现象 r ...
随机推荐
- 如何覆盖elementUI样式
question: 在某个组件里面更改element-Ui的样式,而不影响全局. solution: 在需要更改的组件里新增一个style标签[重点:不要加scoped],然后直接获取class设置样 ...
- docker的file内容解释
关键字---重点啊) FROM 基础镜像,当前新镜像是基于哪个镜像的 MAINTAINER 镜像维护者的姓名和邮箱地址 RUN 容器构建时需要运行的命令 EXPOSE 当前容器对外暴露的端口 WO ...
- springboot的springMVC配置,源码
1,前端控制器自动管理 DispatcherServletAutoConfiguration 中 此方法创建了前端控制器 注册了前端控制器 其中标黄色一行最后的 .getPath()方法点进去 St ...
- Redis详解(九)------ 哨兵(Sentinel)模式详解
在上一篇博客----Redis详解(八)------ 主从复制,我们简单介绍了Redis的主从架构,但是这种主从架构存在一个问题,当主服务器宕机,从服务器不能够自动切换成主服务器,为了解决这个问题,我 ...
- [站点推荐]001.学习新技能的37个最佳网站(The 37 Best Websites To Learn Something New)
忘了过于褒奖的学校.整天呆在拥挤的教室而效果却差得可怜.这些网站和应用涵盖了科学.艺术和技术的无数话题.它们可以教会你实践练习任何技能,从制作豆 沙到用 node.js 开发 app,而且它们都是免费 ...
- MVC案例之通过配置切换底层存储源(面向接口)
1.深入理解面向接口编程: 在类中调用接口的方法,而不必关心具体的实现.这将有利于代码的解耦.使程序有更好的可移植性 和可扩展性 动态修改 Customer 的存储方式:通过修改类路径下的 switc ...
- 搭建Nexus Repository包管理系统
搭建Nexus Repository包管理系统 下载安装程序 下载Nexus Repository最新版本 配置说明 将下载后的文件传输到服务器上 #修改配置文件 vi /etc/security/l ...
- Java和NodeJS解析XML对比
Java解析XML 1.接收xml文件或者字符串,转为InputStream 2.使用DocumentBuilderFactory对象将InputStream转为document对象 Document ...
- Misdirection: 1靶机writeup
看下端口 nmap -A 172.16.61.131 一些坑3306无法访问,80,web2py漏洞无法利用 利用dirb遍历网站路径 得到下面命令执行漏洞 http://172.16.61.131: ...
- Linux下安装vim-plug报错:Failed to connect to raw.githubusercontent.com port 443: Connection refused
安装vim-plug时,输入以下命令: curl -fLo ~/.vim/autoload/plug.vim --create-dirs https://raw.githubusercontent.c ...